


 09-14-2012, 08:09 AM
|
#57 |
|
Senior Member

Join Date: Aug 2012
Drives: 2013 Scion FR-S
Location: Barrie, ON
Posts: 284
Thanks: 93
Thanked 271 Times in 54 Posts
Mentioned: 10 Post(s)
Tagged: 0 Thread(s)
|
Your walkthrough inspired me to attempt this fun, cheap upgrade. I went with Tein H-Tech springs, which provide a conservative drop, and noticeably firmer ride. LOVING IT.
I didn't have a spring compressor, or air tools, and the job took me 3 hours and 50 minutes. Taking the springs off resorted to undoing the bolt and standing back. Rear springs don't even put up a fuss, the fronts popped off with a little bit more force. New springs just require some man-handling. Thanks again for your write-up!
__________________
New: 2014 6MT Asphalt Rota Titan 17x9, RS-3 V2, Skunk2 Pro-C, Eibach Sway Bars, Password:JDM Strut Tower Bar, Perrin MCB, StopTech Stainless Lines, Hawk HP+, Nameless 3" Exhaust, VG Sharkfin, FIVE:AD Spoiler, DDM Tuning HID's 5k, HID
Old: 2013 6AT Boosted Firestorm.. |

|

|
|
09-14-2012, 08:31 AM
|
#58 |
|
Vortech Supercharged
Join Date: Apr 2012
Drives: WRB BRZ 6MT LTD
Location: Massachusetts
Posts: 1,447
Thanks: 1,897
Thanked 467 Times in 283 Posts
Mentioned: 13 Post(s)
Tagged: 1 Thread(s)
|
Anyone know how much the front and rear should be dropped to close the wheel well on the stock wheels and tires?
__________________
 Powered by Vortech, ECS Tuning, and JDL Auto Design Powered by Vortech, ECS Tuning, and JDL Auto Design |
|
|
|
|
09-15-2012, 09:17 AM
|
#59 |
|
Senior Member

Join Date: Jun 2010
Drives: RX8 S1
Location: Brisbane Australia
Posts: 1,396
Thanks: 49
Thanked 50 Times in 38 Posts
Mentioned: 0 Post(s)
Tagged: 0 Thread(s)
|
Hi great writeup and looks like a lot has been covered with respect to prolonging the life of the dampner seals by not allowing it to turn when screwing the top nut down
I'd also like to point out that most of the nuts are not reusable, and the torque only applies to new nuts, not to already torqued ones as they might be deformed (throw away items) Just something to keep in mind 
__________________
 |
|
|
|
|
09-21-2012, 11:52 PM
|
#60 |
|
Grip>Slip

Join Date: Jun 2012
Drives: 13 SWP BRZ Ltd - Innovate Powered!
Location: RVA
Posts: 3,563
Thanks: 656
Thanked 1,716 Times in 1,031 Posts
Mentioned: 45 Post(s)
Tagged: 3 Thread(s)
|
thanks for the write-up! just finished!

Last edited by xjohnx; 09-22-2012 at 12:07 AM. |
|
|
|
|
09-23-2012, 03:26 PM
|
#61 |
|
Senior Member

Join Date: Jun 2012
Drives: Subaru BRZ
Location: Los Angeles, CA
Posts: 138
Thanks: 84
Thanked 30 Times in 22 Posts
Mentioned: 0 Post(s)
Tagged: 0 Thread(s)
|
Is a vicegrip clamped on a deep socket enough to tighten the strut top bolt? Seems like that may be the free tool for it, although the socket would have some chew marks
|
|
|
|
|
09-23-2012, 07:08 PM
|
#62 | |
|
Senior Member
Join Date: Aug 2012
Drives: 2013 Scion FR-S
Location: Barrie, ON
Posts: 284
Thanks: 93
Thanked 271 Times in 54 Posts
Mentioned: 10 Post(s)
Tagged: 0 Thread(s)
|
Quote:
__________________
New: 2014 6MT Asphalt Rota Titan 17x9, RS-3 V2, Skunk2 Pro-C, Eibach Sway Bars, Password:JDM Strut Tower Bar, Perrin MCB, StopTech Stainless Lines, Hawk HP+, Nameless 3" Exhaust, VG Sharkfin, FIVE:AD Spoiler, DDM Tuning HID's 5k, HID
Old: 2013 6AT Boosted Firestorm.. |
|
|
|
|
| The Following User Says Thank You to itdansharpe For This Useful Post: | brz7400 (09-25-2012) |
|
09-23-2012, 07:10 PM
|
#63 |
|
Senior Member

Join Date: May 2012
Drives: 13 fr-s whiteout
Location: South florida
Posts: 505
Thanks: 400
Thanked 211 Times in 107 Posts
Mentioned: 30 Post(s)
Tagged: 3 Thread(s)
|
You guys could've ground two flat spots on each side of the socket and used an adjustable wrench?
__________________
I'll be back!!
|
|
|
|
|
09-29-2012, 03:45 AM
|
#64 | |
|
Senior Member

Join Date: Mar 2012
Drives: 2013 Subaru BRZ
Location: PA
Posts: 683
Thanks: 106
Thanked 248 Times in 133 Posts
Mentioned: 10 Post(s)
Tagged: 0 Thread(s)
|
Quote:
------- DarrenDriver, thanks for the DIY! During my install, I consulted RCE's instructions, GrimmSpeed's DIY, and yours...and yours was by far the best. A couple things though...I really could NOT take off the strut top nut without an impact wrench (with the struts off the car and spring compressors on the springs). I guess people were able to do this, but I'm not sure how. I even had go-thru sockets+allen key and couldn't get the nut to turn. Maybe the trick is to loosen this nut while the strut is still on the car???? (Does the same thing go for tightening this nut? I'm a bit unsure about my method: I used the go-thru socket and allen key to hand tighten the nut, then I gave it a little whirl with the impact wrench...certainly not an exact torque spec!) Also, some people (and the other instructions) say not to remove the bolt connecting the lower control arm to the hub, but your idea of removing this bolt really saved me and made removal/installation doable for me. I couldn't get the lower control arm low enough otherwise. Finally though, I think your DIY and the other instructions don't mention how, for the rear struts, the lower bolt hole has to be aligned properly with the top bolts. I did this wrong at first, and I don't think the rear top hat swivels like the fronts. Am I missing something? In any event, if I'm right, it would be nice to mention that these have to be aligned properly. Thanks again though...amazingly helpful DIY! |
|
|
|
|
|
09-30-2012, 03:24 AM
|
#65 |
|
Senior Member
Join Date: Jun 2012
Drives: Rocket Bunny FR-S
Location: Irvine/Huntington Beach Orange County
Posts: 739
Thanks: 157
Thanked 283 Times in 141 Posts
Mentioned: 15 Post(s)
Tagged: 0 Thread(s)
|
thanks darren! this diy really saved me, and thanks for those tips today! much appreciated bro
|
|
|
|
|
09-30-2012, 08:10 PM
|
#66 | |
|
Photo Specialist

Join Date: Feb 2012
Drives: 2013 Toyota 86 DGM 6MT
Location: Texas
Posts: 1,152
Thanks: 587
Thanked 1,802 Times in 420 Posts
Mentioned: 94 Post(s)
Tagged: 0 Thread(s)
|
Quote:
|
|
|
|
|
|
10-03-2012, 12:26 AM
|
#67 |
|
Senior Member
Join Date: Mar 2012
Drives: 2013 Subaru BRZ
Location: PA
Posts: 683
Thanks: 106
Thanked 248 Times in 133 Posts
Mentioned: 10 Post(s)
Tagged: 0 Thread(s)
|
I realized today that once the struts are back on the car, you can use a torque wrench on the top nut of the rear struts (I BELIEVE) without anything spinning. I torqued those to 41ft-lbs...actually I had a ways to tighten after my little whirl with the impact wrench. This has me a bit worried about the front struts top nut being too loose...I'm still unsure how I would torque these down with my torque wrench. When I gave it a quick try there was a scary noise...clearly stuff was spinning since (unlike the rears) the front top hats allow swiveling.
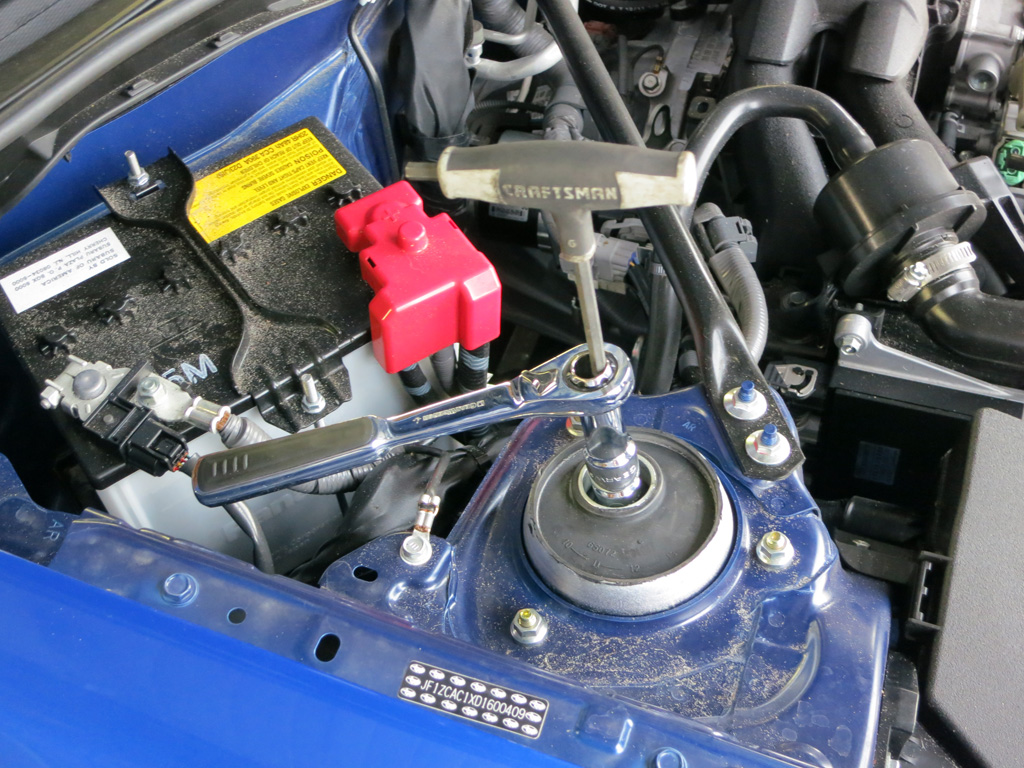
It seems like something like this would work, but I can't find anything like this in the sizes we need: 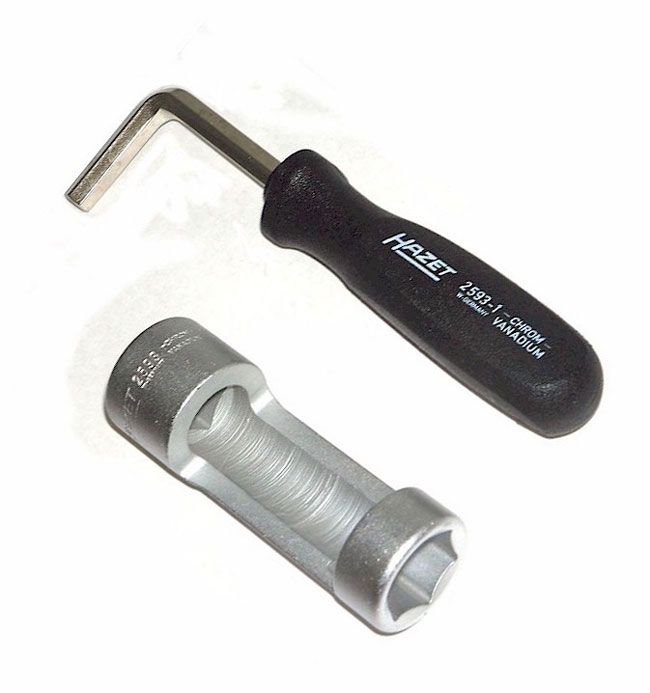 Actually I just figured something out that works for torquing these nuts down, although it involves a crowfoot wrench so I'm not sure how accurate it is. Here's what I used: 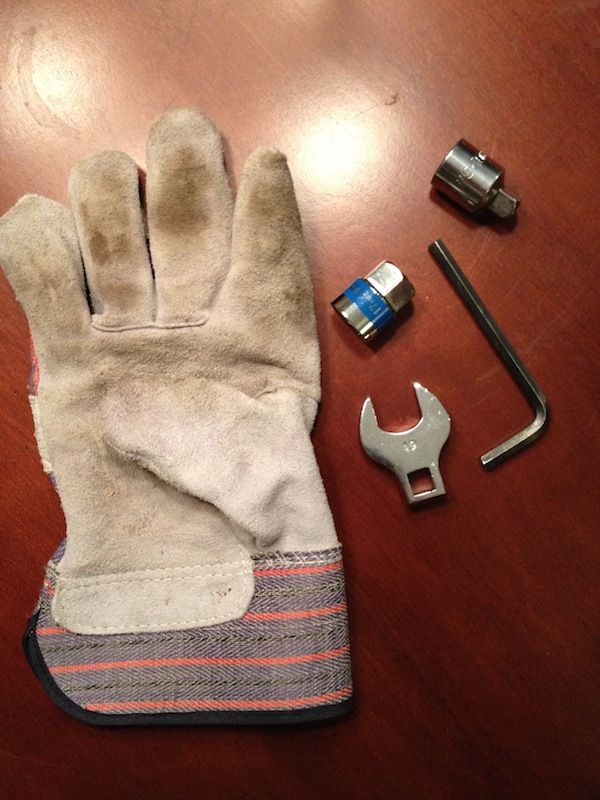 6mm allen key, glove for holding the allen key in place, 17mm go-thru socket from harbor freight set (http://www.harborfreight.com/21-piec...set-67974.html), 19mm crowfoot wrench (for top of go-thru socket), and adapter to attach the crowfoot to my torque wrench.  My top nuts now seem to be at least 41 ft-lbs although I think it's possible they are over-torqued from my impact wrenching. Last edited by Phaedrus29; 10-03-2012 at 03:50 AM. |
|
|
|
| The Following 2 Users Say Thank You to Phaedrus29 For This Useful Post: | FRSFirestorm (01-21-2013), Laika (10-03-2012) |
|
12-29-2012, 03:33 PM
|
#68 | |
|
Senior Member
Join Date: Nov 2011
Drives: 2013 Firestorm FR-S
Location: Houston
Posts: 506
Thanks: 18
Thanked 77 Times in 64 Posts
Mentioned: 10 Post(s)
Tagged: 0 Thread(s)
|
Quote:
|
|
|
|
|
|
12-29-2012, 11:14 PM
|
#69 | |
|
Senior Member
Join Date: Aug 2012
Drives: Asphalt FR-S
Location: DFW, Texas, USA
Posts: 147
Thanks: 17
Thanked 47 Times in 34 Posts
Mentioned: 5 Post(s)
Tagged: 0 Thread(s)
|
Quote:
http://www.sears.com/craftsman-20pc-...8&blockType=G8 You would have to torque it by feel, I don't think there is a torque wrench with this kind of setup.
__________________
Asphalt FR-S
1965 Mustang Vintage Road Racer Ducati Paul Smart 1000LE Ducati 848 |
|
|
|
|
|
12-30-2012, 01:05 AM
|
#70 |
|
First FR-S
Join Date: Jan 2012
Drives: Whiteout MT FRS
Location: austin tx
Posts: 561
Thanks: 120
Thanked 125 Times in 83 Posts
Mentioned: 2 Post(s)
Tagged: 0 Thread(s)
|
awesome guide, this is the car that i will finally able to learn how to do all the fundamental things with so i can teach my kids later.
|
|
|
|
|
|
|
|
 |
|
|
 Similar Threads
|
||||
| Thread | Thread Starter | Forum | Replies | Last Post |
| Replacing the Scion FR-S seats | bloomy116 | Scion FR-S / Toyota 86 GT86 General Forum | 36 | 11-09-2012 12:41 PM |
| Installing TRD Parts / Locating a good shop | Re~Mix | Engine, Exhaust, Transmission | 9 | 06-12-2012 12:05 PM |
| T1R Coil-over suspension | AJ PwR | Brakes, Suspension, Chassis | 33 | 05-29-2012 10:07 PM |
| Handling: Camber Attainable with Struts. Your Experiences? | skeeler | Suspension | Chassis | Brakes -- Sponsored by 949 Racing | 31 | 11-09-2011 04:07 PM |


 B-Production Vintage Road Racecar