|
||||||
| Forced Induction Turbo, Supercharger, Methanol, Nitrous |
 |
|
|
Thread Tools | Search this Thread |
 05-22-2014, 06:24 PM
|
#1 | |||||||||||||
|
Senior Member

Join Date: Jan 2014
Drives: Whiteout FR-S
Location: Miami
Posts: 251
Thanks: 97
Thanked 200 Times in 111 Posts
Mentioned: 33 Post(s)
Tagged: 0 Thread(s)
|
Vortech Supercharging - FAQ and Notes
Vortech Supercharging - FAQ and Notes
Table of Contents @Dezoris pointed out that the Vortech owners thread had gotten so long it was impossible to navigate through and find any specific info you might need. He wasnt the only one that felt so. Heres my shot at trying to compile what ever I can find that is relevant. Ill be adding more as I filter through all the pages. Let me know if I miss something and Ill add it to this post. (This is going to be a constant work in progress) The goal is to have the important info and FAQ on the first page so people dont have to hunt it down. Kit Revisions: Quote:
Install Instructions: Manufacturer installation guide http://www.vortechsuperchargers.com/images/97.pdf Manufacturer V2 UPGRADE installation guide Thx to @draggin_az FR-S Oil Feed_Drain Manual 081613.pdf Thx to @RallySportDirect http://www.ft86club.com/forums/showthread.php?t=39392 Thx to @Dezoris http://www.ft86club.com/forums/showthread.php?t=40792 Thx to @Enjuku Racing www.ft86club.com/forums/showthread.php?t=30900 Partial torque specs Thx to @Foobar Quote:
v3-H67B Compressor Map:  v3-H67B Blower Specs: Max Speed - 52,000rpm Impeller Speeds vs. Pulley Size: Quote:
(Stock crank pulley diameter is 5.62, Use calculator labeled "V-2 / V-3 Calculator") http://www.vortechsuperchargers.com/...id=33511#rpmv2 V2 Upgrade Info: Quote:
Quote:
Quote:
Thx to: @draggin_az $1,095 + Shipping Manufacturer V2 UPGRADE installation guide Thx to @draggin_az FR-S Oil Feed_Drain Manual 081613.pdf Pulley/Belt Combination Chart:  Goodyear Gatorback belt part numbers: Thx to @DJCarbine Quote:
Third Party Parts Suppliers / Rebuild Services: SuperchargerRebuild.com SuperchargersOnline.com JonBondPerformance.com Idler Pulley Issues/Solutions: Thx to @cb7tuner Quote:
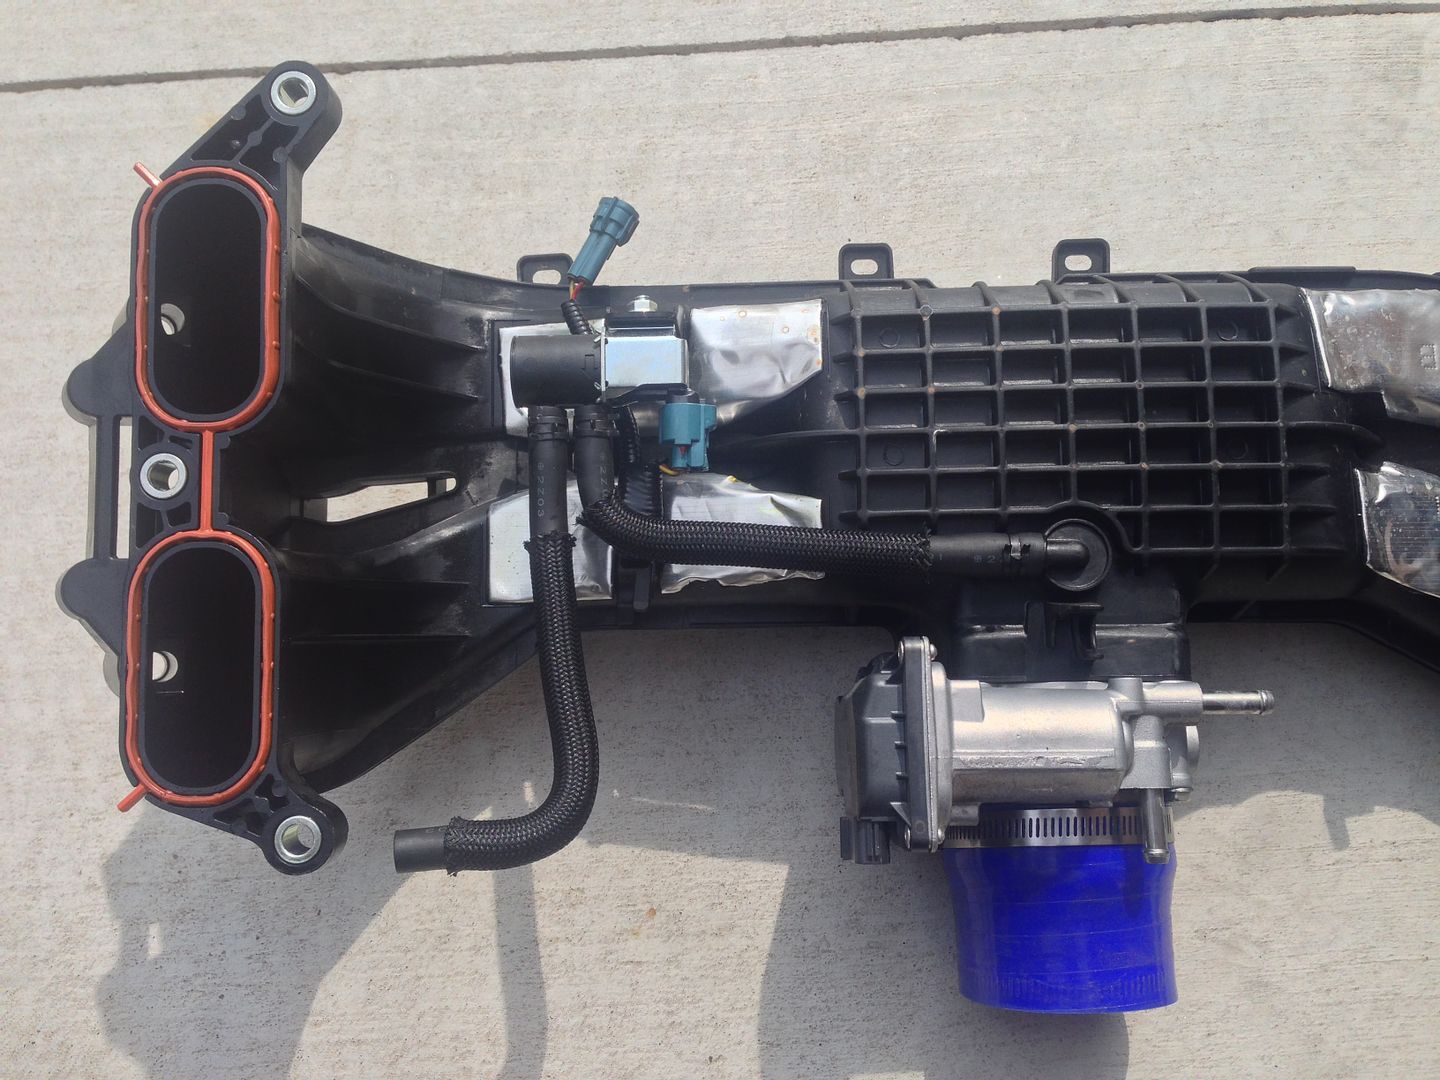
BPV/BOV Upgrades: Using the stock A Pipe from the kit: Thx to: @tye300 Link to write up with pictures. Comparison videos inside http://www.ft86club.com/forums/showthread.php?t=67729 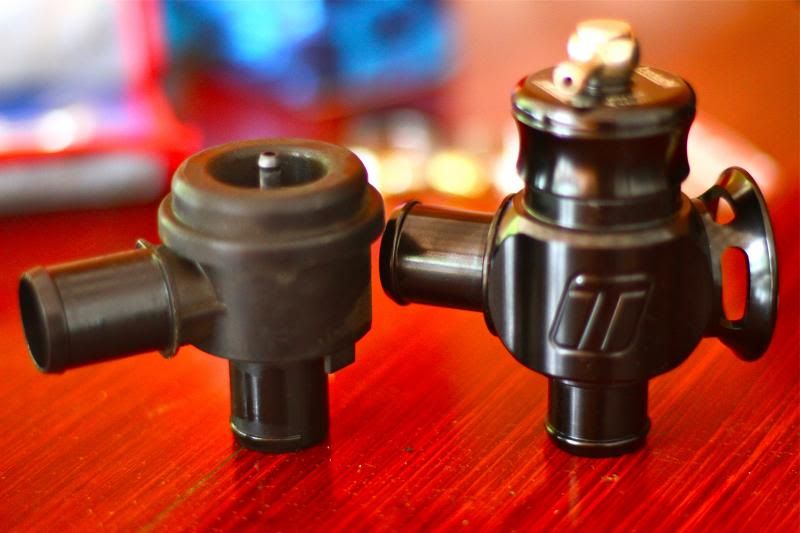 Thx to @DJCarbine Quote:
http://www.ft86club.com/forums/showp...33&postcount=1  Quote:
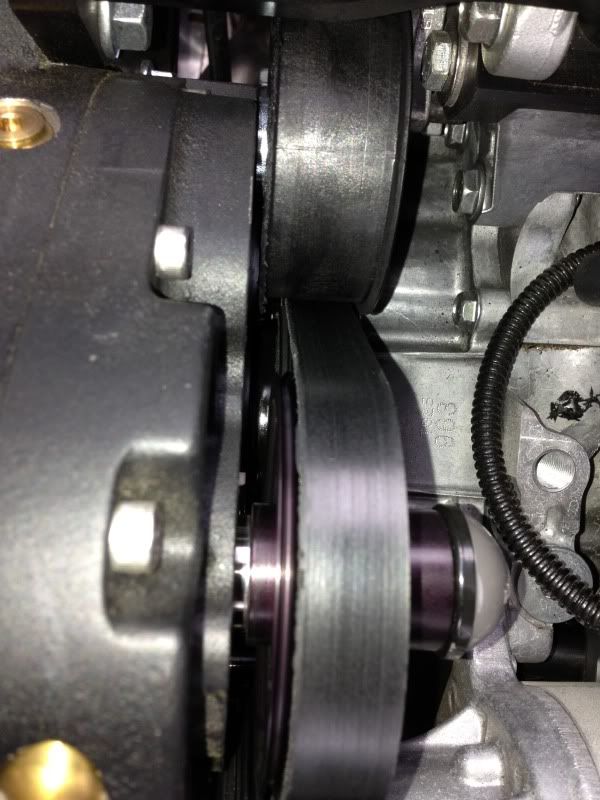
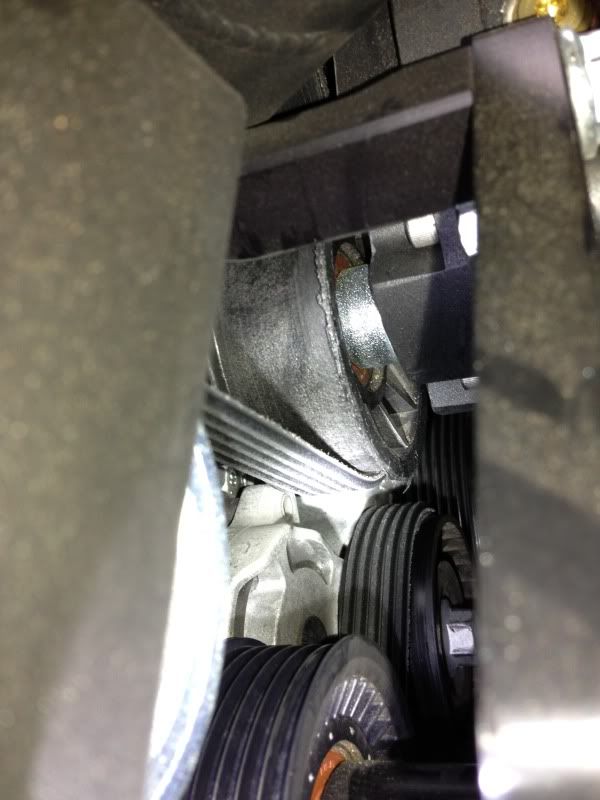
Wastegate Integration: No exact details but an apparent functioning example of limiting boost via EBC  [ame="http://www.youtube.com/watch?v=iZ3cIuNhTOA&t=2m5s"]Perrin EBCS Tial wastegate Vortech supercharger - YouTube[/ame] Possible Boost/Vacuum Leak: Thx to @spdbydesign Detailed Pictures: http://www.ft86club.com/forums/showp...&postcount=528 Thx to @Sportsguy83@KAB-FRS It can be done with out removing the intake manifold: http://www.ft86club.com/forums/showp...91&postcount=1 Quote:
Oil Cooler Fitment / Modifications: Perrin Oil Cooler Scroll down to Dezoris post below. Mishimoto Oil Cooler Supplied cooler mounting bracket NOT COMPATIBLE. Custom solution required Thx to@tye300 http://www.ft86club.com/forums/showp...&postcount=276 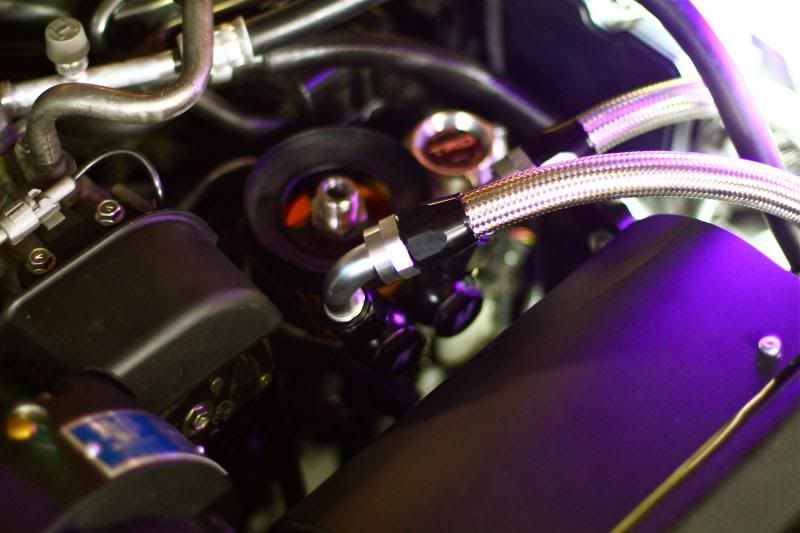 Compatible EL/Longtube Headers: (As headers are confirmed theyll be added) JDL Catted EL (With minor modification to blower bracket) NOT COMPATIBLE WITH V2 OIL FED UNITS Thx to @kiichiro Quote:
COMPATIBLE WITH V2 OIL FED UNITS Thx to @Drift-Office Full thread can be found here: http://www.ft86club.com/forums/showthread.php?t=45835 Last edited by marcoaferrer; 08-01-2014 at 03:27 PM. |
|||||||||||||

|

|
| The Following 25 Users Say Thank You to marcoaferrer For This Useful Post: | 8686 (05-23-2014), alexand3r (05-27-2014), Alfalasy (09-30-2014), Amadeus (05-22-2014), Bonburner (09-26-2018), Boofneenee (08-23-2014), botbs (05-28-2014), Cal3000 (05-26-2014), civicdrivr (12-24-2014), Dezoris (05-23-2014), F1point4 (06-24-2014), Fish Eagle (09-03-2014), HRTROB (05-23-2014), Jman1759 (12-23-2014), KKaWing (05-22-2014), misooscar (05-23-2014), ModBargains.com (05-27-2014), mwjcyber (05-22-2014), puma (05-22-2014), SirBrass (05-27-2014), Sportsguy83 (05-23-2014), surfuxalot (06-18-2015), ToyoburuBRZ (06-05-2014), Turbowned (06-24-2014), Tye300 (06-05-2014) |
|
05-22-2014, 08:44 PM
|
#2 |
|
Senior Member
Join Date: Jan 2014
Drives: Whiteout FR-S
Location: Miami
Posts: 251
Thanks: 97
Thanked 200 Times in 111 Posts
Mentioned: 33 Post(s)
Tagged: 0 Thread(s)
|
Thats everything I could find for now. Let me know if I missed anything.
|
|
|
|
| The Following User Says Thank You to marcoaferrer For This Useful Post: | charged86 (09-10-2014) |
|
05-23-2014, 12:03 AM
|
#3 |
|
Senior Member

Join Date: Aug 2012
Drives: FR-S
Location: IL
Posts: 2,857
Thanks: 519
Thanked 2,997 Times in 1,095 Posts
Mentioned: 159 Post(s)
Tagged: 1 Thread(s)
|
Oil Cooler Install Tips and Tricks (Perrin)
What is a thermostatic oil cooler setup? Its a liquid to air cooler that uses a thermostatic plate to mechanically control oil flow to an oil cooler. The thermostat inside this sandwich plate can open at a specified temperature to allow full oil flow to the cooler. Most of these plates go full open at 185F. Although this depends on manufacturer, also the thermostats and plates can be custom ordered. THERMOSTATIC SANDWICH PLATE BY MOCAL (185F FULL OPEN)  PERRIN MOCAL PLATE FILTER AND LINES INSTALLED:   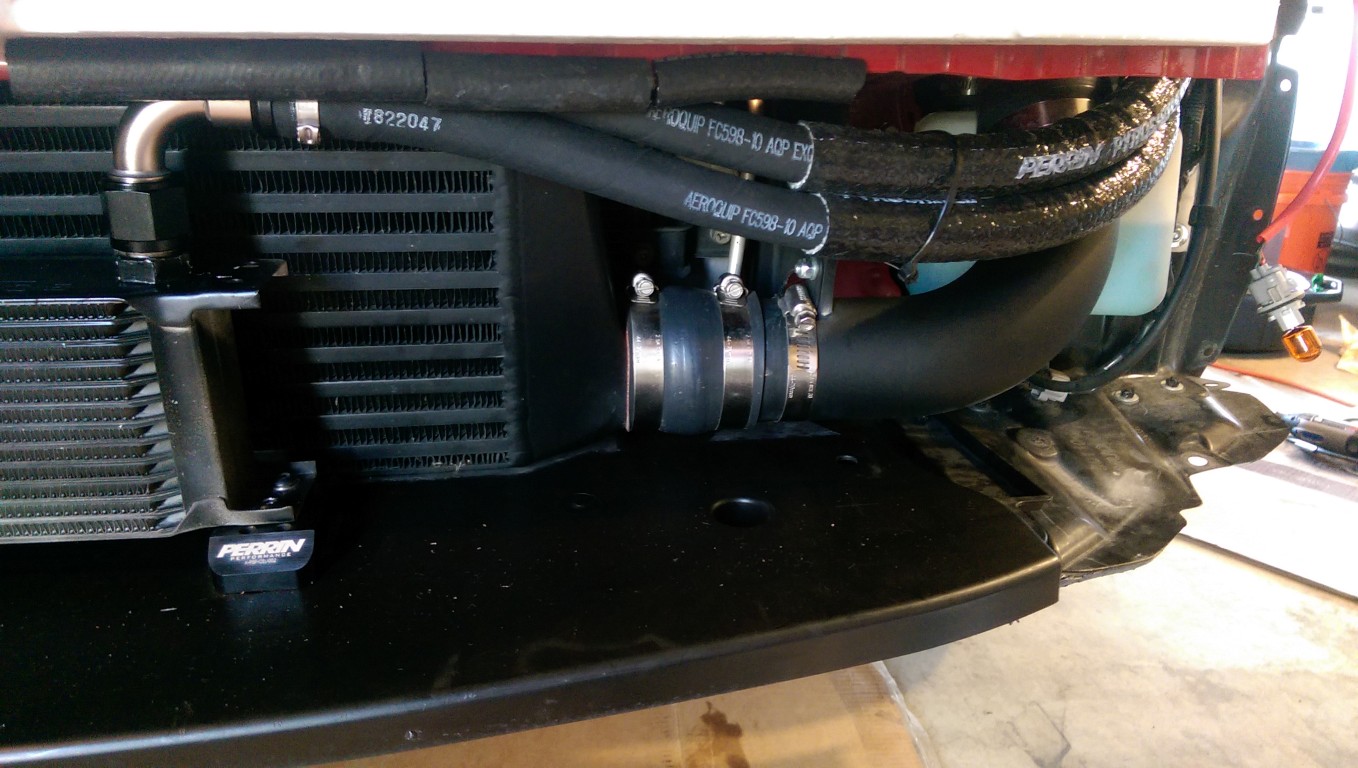  Why do I need an oil cooler? The short answer is the FRS/BRZ/GT86 in stock unmodified form tend to have higher oil temperature when the vehicle is run hard on track or autox, and tends to have very slow temperature recovery times Running forced induction means you need to keep the oil at normal levels 170-220F on 0w20 oil for street driving. That can be very hard to do in hot climates or those who tear through the gears often. If you drive this car on the track with the Vortech kit without an oil cooler your oil temps will reach near dangerous levels within 10-15 minutes. 270F+. From most research after the past year optimal track oil temps are 220-250F (265F being the acceptable upper limit) What thermostatic oil coolers fit?
Tips and Tricks for making the oil cooler lines fit properly: If you are running a thermostatic kit the biggest problem is line clearance over the Vortech airbox bracket, ABS module, airbox, headlamp assembly and bumper beam. VORTECH BRACKET TOUCHING OIL LINES: 

     
Tips and Tricks line and AN Fittings:
 Set of 5 AN Wrenches: http://www.amazon.com/gp/product/B003BZLLUE/ref=oh_details_o08_s00_i00?ie=UTF8&psc=1 Adjustable AN Wrench: http://www.amazon.com/gp/product/B003BZR6E4/ref=oh_details_o08_s01_i00?ie=UTF8&psc=1
FINAL TIPS AND ADVICE:

WARNINGS AND EFFECTS OF LEAKS 1. Oil will pool on bypass valve if plate is leaking. 2. Oil will pool on skid plate  3. Oil can contact drive belt 4. Oil can cause fire if enough collects on exhaust 5. Oil can leak out of skid plate and coat tires and cause loss of control
__________________
Last edited by Dezoris; 05-23-2014 at 02:12 AM. |
|
|
|
| The Following 8 Users Say Thank You to Dezoris For This Useful Post: | alexand3r (05-27-2014), Cal3000 (05-26-2014), misooscar (07-30-2014), ModBargains.com (05-27-2014), mwjcyber (05-23-2014), SirBrass (05-27-2014), surfuxalot (06-18-2015), Turbowned (06-24-2014) |
|
05-23-2014, 09:53 AM
|
#4 |
|
Senior Member
Join Date: Aug 2012
Drives: FR-S
Location: IL
Posts: 2,857
Thanks: 519
Thanked 2,997 Times in 1,095 Posts
Mentioned: 159 Post(s)
Tagged: 1 Thread(s)
|
Oil Temperature Reference Chart 1.5 Years:
Subject to Change with Future Data Collection Ranges and Data Collected: 100-169F Warm Up Phase, high oil pressures 170-189F Near Operating temps, oil pressures still higher 190-225F Normal Operating Range, oil pressures normalize 225-245F Middle End of operating range for track use, 5% drop in oil pressures 245-255F Upper End of operating ranges for track use, 10% further drop in pressures on 0w20 255-265F Red Zone of operating ranges for track zone, 0w20 starts to thin, oil pressures drop to questionable range. 265F+ Playing with fire on 0w20 Vortech Specific Used Oil Analysis: Redline 0w20 | 3000 Miles on Sample 4 Hours Track Time, 10 Autox Runs | 2000 Mile Road Trip RESULTS: VERY GOOD POTENTIAL: Oil should go 5,000 miles no issue 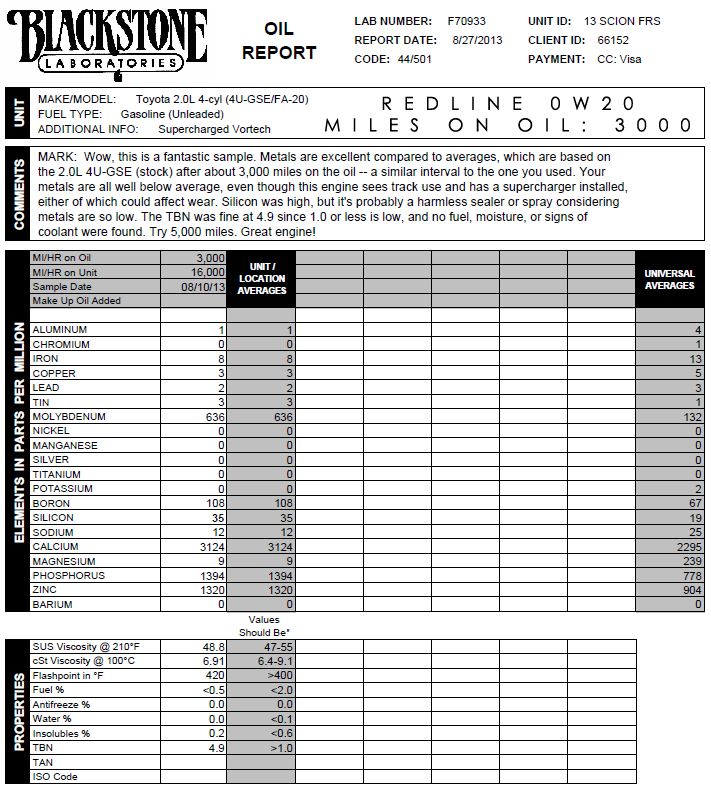 Redline 0w20 | 6700 Miles on Sample 2 Hours Track Time, 50 Autox Runs | 2000 Mile Road Trip RESULTS: VERY GOOD POTENTIAL: Running 10,000 Miles in between changes 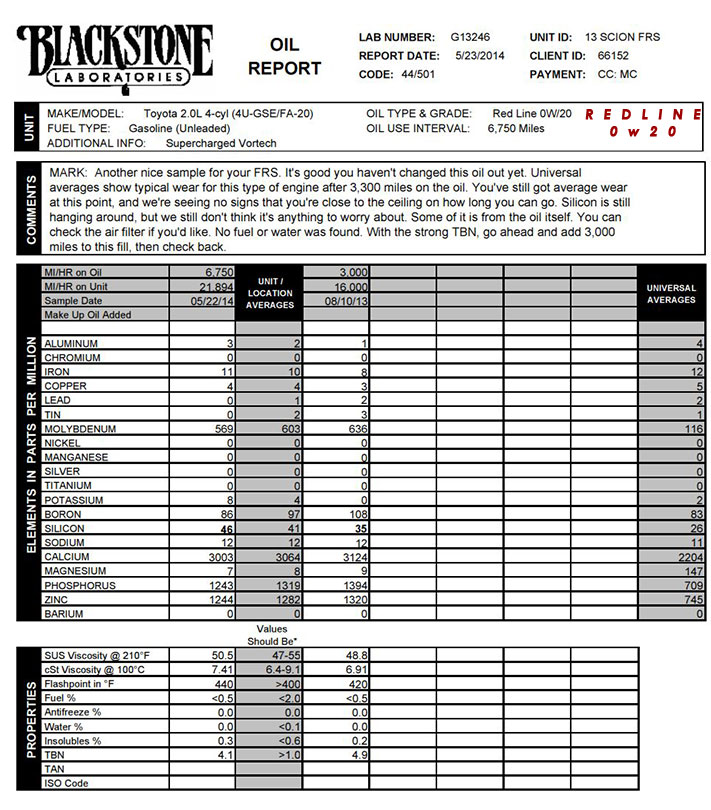
__________________
Last edited by Dezoris; 05-27-2014 at 06:09 PM. |
|
|
|
| The Following 4 Users Say Thank You to Dezoris For This Useful Post: |
|
05-23-2014, 09:53 AM
|
#5 |
|
Senior Member
Join Date: Aug 2012
Drives: FR-S
Location: IL
Posts: 2,857
Thanks: 519
Thanked 2,997 Times in 1,095 Posts
Mentioned: 159 Post(s)
Tagged: 1 Thread(s)
|
Reserved 2
__________________
|
|
|
|
|
05-23-2014, 11:15 AM
|
#6 |
|
corolla specs/GTR looks
Join Date: May 2013
Drives: ooh oooh pretty tail lights
Location: slower than a accord V6
Posts: 490
Thanks: 229
Thanked 113 Times in 79 Posts
Mentioned: 5 Post(s)
Tagged: 0 Thread(s)
|
This doesn't fit with the oil fed kit FYI and it would be interesting to see headers that are compatible for those of us electing the oil fed option
__________________
SOLD THEM BOTH
Hers: 2007 987S Mine: 2012 991S That was fun, thanks Hachi  Last edited by kiichiro; 05-23-2014 at 11:45 AM. |
|
|
|
|
05-23-2014, 11:17 AM
|
#7 |
|
Senior Member
Join Date: Jan 2014
Drives: Whiteout FR-S
Location: Miami
Posts: 251
Thanks: 97
Thanked 200 Times in 111 Posts
Mentioned: 33 Post(s)
Tagged: 0 Thread(s)
|
Vortech Supercharging - FAQ and Notes
Cool I'll add a note. As more info is available on fitment for oil fed kits I'll update the list
Sent from my iPhone using Tapatalk |
|
|
|
| The Following User Says Thank You to marcoaferrer For This Useful Post: | kiichiro (05-23-2014) |
|
05-23-2014, 12:52 PM
|
#8 |
|
Senior Member
Join Date: Jan 2014
Drives: Whiteout FR-S
Location: Miami
Posts: 251
Thanks: 97
Thanked 200 Times in 111 Posts
Mentioned: 33 Post(s)
Tagged: 0 Thread(s)
|
@Dezoris
Do you have more info on how this kit needs to be modified to fit? Where did you read that it required modification? "Full Blown Oil Cooler with cooler bracket mods" |
|
|
|
|
05-23-2014, 05:02 PM
|
#9 | |
|
Senior Member
Join Date: Aug 2012
Drives: FR-S
Location: IL
Posts: 2,857
Thanks: 519
Thanked 2,997 Times in 1,095 Posts
Mentioned: 159 Post(s)
Tagged: 1 Thread(s)
|
Quote:
__________________
|
|
|
|
|
|
05-23-2014, 10:25 PM
|
#10 |
|
Senior Member
Join Date: Dec 2012
Drives: Panda FR-S
Location: Corona, California
Posts: 531
Thanks: 297
Thanked 377 Times in 161 Posts
Mentioned: 3 Post(s)
Tagged: 0 Thread(s)
|
Is there an intake air cone equivalent that I can buy at Autozone or Pepboys?
__________________
Vortech SC on 9psi Pulley, Invidia Catless Front Pipe, Invidia N1 Catback Exhaust
 242whp/197ft-lb on Mustang Dyno (91 octane water) 284whp/223ft-lb on Mustang Dyno (E85) Delicious Tuning |
|
|
|
|
05-24-2014, 12:31 AM
|
#11 | |
|
Senior Member
Join Date: Aug 2012
Drives: FR-S
Location: IL
Posts: 2,857
Thanks: 519
Thanked 2,997 Times in 1,095 Posts
Mentioned: 159 Post(s)
Tagged: 1 Thread(s)
|
Quote:
Yes Courtesy of DJCarbine: http://www.ft86club.com/forums/showp...postcount=1307
__________________
|
|
|
|
|
| The Following User Says Thank You to Dezoris For This Useful Post: | Cal3000 (05-24-2014) |
|
05-26-2014, 11:51 AM
|
#12 |
|
Small penis big dreams

Join Date: Sep 2012
Drives: '13 Scion FR-S
Location: Virginia Beach, VA
Posts: 585
Thanks: 377
Thanked 289 Times in 147 Posts
Mentioned: 10 Post(s)
Tagged: 7 Thread(s)
|
awesome info!!!!
__________________
v3 -> v2 Vortech SC / 2.87 pulley
Fuel pump, FIC 770 injectors, custom header back, perrin resonated CBE 277hp 93 octane 370hp on E-85 |
|
|
|
|
05-27-2014, 11:19 AM
|
#13 |
|
Small penis big dreams
Join Date: Sep 2012
Drives: '13 Scion FR-S
Location: Virginia Beach, VA
Posts: 585
Thanks: 377
Thanked 289 Times in 147 Posts
Mentioned: 10 Post(s)
Tagged: 7 Thread(s)
|
I have the V-3 and installed a 2.87 pulley. The power difference between the factory pulley and the 2.87 is highly noticable and much more fun to drive.
Long story short I blew a seal (cause is still undeterminded). When Vortech opened it up, there was also bearing damage so the cost to rebuild was ~$950. I decieded that since Vortech already has it they might as well go ahead and do the V-3 -> V-2. The exact cost is $1,095 + shipping.
__________________
v3 -> v2 Vortech SC / 2.87 pulley
Fuel pump, FIC 770 injectors, custom header back, perrin resonated CBE 277hp 93 octane 370hp on E-85 |
|
|
|
| The Following User Says Thank You to draggin_az For This Useful Post: | marcoaferrer (05-27-2014) |
|
05-27-2014, 11:57 AM
|
#14 |
|
Senior Member
Join Date: Jan 2014
Drives: Whiteout FR-S
Location: Miami
Posts: 251
Thanks: 97
Thanked 200 Times in 111 Posts
Mentioned: 33 Post(s)
Tagged: 0 Thread(s)
|
@draggin_az did you ever use the 3.125 pulley or did you go straight to the 2.87?
|
|
|
|
|
|
|
|
|
|
|
 Similar Threads
|
||||
| Thread | Thread Starter | Forum | Replies | Last Post |
| New Vortech Maxflow Blow-Off Valve Upgrade for FT86 Supercharging Systems | Brian@Vortech | Forced Induction | 168 | 08-08-2018 11:45 AM |
| Questions and Discussion on Vortech Supercharging Systems | Brian@Vortech | Forced Induction | 1462 | 01-27-2017 02:05 PM |
| Vortech Supercharging System Update - More boost, more POWER! | Brian@Vortech | Forced Induction | 337 | 03-12-2016 03:42 PM |
| Vortech Supercharging Systems Now Legal On 2 Continents... | Brian@Vortech | Forced Induction | 27 | 01-22-2014 01:33 PM |
| New Vortech Supercharging System Information... | Brian@Vortech | Forced Induction | 306 | 11-08-2012 05:49 PM |