


|
||||||
| DIY (Do-It-Yourself) Guides For all DIYs. |
 |
|
|
Thread Tools | Search this Thread |
 06-27-2013, 02:55 PM
|
#1 |

Join Date: Apr 2012
Drives: 2014 Widebody Cosworth FR-S
Location: Salt Lake City, Utah
Posts: 4,542
Thanks: 205
Thanked 1,198 Times in 554 Posts
Mentioned: 38 Post(s)
Tagged: 0 Thread(s)
|
DIY Tom's Taillights Install
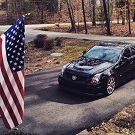
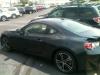
  First Step, make sure you have the LED relay and the 2 rear tails and that everything is in good condition. Yes? Then proceed  I installed the LED flasher first, but you could do this at anytime. Open the driver side door, pop off the side access panel, it pops off easily from the bottom.   We need to take off the lower dash panel, so we will need to remove the 2 screws holding it to the dash.   Now you can take off the lower dash panel, which should pop right out with light force  I did not remove any of the electrical connectors as changing out the relay/flasher is a quick job. The relay is located just to the left of the steering column, but is a bit tricky to access due to the location.  I did not take a picture of this, but I had to insert a very small flat head screwdriver to release the relay from the white plastic clip holding it to the dash beam. Once the relay is free from the clip, you have a bit more room to change it out.  The new LED relay is a direct plug and play and will even attach to the dash beam just like stock.   Plug the new relay in, attach it back to the white clip, and reinstall the lower dash panel and access panel. Moving on to the Tail Lights, we will need to first remove the trunk floor liner, and the center plastic section which is held on by 3 black plastic clips.  Pop all 3 clips out and remove the center plastic section.   Now we can remove the driver side trunk panel. There should be 5 clips total and the trunk popper switch.       The passenger side panel should also have 5 clips total to remove      With the trunk liners removed we now have access to the tail light harness and nuts.  I popped the white harness holders off the stud with my flat head, there will be 1 on the passenger side and 2 on the driver side. You could also use a pick to lift up the clip holding the zip-tie  Unplug the main harness from the tail lights  Now use your 8mm socket to remove the 4 nuts on each taillight  With all 4 nuts removed and the harness unplugged, carefully remove the tail lights.  Carefully put the new tail light back in, making sure everything is aligned correctly. Install all 4 nuts on the new tail light and plug in the harness. Check to make sure the lights are functioning properly. *PLEASE NOTE* We had to re-pin our factory harness connection due to the difference in JDM Vs. USDM cars, so here is a brief description of how to re-pin the harness in if your car requires it. On the harness plug itself, there will be a plastic tab on the top, use a small flat head or dental pick to lift it up and away from the plug.  Always take a picture of the wires for reference  I was not able to take a non-blurry picture of the pins and the small plastic clips inside the plug that hold the pins in, but using your dental pick you will want to essentially push the metal pin down, slide the pick towards the back of the plug, and this should also lift the plastic clip up, freeing the pin to be slid out from the back.  The end result, here is the proper wire configuration for the driver side taillight.  And the passenger side tail light's correct wiring  Once you confirm the tail lights are working to your liking, go ahead and secure the pins back into the plugs, and snap down the small plastic tab we removed earlier. Button everything back up and go enjoy your new tail lights!!! For more info on the Tom's Tail Lights, please click here Before:   After:      New Video we made [ame="http://www.youtube.com/watch?v=nYjuGWeb4XE"]http://www.youtube.com/watch?v=nYjuGWeb4XE[/ame] Thanks, Rick Last edited by RallySport Direct; 06-28-2013 at 07:44 PM. |

|

|
| The Following 12 Users Say Thank You to RallySport Direct For This Useful Post: | burnt toast (06-30-2013), Chee-Hu (07-01-2013), crizkay (06-27-2013), DragonDriver5 (03-24-2014), Drebin252 (03-13-2014), hernanBRZ (07-05-2013), MikeM5 (07-03-2013), Overland'n'5thGEN (06-27-2013), p00mba (06-27-2013), Retro86 (07-09-2013), Shinryu (06-29-2013), Yamaha_R6 (03-28-2014) |
|
06-27-2013, 03:07 PM
|
#2 |
|
Senior Member
Join Date: Jul 2012
Drives: Raven Black
Location: Ottawa, Canada
Posts: 1,343
Thanks: 451
Thanked 563 Times in 276 Posts
Mentioned: 5 Post(s)
Tagged: 0 Thread(s)
|
NICE!!! that's easy enough!
Can you show us some pics of the running lights, brake lights, turn signals??? |
|
|
|
|
06-27-2013, 05:02 PM
|
#3 | ||
|
Join Date: Apr 2012
Drives: 2014 Widebody Cosworth FR-S
Location: Salt Lake City, Utah
Posts: 4,542
Thanks: 205
Thanked 1,198 Times in 554 Posts
Mentioned: 38 Post(s)
Tagged: 0 Thread(s)
|
Quote:
Quote:
You can just plug them in and run them, but then when your driving lights are on, it will light up the amber turn signal light, so we wanted to make sure it was working 100% like we wanted them to, so we had to re-pin the harness. The JDM models seem to use a slightly different wiring compared to the USDM models. Let me know if you have any questions on that Thanks, Rick |
||
|
|
|
|
06-27-2013, 05:22 PM
|
#4 |
|
Never on Time Always Late

Join Date: Jun 2012
Drives: #silenced crickets
Location: Norcal
Posts: 578
Thanks: 86
Thanked 152 Times in 101 Posts
Mentioned: 9 Post(s)
Tagged: 0 Thread(s)
|
Sweet write up!
__________________
CO>CA Cartel
|
|
|
|
| The Following User Says Thank You to Norkoastal For This Useful Post: | RallySport Direct (06-27-2013) |
|
06-27-2013, 06:35 PM
|
#5 |
|
Just a dude
Join Date: Mar 2013
Drives: Scion FR-S 2013
Location: Edson, Alberta, Canada
Posts: 3,289
Thanks: 1,185
Thanked 1,188 Times in 852 Posts
Mentioned: 34 Post(s)
Tagged: 0 Thread(s)
|
Question, the relay, this controls the front and rear flashers, or are they seperate front and back?? I already changed ONE to a CF18 I believe for my front LED switchbacks so wondering if I am good to go if I go this route?
__________________
|
|
|
|
|
06-27-2013, 07:29 PM
|
#6 | ||
|
Join Date: Apr 2012
Drives: 2014 Widebody Cosworth FR-S
Location: Salt Lake City, Utah
Posts: 4,542
Thanks: 205
Thanked 1,198 Times in 554 Posts
Mentioned: 38 Post(s)
Tagged: 0 Thread(s)
|
Quote:
Quote:
Hope this helps Thanks, Rick |
||
|
|
|
|
06-27-2013, 10:14 PM
|
#7 |
|
Sideways and smiling!
Join Date: Jan 2012
Drives: First 86 FRS 5/8/2012 (second US)
Location: Oregon
Posts: 941
Thanks: 17
Thanked 273 Times in 179 Posts
Mentioned: 15 Post(s)
Tagged: 0 Thread(s)
|
If I didn't already have and love my crystal eyes red, I would have been all over these. Very detailed install! But when I installed my hyper flash, I was able to just crawl into the footwell of the driver seat an reach up to swap the relays lol.
__________________
|
|
|
|
|
06-27-2013, 10:15 PM
|
#8 |
|
Just a dude
Join Date: Mar 2013
Drives: Scion FR-S 2013
Location: Edson, Alberta, Canada
Posts: 3,289
Thanks: 1,185
Thanked 1,188 Times in 852 Posts
Mentioned: 34 Post(s)
Tagged: 0 Thread(s)
|
Thanks Rick great job on the write up. I'm really suprised re doing the pins however, given time for them to come to NA market figured these would be 100% plug and play.
__________________
|
|
|
|
|
06-28-2013, 10:26 AM
|
#9 | ||
|
Join Date: Apr 2012
Drives: 2014 Widebody Cosworth FR-S
Location: Salt Lake City, Utah
Posts: 4,542
Thanks: 205
Thanked 1,198 Times in 554 Posts
Mentioned: 38 Post(s)
Tagged: 0 Thread(s)
|
Quote:
Good to know! And even with the lower dash panel off, I still cut up my hands on the sharp metal haha. Quote:
Thanks again! Rick |
||
|
|
|
|
06-28-2013, 01:12 PM
|
#10 |
|
Senior Member
Join Date: Nov 2011
Drives: Subaru BRZ Limited 6MT
Location: Winston-Salem, NC
Posts: 2,432
Thanks: 712
Thanked 954 Times in 545 Posts
Mentioned: 47 Post(s)
Tagged: 0 Thread(s)
|
Wow those look great. I'm neck deep in performance mods right now but want to pick these up down the road.
__________________
Innovate Supercharged Black Limited BRZ 6-Speed MT(Build Thread)
2010 Cadillac CTS-V Sedan M6 w/550whp (Build Thread)  |
|
|
|
|
06-28-2013, 07:45 PM
|
#11 | |
|
Join Date: Apr 2012
Drives: 2014 Widebody Cosworth FR-S
Location: Salt Lake City, Utah
Posts: 4,542
Thanks: 205
Thanked 1,198 Times in 554 Posts
Mentioned: 38 Post(s)
Tagged: 0 Thread(s)
|
Quote:
We also just posted up a video we made [ame="http://www.youtube.com/watch?v=nYjuGWeb4XE"]http://www.youtube.com/watch?v=nYjuGWeb4XE[/ame] Thanks, Rick |
|
|
|
|
|
06-28-2013, 10:59 PM
|
#12 |
|
Senior Member
Join Date: May 2013
Drives: IB '05 E46 M3 ZCP
Location: Tampa
Posts: 244
Thanks: 12
Thanked 128 Times in 64 Posts
Mentioned: 2 Post(s)
Tagged: 0 Thread(s)
|
Damn. You've convinced me to purchase these taillights vs. the Crystal Eyes. That White BRZ looks amazing!
|
|
|
|
|
07-01-2013, 10:35 AM
|
#13 | |
|
Join Date: Apr 2012
Drives: 2014 Widebody Cosworth FR-S
Location: Salt Lake City, Utah
Posts: 4,542
Thanks: 205
Thanked 1,198 Times in 554 Posts
Mentioned: 38 Post(s)
Tagged: 0 Thread(s)
|
Quote:
Thanks, Rick |
|
|
|
|
|
07-02-2013, 12:18 PM
|
#14 |
|
Banned
Join Date: May 2013
Drives: on cruise control
Location: Long Island
Posts: 618
Thanks: 234
Thanked 145 Times in 109 Posts
Mentioned: 6 Post(s)
Tagged: 0 Thread(s)
|
looked easy enough up until the pin thing. now i need to find someone to do the install cause i just dont get it
|
|
|
|
|
|
|
|
|
|
|
 Similar Threads
|
||||
| Thread | Thread Starter | Forum | Replies | Last Post |
| SOCAL INSTALL AND SELL-- HID KITS--LED LIGHTS--REVERSE LIGHT--PAINT TAILLIGHTS!! | F-T | Exterior Parts - Lighting | 202 | 03-21-2016 02:02 PM |
| FS: FRS/BRZ Red OEM taillights | 86design | Exterior Parts (Aero, Lighting, Etc.) | 4 | 06-26-2013 06:34 PM |
| New taillights | youngy | AUSTRALIA | 7 | 04-14-2013 06:16 AM |
| Taillights idea | adprokid | Cosmetic Modification (Interior/Exterior/Lighting) | 25 | 09-16-2012 12:40 AM |


 Ms. Gunny
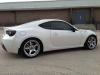 2013 Scion FR-S
