|
||||||
| DIY (Do-It-Yourself) Guides For all DIYs. |
 |
|
|
Thread Tools | Search this Thread |
 07-16-2013, 02:25 PM
|
#1 |
|
Senior Member
Join Date: Jul 2012
Drives: 2013 SWP BRZ
Location: New York
Posts: 2,240
Thanks: 458
Thanked 878 Times in 556 Posts
Mentioned: 34 Post(s)
Tagged: 0 Thread(s)
|
DIY: Deastchwerks 265c Fuel Pump Install
Due to the lack of information on a proper fuel pump install (and lack of pictures), I decided that when I went to put my fuel pump in for my supercharger install I would take a lot of pictures and do another writeup. This is in no way meant to belittle the others who have made a writeup, but there was a lot left to be desired. Even the instructions from deastchwerks are not very adequate.
Tools Needed - Socket Wrench - 10mm socket - 10mm wrench - plastic panel tool (or a flathead screwdriver) - Pliers - Hammer - Punch - Dremel or box cutter - Rags Step One: Release Fuel Pressure and Cut off Battery Power First thing you want to do is relieve any pressure built up in the fuel system. This will just make you spill less gass all over when you disconnect the fuel line off the fuel canister. It might not be completely necessary to do (I was doing my supercharger install and had to remove fuel lines in the engine bay) but its best practice. Go into the engine bay and remove your fuse box cover. You want to pull out the 20amp fuse labeled Fl Pump. See photo Below. 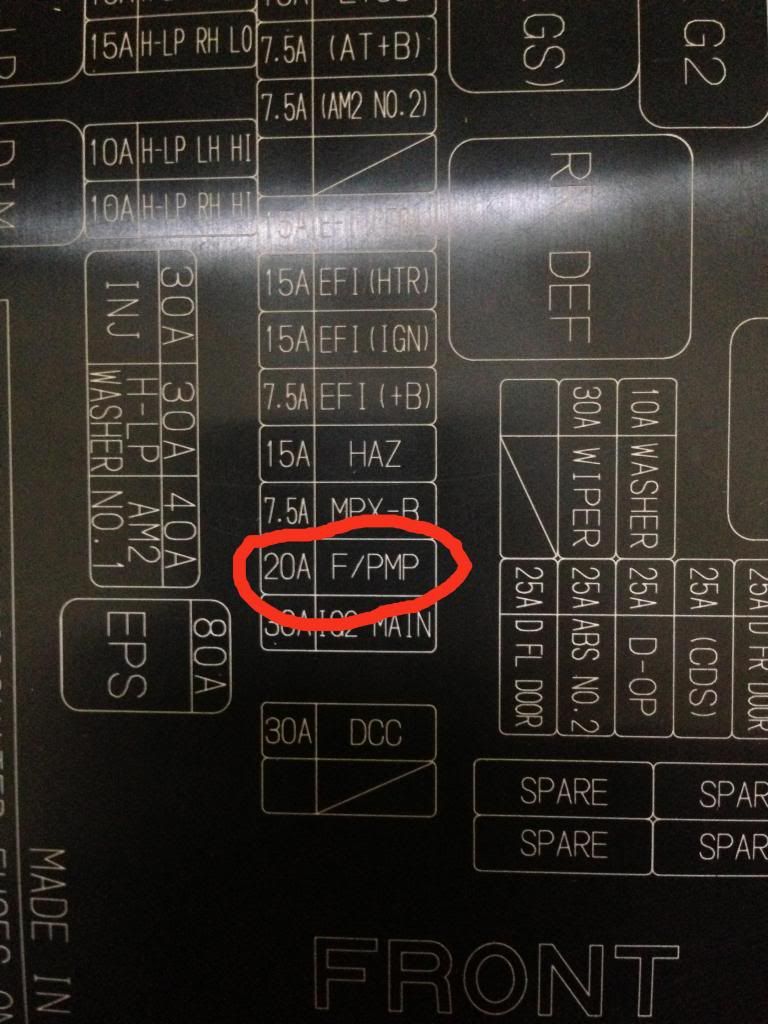 After you remove this, go back into the car and turn it over. It might still start up on you, and thats ok. Let it die, or in my case shut it back off if its running more than 10 seconds and then try to turn it on again. It shouldn't. Then go open up the gas cap, and screw it back on afterword. You are just trying to get the pressure out of the system. Once you get that out of the way, remove the negative terminal of the battery with a 10mm wrench to kill power. Wrap up the terminal end with a towel for good measure. Step Two: Remove the driver rear seat This is pretty self explanatory but pull your driver seat up and remove the 10mm bolt holding the seat bottom down in the rear. The back of the seat "hooks" and you have to lift the front of the seat up while pulling down on the rear to get it around the hook. 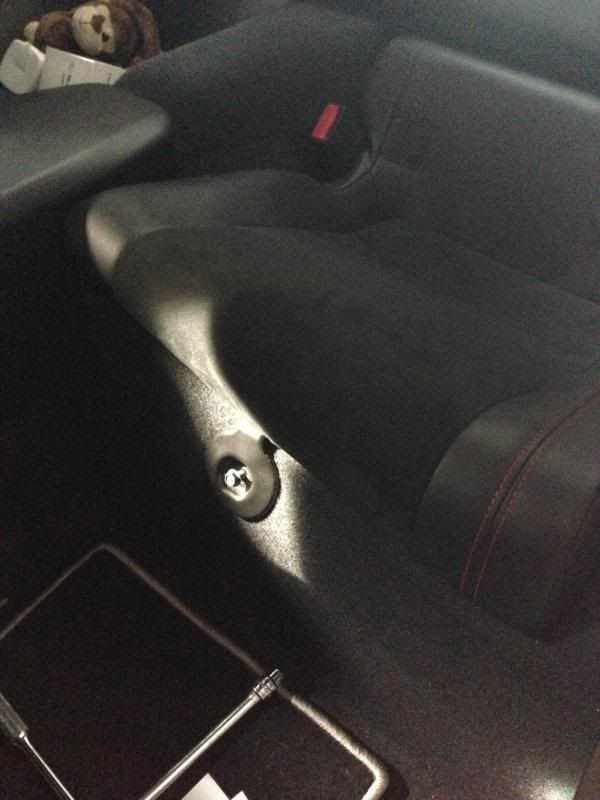 Step Three: Remove Metal Fuel Pump Lid Cover Once the seat is removed, you will see the cover that has the fuel pump wire passing through it. This is just held in place by black silicone sealant, so grab your plastic panel tool or a screwdriver and pry it up and slowly pull it off. If you are using a screwdriver be careful you don't scratch the paint. 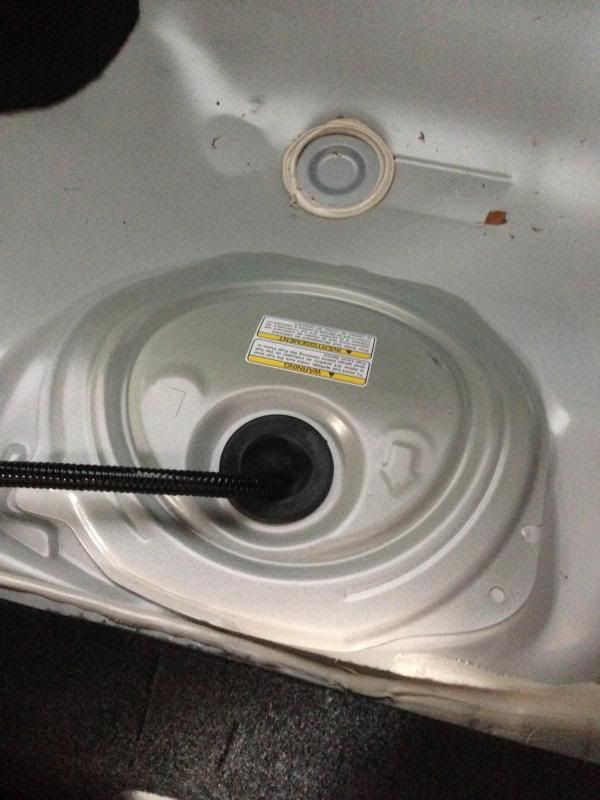 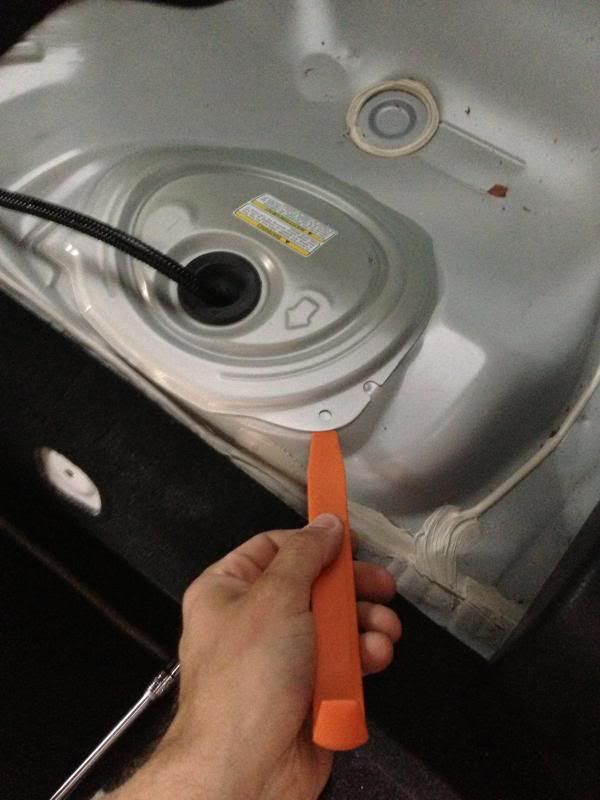 If its hot out, make sure you pull this lid up slow, because it is going to web like crazy and its a PAIN in the ass to clean up if you get it all over the place. You can take a razor and cut it as well if its webbing a lot. 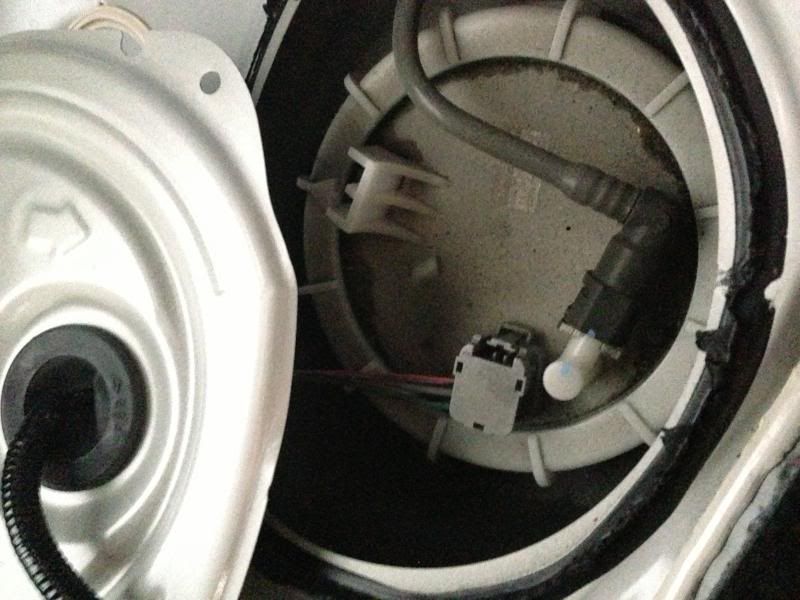 Once you do that, you need to unplug the connection into the top of the fuel tank cartridge. Just push the clip in and pull it out, and then you can safely put the metal lid off to the side somewhere out of the way (as much as the wire will let you go). 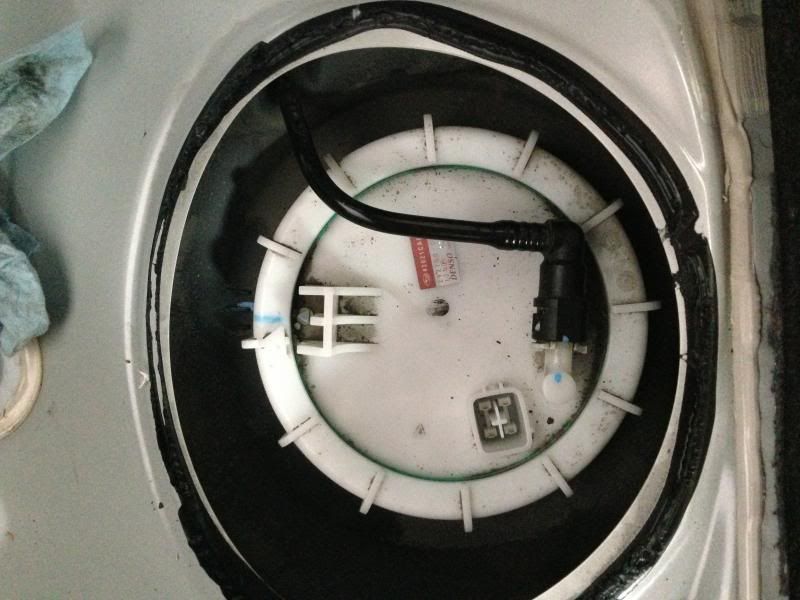 Step Four: Remove Fuel line from Top of Canister Get a rag and get ready for some fuel to come out of this line. Squeeze on the white tabs on either side of the black plug, and just pull the line off. Simple. Step Five: Take photos of Fuel Canister, and notes of Orientation This part is very important. Notice the photos below. You should have a blue mark like mine did on the correct orientation on how everything is suppose to line back up once you are ready to put the canister back in. The most important arrow is the one ON the tank itself. This has to be lined up with the small dots on the outside of the tank (the black area). Your fuel canister goes in a certain way because of the float sensor, if this is in the wrong direction you could possibly get wrong fuel readings, or damage the float!! 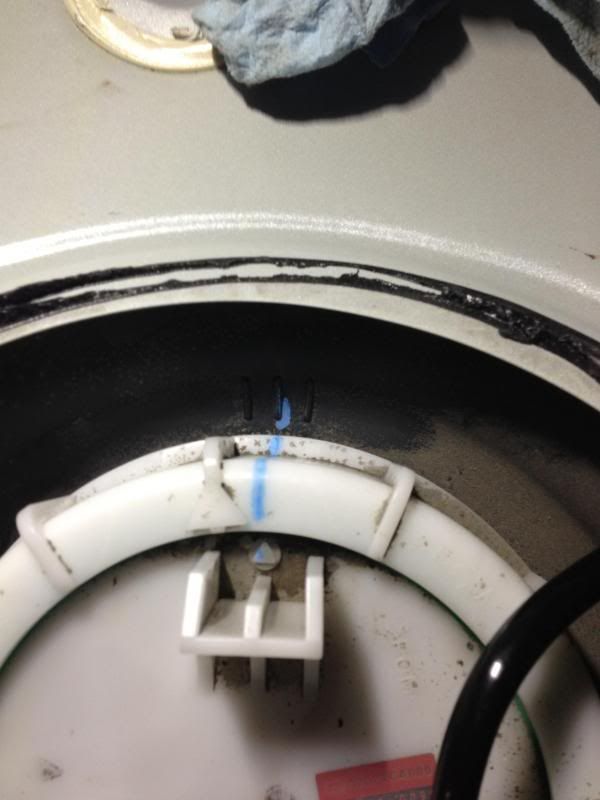 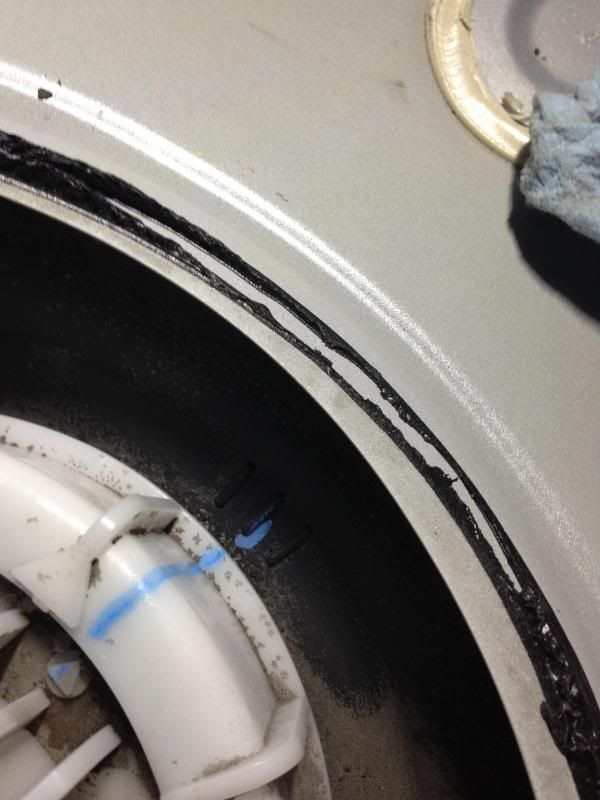 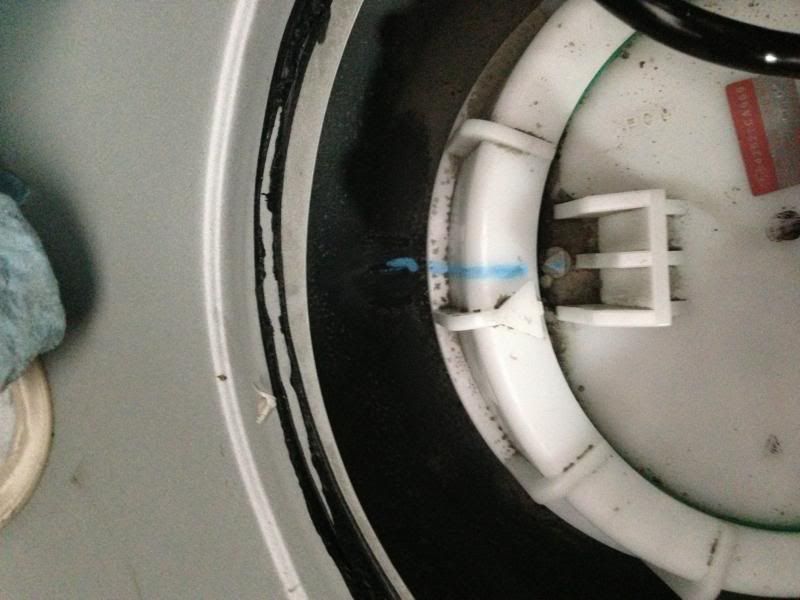 MAKE SURE TO LINE UP ARROWS WITH CASTING DOTS WHEN RE-INSTALLING |

|

|
| The Following User Says Thank You to xxscaxx For This Useful Post: | woode (01-17-2014) |
|
07-16-2013, 02:26 PM
|
#2 |
|
Senior Member
Join Date: Jul 2012
Drives: 2013 SWP BRZ
Location: New York
Posts: 2,240
Thanks: 458
Thanked 878 Times in 556 Posts
Mentioned: 34 Post(s)
Tagged: 0 Thread(s)
|
Step Six: Remove Plastic Ring
Grab your hammer and punch, and start to lightly tap the ring to the left to loosen it. You are going to have to go about 5" or so before you can turn it off by hand. Be gentle! 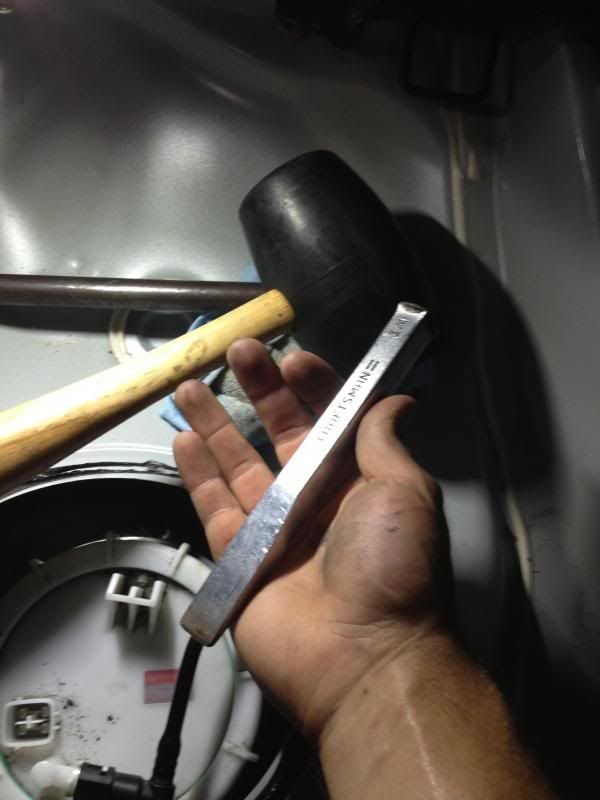 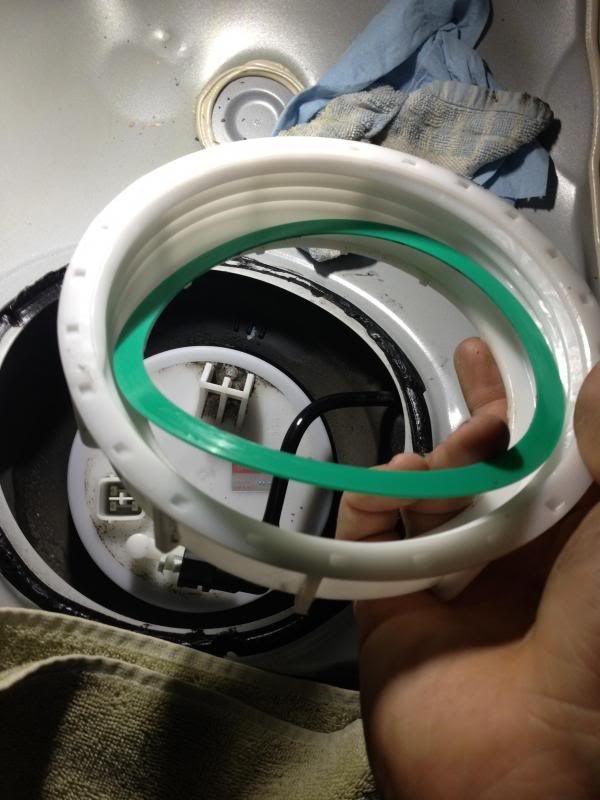 Step Seven: Slowly Pull Canister Out, Unclip Fuel Harness Slowly start to lift up on the Canister. You are going to have to lift it up to the point where the canister clears the top of the tank opening, then angle it towards the passenger side of the car so you can clear the float sensor and the fuel pump harness that is plugged in. Once you get it up enough, unclip that plug just as you did the one on the top of the fuel tank (squeeze and pull off). I HIGHLY suggest you put some towels down in your car because the canister holds a shit ton of fuel in it. 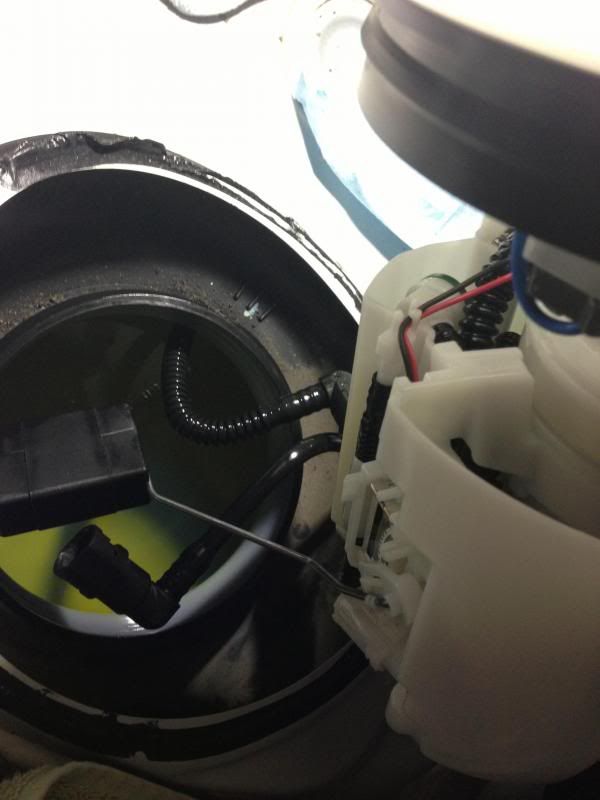 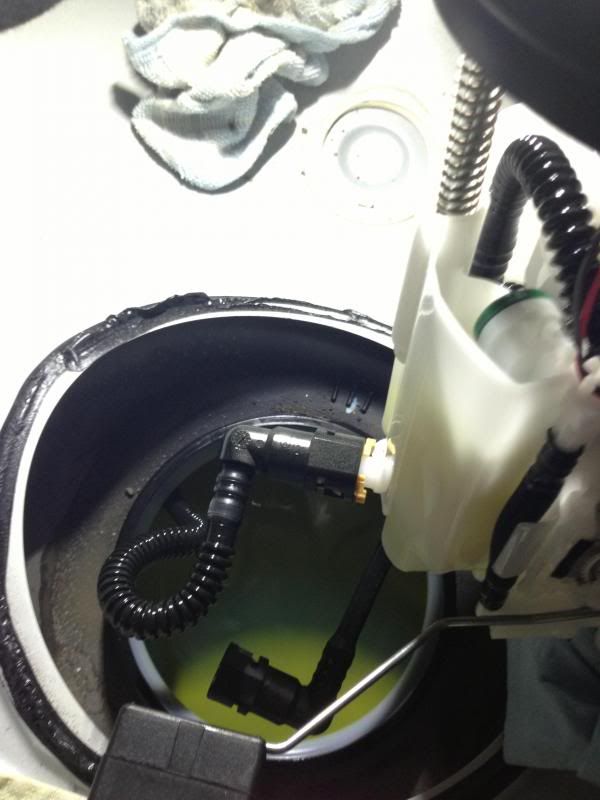 Once you have it unplugged, tip the canister back and forth OVER the hole, and try to get as much gas out as possible before trying to pull it out of the car, so you don't spill it all over your rug. Step Eight: Analyze Canister, Take Photos Again, snap a bunch of photos of the Canister, taking note of the following: - Fuel pump wires and routing - two black wires inside canister 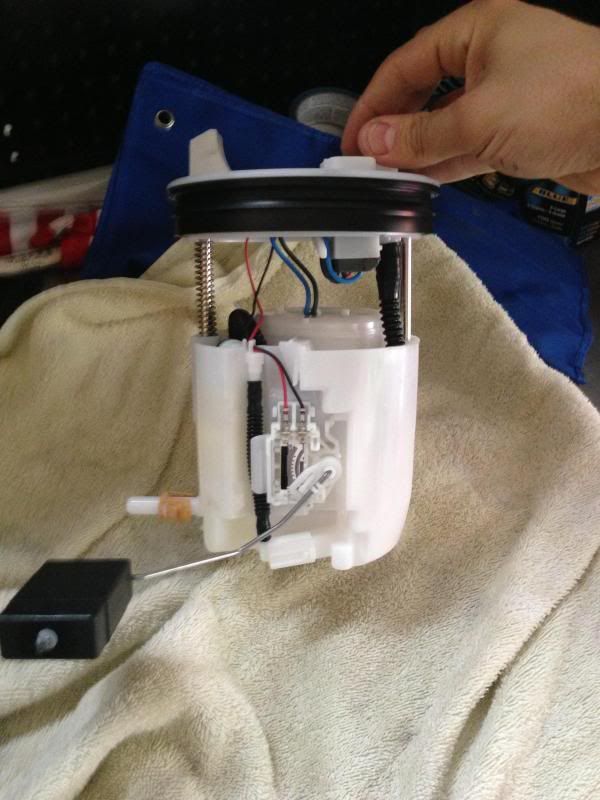 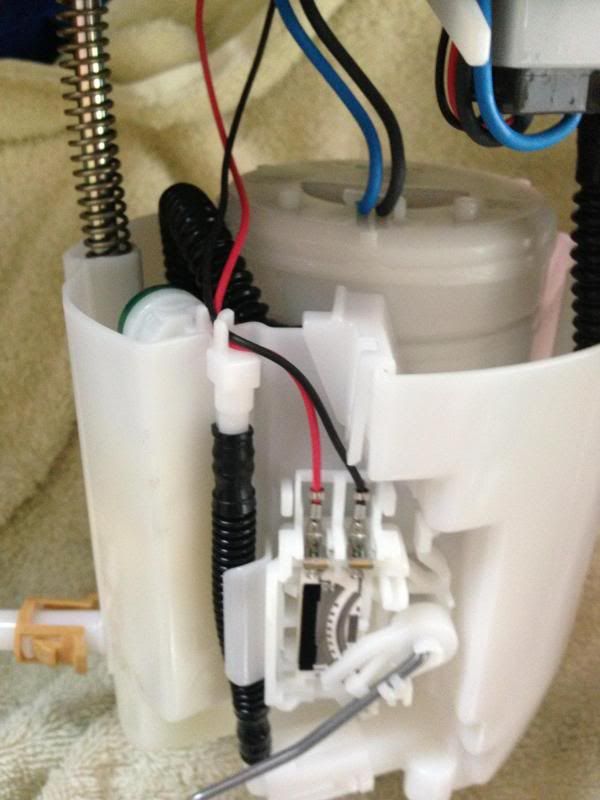  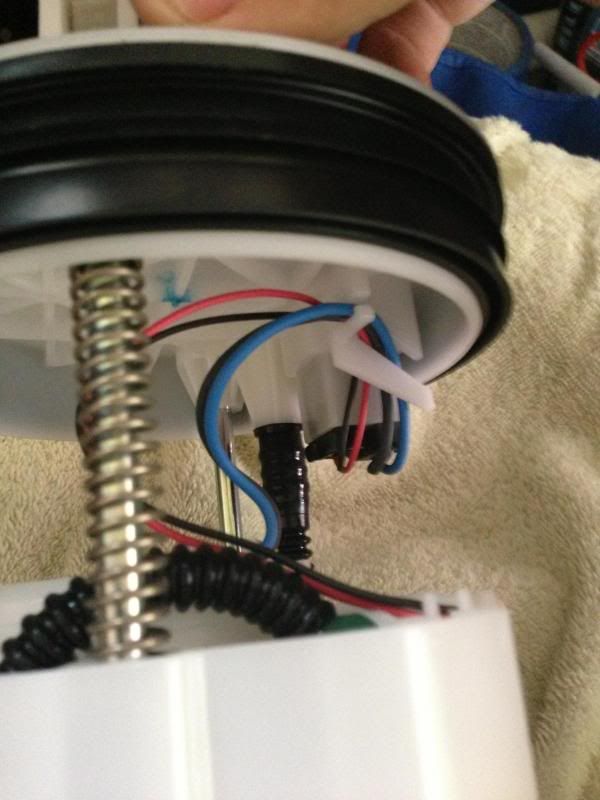 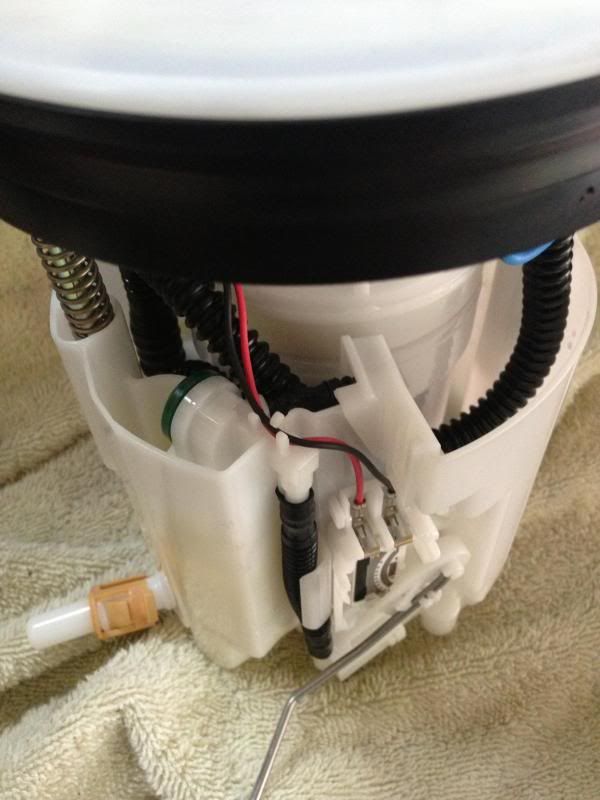 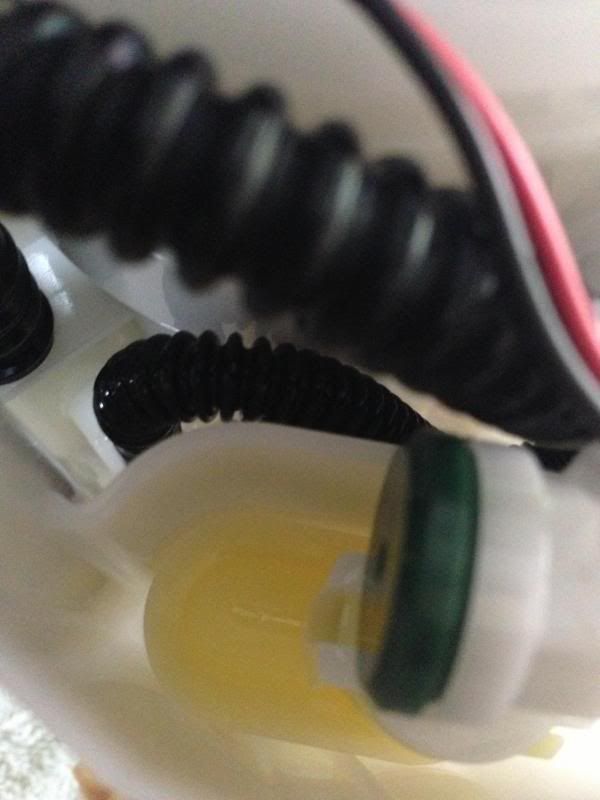 I took enough photos to where you shouldn't have to do this, but its always best practice in case you don't understand a picture, you have a backup of what it looked like prior. I will explain the orientations of each line when re-assembling the canister. |
|
|
|
|
07-16-2013, 02:26 PM
|
#3 |
|
Senior Member
Join Date: Jul 2012
Drives: 2013 SWP BRZ
Location: New York
Posts: 2,240
Thanks: 458
Thanked 878 Times in 556 Posts
Mentioned: 34 Post(s)
Tagged: 0 Thread(s)
|
Step Nine: Disassembling the Canister
Grab your pliers, push down slightly on the top of the canister to remove the c clip on the metal arm (the arm with the spring on it). Once this is removed, you can slide up the top part of the canister. You must unplug the fuel pump from the top of the canister to be able to pull it off most of the way to get into the fuel pump assembly inside. You can't pull this completely off but hang it off to the side for now. 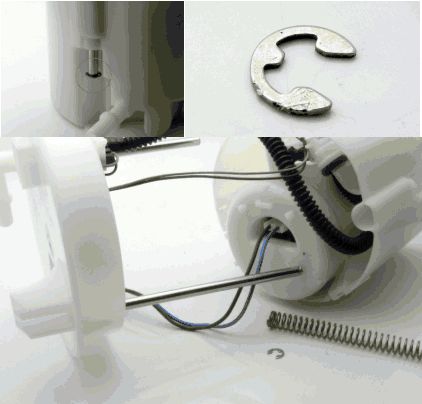 Once that is done, there are three clips holding the fuel pump assembly down into the canister. Unclip these three, and then pull up. Take note of the orientation of the black hoses inside the canister. This is where sportsguy had issues because he accidentally pinched one of those wires. The small hose goes down and then U's back up. The larger hose U's up, then downward, than back up again. 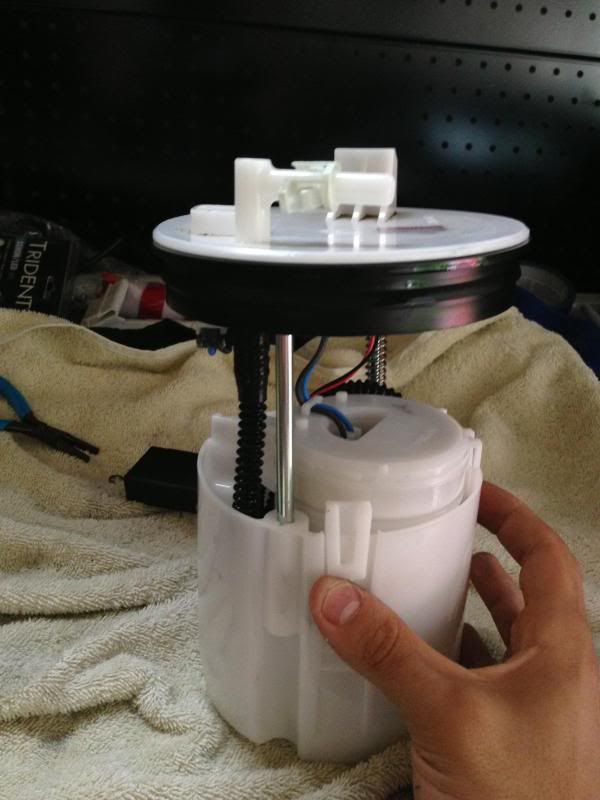 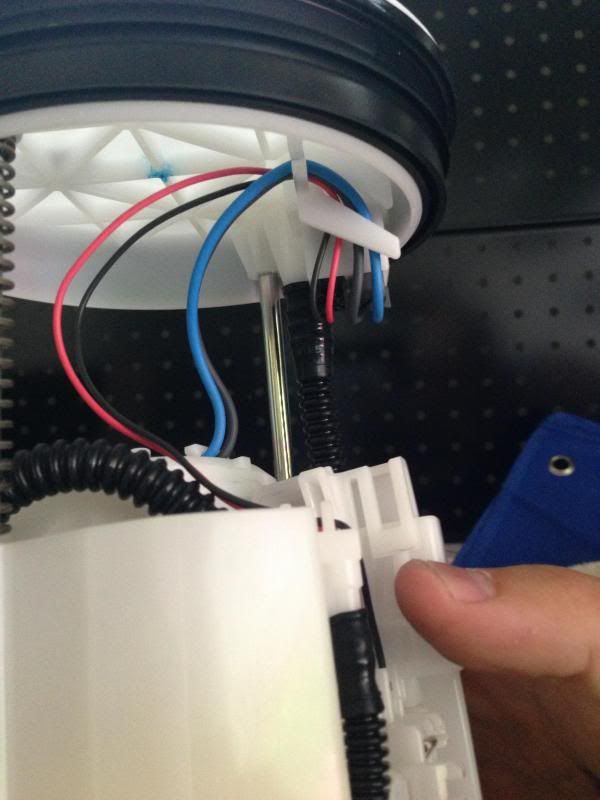 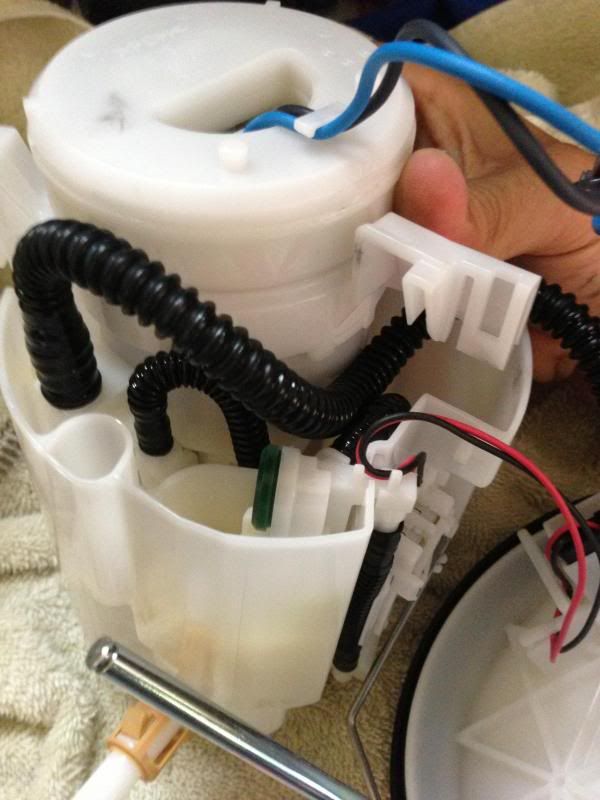 Once you unclip it you can pull the fuel pump assembly away from the canister, but the black hoses attach to this so now you must unclip the 5 clips at the bottom of the fuel pump assembly. This is kind of annoying to do since they are on there TIGHT. I found its best to start with the clip below (on the right), then move to the left around. 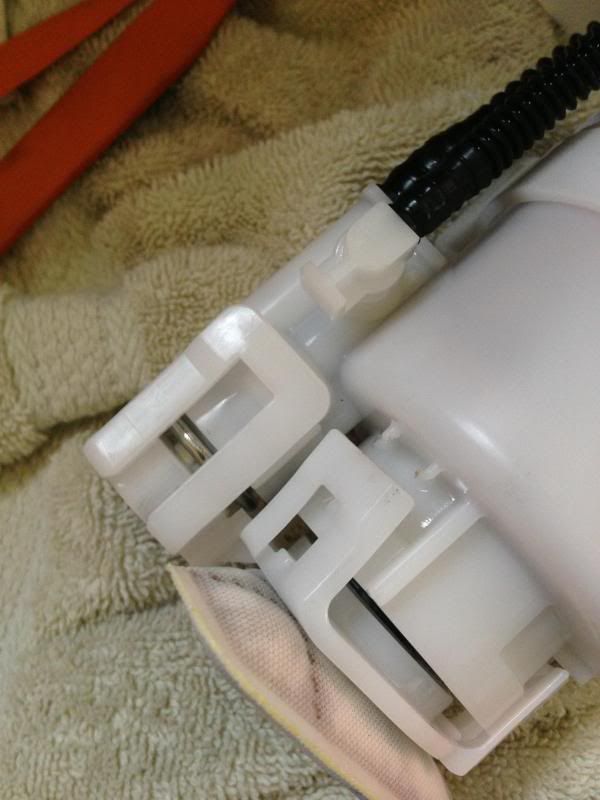 After you unclip it, you can slide the stock fuel pump out. Pull it out slowly and make sure you have the stock white collar and its o ring still present on the pump. If not it probably is stuck up in the canister. 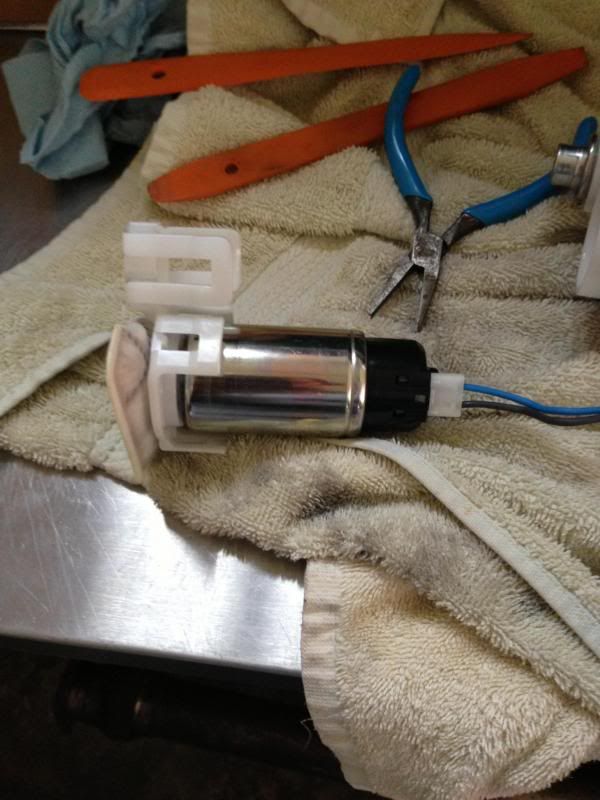 Stock fuel pump (bottom) vs Deatschwerks pump (top) 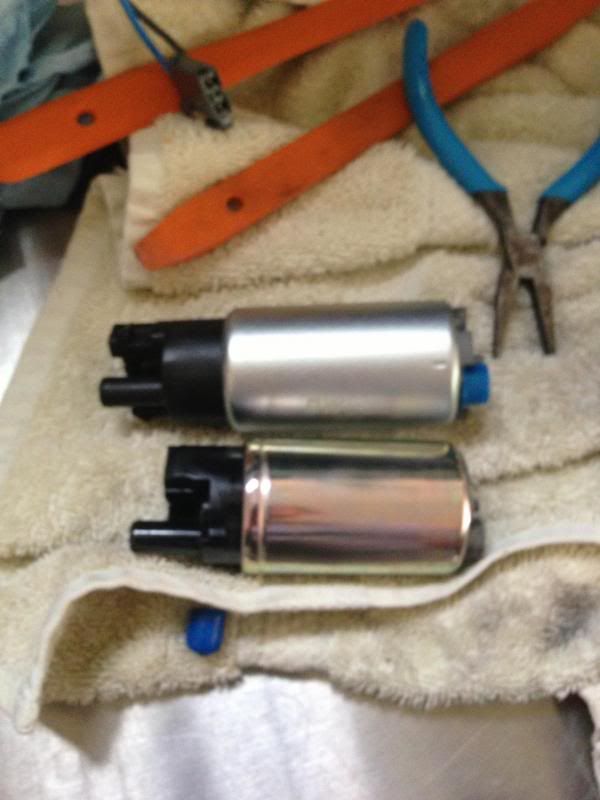 Step Ten: Cutting the bottom Clip You have to do this because the clip is all one piece, and you can’t reuse the part that has the stock fuel sock attached to it. Deastchwerks shows them using a razor to cut this piece but I tried for about 5 minutes before I gave up and pulled the dremel out which took me a minute to complete. Just go slow if you go this route and don’t hit the stock fuel sock. Cut here:  Pieces separated: 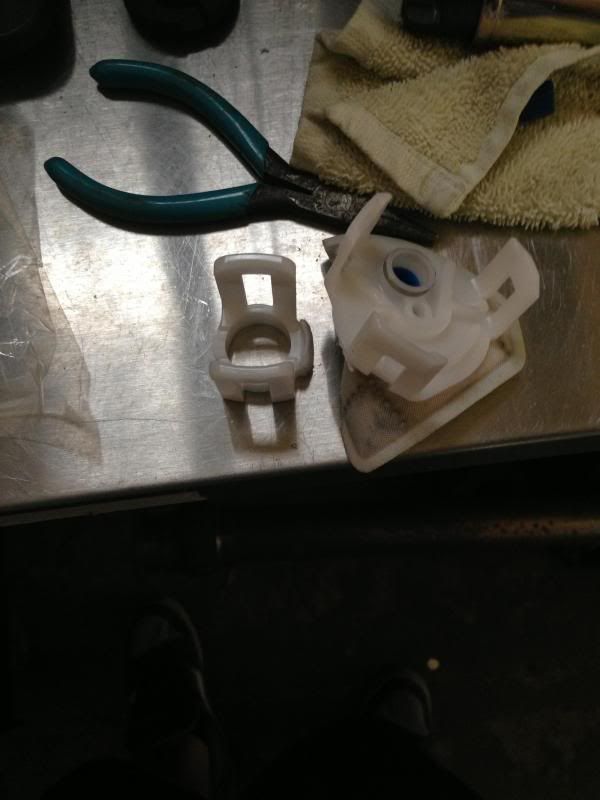 Step Eleven: Assembling the DW pump for Re-installation This is the step where all the confusion lies. How do I reinstall the pump? 2 o rings? 3 o rings? 12? Stock collar? No stock collar? O Rings: NAPA part 2-12093 for 2 of them View the photo below to see how I installed the fuel pump o rings. After talking with Tony from @FA20Club.com, he insured me that he has done multiple fuel pump installs with this orientation and I trusted his judgement on it. @Sportsguy83 opted to go the Visconti route and install 4 o rings. Now if you look at my setup, by installing two more o rings you are making up for the stock white collar height. 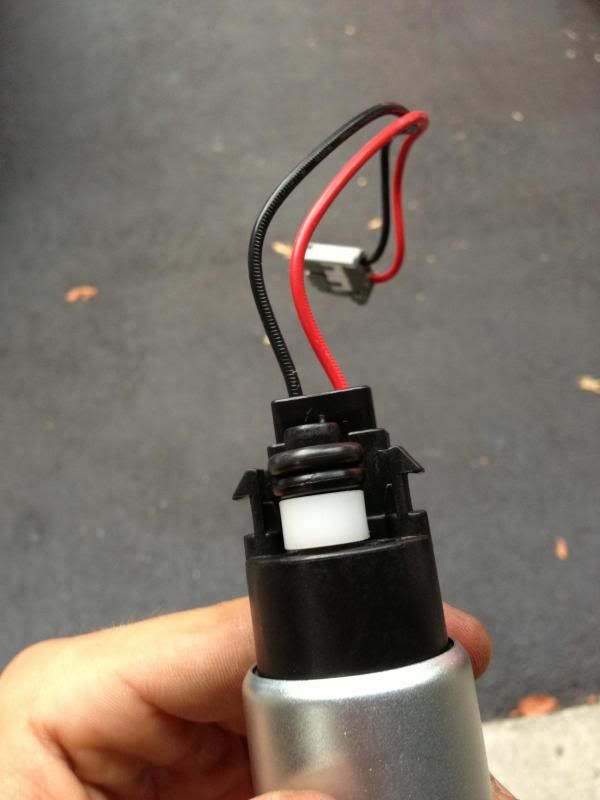 Use the assembly lube in the kit DW sent you and lube the nipple of the pump. This will help you slide that white collar on. It wants to grab a bit when you first push it on, but once you get it on there it slide down nice. You NEED to push it down. Once you have that on, put the two supplied o rings that DW provided for you onto the nipple.  I’m not saying the 4 o ring method is incorrect, I would go with whatever way you are more comfortable with. Grab the wiring harnesses provided in the kit and clip it into the DW fuel pump (clipped in above). Then grab the Fuel sock, and install it on the bottom of the pump, and used the supplied lock ring to keep it in place. Then put the rubber grommet on. Sorry I thought I took photos of this but I will include the photos DW took of this. 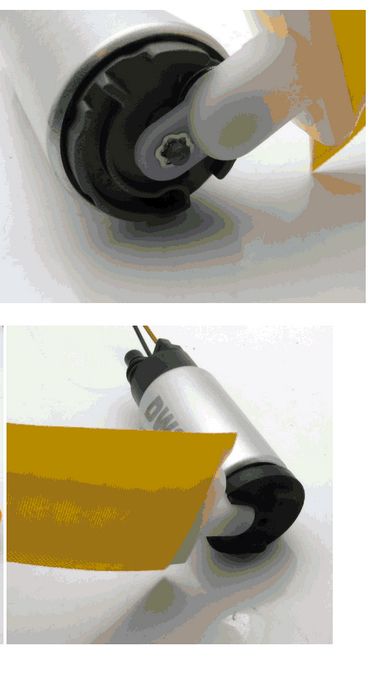
Last edited by xxscaxx; 10-28-2013 at 12:11 PM. |
|
|
|
|
07-16-2013, 02:26 PM
|
#4 |
|
Senior Member
Join Date: Jul 2012
Drives: 2013 SWP BRZ
Location: New York
Posts: 2,240
Thanks: 458
Thanked 878 Times in 556 Posts
Mentioned: 34 Post(s)
Tagged: 0 Thread(s)
|
Step Twelve: Re-Assembling the Canister
Now that you have the fuel pump ready to go, slide the harness kit up through the top hole of the fuel pump assembly, and line up the nipple of the fuel pump to the small circular hole inside. *NOTE: It is important to make sure you removed the stock o ring from the stock fuel pump. Mine was stuck in this hole. When you have it lined up, it should click in place. Snap the plastic clip piece you cut earlier onto the canister. Fold up the DW fuel sock up against the fuel pump so you can slide it back into the canister assembly. When you put it back together you should see the sock up against the inner side of the fuel assembly. 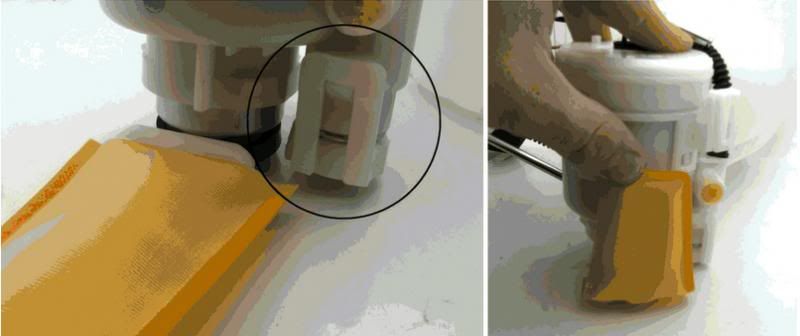 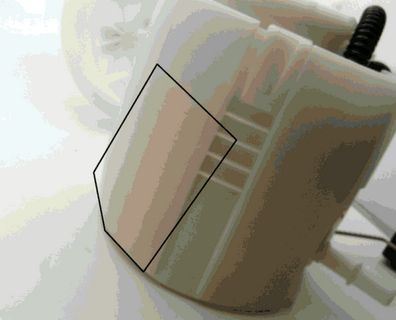 Now, make sure when you put the fuel pump assembly back in, you have the black hoses inside in the right orientation. Honestly, I didnt really have to do much to get them back into the orientation. They didnt get twisted or anything like that when I took the top part off. Heres a crappy little quick sketch I did of the line routing. Hopefully this and the photos I took provide a good idea of how they should look. 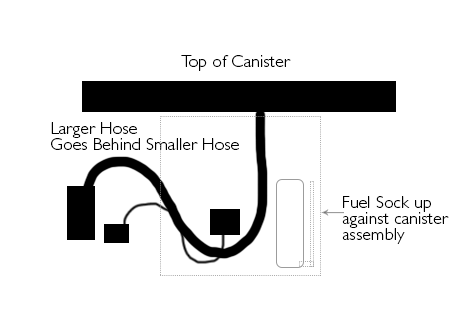 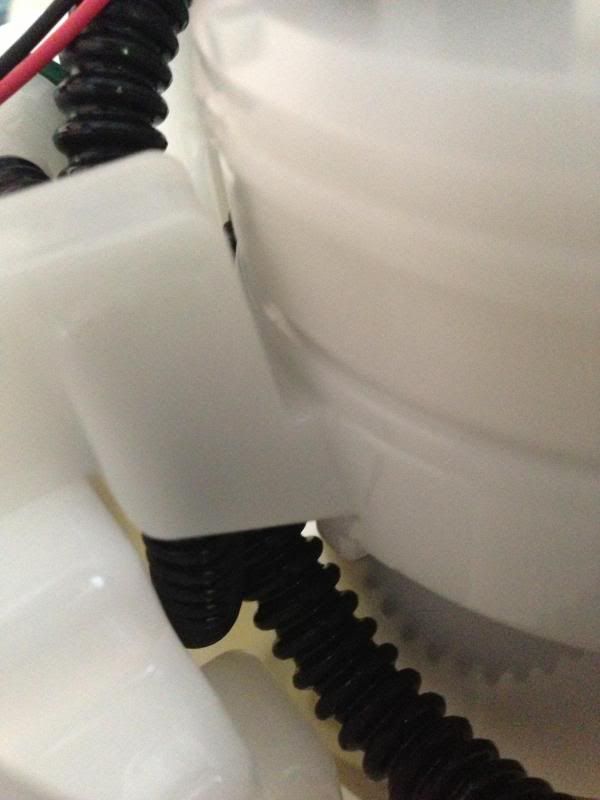 You have to push with a little force down on the fuel pump assembly to get the clips to snap back in place into the canister. Make sure you line them up, then push down and clip them in. Once you do that, plug the harness into the top of the fuel lid of the canister. The wires coming off the top of the canister lid come up and around the plastic tab. The fuel pump wires off the harness go onto the plastic tab on top of the fuel pump assembly. The black/red smaller wires follow the same path but then go under the plastic tabs right near the float switch. Make sure to put the spring back on the metal arm if you had taken it off earlier. Once you have everything back, on, push the top of the canister down and put the c clip back into the metal arm. Step Thirteen: Re-Install the fuel canister back into the Car Now that everything is back together, its time to put it back in. Reconnect the fuel line on the side of the canister. Again, tip the canister towards the passenger side and angle in the float sensor. Once it clears, you can tip it back straight, and drop the canister straight down. Now the rubber gasket that is around the canister I found it was easiest to set it down, then work the back in (side closest to you) and then work around the sides to push the gasket down as you get towards the front. I had used the assembly lube on this ring but I advise not to because when you are trying to tighten the plastic ring, the fuel pump canister moves and throws off the alignment of the arrows. DO NOT FORCE the canister down or you are going to increase the chances of ripping this gasket!! Once you have it down, you will know because it will go in nice and easy and wont back out by much if you let go of the canister (it wont push back up out of the gasket). Line up the arrow on the canister to the dot on the casting on the outside of the tank. Now, take note of this lip on the plastic ring. 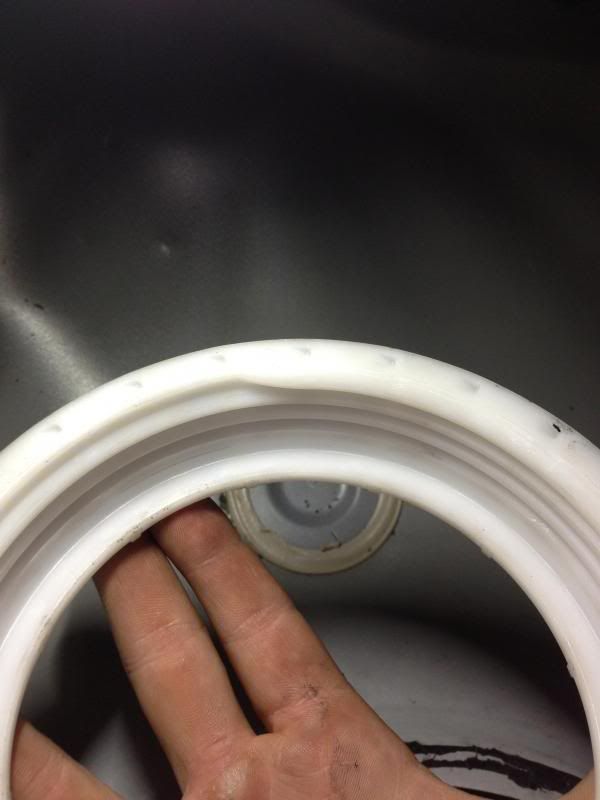 Now look at the front of the outer gasket of the tank (by the dots). You will see that these two need to line up in order to put the plastic ring on correctly. Line that up, and then push the plastic ring down. I had to push down on the back of the ring (closest to you) in order for it to line up so you werent trying to thread it on an angle. I thought I took a picture of the rubber gasket sorry about that. You will know you have it on correct because if you dont, you wont even get half a turn in before you cant turn it anymore. You should be able to turn it about 80% of the way on before you need to pull the hammer and punch back out to tighten it. I couldnt get the arrow to exactly line up on the plastic ring to those arrows (it was very close), but the important arrow is the actual canister itself. I hammered it back on until I couldnt move it anymore. When I did this my canister kept moving so you might have to play with it a few times to get it lined up correctly. Step Fourteen: Re-install Plug, Fuel line and metal lid Now that you have the plastic ring back on, reconnect the fuel line, then plug back in the fuel plug in the top of the canister. Line up the metal lid (arrows point towards the front of the car), and press it back down. I put pressure on it for about 30 seconds or so. Step Fifteen: Re-install Fuse, battery Terminal, Seat Put the 20amp fuse back into the panel in the engine bay. Reconnect the negative terminal of the battery and tighten down. Before putting the seat back in, turn the car to the start position and make sure you hear the fuel pump prime (you might even want to do this before you press the metal lid back down). If you hear it prime, fire up the car, and make sure the pump is running ok. Once you do that, shut the car back off, and re-install the rear seat. Remember that you need to get the bar on the bottom of the seat behind that metal tab on the frame of the car. Finish by patting yourself on the back and drinking a beer. Hopefully this helps people a bit more on installing a fuel pump. Its really straight forward, so dont be nervous. Just dont cut your finger like I did and keep pouring gas on it, because it burns like HELL! If I missed something please inform me and Ill add it. I didnt realize this was going to be such a long write-up. |
|
|
|
| The Following 18 Users Say Thank You to xxscaxx For This Useful Post: | Bigmaxy (02-28-2014), Dezoris (10-26-2013), Draco_PR23 (07-17-2013), GhostOp86 (11-23-2015), GTB/ZR-1 (07-16-2013), Initial_RD (06-13-2016), jamesm (07-17-2013), joe strummer (11-20-2015), kowalski (01-18-2018), microbionic (10-28-2013), PerCompLLC (05-03-2023), philooo (08-25-2015), Pointmutation (02-15-2023), raven1231 (11-20-2015), RavioliG (10-22-2017), romin (01-26-2015), Sportsguy83 (07-16-2013), swift996 (07-17-2013), Turbowned (09-19-2014) |
|
07-16-2013, 02:58 PM
|
#5 |
|
I Love custom Turbo kits
Join Date: Mar 2012
Drives: Limited BRZ
Location: Miami
Posts: 10,770
Thanks: 20,004
Thanked 8,343 Times in 4,361 Posts
Mentioned: 441 Post(s)
Tagged: 12 Thread(s)
|
I would have liked to use the White Spacer, but for some reason it just didn't want to go in. I try pressing it in hard, but not with full force as I didn't want to risk breaking it.
I called DW, and they assured me I did not need to use it. I believe the white spacer is better than 4 O rings. AWESOME Write up!!! I will link to it in my thread.
__________________
|
|
|
|
| The Following User Says Thank You to Sportsguy83 For This Useful Post: | xxscaxx (07-16-2013) |
|
07-16-2013, 03:04 PM
|
#6 | |
|
Senior Member
Join Date: Jul 2012
Drives: 2013 SWP BRZ
Location: New York
Posts: 2,240
Thanks: 458
Thanked 878 Times in 556 Posts
Mentioned: 34 Post(s)
Tagged: 0 Thread(s)
|
Quote:
DW is apparently stupid...  Thanks man! Just trying to help out. |
|
|
|
|
| The Following User Says Thank You to xxscaxx For This Useful Post: | Sportsguy83 (07-16-2013) |
|
07-17-2013, 03:07 PM
|
#7 |
|
Senior Member

Join Date: Nov 2011
Drives: Subaru BRZ Limited 6MT
Location: Winston-Salem, NC
Posts: 2,432
Thanks: 712
Thanked 954 Times in 545 Posts
Mentioned: 47 Post(s)
Tagged: 0 Thread(s)
|
I'm guessing you should depressurize the system the same way if doing injectors?
__________________
Innovate Supercharged Black Limited BRZ 6-Speed MT(Build Thread)
2010 Cadillac CTS-V Sedan M6 w/550whp (Build Thread)  |
|
|
|
|
07-17-2013, 10:13 PM
|
#8 | |
|
Senior Member
Join Date: Jul 2012
Drives: 2013 SWP BRZ
Location: New York
Posts: 2,240
Thanks: 458
Thanked 878 Times in 556 Posts
Mentioned: 34 Post(s)
Tagged: 0 Thread(s)
|
Quote:
|
|
|
|
|
| The Following User Says Thank You to xxscaxx For This Useful Post: | swift996 (07-17-2013) |
|
07-22-2013, 09:16 AM
|
#9 |
|
Senior Member
Join Date: Jul 2012
Drives: 2013 SWP BRZ
Location: New York
Posts: 2,240
Thanks: 458
Thanked 878 Times in 556 Posts
Mentioned: 34 Post(s)
Tagged: 0 Thread(s)
|
Just wanted to report that I have not had any issues so far with the fuel pump installed with the spacer and o-rings. I will report back after a few weeks but I think if any problems were to occur it would have already happened by now.
|
|
|
|
|
07-22-2013, 09:21 AM
|
#10 |
|
Banned
Join Date: Nov 2012
Drives: 2013 Supercharged SSM BRZ Limited
Location: Sportsguy83 butt
Posts: 5,652
Thanks: 16,143
Thanked 12,901 Times in 5,671 Posts
Mentioned: 316 Post(s)
Tagged: 12 Thread(s)
|
Crickets gone??
|
|
|
|
| The Following User Says Thank You to sklimo For This Useful Post: | microbionic (10-28-2013) |
|
07-22-2013, 09:44 AM
|
#11 |
|
Senior Member
Join Date: Mar 2013
Drives: whiteout gt86 2015 IS350fsport
Location: northern kentucky. cincy
Posts: 1,931
Thanks: 2,154
Thanked 697 Times in 437 Posts
Mentioned: 42 Post(s)
Tagged: 0 Thread(s)
|
I didn't reuse the spacer but I did use three o_rings some people use 3
__________________
INSTAGRAM @Rcf_700 www.youtube.com/boostindub
|
|
|
|
|
10-19-2013, 01:36 PM
|
#12 | |
|
Senior Member

Join Date: Mar 2013
Drives: 2013 Scion FR-S
Location: San Diego, CA
Posts: 285
Thanks: 120
Thanked 135 Times in 87 Posts
Mentioned: 13 Post(s)
Tagged: 1 Thread(s)
|
Quote:
__________________
 |
|
|
|
|
|
10-19-2013, 04:11 PM
|
#13 | |
|
Senior Member
Join Date: Jul 2012
Drives: 2013 SWP BRZ
Location: New York
Posts: 2,240
Thanks: 458
Thanked 878 Times in 556 Posts
Mentioned: 34 Post(s)
Tagged: 0 Thread(s)
|
Quote:
|
|
|
|
|
|
10-19-2013, 04:18 PM
|
#14 |
|
Hold my beer n watch this
Join Date: Nov 2012
Drives: '14 Fiesta ST / '91 240sx
Location: Calgary, Alberta
Posts: 782
Thanks: 214
Thanked 301 Times in 177 Posts
Mentioned: 8 Post(s)
Tagged: 0 Thread(s)
|
I still don't understand this hole stacking orings, it just doesn't make sense to me why it'd be like that.
Great write up though! I'm installing this pump next week and really appreciate the pics
__________________
Nolan
|
|
|
|
|
|
|
|
|
|
|
 Similar Threads
|
||||
| Thread | Thread Starter | Forum | Replies | Last Post |
| Fuel pump upgrade install (Visconti 290lph) | jet86 | DIY (Do-It-Yourself) Guides | 44 | 01-04-2018 07:56 PM |
| PSA: Tips on what needs to be payed close attention on Fuel Pump install | Sportsguy83 | Engine, Exhaust, Transmission | 34 | 04-25-2014 11:24 PM |
| Fuel pump issue. | sevi21 | Issues | Warranty | Recalls / TSB | 13 | 02-01-2013 09:57 AM |
| Car fuel pump on... | Genomaxter | Engine, Exhaust, Transmission | 5 | 11-29-2012 10:06 AM |
| Dynosty FR-S/BRZ Fuel System Upgrades! Deatschwerks DW65C Fuel Pump | Dustin@Dynosty | Engine, Exhaust, Bolt-Ons | 3 | 08-21-2012 04:53 PM |


 The One