


 06-17-2018, 10:46 AM
|
#113 |
|
Senior Member
Join Date: Dec 2011
Drives: '24 GR86
Location: Arizona
Posts: 3,674
Thanks: 655
Thanked 3,341 Times in 1,575 Posts
Mentioned: 16 Post(s)
Tagged: 0 Thread(s)
|
Subd
This is going to be nuts
__________________
|

|

|
|
06-24-2018, 05:28 AM
|
#114 |
|
Senior Member

Join Date: Jul 2016
Drives: BRZ, WRX
Location: Sydney, Australia
Posts: 291
Thanks: 105
Thanked 962 Times in 233 Posts
Mentioned: 2 Post(s)
Tagged: 0 Thread(s)
|
Another small update:
More work toward getting the subframe permanently mounted into the back of the car today. I had to get the cradle back into the welding jig as the jig bolts to the factory mounting points placing the cradle in the correct position. I had some trouble getting it back into the jig because the extra gussets I added were preventing it from sliding down into position. So I had to cut two of the control arm locating points off the jig. 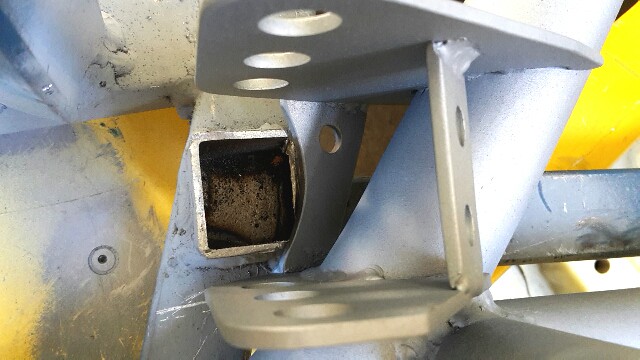 Next I had to trim some more sheet metal away to allow some space to run the tubes up to the shock mounts. Before 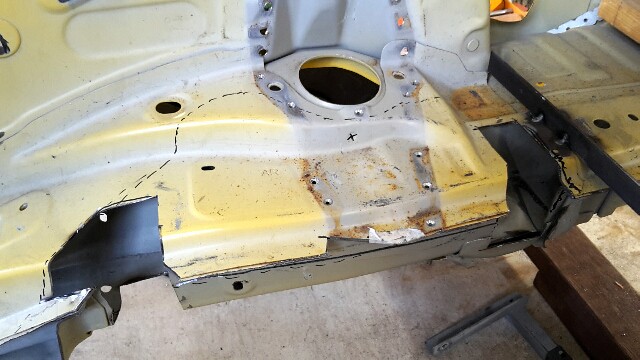 After 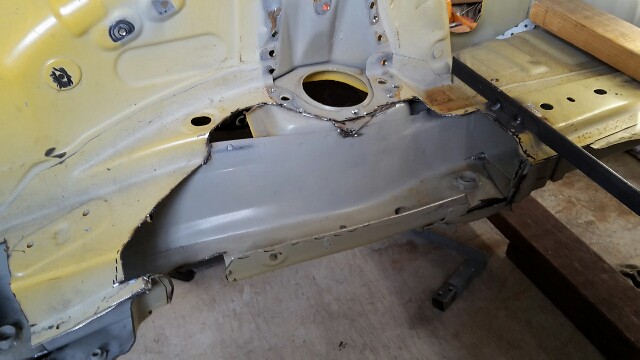 With the cradle back in the jig I then bolted it into position in the rear of the car and begun to mock up my tubes for the shock mounts. Using the electrical conduit is a good way to visualise things before cutting up the steel tube. The junction of tubes around the shock mount is complex but I think this configuration is the best possible and by placing it in front of the shock it shortens up the tube lengths and saves some weight. 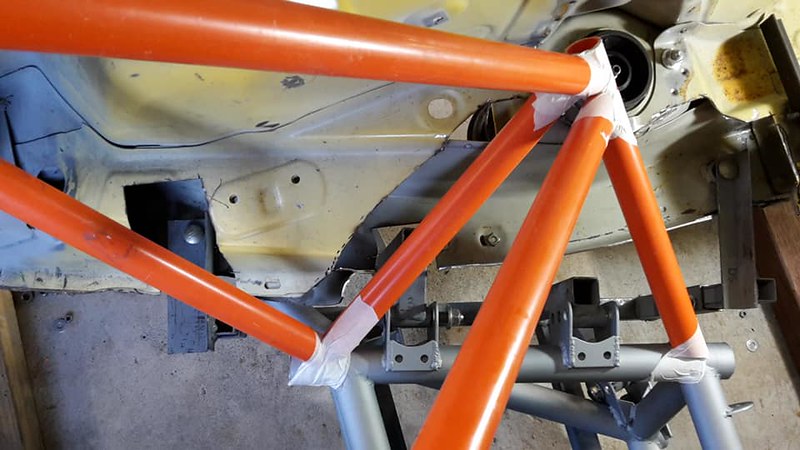 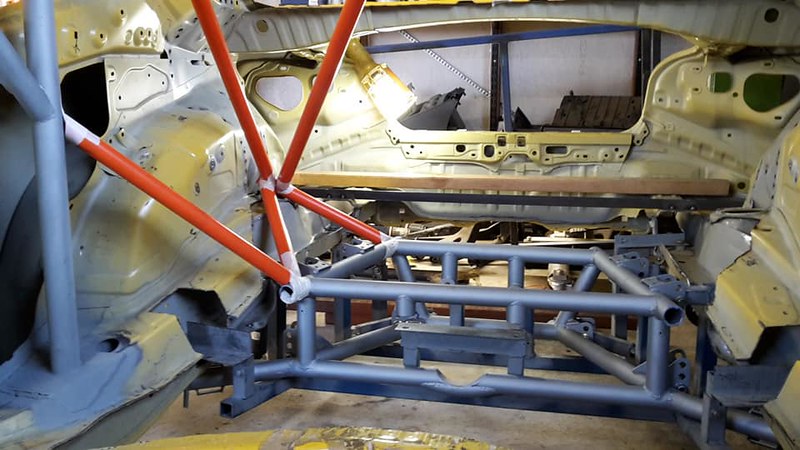 You can see here how all the connecting tubes have their load path continuing through the roll cage to existing tubes. 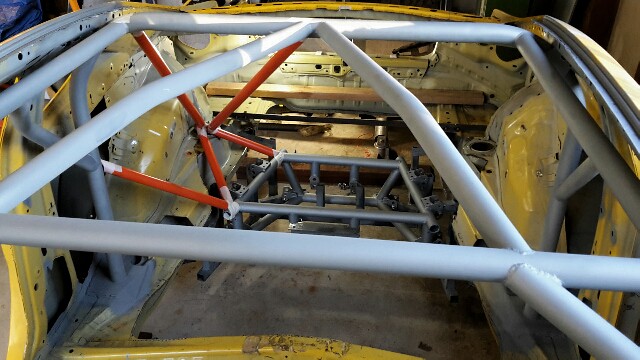
|
|
|
|
| The Following 3 Users Say Thank You to DIY For This Useful Post: |
|
07-11-2018, 07:08 AM
|
#115 |
|
Senior Member
Join Date: Jul 2016
Drives: BRZ, WRX
Location: Sydney, Australia
Posts: 291
Thanks: 105
Thanked 962 Times in 233 Posts
Mentioned: 2 Post(s)
Tagged: 0 Thread(s)
|
Solid diff mounts complete
I have finished the diff mounts now so I will share some photos. They were a bit of a challenge to get right as there is minimal space between the upper and lower tubes for the snout of the diff.
You can see here in this older photo that there is not much gap between the head of the bolt and the lower tube. 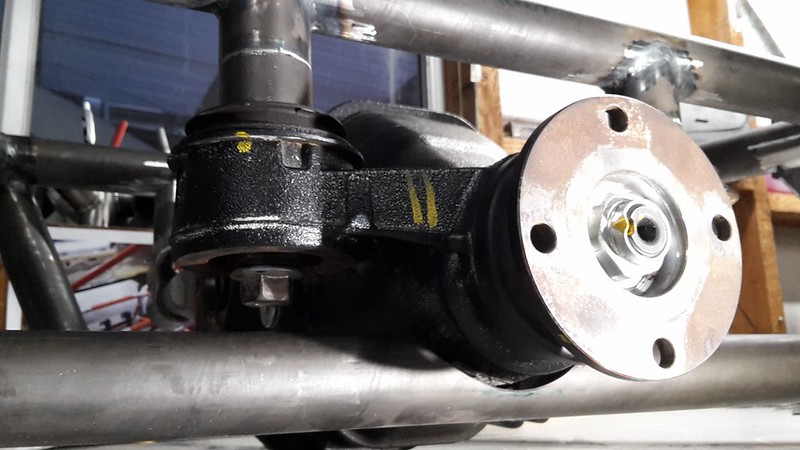 The bolt in the photo above was actually 14mm too short but simply using a longer bolt would not work as it would clash with the lower tube. My solution was to make some recessed washers meaning I could use a similar length bolt that would push up into the recess to get the proper thread engagement in the captive nuts above. This is my design on paper. 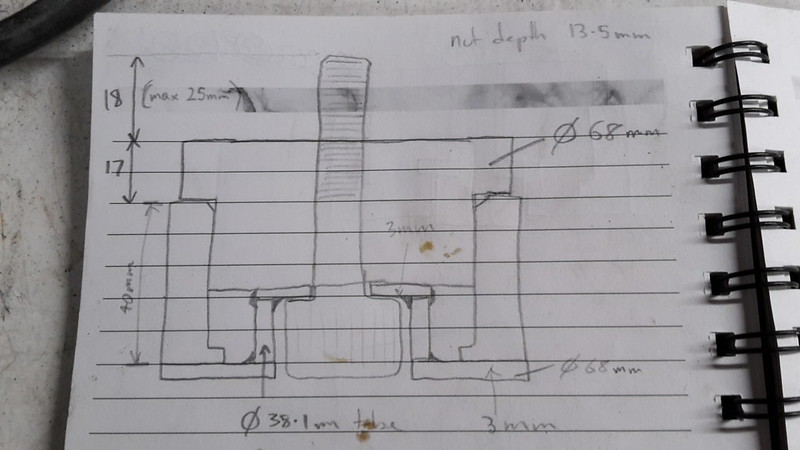 So I started making the recessed washers first, just an angle grinder, a drill, a hole saw and the TIG welder. 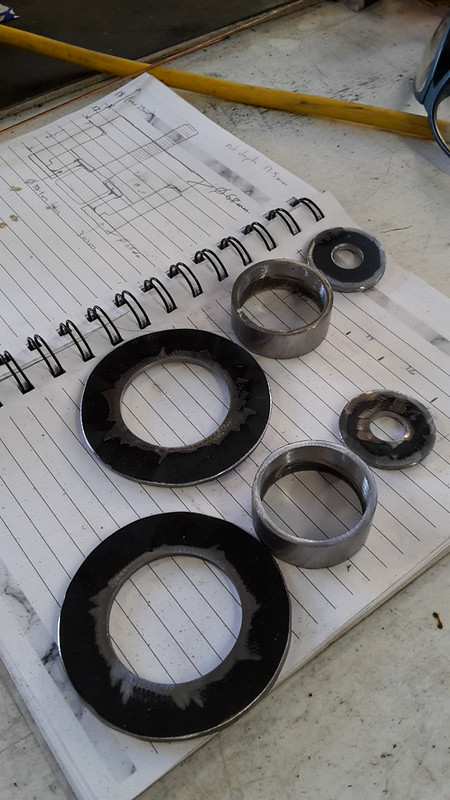 I haven't used the welder for a while, I've been doing a bit of snowboarding lately in my spare time. 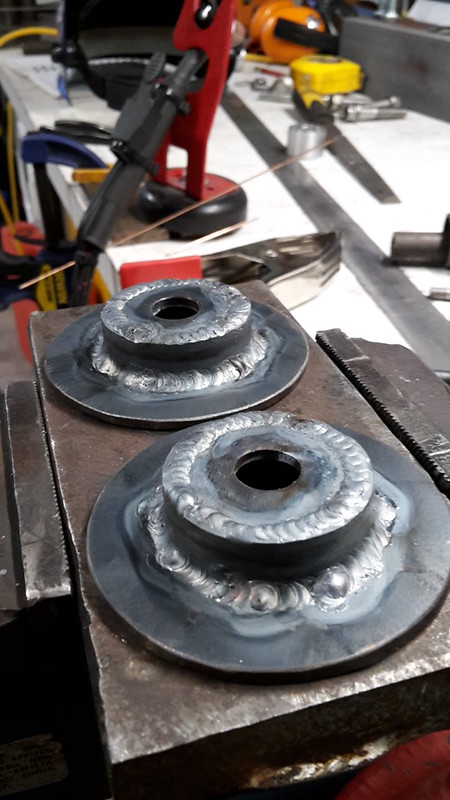 Ground the top face flat and gave them a coat of cold gal. The bolts I bought had to be trimmed down to the exact length I required too. 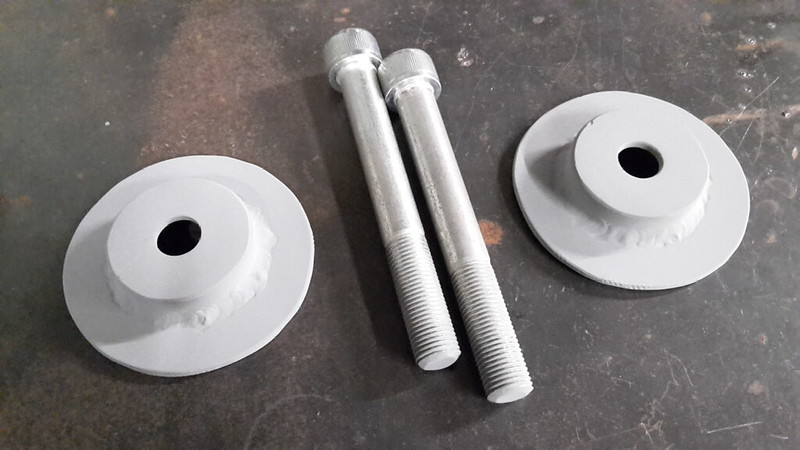 This is how the other side looks, pretty neat. 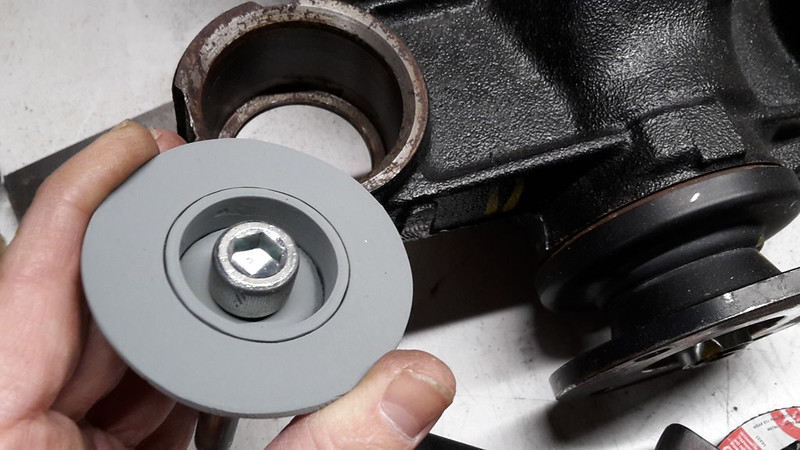 and I had to outsource the lathe work to a friend of mine, he turned up these aluminium spacers to my specs. 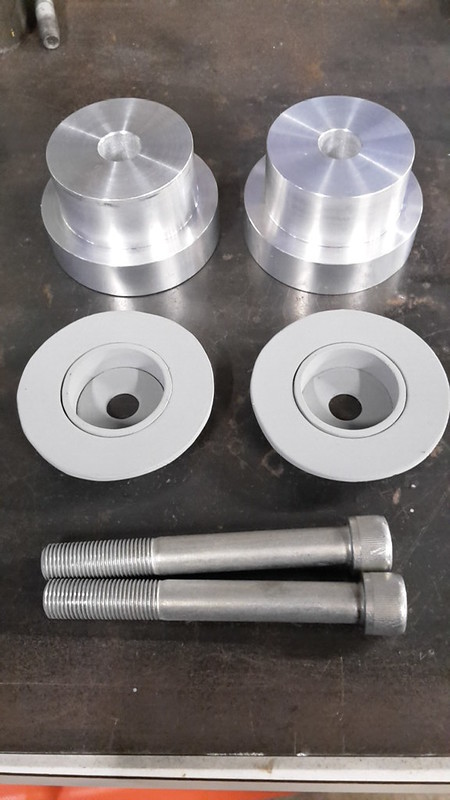 and this is how they sit inside the diff, perfect fitment! 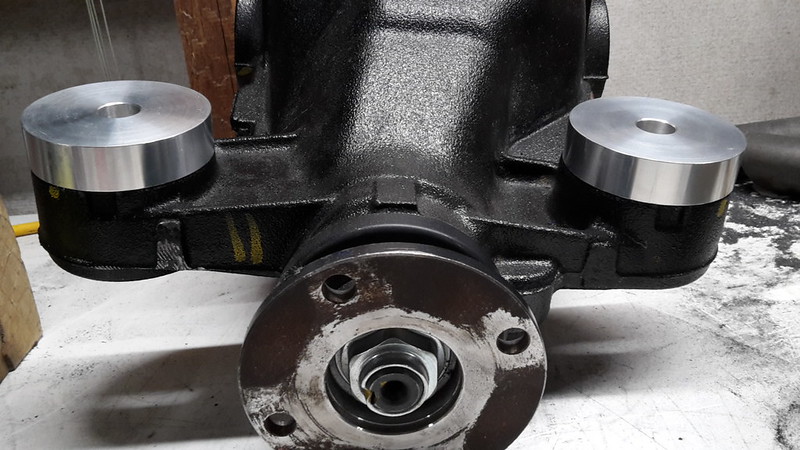 This is the complete assembly with the removable spacers on top that allow me to raise the diff. I will need to purchase some shorter bolts if I ever need to do this. 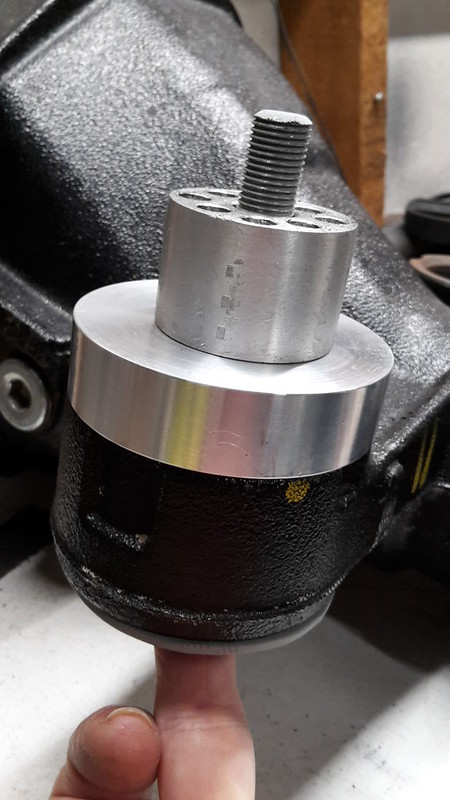 All up the solid diff mounting system was 375 grams lighter than the factory rubber bushing setup but the real advantage is the lack of movement and connected feeling you get by removing rubber bushings. |
|
|
|
| The Following 4 Users Say Thank You to DIY For This Useful Post: |
|
07-15-2018, 05:26 AM
|
#116 |
|
Senior Member
Join Date: Jul 2016
Drives: BRZ, WRX
Location: Sydney, Australia
Posts: 291
Thanks: 105
Thanked 962 Times in 233 Posts
Mentioned: 2 Post(s)
Tagged: 0 Thread(s)
|
I had half a day to work on the car this weekend and got a little bit done. I wanted to test fit the diff in the cradle before welding it into the car so I pulled it back out of the car and removed it from the jig.
I'm not going to lie, getting the diff into the cradle is not a simple task due to the compact size of my design. It involves lifting it up into the center facing 90 degrees to its normal direction, at this point you must insert the front mounting bolts before spinning it around due to the small gap between tubes. I will probably make a little attachment for my floor jack that holds the diff and allows it to spin to make things easier. Here are a couple of photos with the diff in place.  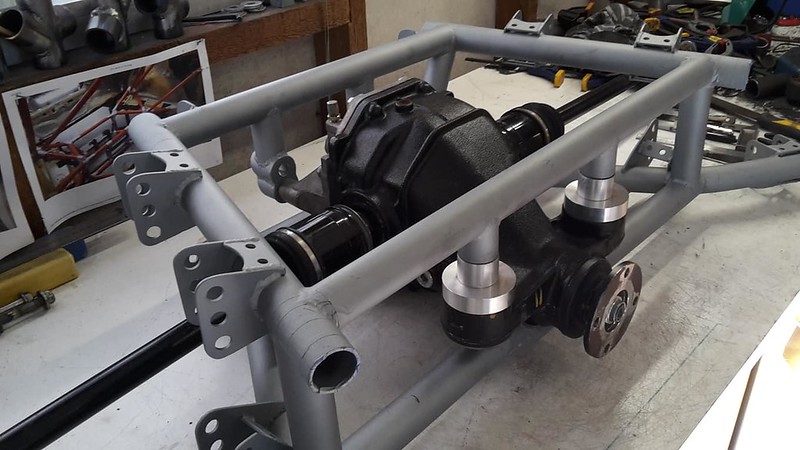 The next problem I had was getting a hex tool onto the bolts at the front of the diff, there is not much space there. I ended up fabricating my own tool by simply cutting a small piece off my hex tool and then plug welding it onto some flat bar. 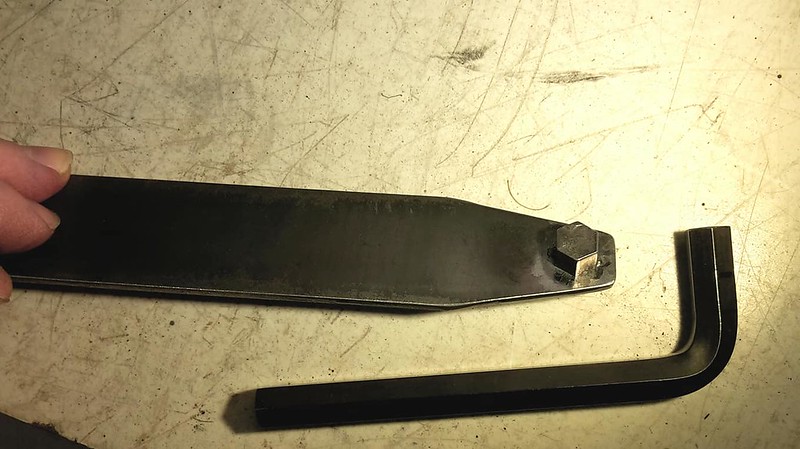 It works perfect although a ratchet function would be nice. 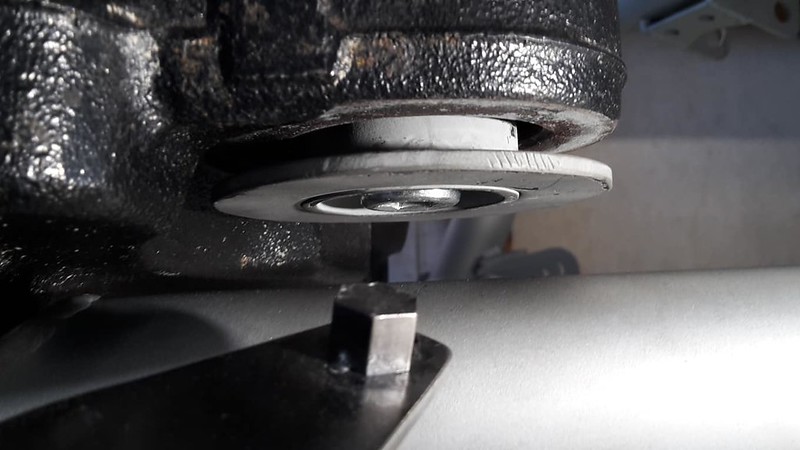 Once happy with the diff fitment I mounted the cradle back in the jig for the final time and then placed the whole thing back in the car. After a bit of measuring and checking of levels I bolted the jig in place ready to begin welding it to the roll cage. |
|
|
|
| The Following 7 Users Say Thank You to DIY For This Useful Post: | Ash_89 (03-02-2021), BigFatFlip (07-16-2018), Busybee (09-02-2018), DustinS (07-16-2018), Herndon (07-17-2018), Irace86.2.0 (09-15-2018), JeremyR (07-16-2018) |
|
07-16-2018, 11:26 AM
|
#117 |
|
Senior Member

Join Date: Nov 2012
Drives: 2015 BRZ Limited
Location: Bay Area, CA
Posts: 487
Thanks: 613
Thanked 269 Times in 181 Posts
Mentioned: 13 Post(s)
Tagged: 0 Thread(s)
|
Those diff mounts look great

__________________
|
|
|
|
| The Following User Says Thank You to JeremyR For This Useful Post: | DIY (07-16-2018) |
|
07-18-2018, 02:57 AM
|
#118 |
|
Senior Member
Join Date: Jul 2016
Drives: BRZ, WRX
Location: Sydney, Australia
Posts: 291
Thanks: 105
Thanked 962 Times in 233 Posts
Mentioned: 2 Post(s)
Tagged: 0 Thread(s)
|
I am posting a bit of stuff on Instagram now @ brzdiy if you want to follow me, this forum will still be where I post all the detail though.
Finally I have passed the point of no return, the suspension cradle and roll cage are now joined. 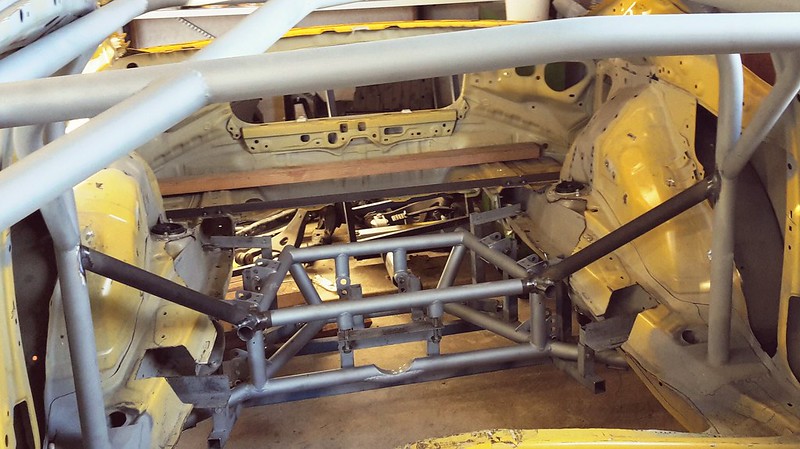
__________________
|
|
|
|
|
07-22-2018, 05:55 AM
|
#119 |
|
Senior Member
Join Date: Jul 2016
Drives: BRZ, WRX
Location: Sydney, Australia
Posts: 291
Thanks: 105
Thanked 962 Times in 233 Posts
Mentioned: 2 Post(s)
Tagged: 0 Thread(s)
|
I made a start on the shock mounts today, this is just a sneak peek as its far from finished.
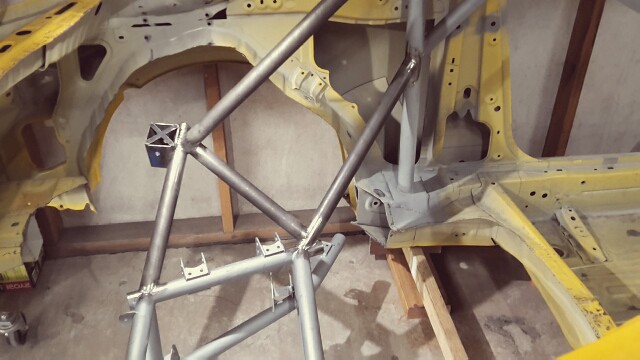
It took a lot longer than I was expecting, lots of measuring and checking of angles before coming up with an idea for the tabs for the shock to bolt onto. I am going to be using this style of upper shock mount. 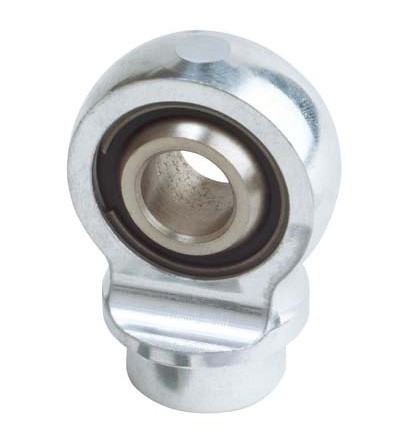 I managed to clamp some box section into my tube notcher which made getting a clean notch very easy. 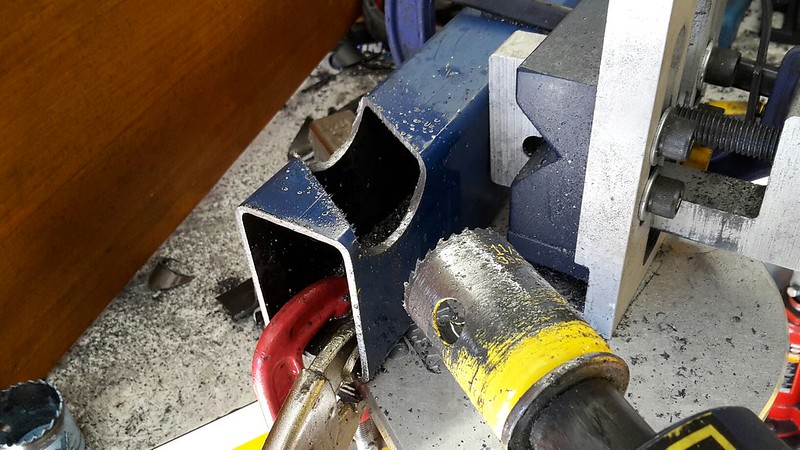 You can see here how the notched box section fits neatly onto the tube whilst keeping the box section parallel to the angle of the original shock mount. I have lifted the mounting point a little to account for the lifted cradle. 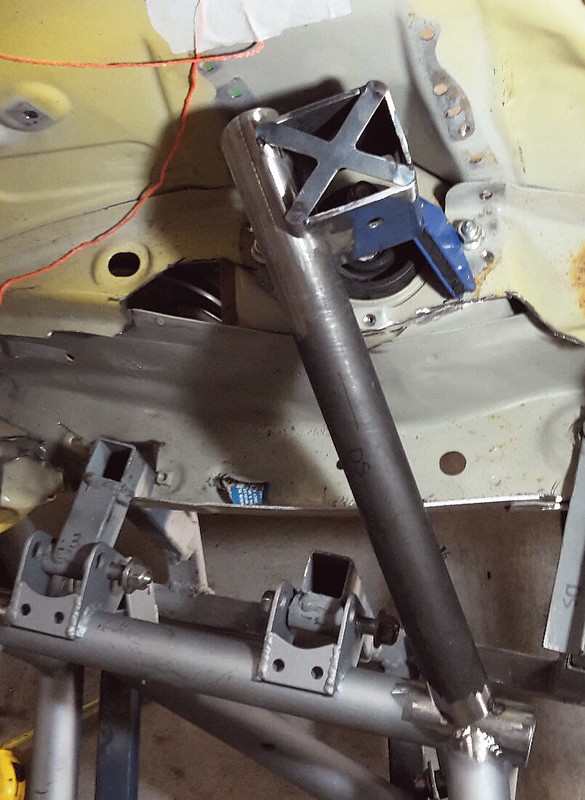 The "x" is just to stiffen it up a little without adding excess weight. 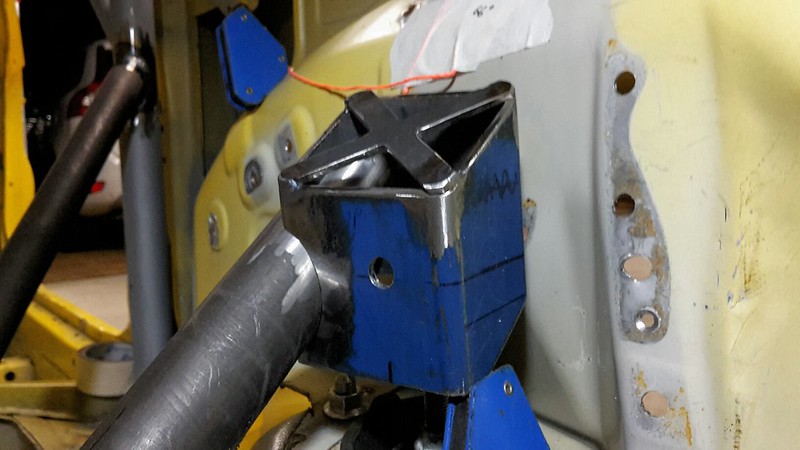 Once this part is done the rest of the tubing will be a lot quicker to complete.
__________________
|
|
|
|
| The Following 4 Users Say Thank You to DIY For This Useful Post: |
|
08-05-2018, 08:06 AM
|
#120 |
|
Senior Member
Join Date: Jul 2016
Drives: BRZ, WRX
Location: Sydney, Australia
Posts: 291
Thanks: 105
Thanked 962 Times in 233 Posts
Mentioned: 2 Post(s)
Tagged: 0 Thread(s)
|
It has been a while since I updated this thread, I've only done a little bit of work on the car in past few weeks as I went snowboarding again.
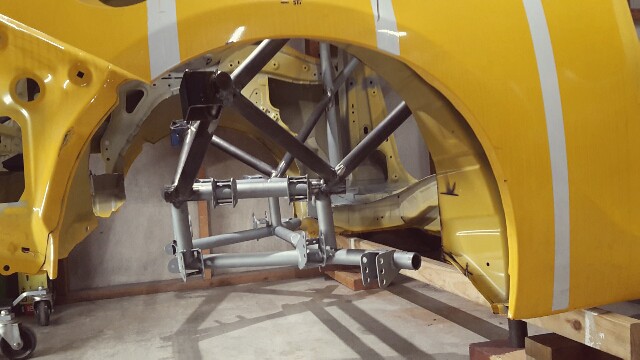
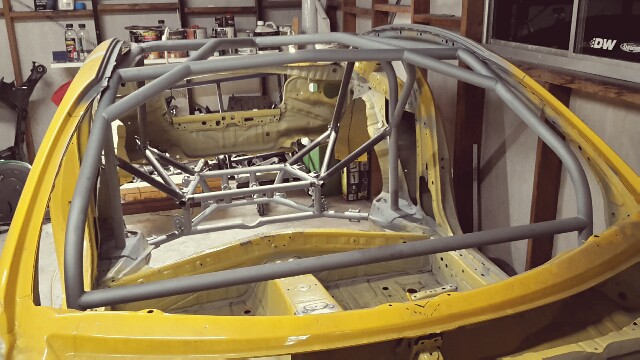
Anyway things are going well and the car is looking pretty crazy now with all the tubes going everywhere. Picking up where we left off, I begun by breaking the tacks on the tube that located the shock mount to the cradle so I could fully weld the shock mount on the bench. 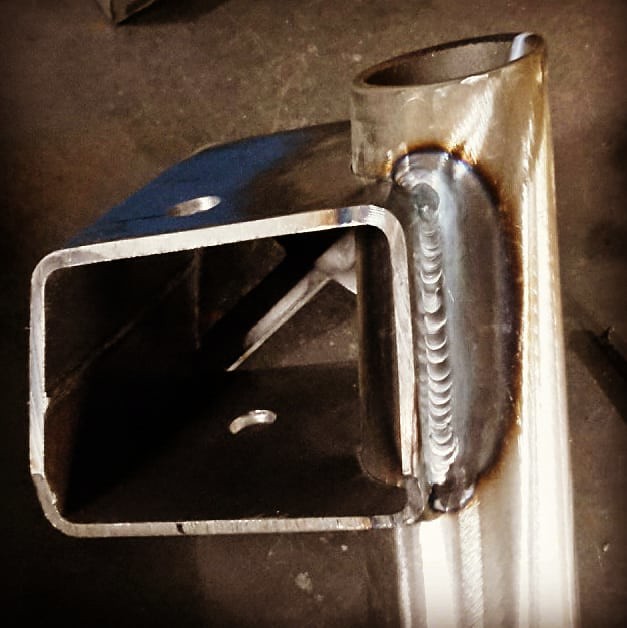 After a lot of measuring to make sure the shock mount was in the correct position I welded the tube back in place and began to make the next tube. 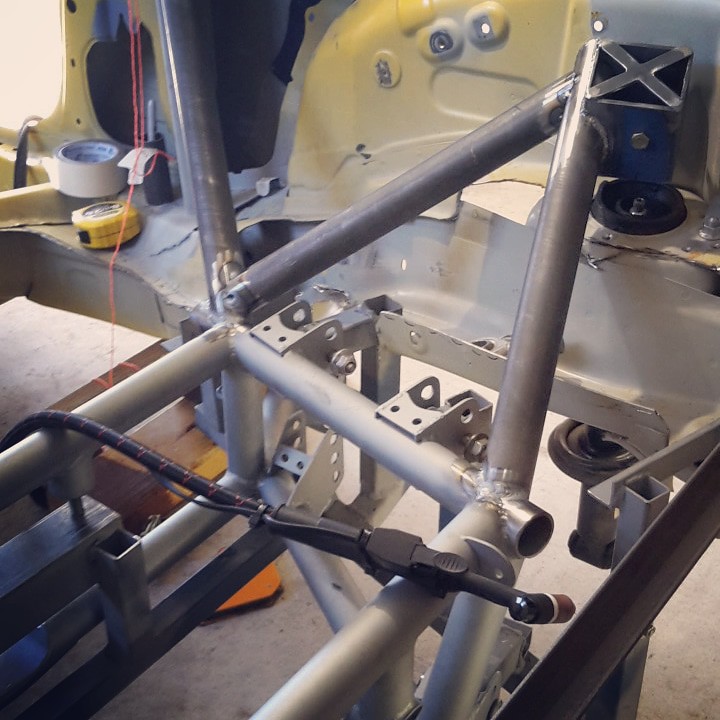 Things were going well until I had to make a very complicated notch for the next tube which is the large one that runs up to the main hoop of the roll cage. I had to do it by hand as the joint was too complex for my tube notcher. This one literally took me a few hours to get right.  I've welded all the tubes as much as possible before running out of time again. Some of them will need to be completed once the jig is gone and some more of the sheet metal is cut away. So this is where I am up to now. 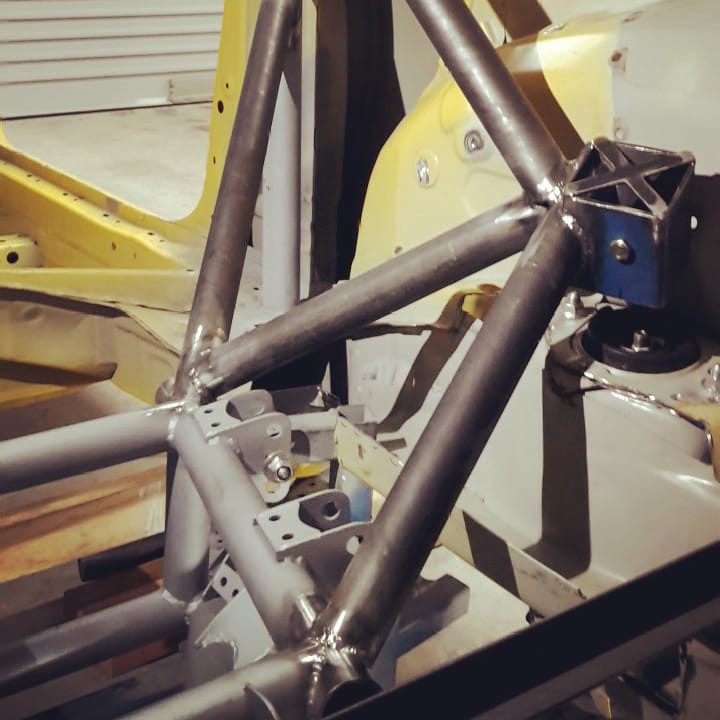 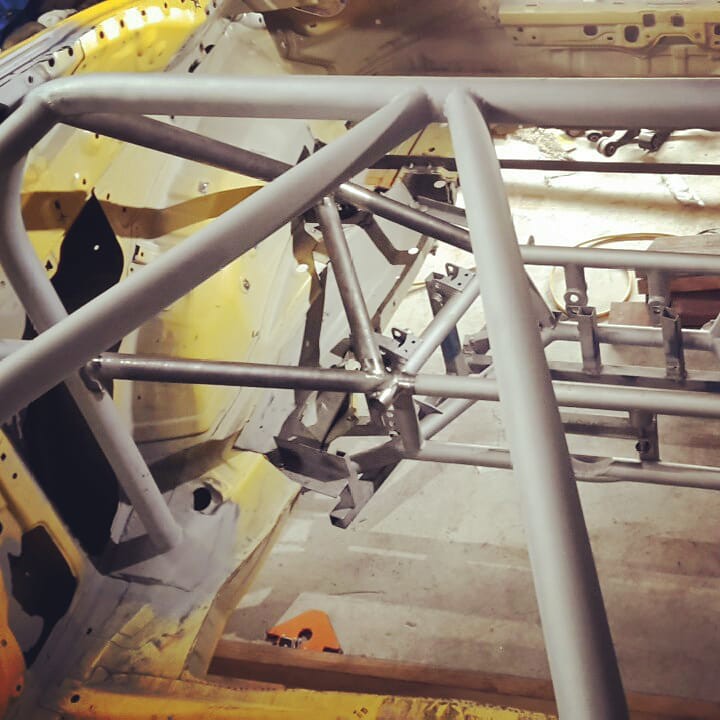 Once I have completed the other side to the same level I can remove the jig.
__________________
|
|
|
|
| The Following 7 Users Say Thank You to DIY For This Useful Post: | Ash_89 (03-02-2021), BigFatFlip (08-05-2018), Code Monkey (08-12-2018), Irace86.2.0 (09-15-2018), JeremyR (08-07-2018), laextreme5 (08-06-2018), Zer0 (08-05-2018) |
|
08-12-2018, 05:16 AM
|
#121 |
|
Senior Member
Join Date: Jul 2016
Drives: BRZ, WRX
Location: Sydney, Australia
Posts: 291
Thanks: 105
Thanked 962 Times in 233 Posts
Mentioned: 2 Post(s)
Tagged: 0 Thread(s)
|
I got about half a day to work on the car this weekend so I got started on the passenger side rear shock mount. Basically I was just replicating the driver's side but there are a lot of critical measurements to make sure they are symmetrical so progress was minimal.
Here are all the raw ingredients for the shock mount. Just needed to clean them up for welding. 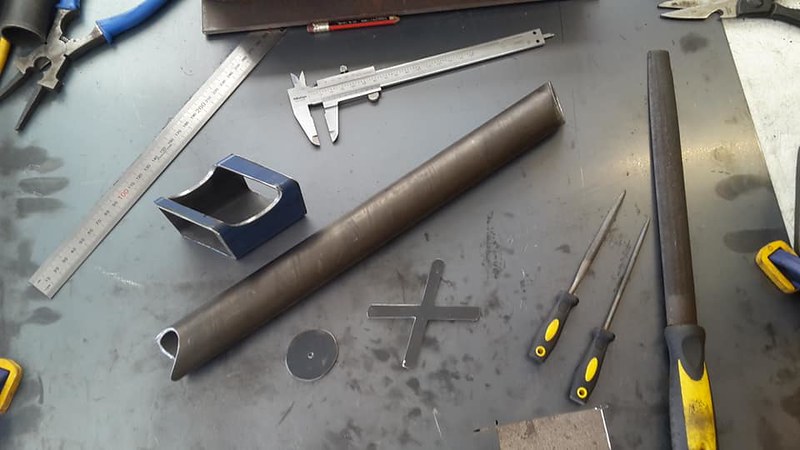 First I had to use an angle finder and tack weld the tube in at the same angle as the driver's side such that the shock mount is in the same position. Then tack the shock mount to the tube. Then I broke the tacks off and went and welded it all together on the bench. Love the colours you get sometimes during the welding. 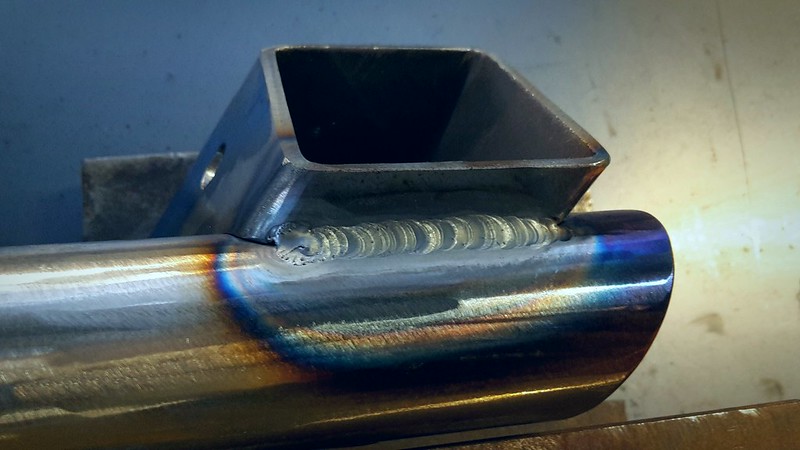 So that's all I got done, welding it on the bench took a long time as all the welds were very close together and I didn't want it to get too hot so I had to wait between welds. It's ready to be welded into the car now but next weekend I'm going snowboarding again. 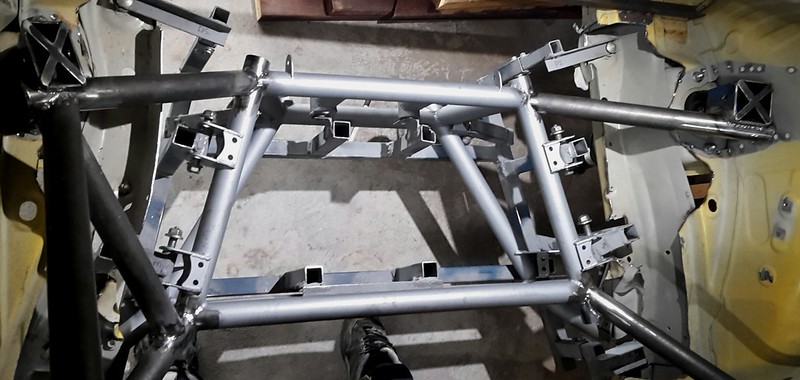
__________________
|
|
|
|
| The Following 8 Users Say Thank You to DIY For This Useful Post: | Ash_89 (03-02-2021), BigFatFlip (08-14-2018), Busybee (09-02-2018), Code Monkey (08-12-2018), Irace86.2.0 (09-15-2018), JeremyR (08-15-2018), mistople (10-15-2018), Zer0 (08-12-2018) |
|
08-14-2018, 02:07 PM
|
#122 |
|
Senior Member

Join Date: Jan 2014
Drives: FR-S 10 series
Location: Petroleum City
Posts: 369
Thanks: 431
Thanked 291 Times in 144 Posts
Mentioned: 4 Post(s)
Tagged: 0 Thread(s)
|
The craftsmanship behind this build is insane. I appreciate every bit of it! Great work so far, can't wait for the finished product.
__________________
IG: @Lucky_FatPat
10 series // TRD x Turbo Build: http://www.ft86club.com/forums/showthread.php?t=79474 |
|
|
|
| The Following User Says Thank You to mmmcambelsoup For This Useful Post: | DIY (08-14-2018) |
|
08-26-2018, 03:33 AM
|
#123 |
|
Senior Member
Join Date: Jul 2016
Drives: BRZ, WRX
Location: Sydney, Australia
Posts: 291
Thanks: 105
Thanked 962 Times in 233 Posts
Mentioned: 2 Post(s)
Tagged: 0 Thread(s)
|
I got the passenger side shock mount welded into position today, managed to get pretty much perfect symmetry between both sides too.
I've got a bit of a sore shoulder from a few snowboard crashes last weekend so progress was slow and painful. I left it with that super difficult notch at the bottom of the rear stay yet to do. Once that is done and welded I can remove the welding jig. 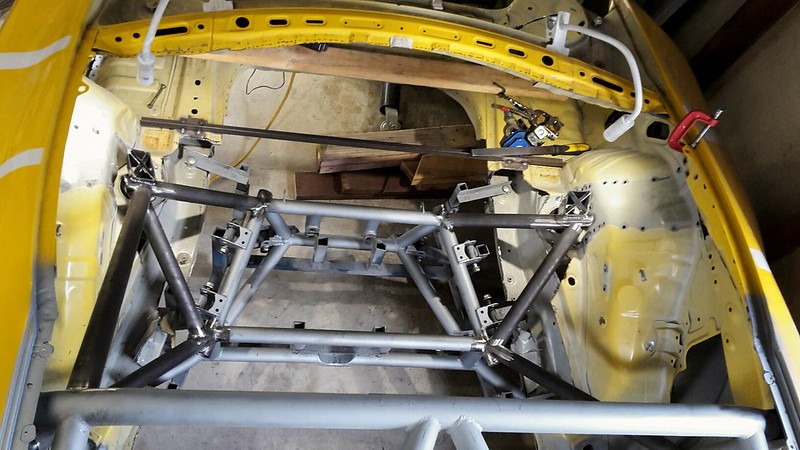
__________________
|
|
|
|
|
08-26-2018, 04:49 PM
|
#124 |
|
He's got this.

Join Date: Mar 2010
Drives: 50th Anni BRZ
Location: SoCal
Posts: 569
Thanks: 251
Thanked 247 Times in 129 Posts
Mentioned: 3 Post(s)
Tagged: 0 Thread(s)
|
Stunning work! looking forward to more!
__________________
Don't worry, I'm certified... promise.
|
|
|
|
| The Following User Says Thank You to R_E_L For This Useful Post: | DIY (08-26-2018) |
|
09-02-2018, 04:25 AM
|
#125 |
|
Senior Member
Join Date: Jul 2016
Drives: BRZ, WRX
Location: Sydney, Australia
Posts: 291
Thanks: 105
Thanked 962 Times in 233 Posts
Mentioned: 2 Post(s)
Tagged: 0 Thread(s)
|
Today I got the passenger side rear stay welded in place and removed the welding jig. I would have got more done but I crushed one of my fingers removing the jig, nothing too serious but I'll probably lose the fingernail.
The tricky part was the notch on this joint. 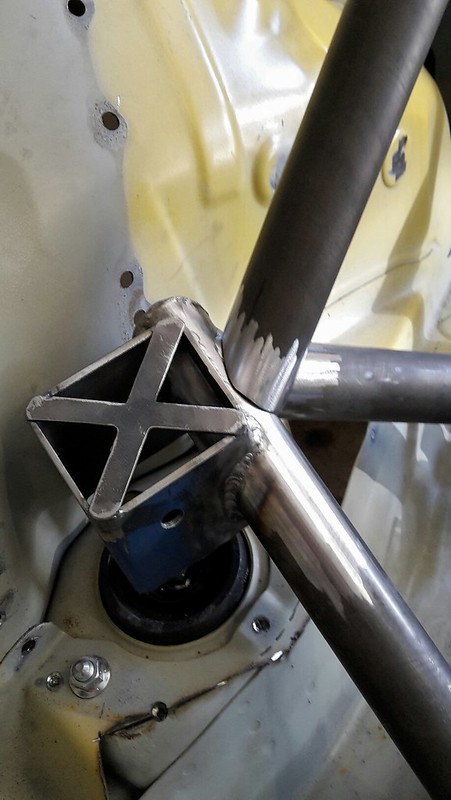 Here is a close up of it. My tube notcher is no use on joints like this so you have to do it by hand. I used some of my son's play-dough to get the rough shape and then just kept trimming small amounts off with a flap disc until it fit properly. 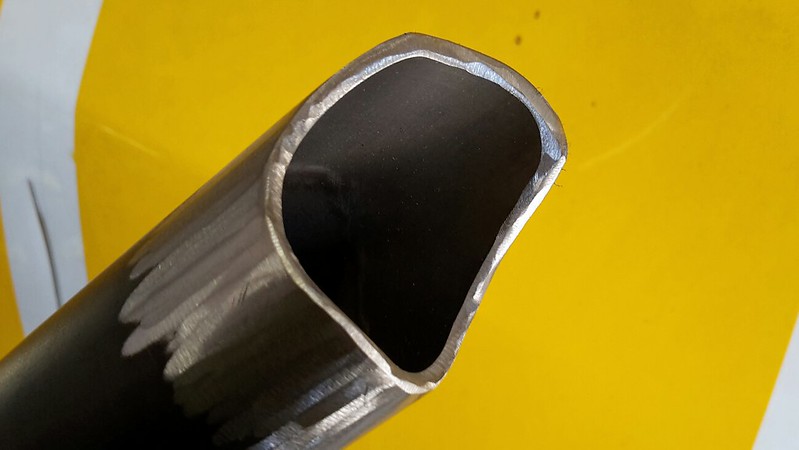 and here it is with the welding jig removed. 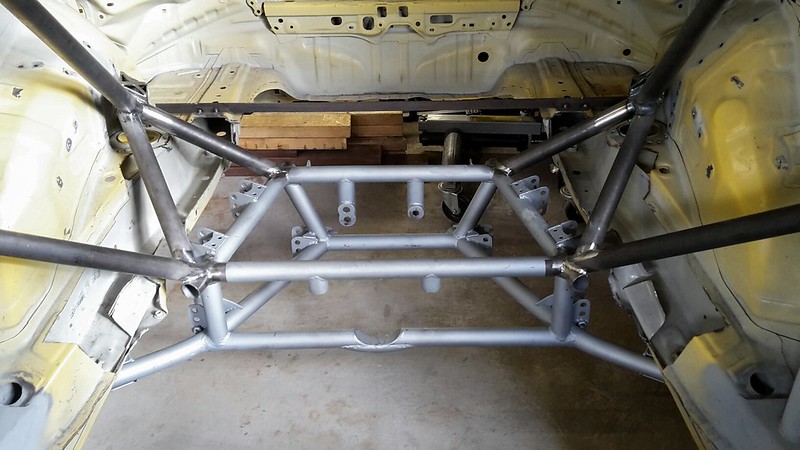
__________________
|
|
|
|
| The Following 4 Users Say Thank You to DIY For This Useful Post: |
|
09-15-2018, 06:19 AM
|
#126 |
|
Senior Member
Join Date: Jul 2016
Drives: BRZ, WRX
Location: Sydney, Australia
Posts: 291
Thanks: 105
Thanked 962 Times in 233 Posts
Mentioned: 2 Post(s)
Tagged: 0 Thread(s)
|
Some more progress today. Started by cutting the OEM frame rails and wheel tubs out as they are no longer required. This also allows me to complete a few welds on each side that I could not get access to.
   Next I will cut and box the OEM frame rails just behind the main hoop so I can join the lower parts of the cradle to the boxed frame rails. Under the rules I am not allowed to remove any metal forward of the rear wheel arches so that is why they are getting boxed in there.
__________________
|
|
|
|
| The Following 2 Users Say Thank You to DIY For This Useful Post: | Ash_89 (03-02-2021), Irace86.2.0 (09-15-2018) |
|
|
|
|
 |
| Thread Tools | Search this Thread |
|
|


