


|
||||||
| DIY (Do-It-Yourself) Guides For all DIYs. |
 |
|
|
Thread Tools | Search this Thread |
 10-21-2012, 02:28 AM
|
#1 |
|
Photo Specialist

Join Date: Feb 2012
Drives: 2013 Toyota 86 DGM 6MT
Location: Texas
Posts: 1,152
Thanks: 587
Thanked 1,802 Times in 420 Posts
Mentioned: 94 Post(s)
Tagged: 0 Thread(s)
|
DIY - Stainless Steel Lines - Speed Bleeders - Fluid Bleed/Flush
Back again. This time we are covering:
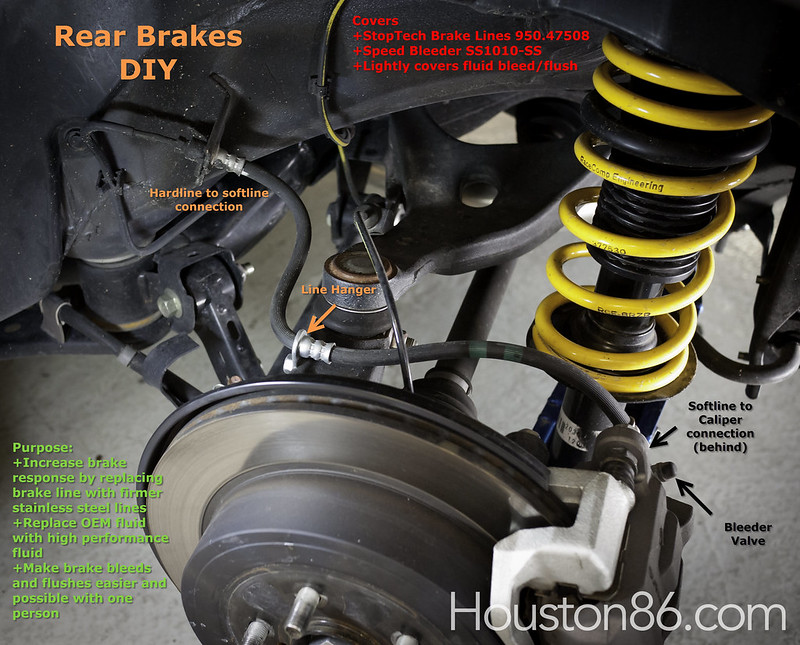
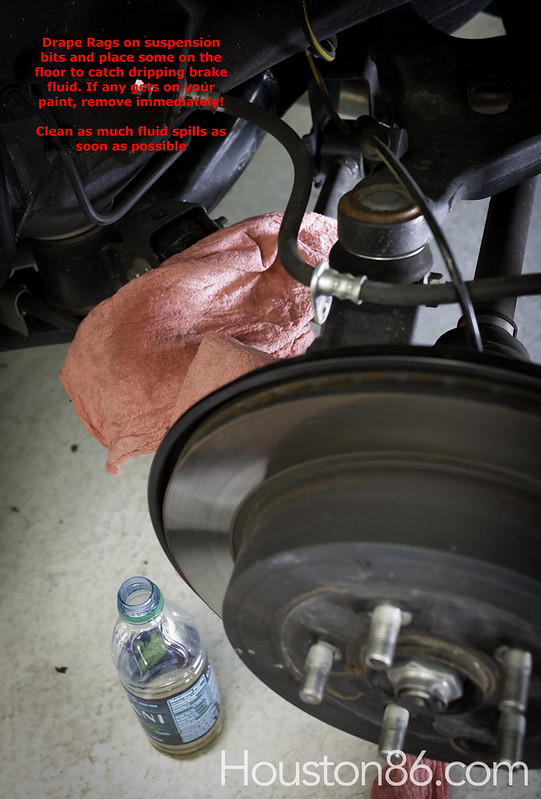
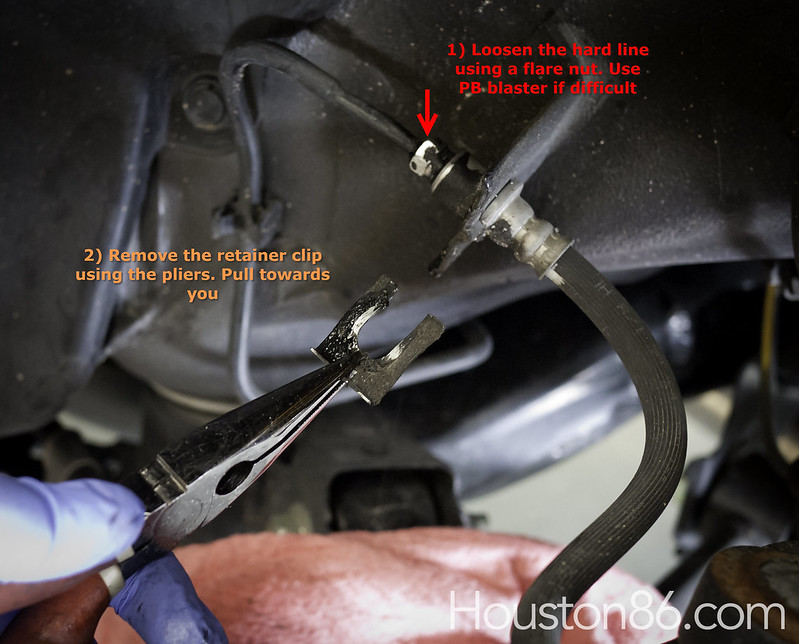
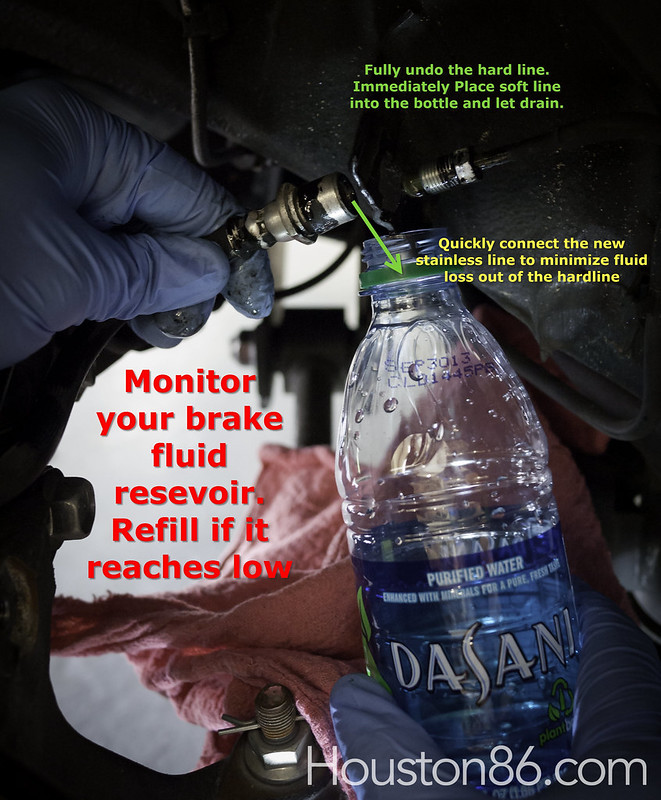
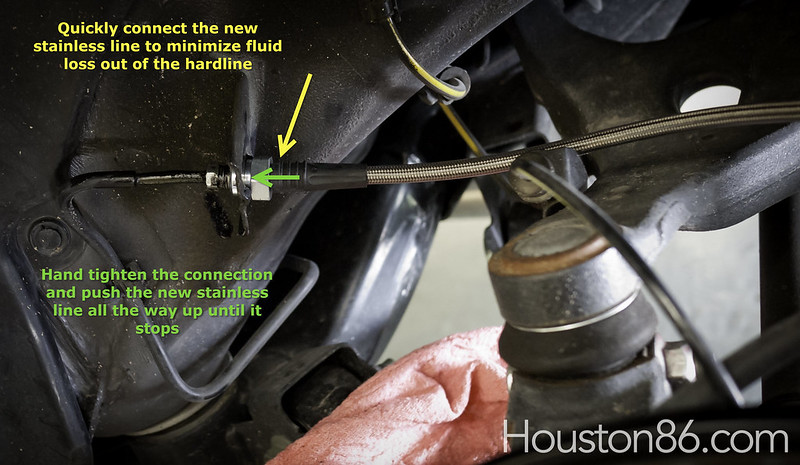
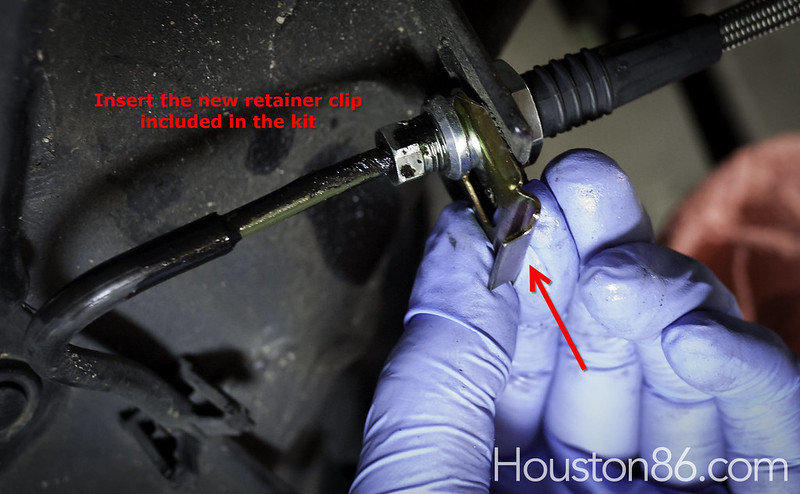
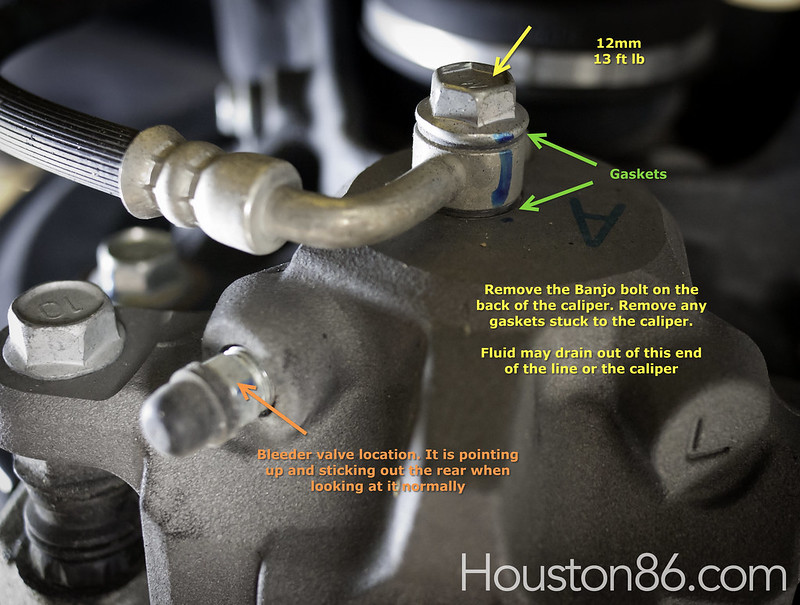
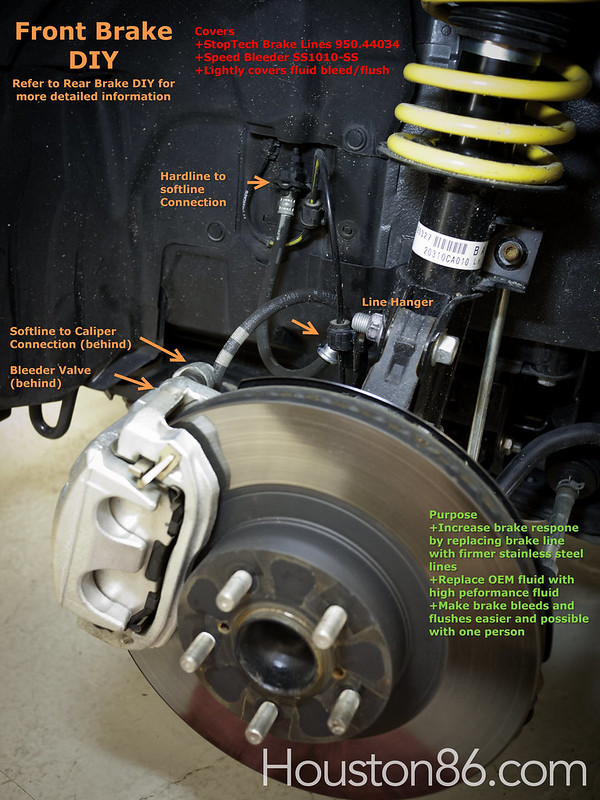
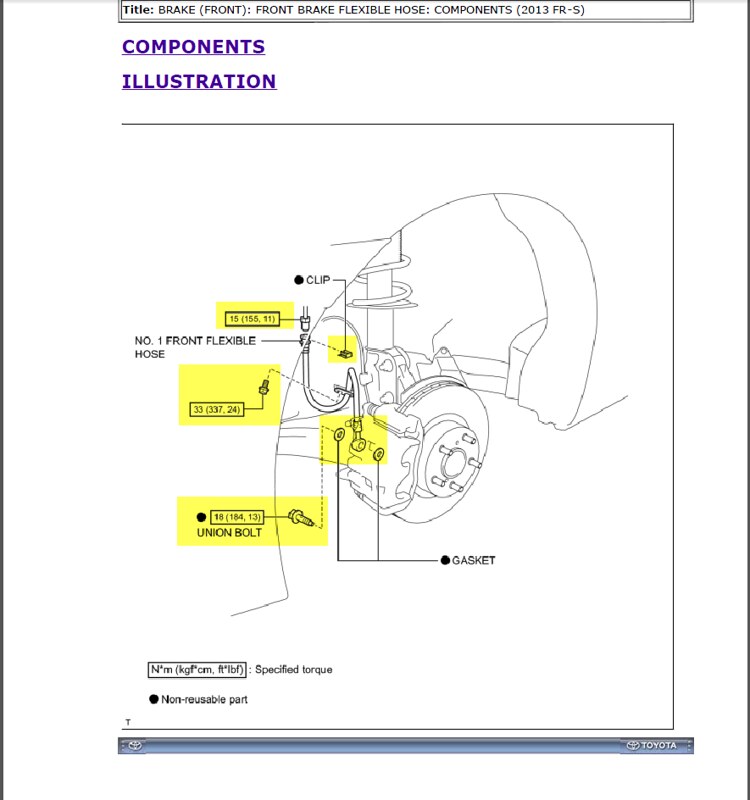
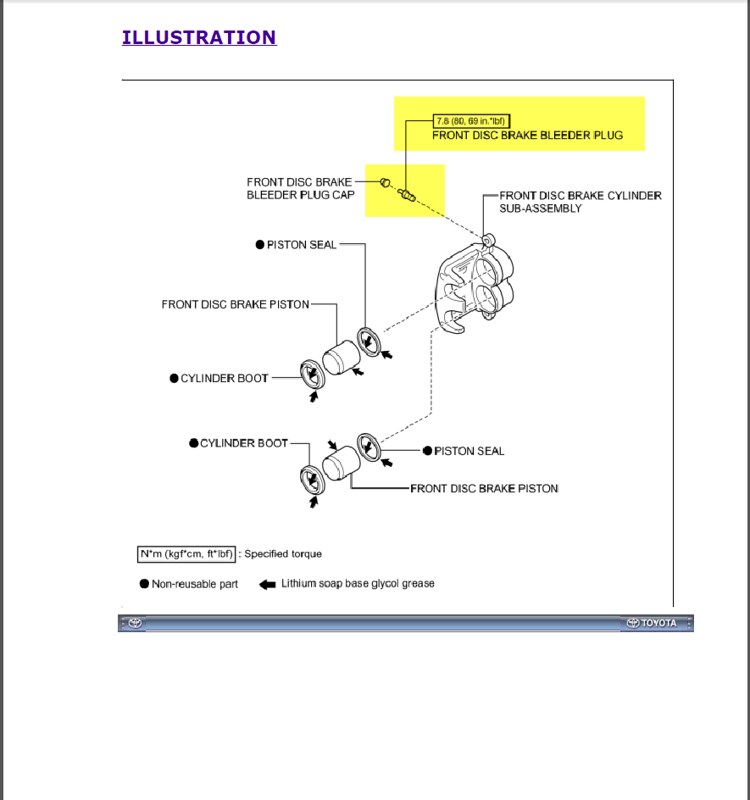
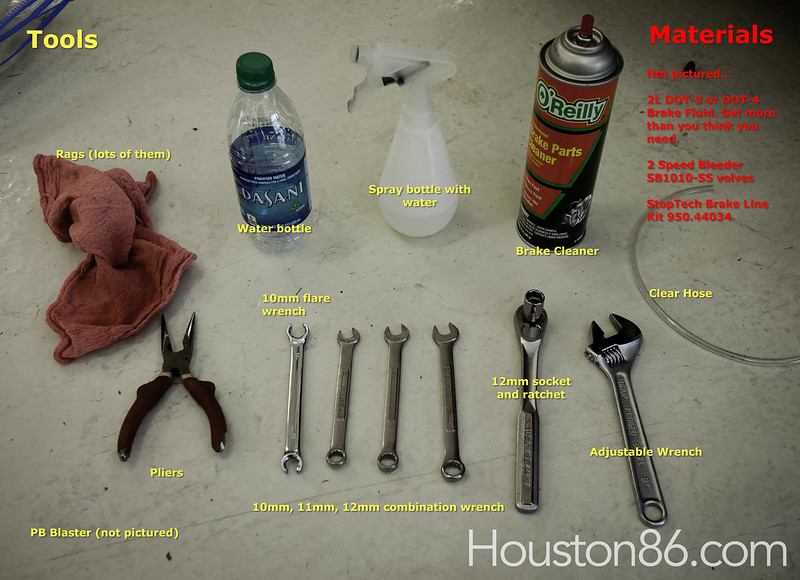
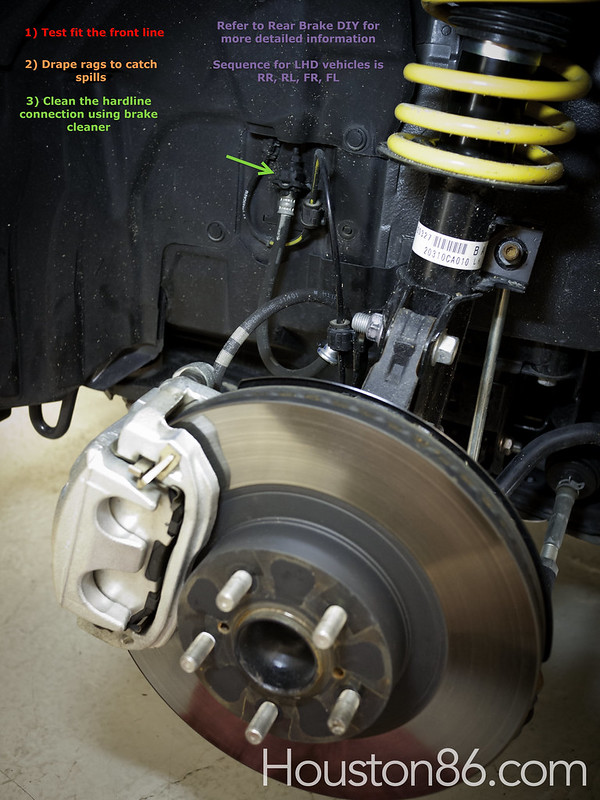
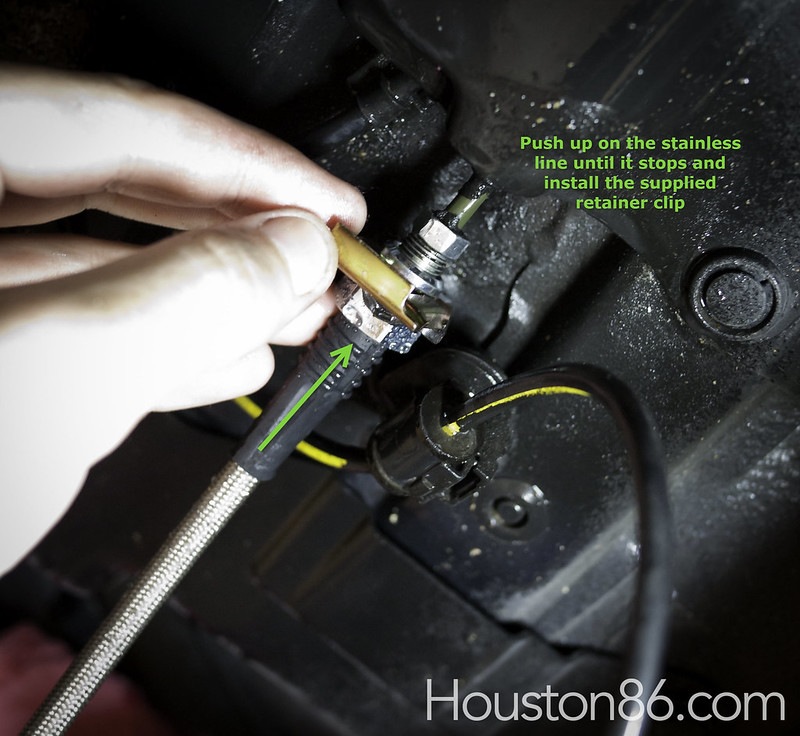
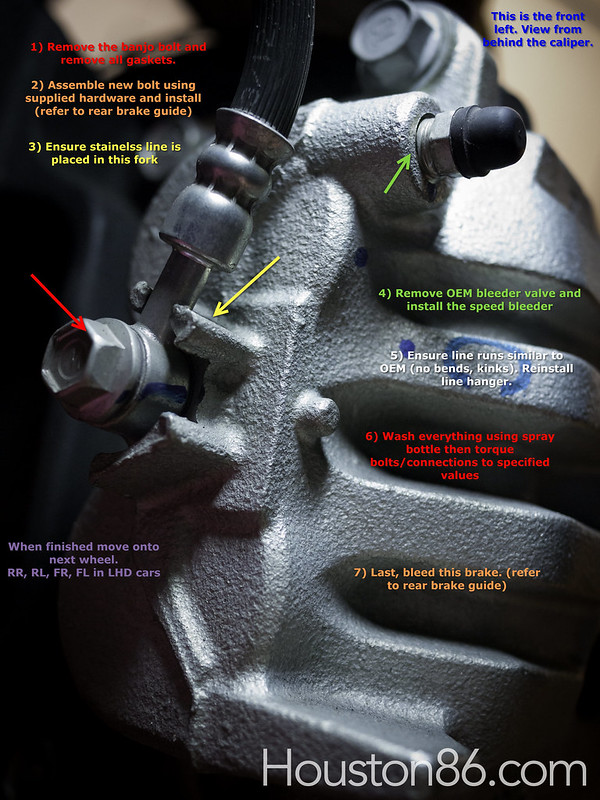
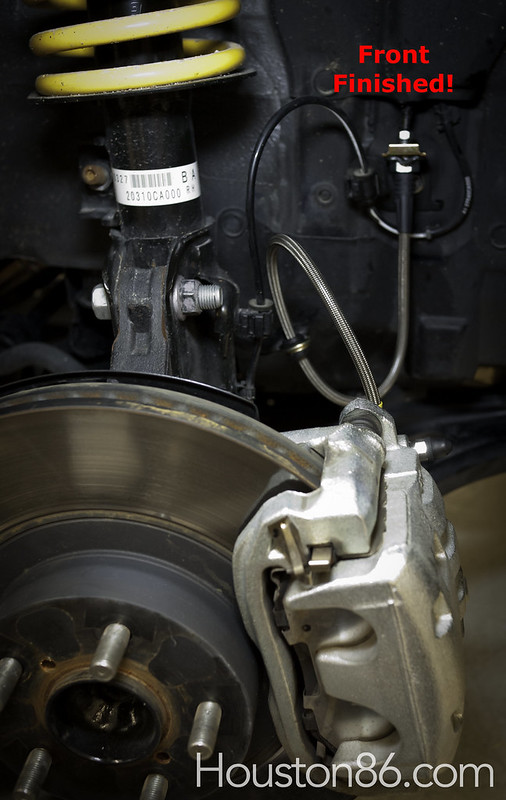
+Stoptech Stainless Steel Brake Line Kit (Thanks Jeremy/Yo @FT-86 SpeedFactory) +Motul RBF 600 (Thanks Adam @No Limit Motorsport) +Speed Bleeders Thanks @cobrabyte for helping me install this and being the hand model. Lol for shameless @Racecomp Engineering displays in all my photos I'll break it out into Rear, Front, then Flush Overall feedback +The StopTech lines do not give or flex during brake actuation. The OEM lines are very flexible (4000mi). This should improve brake response times, since you don't have to exert energy to overcome the flex. I do notice the brakes bite sooner. +The StopTech rear lines do not have the L bend at the caliper connection like the OEM lines. It still fits and works great but not 100% like OEM. +I have not driven the car hard enough to see the benefit of the high temp fluid. +I only used 1L of fluid to do the line change and flush. I had 3L on hand just in case. +Speed bleeder valves work like a champ. At first they seemed gimmicky, but they do what they say. @cobrabyte and I are now believers. Crack open the bleeder and just pump the brakes. Each pump pushes a spring loaded ball bearing out of the way to let fluid out. Then closes on the pedal return preventing air from coming in. You don't need two people anymore or special vacuums to bleed or flush brakes. I might bleed my brakes on each oil change. I hate air in my lines. +The last bit of flex in the braking system is in the master cylinder. Please hurry @GrimmSpeed. I want your brace +I strongly urge you to have more fluid than you need and have all the tools ready especially if you are doing this alone and this is your only vehicle If you are not using speed bleeders, ignore all the references to them. I only cover the traditional and speed bleeder methods of bleeding and flushing fluid. You'll need to raise the car. A lift makes this 100x easier, but if you use stands, please lift the entire car onto stands to keep it level. Refer to @GrimmSpeed DIY here http://www.ft86club.com/forums/showthread.php?t=10111 As always I am not responsible for damage done to your vehicle. Be safe
__________________
Last edited by F1point4; 10-21-2012 at 10:30 AM. Reason: more comments |

|

|
| The Following 35 Users Say Thank You to F1point4 For This Useful Post: | @Art_Mighty (10-25-2012), amram (04-09-2014), Anthony (06-08-2016), Anthonytpt (04-18-2013), BAOVAN (12-27-2016), Briankbot (04-17-2016), CxG (05-26-2016), DrewIsAmus (03-21-2014), eikond (10-22-2012), einzlr (10-21-2012), Flow (01-18-2015), FT-86 SpeedFactory (10-21-2012), ft86Fan (10-23-2012), gkubed (04-20-2017), IShouldStudy (10-21-2012), Khyron686 (10-29-2014), kodyo (12-17-2014), lamawithonel (07-02-2015), low trq (10-21-2012), mav1178 (12-04-2013), MaXimus (10-22-2012), Mchilese (04-30-2017), MJones_RB (10-13-2018), No Limit Motorsport (10-24-2012), normancw (10-22-2012), RazBRZ (04-12-2014), sharris721 (01-12-2015), Sideways? (07-12-2013), Surok (10-21-2012), TemeCal (10-21-2012), TheLaughingMan (06-23-2014), THEmailman (04-22-2013), Tor (03-22-2016), ybotspawn (02-07-2015), zoth (09-09-2015) |
| The Following 36 Users Say Thank You to F1point4 For This Useful Post: | 10Tim (10-16-2013), amram (02-14-2014), B T (03-07-2016), BAOVAN (12-27-2016), Black Tire (06-28-2014), Briankbot (04-17-2016), BRZranger (02-19-2013), Burn (10-23-2012), cbryant514 (06-12-2017), civicdrivr (10-23-2012), CxG (05-26-2016), dooms101 (10-07-2016), DrewIsAmus (03-21-2014), eikond (10-22-2012), Flow (01-18-2015), Hawaiian (07-20-2013), IShouldStudy (10-21-2012), juliog (03-08-2013), lamawithonel (07-02-2015), Lorico (10-01-2015), low trq (10-21-2012), MaXimus (10-22-2012), Mchilese (04-30-2017), Mike86 (01-05-2014), mike_ekim1024 (01-02-2014), MJones_RB (07-26-2018), NJ10 (07-27-2014), Ornelas66 (10-15-2014), RL_BRZ (10-15-2013), Sideways? (07-12-2013), slim blanco (08-25-2014), TemeCal (10-21-2012), TheLaughingMan (06-23-2014), Tor (03-22-2016), WRB-DZA-BRZ (10-01-2014), zoomzoomers (05-08-2013) |
| The Following 39 Users Say Thank You to F1point4 For This Useful Post: | 10Tim (10-16-2013), 8R6 (04-26-2016), Anthonytpt (04-18-2013), ATL BRZ (12-11-2012), BAOVAN (12-27-2016), Briankbot (04-17-2016), BRZranger (02-19-2013), Burn (10-23-2012), cab33 (07-04-2015), cbryant514 (06-12-2017), civicdrivr (10-23-2012), cobrabyte (10-21-2012), CxG (05-26-2016), dooms101 (10-07-2016), DrewIsAmus (03-21-2014), eikond (10-22-2012), IShouldStudy (10-21-2012), jimmillion (02-21-2015), johnb831 (09-17-2013), JSUB (02-21-2013), Khyron686 (06-26-2014), lamawithonel (07-02-2015), Lorico (10-01-2015), low trq (10-21-2012), MaXimus (10-22-2012), mike_ekim1024 (01-02-2014), NJ10 (07-27-2014), sharris721 (01-12-2015), ShaunWRX (06-08-2015), ShoShin (03-11-2015), Sideways? (07-12-2013), slim blanco (08-25-2014), soros151 (10-28-2012), stevo_12v (10-24-2012), stockysnail (08-03-2014), TheLaughingMan (06-23-2014), Tor (03-22-2016), wu_dot_com (02-20-2013), zoomzoomers (05-08-2013) |
|
10-21-2012, 02:30 AM
|
#4 |
|
Photo Specialist
Join Date: Feb 2012
Drives: 2013 Toyota 86 DGM 6MT
Location: Texas
Posts: 1,152
Thanks: 587
Thanked 1,802 Times in 420 Posts
Mentioned: 94 Post(s)
Tagged: 0 Thread(s)
|
Brake Flush
Brake Flush
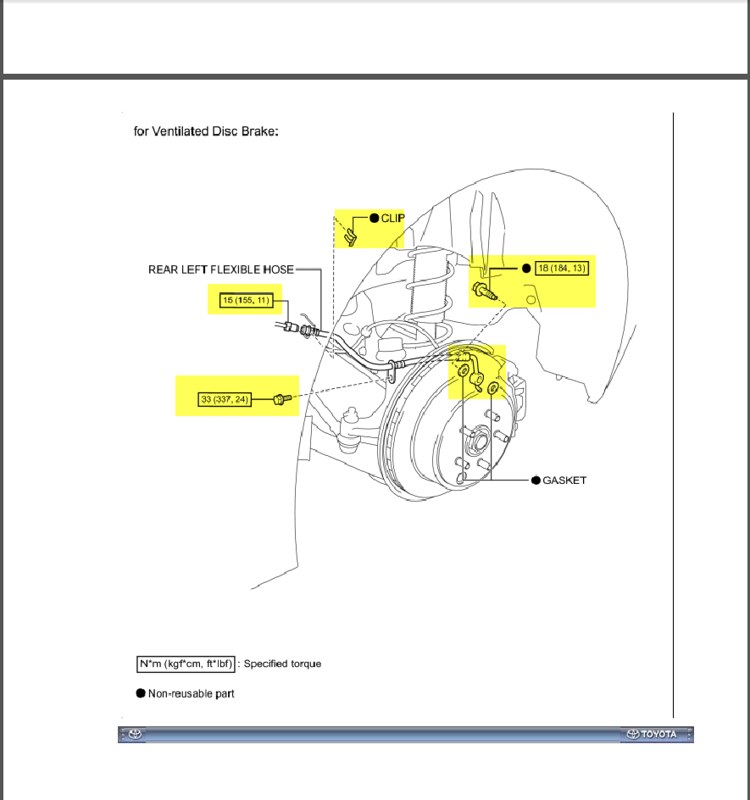
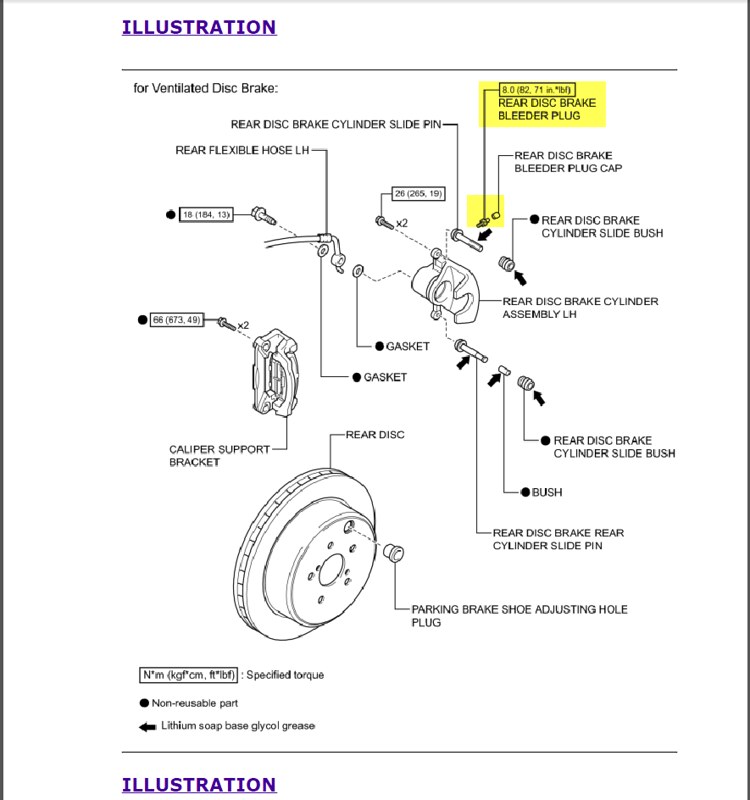
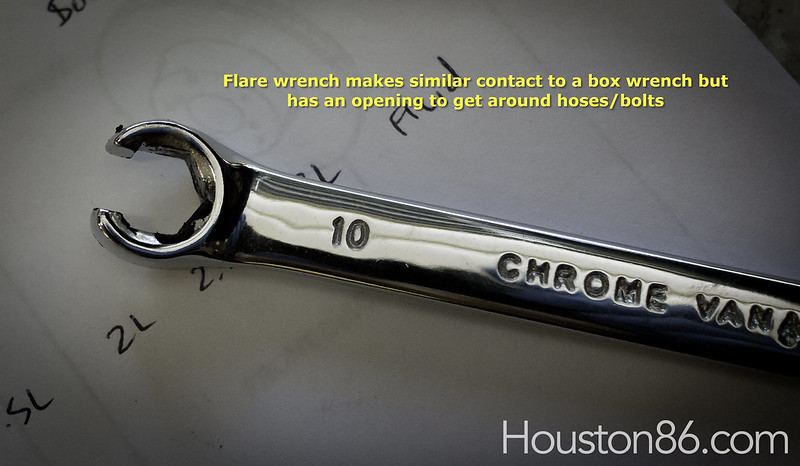
There are many ways to do the flush. There are probably a thousand guides and videos to do this. If you need more clarification, please search. I am not responsible for any damage done to you or you vehicle. Please remember to keep brake fluid off your paint. It is my preference to do things without having to buy tools I'll use once or twice so I will describe how to flush your fluid... + The traditional method (2 player coop) + Speed Bleeder method (single player) Keep in mind a flush is like doing a bleed x100 (described above). The bleed is just to get air out of the lines, so you'll end up replacing a little bit of fluid. The point of the flush is to replace all of the fluids. Tools + 10mm box wrench (for OEM) -or- 11mm box wrench (for speed bleeder) + clear hose + water bottle for catch bottle + rags + gloves + jacks + stands + Brake Fluid. I think 1L is enough, but have more than you think you need. I had 3L just in case. Setup 1) You'll need to raise the car. A lift makes this 100x easier, but if you use stands, please lift the entire car onto stands to keep it level. Refer to @GrimmSpeed DIY here http://www.ft86club.com/forums/showthread.php?t=10111 2) The order you need to flush the fluid out of the system is dictated by distance from the wheel to the master cylinder. Go from furthest to closest. In a left hand drive vehicle this will be rear right, rear left, front right, front left. In a right hand drive vehicle this will be rear left, rear right, front left, front right. I am in the US, so I'll start with the rear right. 3) Open the hood and open the brake reservoir cap. place the cap back on but don't twist it shut. 4) Find the bleeder valve. Remove the dust cover. Place the box wrench on the bleeder valve. Attach the hose to the bleeder, then insert the other end of the hose into your catch bottle. For the rear, the setup looks like this. 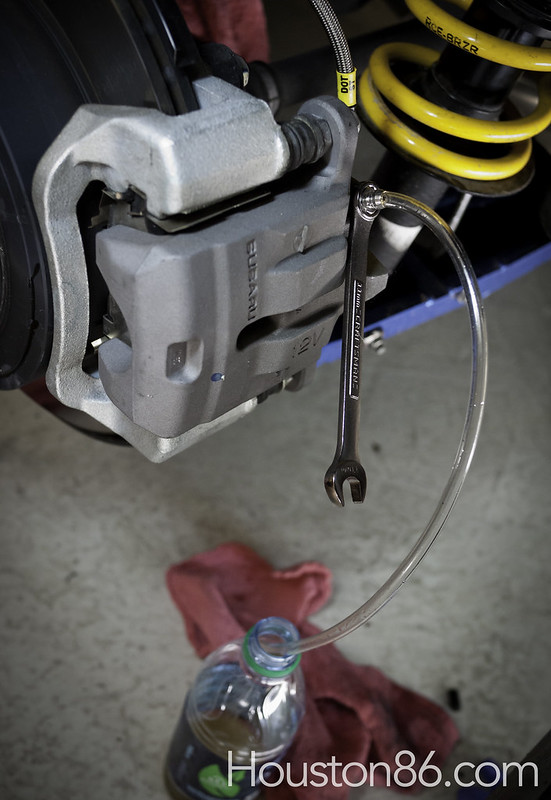 20121019-Flush_StopTech_Motul_SpeedBleeder-19 by VictorN07, on Flickr Didn't get a picture of the front, but this will show you where the bleeder valve is (black nub). It will be on top of the caliper facing the front. 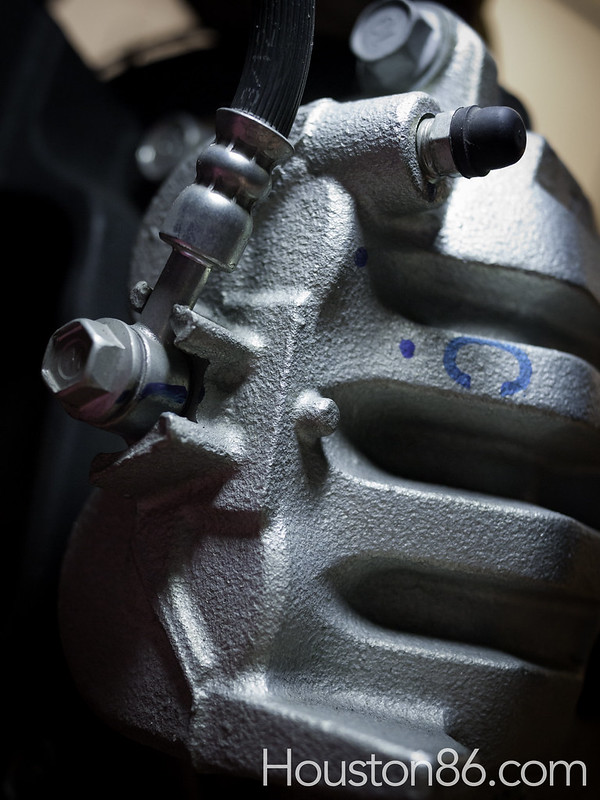 20121019-Flush_StopTech_Motul_SpeedBleeder-09 by VictorN07, on Flickr Speed Bleeder Method (Single Player) 1) Loosen/Open the valve by 1/4 or 1/2 turn. 2) Hop in the car. Pump the brakes slowly. Like the traditional method, you will feel the fluid being pushed out of the system. Press down like halfway and let all the way up. Just keep pumping. Do not bottom out the pedal (push it all the way down). That may cause a rupture in your brake master cylinder. 3) Every ten or so pumps, get out of the car, and check the reservoir fluid level. If its gets to the low marking, just refill with new fluid. Do not let fluid completely drain out of the reservoir, if this happens you have to start over. 4) Also check the fluid in the hose. When you can clearly see a change in color, this tells you new fluid has reached the caliper. On a new car this may be hard to detect. 5) When new fluid has been pushed out to the wheel, close the valve and remove the hose. Move on to the next wheel. Repeat until finished. Speed bleeders have a spring loaded ball bearing that opens and closes when you press and release the brake respectively. This prevents air from reentering the caliper when you let go of the brake pedal. Traditional Method (Two Player) 1) Player 1 will Loosen/Open the valve by 1/4 or 1/2 turn. Tell player 2 to pump. 2) Player 2 will be in the car actuating the brakes. Pump the brakes three times, on the third time hold. Tell Player 1 to close. Like the method above, do not bottom out the brake pedal or you'll have a bad day. 3) Player 1 will close the valve while Player 2 holds. After it is closed, tell Player 2 to let go. 4) Now repeat this procedure until clean fluid can be seen in the hose. This may be hard to see in a new car. Please monitor your fluid levels in the reservoir. Move on to the next wheel. The only thing keeping you from doing the traditional method by yourself is that pedal hold. If you don't close the valve during the hold, then you'll just let air into the system when you go to check your fluid levels and when you finish.
__________________
Last edited by F1point4; 10-21-2012 at 03:15 AM. |
|
|
|
| The Following 71 Users Say Thank You to F1point4 For This Useful Post: | 10Tim (10-16-2013), 20valvewynn83 (10-22-2012), amram (03-21-2014), Anthonytpt (04-18-2013), Asphalt (10-21-2012), ATL BRZ (12-11-2012), BAOVAN (12-27-2016), BigFatFlip (10-26-2012), Binary_fission (09-30-2015), Black Tire (06-28-2014), Briankbot (04-17-2016), BRZranger (02-19-2013), CA2 (01-21-2013), ChrisD (11-01-2015), civicdrivr (10-23-2012), cobrabyte (10-21-2012), CxG (05-26-2016), dem00n (10-21-2012), dodj (03-07-2021), dooms101 (10-07-2016), DrewIsAmus (02-13-2014), dsc_pat (02-14-2022), eikond (10-22-2012), FreshFRS (01-21-2013), FrX (10-22-2012), gmookher (10-21-2012), gonzo (03-25-2013), Got3n (10-30-2012), Guff (03-06-2014), Hawaiian (07-20-2013), Hawk77FT (09-16-2015), IShouldStudy (10-21-2012), Jayde (10-21-2012), johnb831 (09-17-2013), Karnzklutch (05-20-2017), Keenercarguy (02-08-2016), kwood9000 (10-21-2012), lamawithonel (07-02-2015), LetsGo (05-23-2013), Lorico (10-01-2015), low trq (10-21-2012), MaXimus (10-22-2012), mfbmike (02-25-2014), mike_ekim1024 (01-02-2014), MJones_RB (07-26-2018), MTCRX (04-20-2013), normancw (10-26-2012), nubbster927 (07-30-2013), PMok (11-29-2012), RehabJeff86 (07-22-2013), roddy (10-21-2012), sav (10-24-2013), sharris721 (01-12-2015), ShaunWRX (06-08-2015), Sideways? (07-12-2013), SirBrass (04-29-2014), slim blanco (08-25-2014), soros151 (10-28-2012), Spartan65 (10-21-2012), stevo_12v (10-24-2012), stockysnail (08-03-2014), TemeCal (10-21-2012), TheLaughingMan (06-23-2014), TheSt|G (10-28-2012), Tor (03-22-2016), Trap63 (05-12-2013), Viper8 (03-17-2019), waterbison777 (01-20-2014), whitefrs (03-12-2014), WhiteFRS69 (07-28-2015), zoomzoomers (10-26-2012) |
|
10-21-2012, 10:08 AM
|
#5 |
|
Senior Member

Join Date: Jul 2012
Drives: 2013 DGM BRZ
Location: Long Island, NY
Posts: 2,266
Thanks: 355
Thanked 406 Times in 228 Posts
Mentioned: 27 Post(s)
Tagged: 0 Thread(s)
 |
Wow great right up!
|
|
|
|
| The Following User Says Thank You to No Limit Motorsport For This Useful Post: | F1point4 (10-21-2012) |
|
10-21-2012, 10:59 AM
|
#6 |
|
When In Doubt...

Join Date: May 2011
Drives: Slowww
Location: PA215
Posts: 1,844
Thanks: 1,023
Thanked 752 Times in 412 Posts
Mentioned: 20 Post(s)
Tagged: 0 Thread(s)
|
Not to discourage others but this has to be the greatest, most complete write up I've ever seen. The community thanks you.
__________________
Join the Galaxy Blue Silica BRZ registry below: https://docs.google.com/spreadsheet/...2c&usp=sharing |
|
|
|
| The Following 5 Users Say Thank You to Laika For This Useful Post: | amram (03-21-2014), brillo (11-03-2013), F1point4 (10-21-2012), JazzleSAURUS (03-20-2017), Trap63 (08-24-2014) |
|
10-21-2012, 11:10 AM
|
#7 |
|
Senior Member

Join Date: May 2012
Drives: Silver AT Limited
Location: Seattle
Posts: 823
Thanks: 145
Thanked 344 Times in 159 Posts
Mentioned: 17 Post(s)
Tagged: 0 Thread(s)
|
the pictures really help thanks for the great write up
|
|
|
|
|
10-21-2012, 11:52 AM
|
#8 |
|
Senior Member

Join Date: Apr 2012
Drives: '13 Ultramarine
Location: Ontario Canada
Posts: 2,243
Thanks: 1,476
Thanked 1,165 Times in 685 Posts
Mentioned: 15 Post(s)
Tagged: 0 Thread(s)
|
Nice write-up. Definitely in my car's future.
__________________
no man with a good car needs to be justified...
|
|
|
|
|
10-21-2012, 12:15 PM
|
#9 |
|
Join Date: Nov 2011
Drives: 2016 BRZ, 2012 Paris Di2 & 2018 STI
Location: Severn, MD
Posts: 5,407
Thanks: 3,420
Thanked 7,241 Times in 2,962 Posts
Mentioned: 303 Post(s)
Tagged: 9 Thread(s)
|
Very very well done! And nice springs.
 - Andrew |
|
|
|
|
10-21-2012, 02:28 PM
|
#10 |
|
Senior Member
Join Date: Sep 2012
Drives: several
Location: norcal
Posts: 903
Thanks: 421
Thanked 286 Times in 223 Posts
Mentioned: 5 Post(s)
Tagged: 0 Thread(s)
|
This is one of the best write ups with the clearest pictures I have ever seen. It took a lot of work to do that for us. Thank you!!!

|
|
|
|
|
10-21-2012, 02:54 PM
|
#11 |
|
Senior Member

Join Date: Jun 2012
Drives: 2013 BRZ, 2002 WRX
Location: Houston, TX
Posts: 710
Thanks: 978
Thanked 245 Times in 158 Posts
Mentioned: 33 Post(s)
Tagged: 0 Thread(s)
|
Even though these pics slow the process down a little, they're a huge help to the community. I wish more DIYers took the time to snap some pics. Oh, and those speed-bleeders are BOSS. They sounded gimmicky but they are totally as-advertised.
__________________
|
|
|
|
|
10-21-2012, 07:51 PM
|
#12 |
|
Wise old man

Join Date: Jun 2012
Drives: 86 GTS
Location: Sydney
Posts: 1,003
Thanks: 999
Thanked 240 Times in 161 Posts
Mentioned: 7 Post(s)
Tagged: 0 Thread(s)
|
Fantastic thread.
A great addition to the DIY KB |
|
|
|
|
10-21-2012, 11:56 PM
|
#13 |
Join Date: Jul 2012
Drives: 2013 BRZ, 2020 KTM Super Duke 1290R
Location: Denver
Posts: 1,788
Thanks: 714
Thanked 1,141 Times in 624 Posts
Mentioned: 49 Post(s)
Tagged: 1 Thread(s)
|
Bang on! Awesome write up! Will definitely be using it this winter.
|
|
|
|
|
10-24-2012, 05:46 AM
|
#14 |
|
Senior Member

Join Date: Feb 2012
Drives: Mazda MX-6 Turbo, Toyota GTS86 37J
Location: Perth, Western Australia
Posts: 1,262
Thanks: 487
Thanked 743 Times in 413 Posts
Mentioned: 20 Post(s)
Tagged: 0 Thread(s)
|
Damn!! Another good DIY write up by @F1point4!!! Your photos and instructions are clear and concise!!
This came just in time too! Gotta change my fluids over to Motul 5.1 next week.
__________________
[CENTER]
Build thread Last edited by stevo_12v; 10-24-2012 at 05:47 AM. Reason: typo |
|
|
|
| The Following User Says Thank You to stevo_12v For This Useful Post: | F1point4 (10-24-2012) |
|
|
|
|
|
| Tags |
| brakes, fluid, motul, speed bleeders, stoptech |
|
|
 Similar Threads
|
||||
| Thread | Thread Starter | Forum | Replies | Last Post |
| BC Racing Coilovers with Free Stainless Steel Brake Lines!!! | Dustin@Dynosty | Brakes, Suspension, Chassis | 21 | 01-08-2013 10:34 AM |
| Dynosty Stainless Steel Brake Lines $99 Shipped | Dustin@Dynosty | Brakes, Suspension, Chassis | 9 | 12-29-2012 09:56 AM |
| Stoptech stainless brake lines + Motul RBF600 fluid combo | No Limit Motorsport | Brakes, Suspension, Chassis | 9 | 10-31-2012 07:36 PM |
| Stoptech Front Stainless Steel Brake Lines | Pekingduck | Brakes, Suspension, Chassis | 1 | 10-21-2012 10:29 PM |
| Stainless steel brake lines | taosracer | Suspension | Chassis | Brakes -- Sponsored by 949 Racing | 15 | 09-20-2012 04:09 AM |


 Toyota 86 GTS