


 05-13-2015, 05:14 AM
|
#15 | |
|
Senior Member
Join Date: Jan 2015
Drives: White GT86
Location: UK
Posts: 153
Thanks: 48
Thanked 108 Times in 58 Posts
Mentioned: 0 Post(s)
Tagged: 0 Thread(s)
|
Quote:
__________________
 https://www.youtube.com/tweedbean - How To Videos https://www.instagram.com/tweedbean - Latest updates |
|

|

|
|
05-13-2015, 10:09 AM
|
#16 |
|
Banned
Join Date: May 2012
Drives: Manual Transmission, All the Way!
Location: Global
Posts: 336
Thanks: 23
Thanked 147 Times in 139 Posts
Mentioned: 4 Post(s)
Tagged: 0 Thread(s)
|
Love the choice of mods on your build!
- Renato |
|
|
|
| The Following User Says Thank You to TWMPerformance For This Useful Post: | tweedbean (05-13-2015) |
|
05-13-2015, 04:37 PM
|
#17 |
|
Senior Member
Join Date: Jan 2015
Drives: White GT86
Location: UK
Posts: 153
Thanks: 48
Thanked 108 Times in 58 Posts
Mentioned: 0 Post(s)
Tagged: 0 Thread(s)
|
Chrome Bulbs
So I had 5 mins literally spare so decided to swap my indicator bulbs to chrome ones. Front and rears are T20: http://www.ebay.co.uk/itm/1307479309...%3AMEBIDX%3AIT Before:  Stock bulb by James Baker, on Flickr Stock bulb by James Baker, on FlickrAfter:  Chrome bulbs after by James Baker, on Flickr Chrome bulbs after by James Baker, on FlickrBefore:  Stock bulb by James Baker, on Flickr Stock bulb by James Baker, on FlickrAfter:  Chrome bulbs after by James Baker, on Flickr Chrome bulbs after by James Baker, on FlickrI didnt have chance to do the side markers yet but these are t10's: http://www.ebay.co.uk/itm/3015900274...%3AMEBIDX%3AIT Wheels The wheels are all ready to go for tyres now, then fitting. On one I had 4 bolts with round threads, a hammer and torx bit later and they were out and replaced with new bolts  Friday is booked off from work so I can get these and coilovers on, very excited. Friday is booked off from work so I can get these and coilovers on, very excited.Debadge I finished the debadge on the rear to clear it up a little. I will get that toyota badge off when I have other bits going in for paints as there are holes behind it. Much tidier:  Debadge completed by James Baker, on Flickr Debadge completed by James Baker, on Flickr
__________________
https://www.youtube.com/tweedbean - How To Videos https://www.instagram.com/tweedbean - Latest updates |
|
|
|
|
05-13-2015, 06:03 PM
|
#18 |
|
Senior Member

Join Date: Feb 2014
Drives: 2013 FRS
Location: Bay Area
Posts: 471
Thanks: 262
Thanked 170 Times in 121 Posts
Mentioned: 5 Post(s)
Tagged: 0 Thread(s)
|
Digging the chrome bulbs. Nice build so far!
|
|
|
|
| The Following User Says Thank You to Cop For This Useful Post: | tweedbean (05-13-2015) |
|
05-18-2015, 01:09 PM
|
#19 |
|
Senior Member
Join Date: Jan 2015
Drives: White GT86
Location: UK
Posts: 153
Thanks: 48
Thanked 108 Times in 58 Posts
Mentioned: 0 Post(s)
Tagged: 0 Thread(s)
|
So the wheels are on, I decided to go for a light minty green colour as something different that I think works well with the white pearl. I added contrast with red centres and a chrome lip and centre. It needs to go a little lower but I ran out of time to adjust it further, will pick that up another day:
 Wheels in progress by James Baker, on Flickr Wheels in progress by James Baker, on Flickr BBS RS2 by James Baker, on Flickr BBS RS2 by James Baker, on FlickrAnd the coilovers:  Coilovers on by James Baker, on Flickr Coilovers on by James Baker, on FlickrAnd the beatrush master cylinder brace:  Beatrush Master Cylinder brace fitted by James Baker, on Flickr Beatrush Master Cylinder brace fitted by James Baker, on FlickrFinally the wheels on the car:  New Wheels by James Baker, on Flickr New Wheels by James Baker, on Flickr New Wheels by James Baker, on Flickr New Wheels by James Baker, on FlickrI also attend my first show in the GT86, Japfest at Castle Coombe:  Japfest 2015 by James Baker, on Flickr Japfest 2015 by James Baker, on Flickr
__________________
https://www.youtube.com/tweedbean - How To Videos https://www.instagram.com/tweedbean - Latest updates |
|
|
|
|
05-18-2015, 01:31 PM
|
#20 |

Join Date: Jan 2012
Drives: GT-R, S2000, Evo VIII-X, BRZ, FRS+
Location: Los Angeles, CA
Posts: 1,226
Thanks: 529
Thanked 508 Times in 285 Posts
Mentioned: 17 Post(s)
Tagged: 2 Thread(s)
|
Nice build and pictures!
|
|
|
|
| The Following User Says Thank You to BPAuto For This Useful Post: | tweedbean (05-18-2015) |
|
05-18-2015, 05:12 PM
|
#21 |
|
Senior Member
Join Date: Jan 2015
Drives: White GT86
Location: UK
Posts: 153
Thanks: 48
Thanked 108 Times in 58 Posts
Mentioned: 0 Post(s)
Tagged: 0 Thread(s)
|
Well at Japfest I may have mentioned to a couple of others that the car had a knocking coming from the front since I had fitted the teins, which I thought may be the front drop links being too long making the sway bar hit the front wish bone. Tonight I jacked the car up and removed the wheels and straight away I could see I was right, so I have whipped them off and will try to source some shorter ones asap. I am glad thats all it was and a quick test drive confirmed this.
While the car was up in the air I dropped the front another 10mm to level it off with the rear as there was a little rake. I took a couple of snaps while on my test drive and those with a good eye will notice the centre caps are off the wheels, this is due to one saying bye bye on my drive home from Japfest.  One hadn't gone back on properly and I meant to remove it before I left so I could sort it when I got home but I forgot, doh. So its time to source a replacement which is proving tricky as these wheels are not manufactured anymore but I will sort it. One hadn't gone back on properly and I meant to remove it before I left so I could sort it when I got home but I forgot, doh. So its time to source a replacement which is proving tricky as these wheels are not manufactured anymore but I will sort it. Lowered another 10mm on the front by James Baker, on Flickr Lowered another 10mm on the front by James Baker, on Flickr Lowered another 10mm on the front by James Baker, on Flickr Lowered another 10mm on the front by James Baker, on FlickrI am really pleased with the wheel/tyre and suspension combo, the car feels so much more planted and the coilovers are miles better than the BC's I have owned previously on other cars, no crashing at all over rough surfaces. I think it needs another 10mm drop on the front but theres plenty to go on the teins so that wont be a problem. Next job is to decide on a ducktail spoiler for the rear and to get the handling spot on with further suspension mods including rear control arms, adjustable drop links and a number of bushes/braces to stiffen things up. The positive shift bush is a definite. Any suggestions about what to look at handling wise, I am all ears
__________________
https://www.youtube.com/tweedbean - How To Videos https://www.instagram.com/tweedbean - Latest updates |
|
|
|
| The Following User Says Thank You to tweedbean For This Useful Post: | Iceman (05-18-2015) |
|
05-18-2015, 06:32 PM
|
#22 |
|
Senior Member

Join Date: Jun 2012
Drives: GT86
Location: Nordschleife
Posts: 210
Thanks: 456
Thanked 188 Times in 91 Posts
Mentioned: 2 Post(s)
Tagged: 0 Thread(s)
|
Nice build, and much better without the caps IMO.
|
|
|
|
|
05-26-2015, 04:53 PM
|
#23 |
|
Senior Member
Join Date: Jan 2015
Drives: White GT86
Location: UK
Posts: 153
Thanks: 48
Thanked 108 Times in 58 Posts
Mentioned: 0 Post(s)
Tagged: 0 Thread(s)
|
Couple of little updates. I finally managed to find a centre cap replacement, these wheels aren't made anymore however I found a company that had snapped up a load of BBS spares and they had one of these available. I just need to find the time to get it to the powder coaters to get it sorted.
 Wheel centre sourced by James Baker, on Flickr Wheel centre sourced by James Baker, on FlickrI saw this project MU brake fluid reservoir cover and had to have it as its a close match to the wheels and adds a bit more colour to the engine bay.  Project MU Brake reservoir cover by James Baker, on Flickr Project MU Brake reservoir cover by James Baker, on FlickrI have also managed to get all the other centre caps now sitting flush which I am pleased with. I've spent the last couple of days reading up superchargers kits, especially since seeing a few threads around the HKS setup. Up until now I was pretty much set on an AVO turbo but the HKS does sound interesting.
__________________
https://www.youtube.com/tweedbean - How To Videos https://www.instagram.com/tweedbean - Latest updates |
|
|
|
|
07-01-2015, 09:25 AM
|
#24 |
|
Senior Member
Join Date: Jan 2015
Drives: White GT86
Location: UK
Posts: 153
Thanks: 48
Thanked 108 Times in 58 Posts
Mentioned: 0 Post(s)
Tagged: 0 Thread(s)
|
Well its been ages since the last update. Currently saving for forced induction so pace will slow down a little bit as that won't be cheap although I'm sure I will still find the time and money to tweak other bits.
Wheels For those on my Facebook/Instagram you would have seen my BBS RS2's have been stripped down and sent back to the powder coaters. There was an issue with burnt lacquer due to the metal holding too much heat from baking while the clear coat was put on. They are fully rectifying the issue FOC and have agreed to a colour change as I was never 100% sure with the colour once it was on the car. It would work better with a darker car I feel, two light colours together is too dull for me. As usual I am keeping hush on the colour until I see them in the flesh, which should be this Saturday. While fitting them to the car I will be adding some front camber and lowering the a little more to get it even.  Wheels split down by James Baker, on Flickr Wheels split down by James Baker, on FlickrBring on the noise Although the GT86 made a nice sound as standard, I want to turn that up to 11 and take advantage of the Subaru engine. I hopefully have a Borla UEL manifold coming in the next couple of weeks for that Subaru burble and yesterday I took delivery of a scorpion 2.5" decatted front pipe with resonator and a scorpion 2.5" overpipe which will make it a fully decade exhaust system At some point I will also pick up a catback exhaust to go with these, but this won't delay me fitting them. As soon as the Borla arrives I will be fitting all of these myself. Hopefully a job that can be done on axle stands, if not I may need to rent a ramp as I want to do it all myself again, I could pay someone to do it, but wheres the fun it that. I want to learn as I go along and get that sense of achievement knowing I have done it myself, which is what I did with my first MINI.  Scorpion 2.5" over pipe and decatted resonated front pipe by James Baker, on Flickr Scorpion 2.5" over pipe and decatted resonated front pipe by James Baker, on FlickrFront Lip Finally I decided to give the front bumper a more aggressive look for little cost, by spraying the centre section with plastidip to see if I liked it. I changed the lines a couple of times, confering with Rich until I found this line which makes it look like it has fangs. The great benefit of plastidip is you can peel it off and do it again. I will get this section painted properly when I have the front number plate holes filled later in the year. Also if I go for the TRD side skirts then this satin black bumper section will match that on the side skirts.  Front Lip by James Baker, on Flickr Front Lip by James Baker, on FlickrI am in two minds when it comes to body kits currently. From what I have seen so far, not many fit to my standard and many just look like they are just stuck on and don't flow with the lines of the car. I want the cars looks to flow and potentially OEM+ which may mean that I mix elements from different kits, such as the TRD side skirts, Leg Motorsport ducktail spoiler, Fensport OEM rear splitter etc Or I can go the other extreme of blending in a rocket bunny kit. But all this can wait as I want to get FI sorted.
__________________
https://www.youtube.com/tweedbean - How To Videos https://www.instagram.com/tweedbean - Latest updates |
|
|
|
|
07-05-2015, 04:30 PM
|
#25 |
|
Senior Member
Join Date: Jan 2015
Drives: White GT86
Location: UK
Posts: 153
Thanks: 48
Thanked 108 Times in 58 Posts
Mentioned: 0 Post(s)
Tagged: 0 Thread(s)
|
My wheels are back
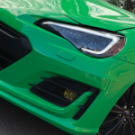
Yesterday I collected my wheels from the powder coaters after they had done a FOC colour change. I decided to change colour as the green was just too light next to the white paint work. I had done many photoshops and got down to 3 colours orange, pink and gold. After a number of conversation and going down to the powder coaters I settled on gold as the pink and orange just didnt look right when I held their samples wheels next to my car. On they go Today I rebuilt the wheels and got them fitted. While up in the air I maxed out the front coils to level it off with the rears, I spaced out the rear wheels 5mm to get the same fitment as the front and I added negative camber to the front to again replicate the camber on the rear. All little niggly things that I wanted to get right. Back from the powder coaters:  Back from the powder coaters by James Baker, on Flickr Back from the powder coaters by James Baker, on FlickrRebuilt and ready to go, I think the red centres do work better with the gold, I am awaiting a replacement one in the post, hence only three in this picture. They went together a lot easier this time around. Laminx Fog Lights While in the air I pulled off the front fog light surrounds and tinted the fog lights yellow, im not 100% sold on it just yet, but I will leave it for now and see if it grows on me. It didnt cost anything as I had some yellow laminx left from the clubby:  The covers popped right off by James Baker, on Flickr The covers popped right off by James Baker, on Flickr Laminx Fog light by James Baker, on Flickr Laminx Fog light by James Baker, on FlickrGlad to see the Teins still look like new:  Still look like new by James Baker, on Flickr Still look like new by James Baker, on FlickrThe finished article:  Front by James Baker, on Flickr Front by James Baker, on Flickr Rear by James Baker, on Flickr Rear by James Baker, on FlickrGoodbye rake:  Side by James Baker, on Flickr Side by James Baker, on Flickr Wheel close up by James Baker, on Flickr Wheel close up by James Baker, on Flickr Engine Bay by James Baker, on Flickr Engine Bay by James Baker, on FlickrI am really pleased with the new look and they way this car is going.
__________________
https://www.youtube.com/tweedbean - How To Videos https://www.instagram.com/tweedbean - Latest updates |
|
|
|
|
07-06-2015, 01:10 PM
|
#26 |
|
Senior Member

Join Date: Apr 2015
Drives: FR-S
Location: Chicago, IL
Posts: 282
Thanks: 56
Thanked 68 Times in 43 Posts
Mentioned: 2 Post(s)
Tagged: 1 Thread(s)
|
I like the gold better but they both look good. I like it!
Your thread convinced me to do brz fender vents too, I like it a lot better.
__________________
|
|
|
|
|
11-21-2016, 08:35 AM
|
#28 | |
|
Senior Member
Join Date: Jan 2015
Drives: White GT86
Location: UK
Posts: 153
Thanks: 48
Thanked 108 Times in 58 Posts
Mentioned: 0 Post(s)
Tagged: 0 Thread(s)
|
Quote:
 GT86 by James Baker, on Flickr GT86 by James Baker, on Flickr
__________________
https://www.youtube.com/tweedbean - How To Videos https://www.instagram.com/tweedbean - Latest updates |
|
|
|
|
|
|
|
|
 |
|
|
 Similar Threads
|
||||
| Thread | Thread Starter | Forum | Replies | Last Post |
| GT86 on GT6 on PS3 | WLY | AFRICA | 6 | 03-22-2014 12:11 PM |
| GT86 FOB KEY | SPEEDGOD | Canada Classifieds | 0 | 07-29-2013 10:17 AM |
| GT86 OEM Option Pin Stripes (anyone done this to their 86/GT86/FRS/BRZ)??? | jbsali | Cosmetic Modification (Interior/Exterior/Lighting) | 27 | 07-28-2013 11:10 PM |
| MEETING 'MR GT86' - Tada San drives GT86 in Scotland (Pistonheads) | RadOnc | Scion FR-S / Toyota 86 GT86 General Forum | 15 | 11-23-2012 08:42 AM |
| Want the GT86 UK look.. | Maj3sty | AUSTRALIA | 11 | 08-20-2012 07:07 AM |


 Eleanor