


 12-26-2014, 01:52 PM
|
#1 |
|
Senior Member

Join Date: Apr 2014
Drives: 2014 FR-S 6MT Whiteout
Location: Southern Maryland
Posts: 950
Thanks: 234
Thanked 374 Times in 260 Posts
Mentioned: 9 Post(s)
Tagged: 0 Thread(s)
|
DIY Rally Armor Mudflaps
So I looked for a DIY for the Rally Armor mudflaps and couldn't find one so I decided to do my own. A few things first - one, I tried to be clever and use my panel removal tools to pop out the plastic rivets. They didn't help; too flexible. Two, if you are hand with a jack, take the rear wheels off. I have average to large hands and it was not very fun getting the screws tight, particularly on the left side (I am left handed).
I used a small flathead screwdriver, a small Philips screwdriver and an offset screwdriver to do this, along with the parts that came in the kit. 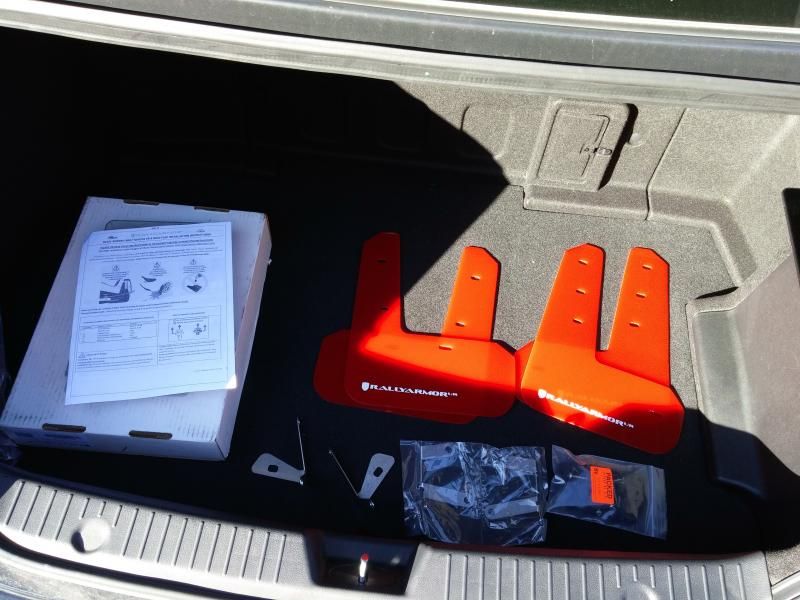  I did the fronts starting with the left, and then did the rears starting with the right. I started the car and crank the wheel all the way left to give myself room to work. I left the car running for the fronts as it was cold and I didn't want to start it and stop it twice. For the fronts you remove the top three screw pop rivets and two rivets underneath the wheel well on either side of the pinch weld.  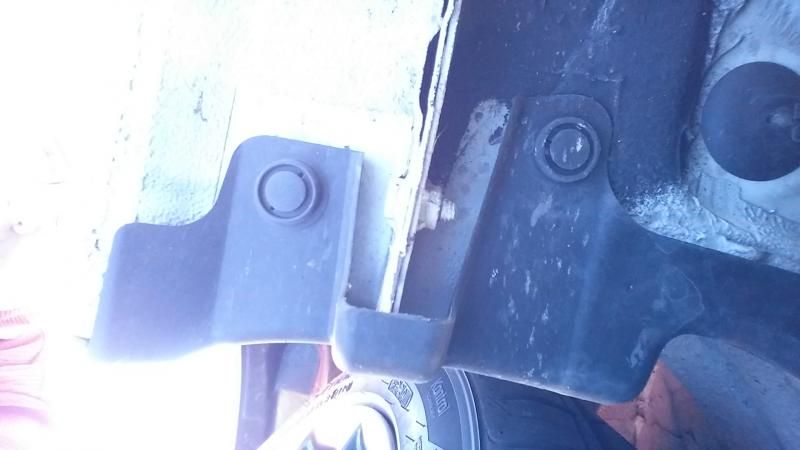 The top rivets unscrew about half a turn and can then be pried out (the head is flimsy but they're not reused so you can just yank them out). 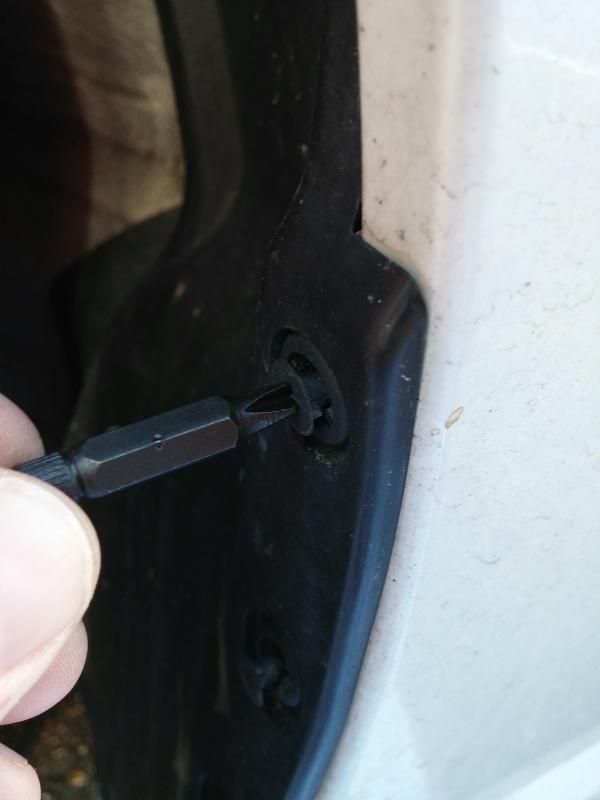 The rivets underneath just get the center pried up and then they pop out. 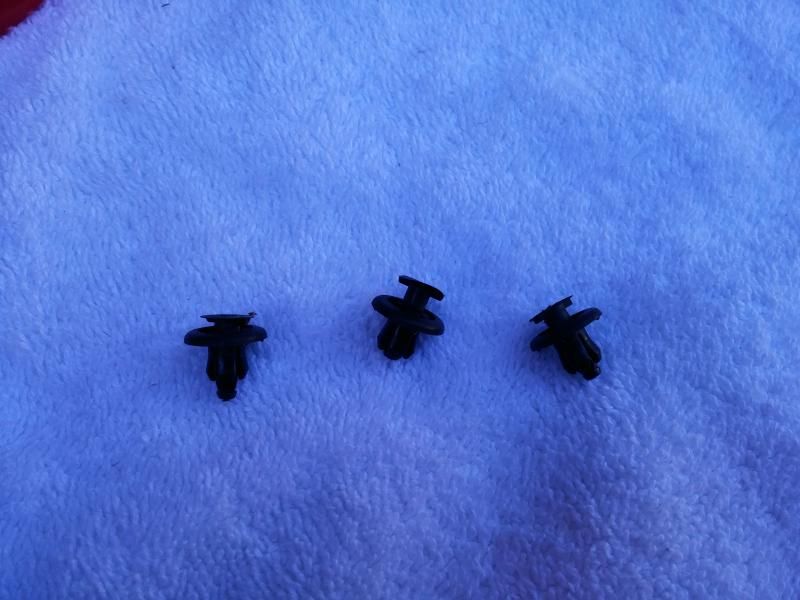 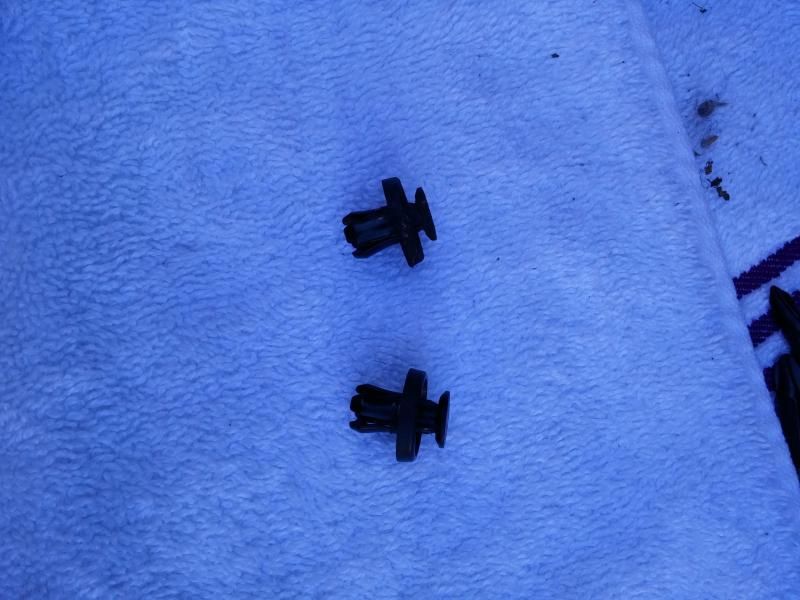 Once all the rivets are out the black clips get placed over the white fender plastic underneath the liner. I took the opportunity to clean that area since it was accessible. 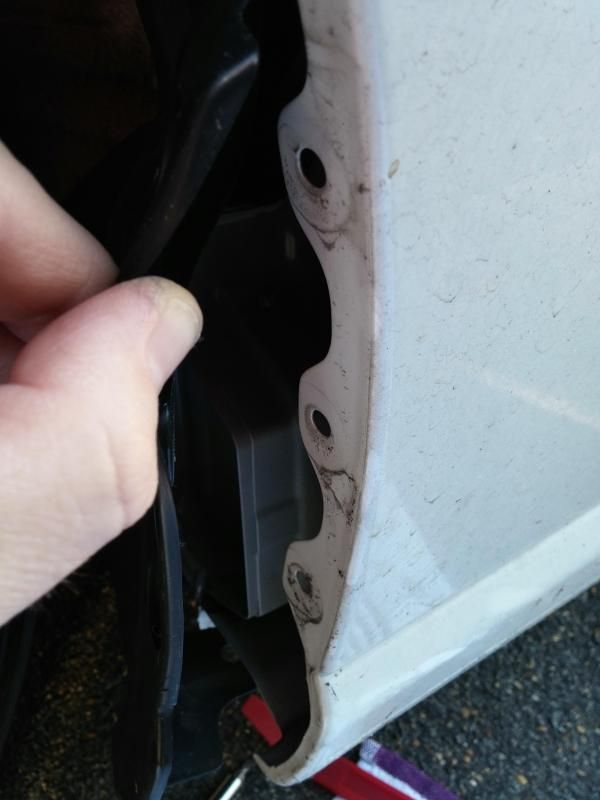 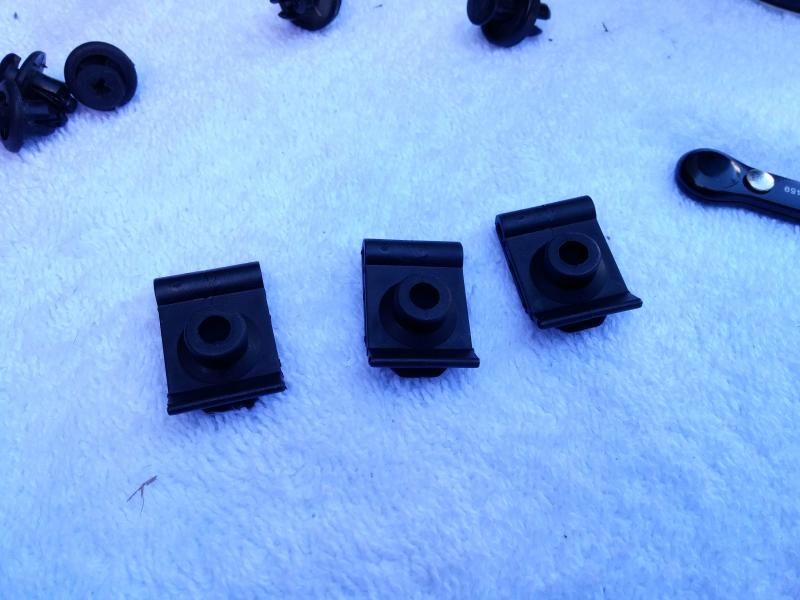 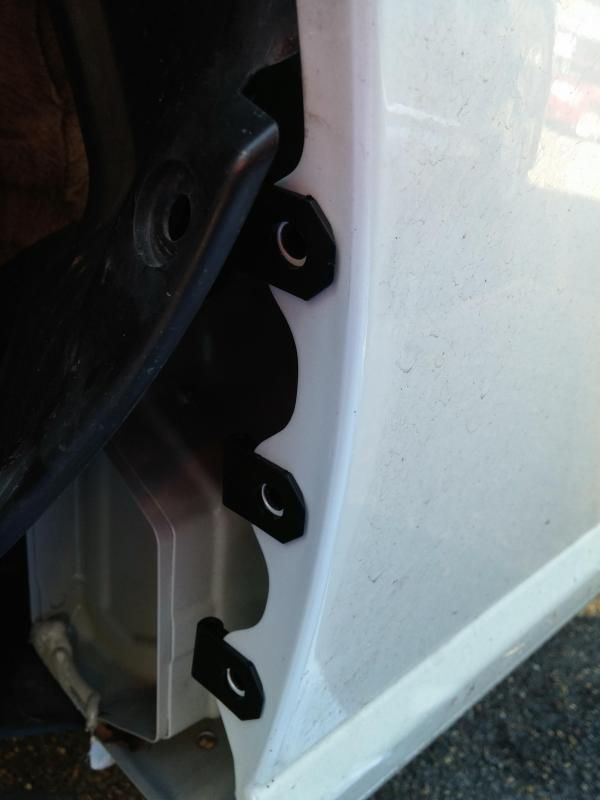 Once the clips are in place you can take the bracket and put it in place.  It mounts underneath the fender across the pinch weld with the two pop rivets. The other mounting hole face down and to the inside of the wheel well. 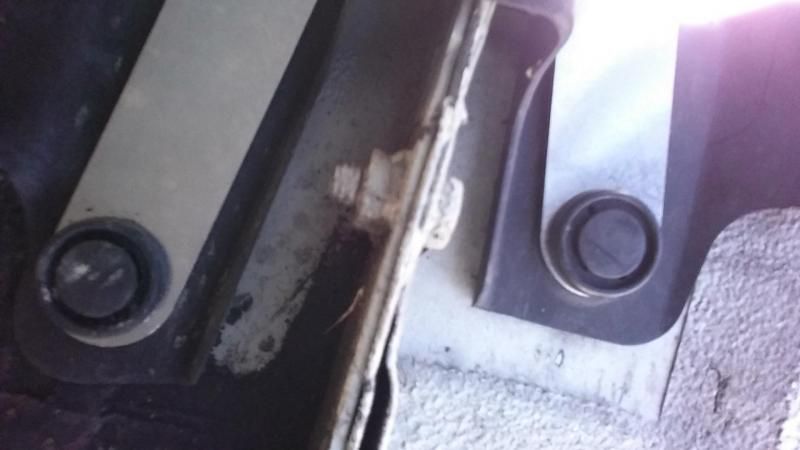 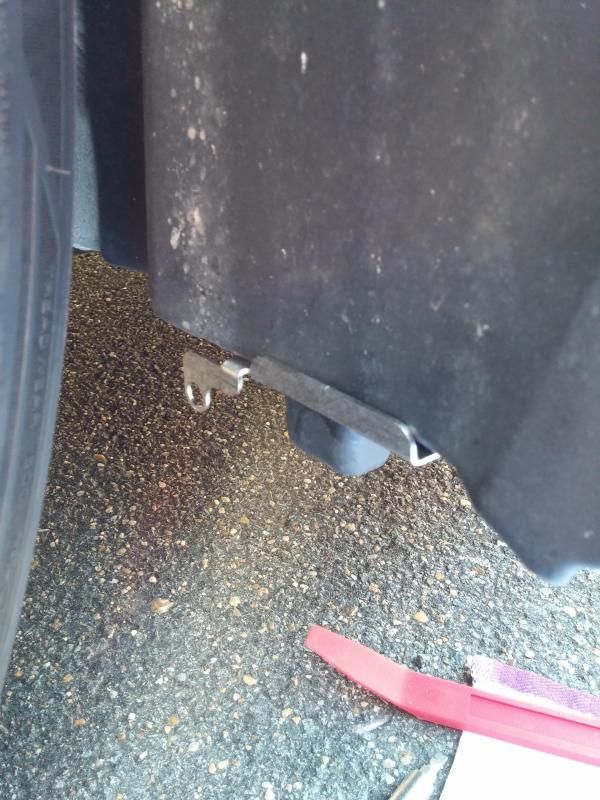 Place another black clip on the mounting hole on the bracket in the wheel well. 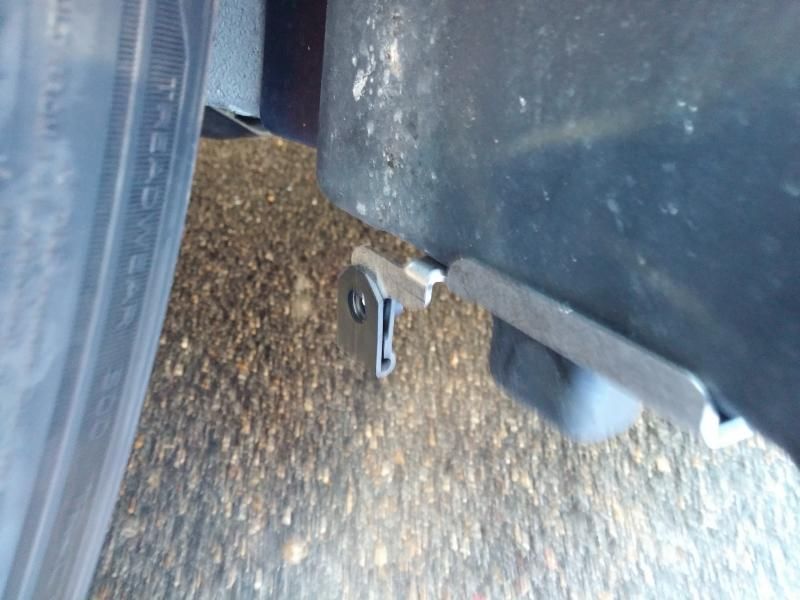 With the bracket done take three long screws, one short screw, four washers and the mudflap and mount it up. The short screw and a washer go on the inside mounting hole and the long screws with a washer each go on the upper holes. 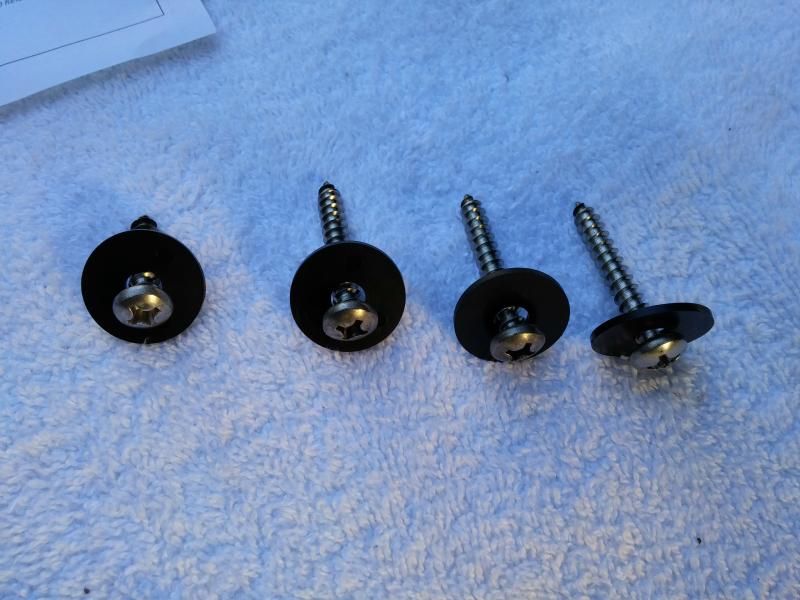 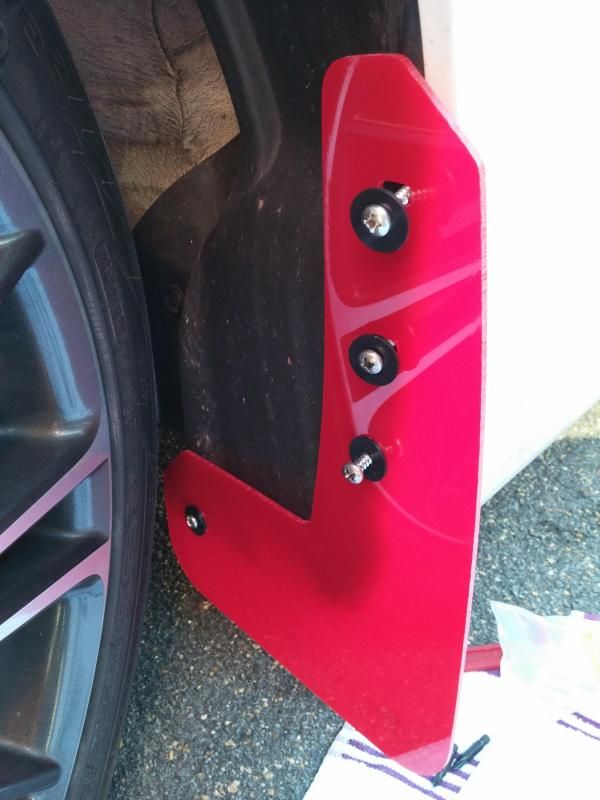 Tighten them up most of the way, make sure the mudflap is straight and finish tightening them. It might help before tightening the inside screw to crank the wheel back over to the right, which will enable tightening with a full size screwdriver. 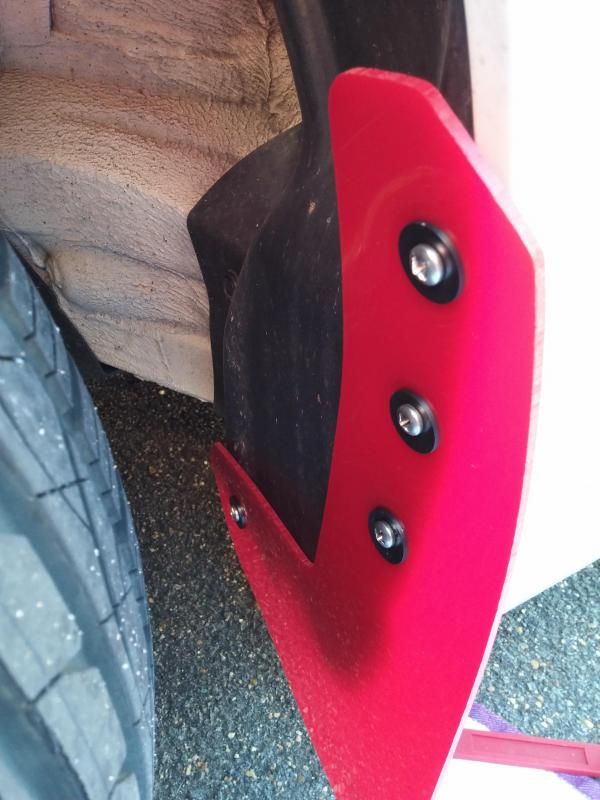 Repeat for the other side. On the left side of the car the mudflaps will tend to go outward when tightening, and inward on the right side. Keep this in mind when you are doing the other ones to line everything up. For the rears, there's less to take apart and fewer things to add, but less room to do it in. Unless, like I said, you're handy with a jack and you take the wheels off. I did not. The first thing on the rears is to pull out the first pop rivet underneath the fender right at the back of the wheel well, which joins the fender to the wheel well liner. This pop rivet is larger than the others and harder to remove, but it'll come out with some work. Whatever tool you use to pop the rivet, make sure you don't mar the fender. 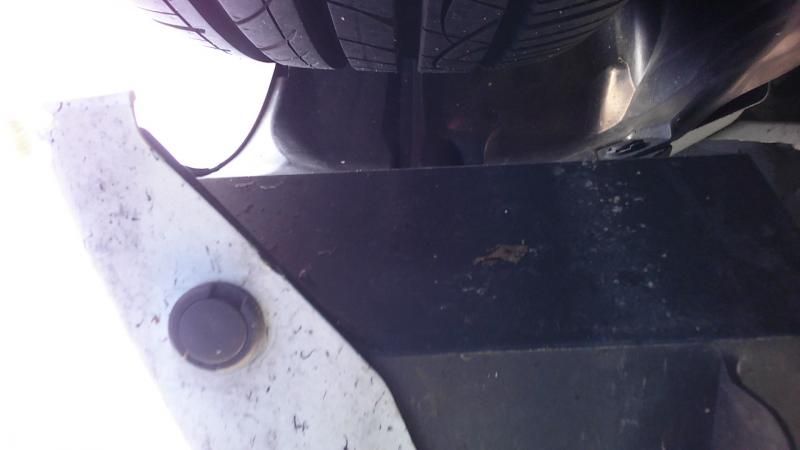 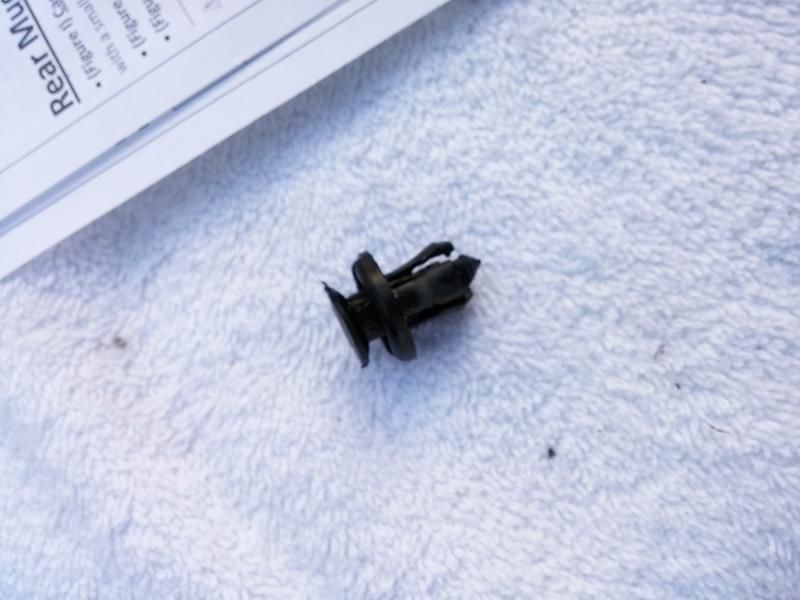 With the pop rivet out (and after cleaning the area) slide the bracket in place between the black wheel well liner and the fender.  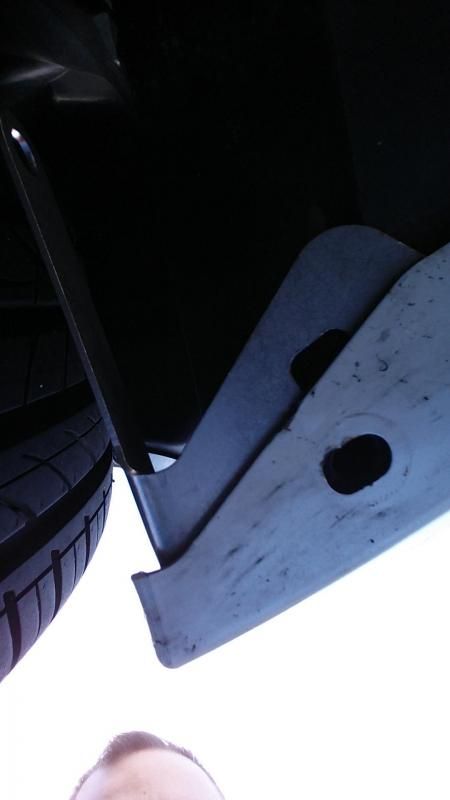 Then pop the rivet back into place through the fender, bracket and liner. Make sure you get the rivet through all three before popping the rivet closed (twisting helps). 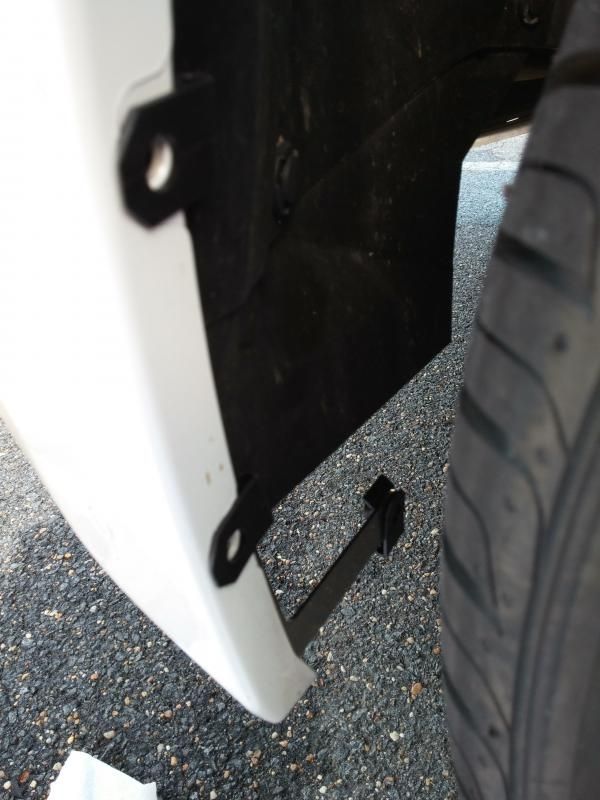 With the bracket in place, pop three black clips into place. The top one goes on the fender plastic only; the middle goes across the fender and the bracket, and the bottom just goes on the bracket. Next, two large screws and one small screw, all with washers. Top and middle get long screws, bottom gets a short screw. Use the offset screwdriver to tighten them down.  Repeat on the other side making sure they're lined up as close to the same as possible. Put your tools away and enjoy.  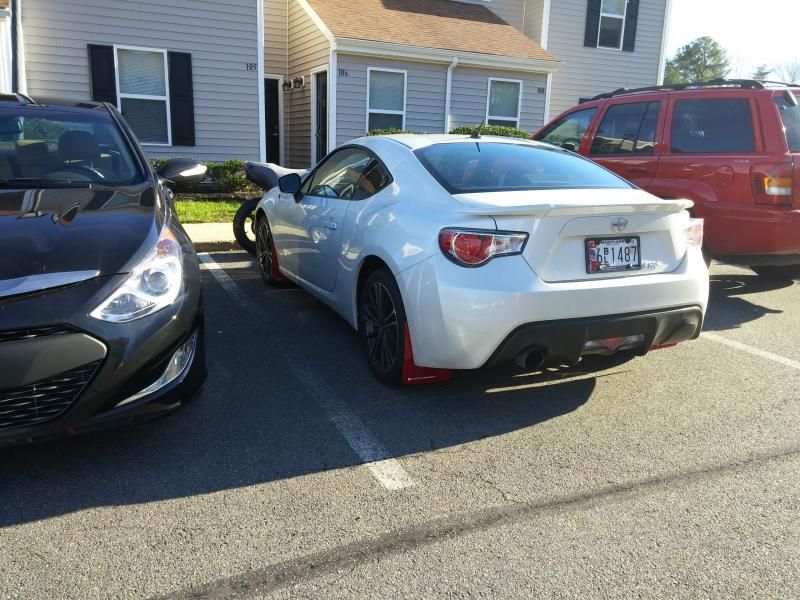 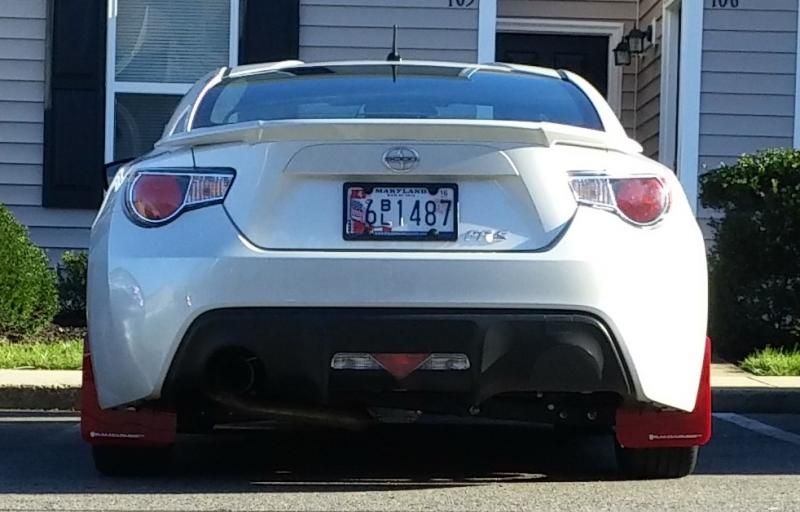
__________________
Last edited by phobos512; 12-26-2014 at 02:20 PM. |

|

|
| The Following 8 Users Say Thank You to phobos512 For This Useful Post: | akahenry (03-07-2015), BAOVAN (01-03-2017), chas3wba0 (12-30-2014), Choco (01-21-2015), JCE17 (12-31-2014), JMon85 (06-13-2018), SciOnDrifTtSlIdeR (12-29-2014), stockysnail (05-03-2015) |
|
12-29-2014, 12:47 PM
|
#3 | |
|
No Money, No Problems

Join Date: Sep 2014
Drives: 2015 Scion FR-S (Halo White)
Location: Bakersfield, CA
Posts: 901
Thanks: 740
Thanked 678 Times in 354 Posts
Mentioned: 11 Post(s)
Tagged: 0 Thread(s)
|
Quote:
__________________
 |
|
|
|
|
| The Following User Says Thank You to LucidMomentum For This Useful Post: | SciOnDrifTtSlIdeR (12-30-2014) |
|
12-29-2014, 03:15 PM
|
#4 | |
|
Senior Member
Join Date: Sep 2014
Drives: 13 FRS Satin
Location: Alberta
Posts: 162
Thanks: 25
Thanked 60 Times in 41 Posts
Mentioned: 1 Post(s)
Tagged: 0 Thread(s)
|
Quote:
Actual question though, do the Rally Amours keep the panels behind it clean or do you think a st of mud guards/ splash guards would do a better job? Trying to go function over form, event though the red mud flaps look amazing. |
|
|
|
|
|
12-29-2014, 03:44 PM
|
#5 | |
|
No Money, No Problems
Join Date: Sep 2014
Drives: 2015 Scion FR-S (Halo White)
Location: Bakersfield, CA
Posts: 901
Thanks: 740
Thanked 678 Times in 354 Posts
Mentioned: 11 Post(s)
Tagged: 0 Thread(s)
|
Quote:
However in the rain, due to the heigt of the car there's not a lot of space for water to go and when it hits the flaps some of it hits the side panels. Especially if you like to drift a bit in the rain  It's not going to save you from having to wash the car, but it'll save you from rocks and heavy mud buildup on the side panels. It's not going to save you from having to wash the car, but it'll save you from rocks and heavy mud buildup on the side panels. I got these guards because they're flexible, since I drive over a lot of rocks.
__________________
|
|
|
|
|
| The Following User Says Thank You to LucidMomentum For This Useful Post: | Chanpion (12-29-2014) |
|
12-30-2014, 07:05 PM
|
#6 |
|
Senior Member

Join Date: Mar 2014
Drives: 2013 Subaru BRZ Limited
Location: Farmington Hills, MI
Posts: 581
Thanks: 32
Thanked 326 Times in 174 Posts
Mentioned: 3 Post(s)
Tagged: 0 Thread(s)
|
Nice tut. I was going to install the rears, but didn't have a ratchet like yours.
I've grown to like having the fronts only. They look great year around. Interesting exhaust cutout plug. Are you going to blend it? |
|
|
|
|
12-31-2014, 09:28 AM
|
#7 | |
|
Senior Member
Join Date: Apr 2014
Drives: 2014 FR-S 6MT Whiteout
Location: Southern Maryland
Posts: 950
Thanks: 234
Thanked 374 Times in 260 Posts
Mentioned: 9 Post(s)
Tagged: 0 Thread(s)
|
Quote:
__________________
|
|
|
|
|
|
12-31-2014, 09:30 AM
|
#8 | |
|
Senior Member
Join Date: Apr 2014
Drives: 2014 FR-S 6MT Whiteout
Location: Southern Maryland
Posts: 950
Thanks: 234
Thanked 374 Times in 260 Posts
Mentioned: 9 Post(s)
Tagged: 0 Thread(s)
|
Quote:
As far as the delete panel...well, it's carbon fiber - it's supposed to stand out  http://www.innovateddynamics.com/pro...e-frs-brz-gt86
__________________
|
|
|
|
|
|
12-31-2014, 09:47 AM
|
#9 |
|
Member

Join Date: Feb 2013
Drives: 2013 Scion FR-S - Asphalt 6MT
Location: STL, MO
Posts: 44
Thanks: 8
Thanked 5 Times in 5 Posts
Mentioned: 0 Post(s)
Tagged: 0 Thread(s)
|
Thanks for posting this. I received these as a Christmas present and plan on putting them on this weekend.
|
|
|
|
|
12-31-2014, 09:50 AM
|
#10 | |
|
Senior Member
Join Date: Apr 2014
Drives: 2014 FR-S 6MT Whiteout
Location: Southern Maryland
Posts: 950
Thanks: 234
Thanked 374 Times in 260 Posts
Mentioned: 9 Post(s)
Tagged: 0 Thread(s)
|
Quote:
__________________
|
|
|
|
|
|
12-31-2014, 10:52 AM
|
#11 |
|
Spun
Join Date: Mar 2013
Drives: 17' Focus RS
Location: New England
Posts: 1,179
Thanks: 396
Thanked 400 Times in 273 Posts
Mentioned: 1 Post(s)
Tagged: 0 Thread(s)
|
Do you rally your car often? Are you going to install the lift springs along with this kit? What kind of tires do you run, for offroad?
|
|
|
|
|
01-01-2015, 04:17 PM
|
#12 | |
|
Senior Member
Join Date: Apr 2014
Drives: 2014 FR-S 6MT Whiteout
Location: Southern Maryland
Posts: 950
Thanks: 234
Thanked 374 Times in 260 Posts
Mentioned: 9 Post(s)
Tagged: 0 Thread(s)
|
Quote:

__________________
|
|
|
|
|
|
01-01-2015, 04:48 PM
|
#13 | |
|
Sideways and smiling!
Join Date: Jan 2012
Drives: First 86 FRS 5/8/2012 (second US)
Location: Oregon
Posts: 941
Thanks: 17
Thanked 273 Times in 179 Posts
Mentioned: 15 Post(s)
Tagged: 0 Thread(s)
|
Quote:
__________________
|
|
|
|
|
|
01-03-2015, 07:10 PM
|
#14 | |
|
Spun
Join Date: Mar 2013
Drives: 17' Focus RS
Location: New England
Posts: 1,179
Thanks: 396
Thanked 400 Times in 273 Posts
Mentioned: 1 Post(s)
Tagged: 0 Thread(s)
|
Quote:
|
|
|
|
|
|
|
|
|
 |
|
|
 Similar Threads
|
||||
| Thread | Thread Starter | Forum | Replies | Last Post |
| OEM Mudflaps to Rally Armor? | aakash | Cosmetic Modification (Interior/Exterior/Lighting) | 1 | 05-31-2014 01:09 AM |
| oem mudflaps or rally armor? | SuperDave | Cosmetic Modification (Interior/Exterior/Lighting) | 20 | 05-28-2014 11:28 AM |
| Fs: Rally Armor mudflaps | RWD_FR-S | Exterior Parts (Aero, Lighting, Etc.) | 4 | 03-09-2014 01:38 AM |
| Rally Armor mudflaps - FREE | nzer | AUSTRALIA | 23 | 01-22-2013 12:58 AM |
| Rally Armor Mudflaps | jammz | Cosmetic Modification (Interior/Exterior/Lighting) | 5 | 12-27-2012 10:29 AM |


