


|
||||||
| DIY (Do-It-Yourself) Guides For all DIYs. |
 |
|
|
Thread Tools | Search this Thread |
 03-23-2015, 07:47 PM
|
#1 |
|
Member
Join Date: Mar 2014
Drives: White Aozora BRZ
Location: Toronto, ON
Posts: 76
Thanks: 1
Thanked 28 Times in 19 Posts
Mentioned: 0 Post(s)
Tagged: 1 Thread(s)
|
Vinyl Tinting Side Markers
Hello all! I have enjoyed reading many of the DIYs on here so I figured I would try my hand at one. Sorry for it being so long, I always prefer too much detail than not enough.
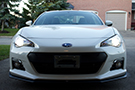
People kept commenting on how the side marker on my car appeared like rust or it just didn't belong; I was going to do something about it! For $10 in vinyl I got it to looking like something I liked more. Yes you could use Nite Shades but I preferred something removable just in case. Option C is buying aftermarket housings but that can be more expensive. What you will need: -tinted vinyl (look on ebay or your favorite vinyl retailer) -spray bottle with 50% isopropyl alcohol, 50% water -heat gun -short Phillips screwdriver -long skinny flat head screwdriver -scissors -microfiber cloth -something like a credit card or a vinyl squeegee Before Picture: STEP 1: Side Marker Removal For me this was the hardest part. I watched videos online, I read my owners manual but it just didn't seem like I was doing it correctly. As a result I basically destroyed the clip that holds in the driver's side housing. I got it back on with some hot glue (not really recommended) but its always going to be a worry spot for me. -turn the wheel as far to the opposite side of the car as the marker you want to take out -use a Phillips screwdriver and untwist the fastener between the cowling and the fender -USE A PANEL REMOVAL TOOL to remove it if it doesn't come out easily. I tried to use the flat head screwdriver and it broke the clip. ->if you do break the clip as I did, Subaru (and presumably Scion) sell them. Subaru Part # 46064AE000. -pull back cowling and locate hole for screwdriver -with your handy-dandy screwdriver find and press on the tab holding the light in. The tab is this shape so use your imagination: /""""""" \ |--------| | _____/ | / <-Screwdriver | \ ______________ Light Housing -gently pull light while prying against the tab -if you do everything correctly it will come out towards you. The bulb is a quarter twist to come out STEP 2: Cleaning and Prep Once you have both housings out of the car you can start getting the materials ready for wrapping. Make sure when you cut the vinyl to cut a lot more than you need. Chances are unless you are a professional, you may need to do this a couple times (and even then its awkward). Also, the housings have a thin piece of foam tape/gasket material between the lens and the car. I took mine off before I wrapped the lens and put some more on after. I had some already and I would recommend getting some. As a tip, the corner of the marker that is closest to the DRL really doesn't take to being wrapped very well. Push it on with lots of excess. Thankfully the location of the marker housing means it won't come off. Once you have your pieces cut and you have cleaned the bejesus out of the lenses you can wrap them. -heat the vinyl with low heat to get it malleable and activate the glue -peel of the layer of plastic protecting the glue side of the vinyl -spray both the housing and the vinyl with your spray bottle of solution. Be sure to not get liquid inside the bulb hole. -slowly apply vinyl keeping bubbles out ->there are actually DOT letters across the top of the lens and I couldn't find a way to wrap them well. This could lead to the demise of these pieces of vinyl in the long run so do your best. ->use generous amounts of low heat. The vinyl will be easier to work with and will adhere better. -wrap the entire edge of the lens, sticking excess to the rear of the lens. It will keep water and debris from pulling the vinyl off. -cut off any extra STEP 3: Repeat step 2 for the other side (and invariably when you screw one up) STEP 4: Install back on car -after installing bulb into housing position corner closest to DRL such that the vinyl is getting pinched between the lens and the fender -shoehorn the bottom two clips into place and squeeze the light into the fender ->I had to use the flat head screwdriver to push the same clip back into it's hole. -install cowling clip with the cowling in place -take a step back and enjoy your handiwork! NOTE: With the vinyl in place its going to be difficult to fit the lens in the opening. There is now at least half a mm more material there (or more if you have thick foam tape) which doesn't really want to be there. It should fit with some help. Finished Product: Hope this helps |

|

|
| The Following 2 Users Say Thank You to chamourian For This Useful Post: | illicitstylz (03-24-2015), swarb (03-23-2015) |
|
03-23-2015, 08:00 PM
|
#2 |
|
Senior Member
Join Date: Sep 2014
Drives: BRZ
Location: Los Angeles
Posts: 3,053
Thanks: 1,773
Thanked 2,451 Times in 1,271 Posts
Mentioned: 79 Post(s)
Tagged: 0 Thread(s)
|
Looks good! What percentage tint is that?
Are those 16" wheels? NICE! |
|
|
|
|
03-23-2015, 08:46 PM
|
#3 |
|
Member
Join Date: Mar 2014
Drives: White Aozora BRZ
Location: Toronto, ON
Posts: 76
Thanks: 1
Thanked 28 Times in 19 Posts
Mentioned: 0 Post(s)
Tagged: 1 Thread(s)
|
hah thanks. This is 20% tint I found on amazon.
And yes, those are 16"s. Winter rims/tires for the snow up north |
|
|
|
|
03-24-2015, 11:15 AM
|
#4 |
|
Senior Member

Join Date: Feb 2013
Drives: 2014 FR-S
Location: Calgary
Posts: 460
Thanks: 64
Thanked 441 Times in 140 Posts
Mentioned: 9 Post(s)
Tagged: 2 Thread(s)
|
Just wanted to say hello to a fellow engineer
 I also had trouble removing sidemarkers initially, the instructions out there are simple enough, but actually trying to remove them without damaging anything is a bit harder. I found that pushing in the bottom clip, and then the side clip works the best. |
|
|
|
|
|
|
|
|
| Tags |
| side marker, smoked, vinyl |
|
|
 Similar Threads
|
||||
| Thread | Thread Starter | Forum | Replies | Last Post |
| Helix Side Markers plus New SMD style Side markers | 86SPEED | Groupbuys | 143 | 11-22-2017 06:25 AM |
| FS: Clear Helix side markers and OEM Amber side markers | unlimited86 | Exterior Parts (Aero, Lighting, Etc.) | 15 | 07-06-2015 02:27 PM |
| FS GA: Helix Clear side markers/ OEM Amber Side Markers | 86TruenoFRS | Exterior Parts (Aero, Lighting, Etc.) | 1 | 03-21-2014 06:06 AM |
| FT: Clear side markers for smoked side markers | Red FRS | Exterior Parts (Aero, Lighting, Etc.) | 7 | 02-05-2014 05:52 PM |
| Warning: tinting/vinyl on tail lights | Panman | Cosmetic Modification (Interior/Exterior/Lighting) | 11 | 10-26-2012 09:40 PM |


