|
||||||
| DIY (Do-It-Yourself) Guides For all DIYs. |
 |
|
|
Thread Tools | Search this Thread |
 09-01-2013, 02:09 AM
|
#1 |
|
Photo Specialist

Join Date: Feb 2012
Drives: 2013 Toyota 86 DGM 6MT
Location: Texas
Posts: 1,152
Thanks: 587
Thanked 1,802 Times in 420 Posts
Mentioned: 94 Post(s)
Tagged: 0 Thread(s)
|
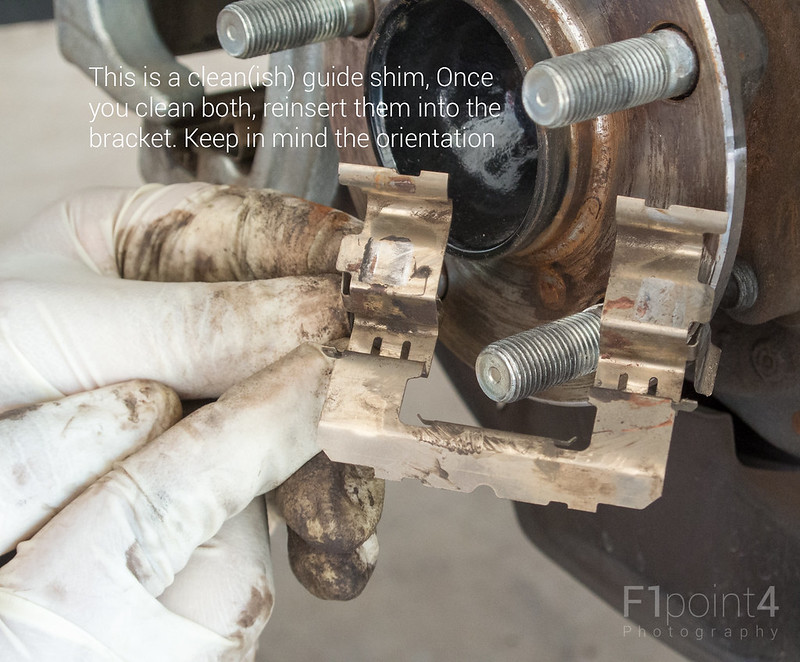
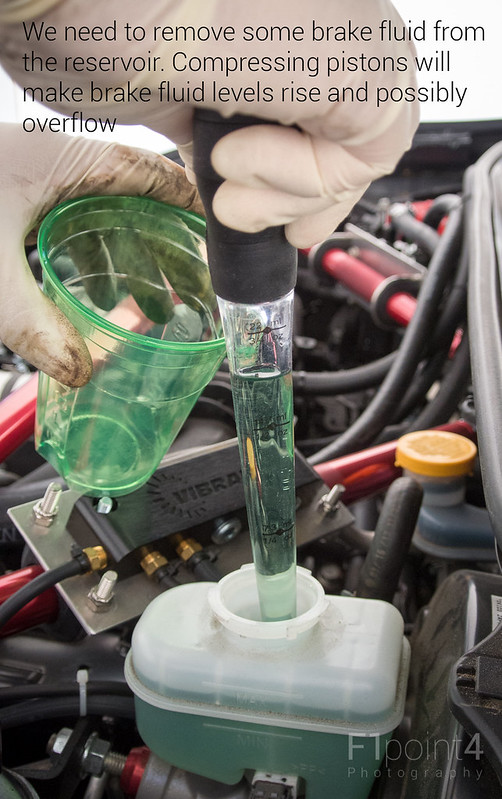
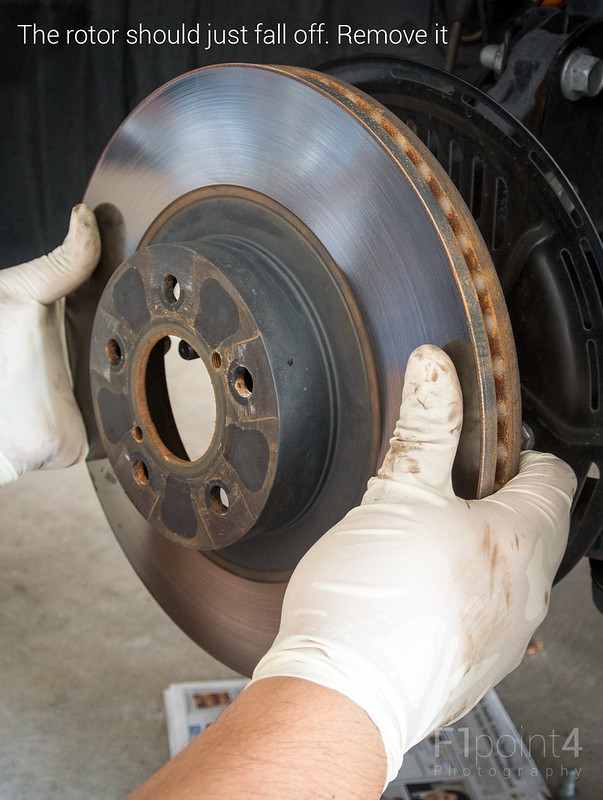
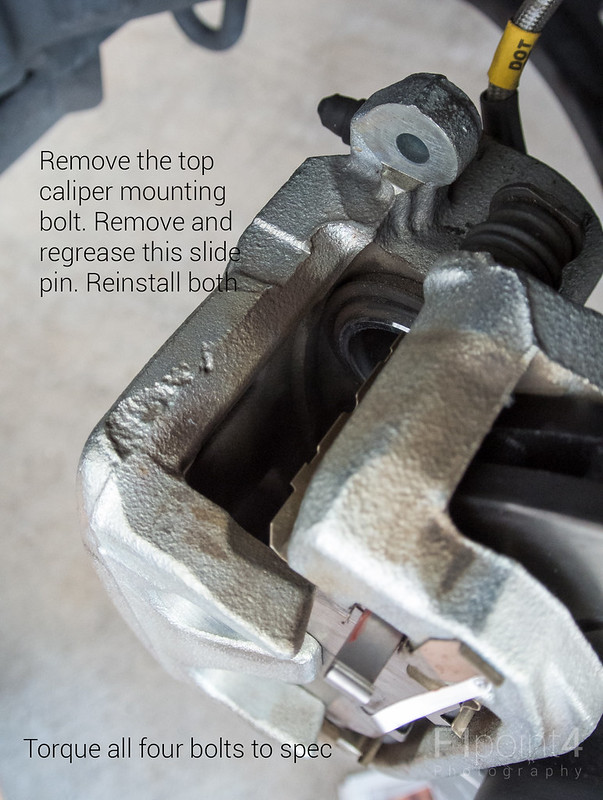
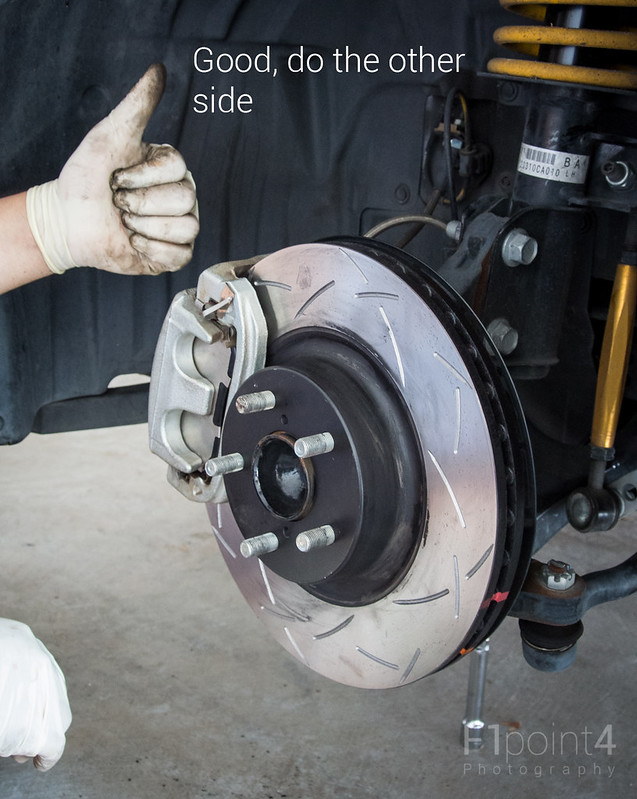
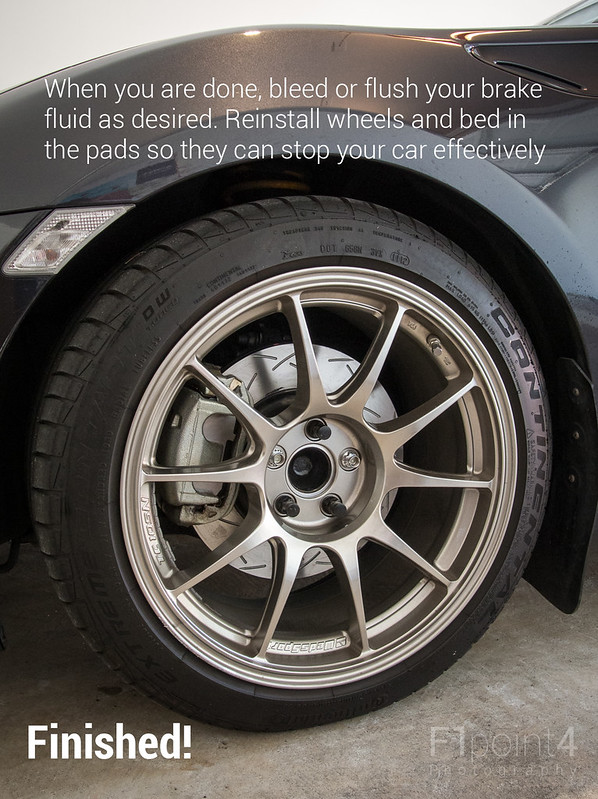
DIY: Front Brake Pad and Brake Rotor Replacement
DIY: Front Brake Pad and Brake Rotor Replacement
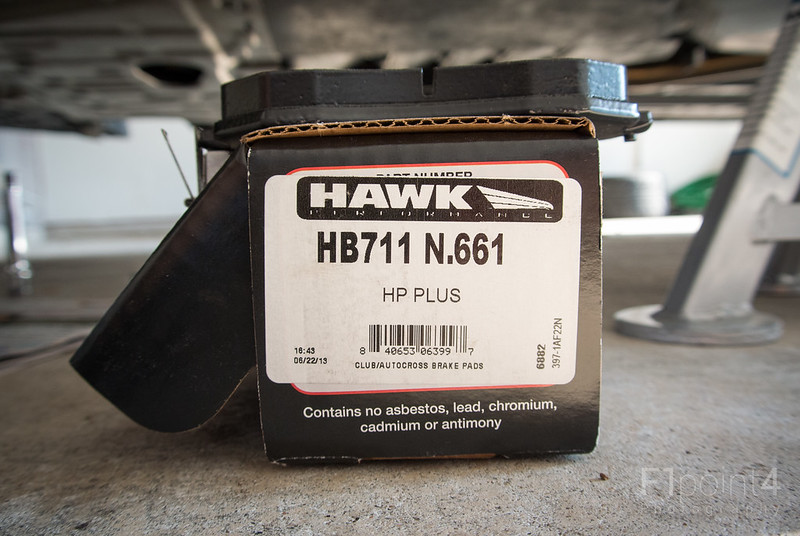
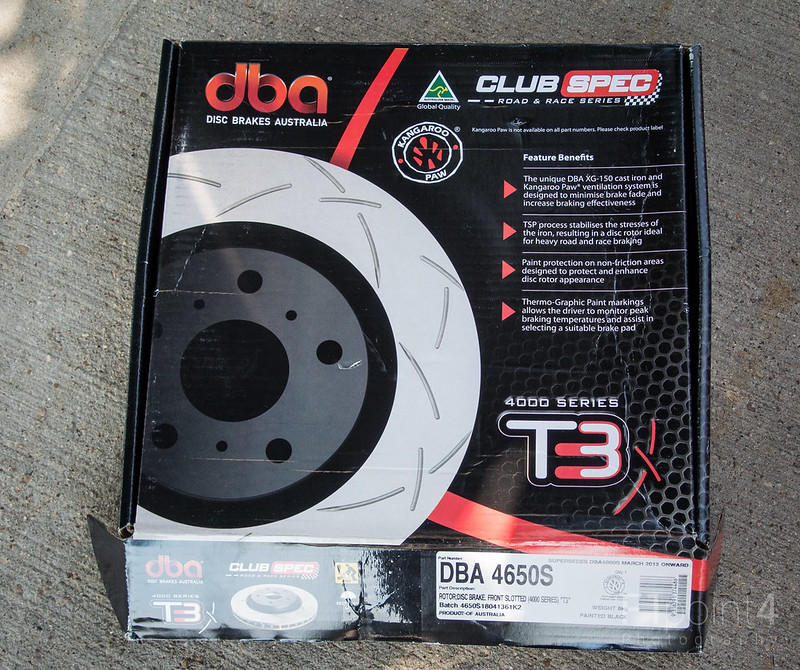
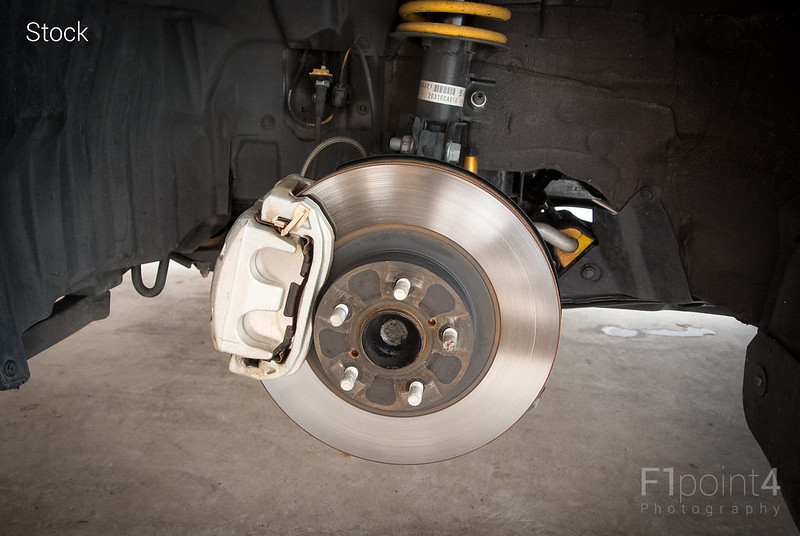
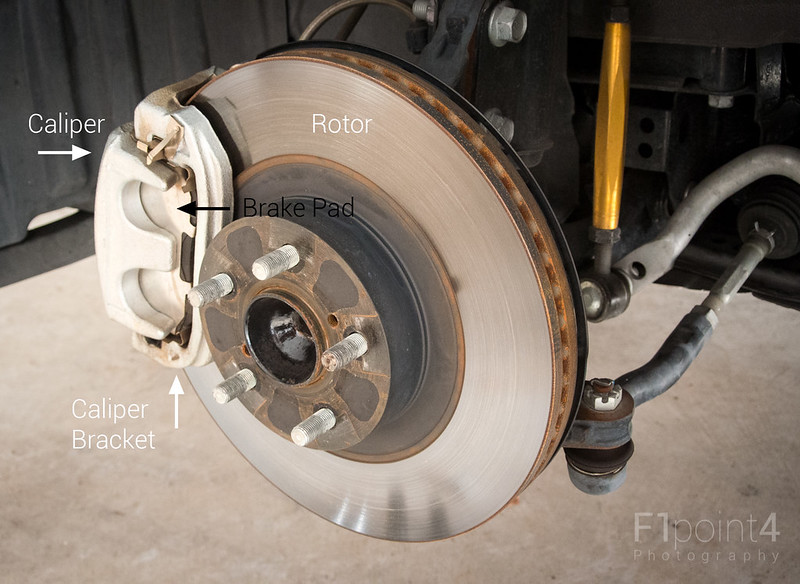
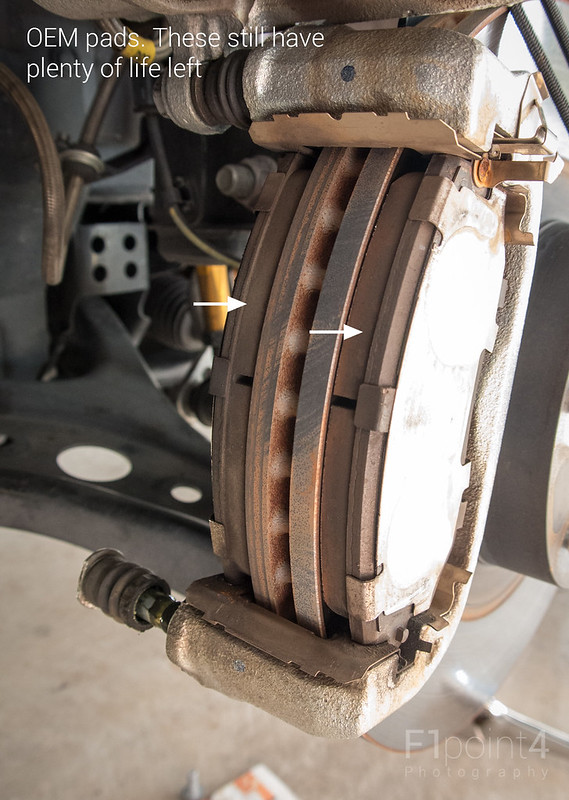
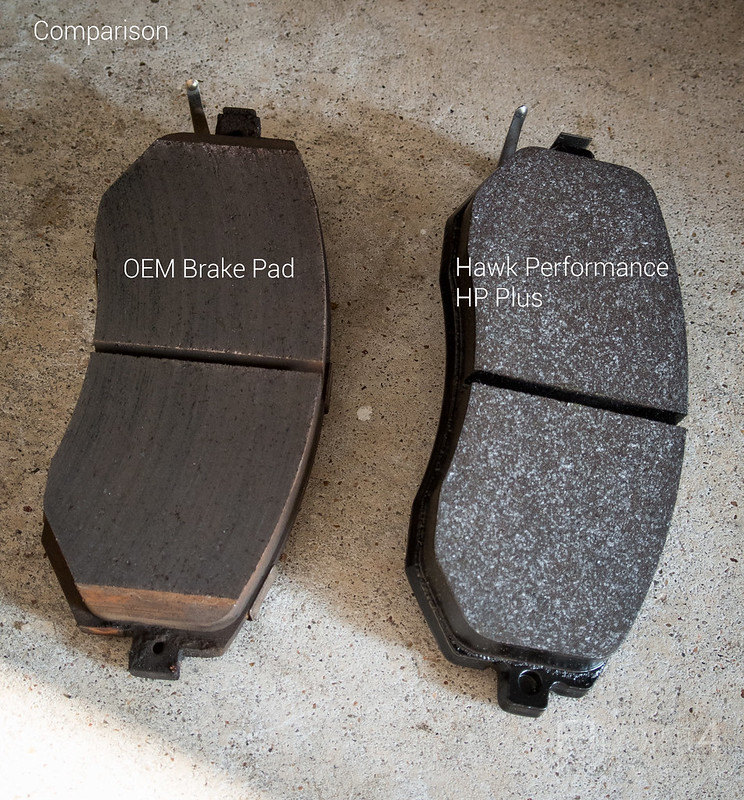
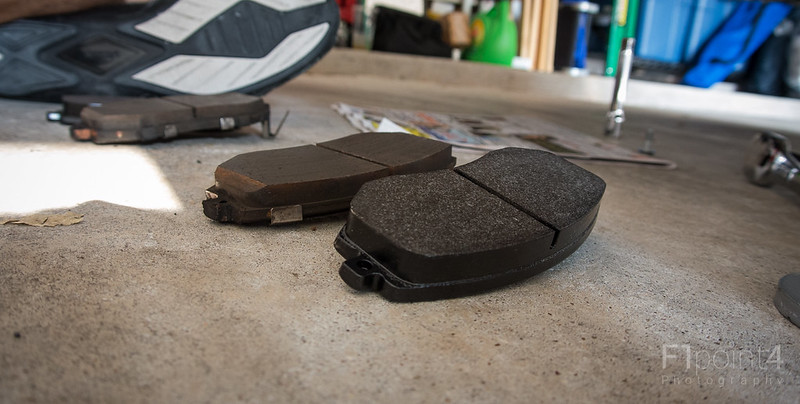
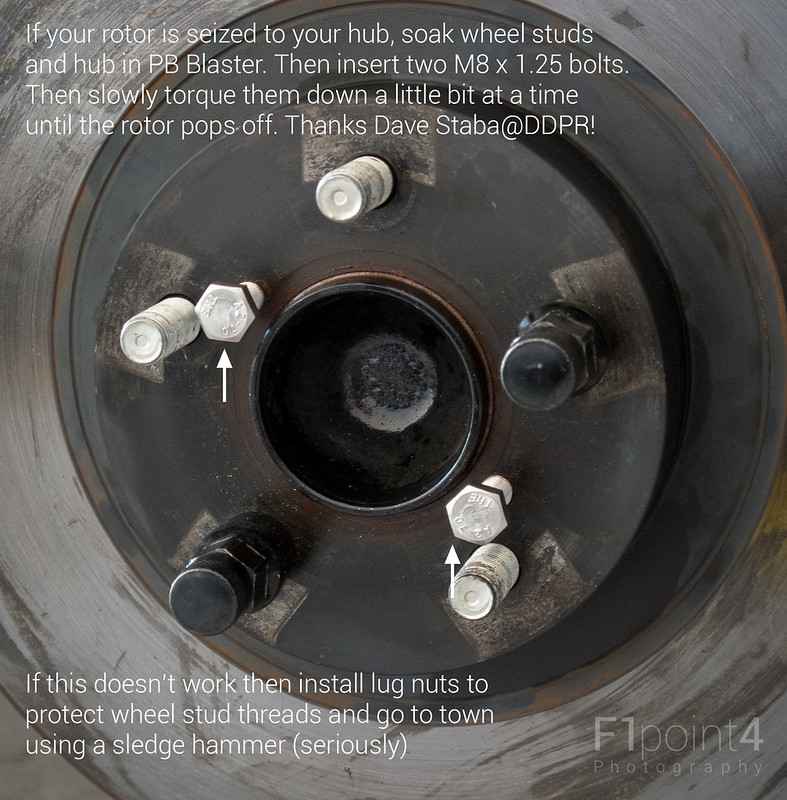
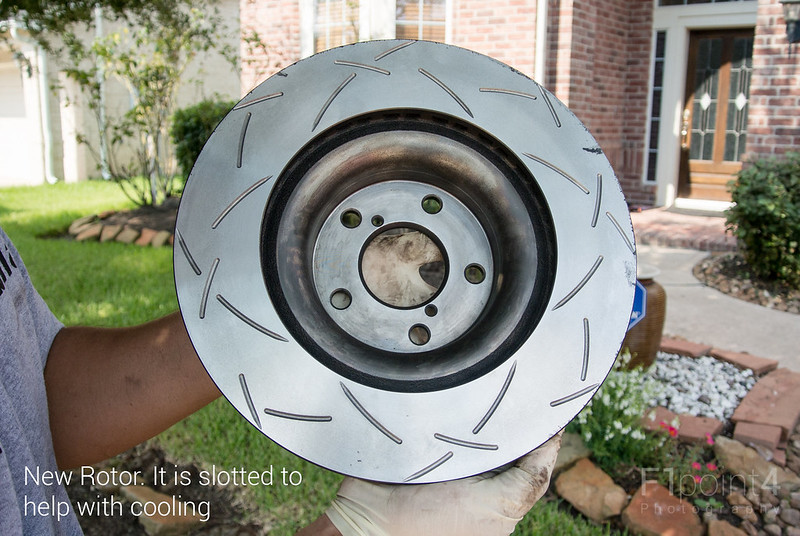
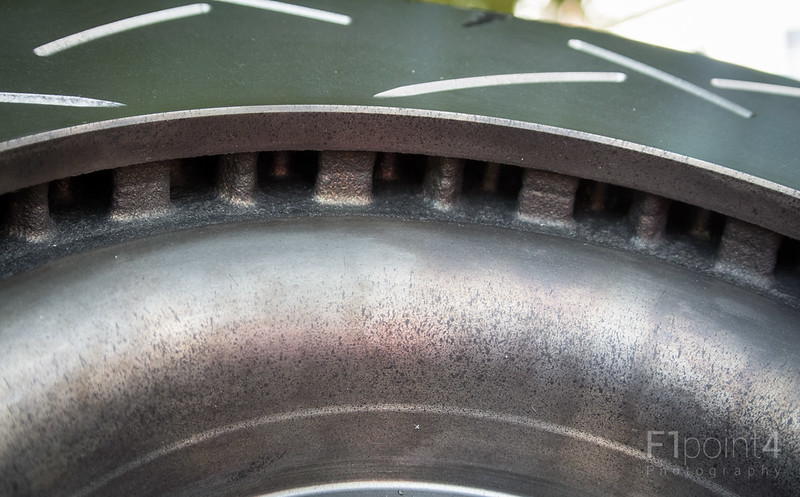
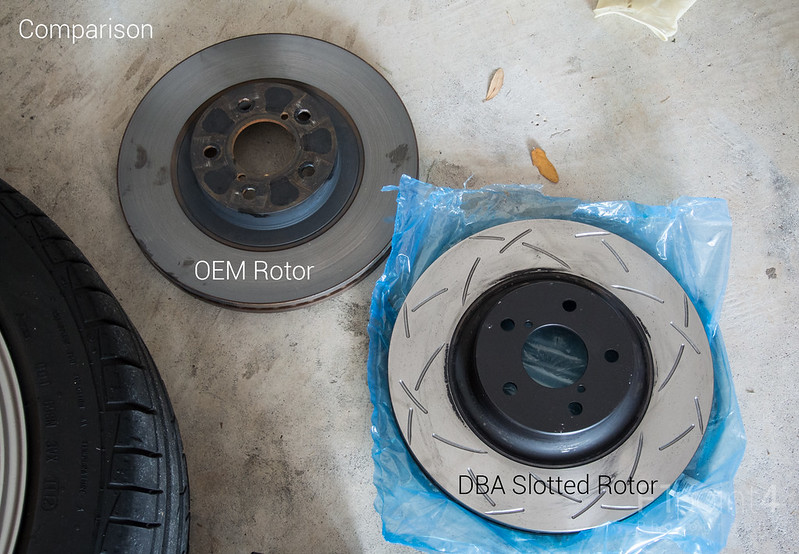
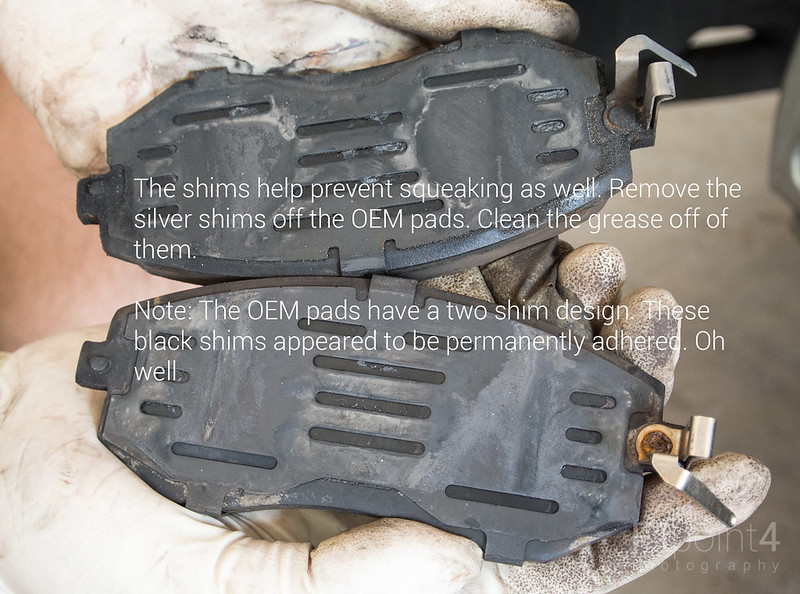
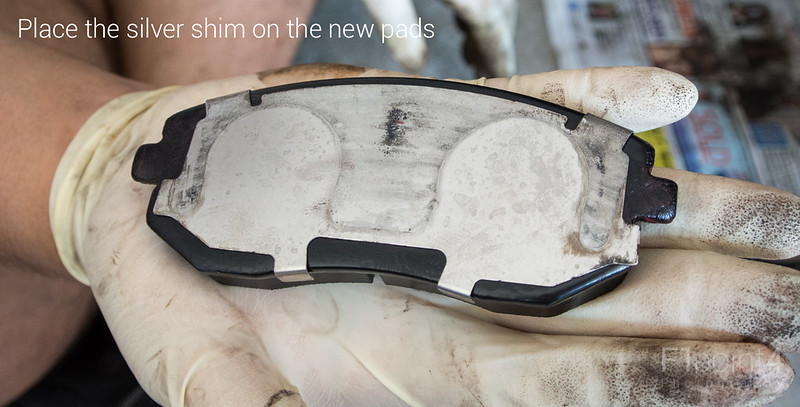
 20130831-DBA4650_HawkHPPlus_FrontJob-001 by VictorN07, on Flickr With my recent commitment to track and do HPDE events more, I decided I needed more upgrades in the braking department. Frankly it is one of the areas I have been neglecting. What I have already ATE Super Racing Blue DOT4 Brake Fluid Stoptech stainless steel lines in the front and rear SpeedBleeders What we will install today Hawk Performance HP Plus Brake Pads DBA 4000 T3 Slotted Rotors Turns out I have plenty of life left in the OEM pads and rotor. Dust boots look good still. I will hang on to the OEM pads and swap them in if the Hawk HP Plus pads don't work so well on the street. I hear they have to get up to temp to be effective. Also, fuck seized rotors. Purpose The purpose of upgrading pads and rotors in the stock braking system isn't to get more stopping power. It is to be able to stop consistently for longer. The Hawk HP Plus pads won't fade as fast as the OEM pads, and the slots in the rotors aid with cooling. It is definitely not as good as BBK such as the AP Sprint Essex Kits, but every bit helps. The plus side is that this is much cheaper, and you can figure out if drop in parts is enough for you. I've been told, good pads and fluids is great for the beginner. From there, stainless lines would be the next logical step, then getting better rotors. BBKs are required for the truly hardcore, such as endurance racers. Fun Story @firestormriot has purchased a Nikon J1 camera. He ended up taking all the photos using his J1 and the kit 10-30mm lens. I did my usual post processing magic. It was fun showing him how to use his camera and tips to take interesting pictures. He picked it up very quickly! I love sharing my passions with people. Thanks man for taking the pics while I got dirty. I also wanted to see if a inexpensive, small senor camera with non-pro glass can make good pictures. In my opinion @firestormriot and his J1 did admirably. You can see the results below. Thanks! Thank you @Chris@Phastek for securing the goods for me. Thanks to Dave Staba at DD Performance Research for the life saving tip that will be explained later on. Thanks to @firestormriot for the garage space and extra set of hands. Wanted to acknowledge @PMok for writing the initial guide for pads. I hope to expand on this. You can find his guide here http://www.ft86club.com/forums/showthread.php?t=24614
__________________
Last edited by F1point4; 09-01-2013 at 02:35 AM. |

|

|
| The Following 6 Users Say Thank You to F1point4 For This Useful Post: | amram (03-27-2014), kodyo (12-20-2014), PMok (09-01-2013), Strife26 (08-23-2018), twodollarcuts (05-18-2021), Young_makaveli (09-01-2013) |
| The Following 32 Users Say Thank You to F1point4 For This Useful Post: | amram (03-27-2014), BabaYaga (12-21-2014), Bcarlos (03-27-2014), Black Tire (12-21-2014), BRZBlack (04-01-2021), CkOne (10-22-2020), clayrush (03-30-2014), DarkSunrise (09-17-2013), dp1 (04-01-2015), dphan (09-08-2013), elbles (06-08-2014), fstlane (09-01-2013), grst1 (03-21-2021), hyper4mance (09-17-2013), illicitstylz (07-25-2015), JetSetKuro (03-24-2021), JimmyMac (09-01-2013), Keenercarguy (01-27-2016), kodyo (12-17-2014), Mchilese (07-27-2017), mike_ekim1024 (12-07-2013), NorCal_Guy (03-30-2014), radon55 (08-21-2019), RehabJeff86 (09-20-2013), RL_BRZ (09-06-2018), shiumai (09-01-2013), stevo_12v (05-14-2015), suaveflooder (09-01-2013), Tiago (03-27-2014), tian105 (05-01-2019), willypongtb (03-27-2014), Young_makaveli (09-01-2013) |
|
09-01-2013, 02:10 AM
|
#3 | |
|
Photo Specialist
Join Date: Feb 2012
Drives: 2013 Toyota 86 DGM 6MT
Location: Texas
Posts: 1,152
Thanks: 587
Thanked 1,802 Times in 420 Posts
Mentioned: 94 Post(s)
Tagged: 0 Thread(s)
|
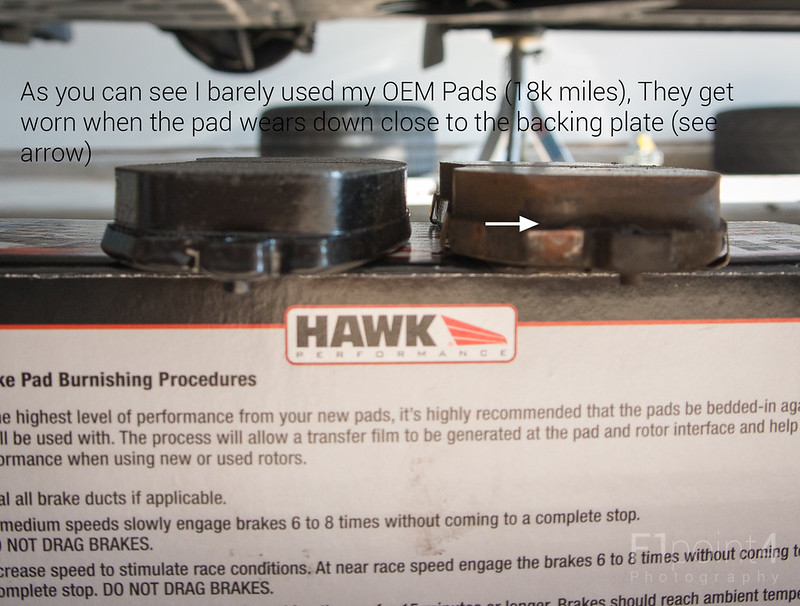
Here are example bed in instructions. If you don't bed in your brakes they may not work as well as they could. Here are the ones that come with the hawk pad.
Quote:
__________________
Last edited by F1point4; 09-01-2013 at 02:38 AM. |
|
|
|
|
|
09-01-2013, 02:59 AM
|
#4 |
|
Senior Member

Join Date: Aug 2012
Drives: 2013 FR-S, 2016 Miata Club
Location: NC
Posts: 785
Thanks: 183
Thanked 258 Times in 171 Posts
Mentioned: 7 Post(s)
Tagged: 0 Thread(s)
|
Nice write up! Did you happen to weigh the new rotors vs. stock?
|
|
|
|
|
09-01-2013, 03:39 AM
|
#5 |
|
Codename: Stitch

Join Date: Apr 2012
Drives: 91 MR2; 06 IS350; 16 BRZ; 18 CX-5
Location: Hayward/NorCal
Posts: 5,248
Thanks: 4,021
Thanked 5,436 Times in 2,307 Posts
Mentioned: 462 Post(s)
Tagged: 6 Thread(s)
|
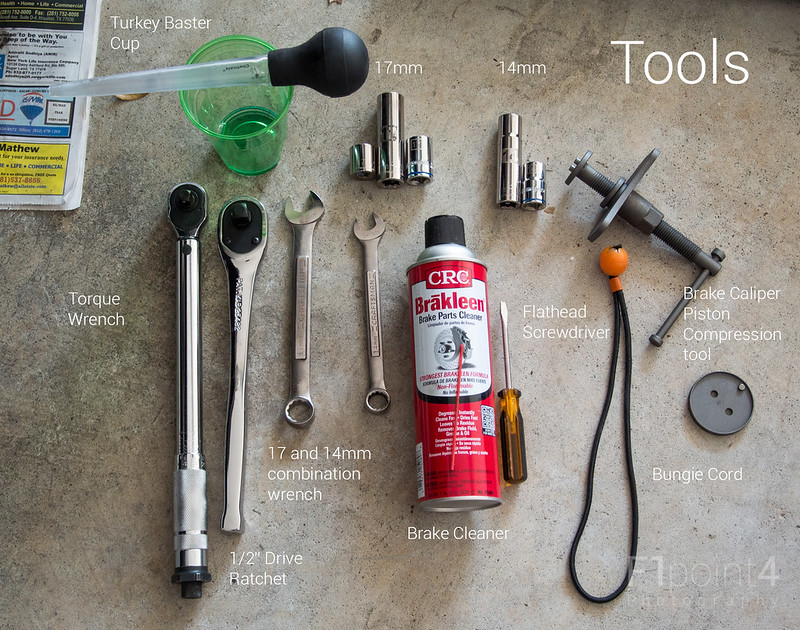
great photos and writeup! a few alternative tools/tips:
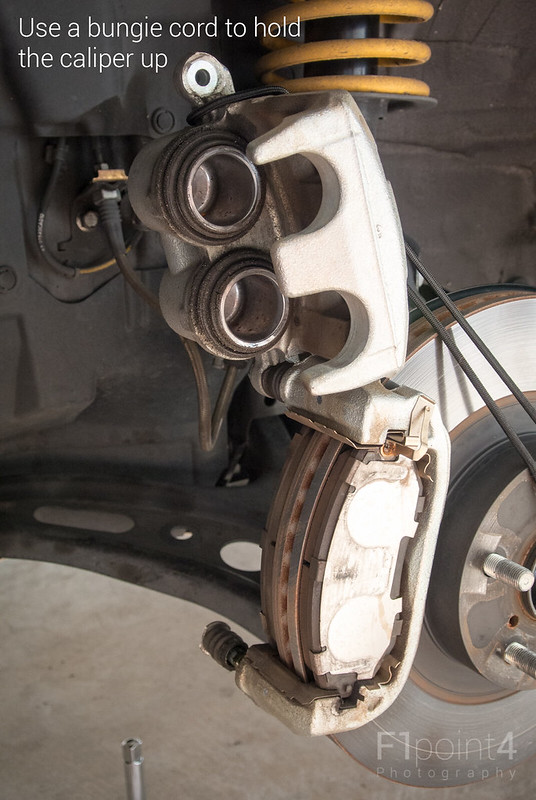
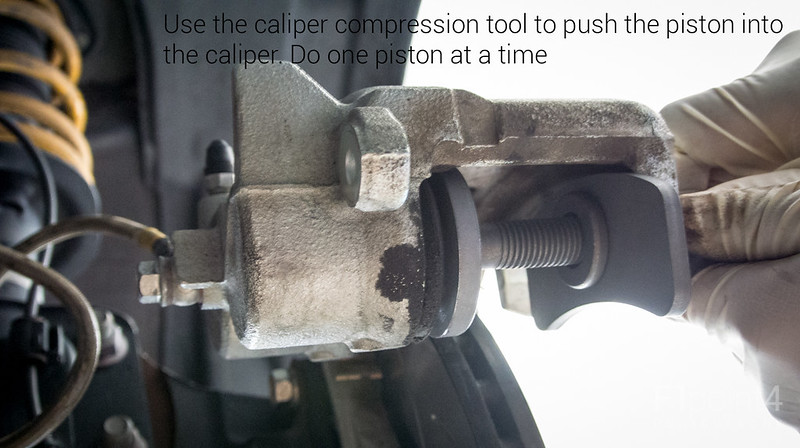
- in place of the bungee cord, I have used a spare jackstand with a sufficiently wide top surface (or put a board/plate on top) to support a caliper so that it doesn't hang from the brake lines while changing disc rotors. Really you can put it on anything that reaches high enough so it can rest on it without stretching the line. - if you don't have a brake piston compression tool, a basic c-clamp in combination with your old brake pad will work to compress the piston. 
__________________
|
|
|
|
| The Following 3 Users Say Thank You to PMok For This Useful Post: |
|
09-01-2013, 04:05 AM
|
#6 |
|
Senior Member

Join Date: Aug 2013
Drives: 2013 frs
Location: Montreal
Posts: 712
Thanks: 181
Thanked 88 Times in 77 Posts
Mentioned: 2 Post(s)
Tagged: 0 Thread(s)
|
Very nice write up
Useful information here Thank you |
|
|
|
| The Following User Says Thank You to Young_makaveli For This Useful Post: | F1point4 (09-01-2013) |
|
09-01-2013, 09:41 AM
|
#7 | |
|
Photo Specialist
Join Date: Feb 2012
Drives: 2013 Toyota 86 DGM 6MT
Location: Texas
Posts: 1,152
Thanks: 587
Thanked 1,802 Times in 420 Posts
Mentioned: 94 Post(s)
Tagged: 0 Thread(s)
|
Quote:
__________________
|
|
|
|
|
|
09-01-2013, 09:59 AM
|
#8 |
|
Senior Member
Join Date: Jun 2012
Drives: BRZ WRB Pearl Limited Manual
Location: Mays Landing, New Jersey
Posts: 247
Thanks: 104
Thanked 40 Times in 35 Posts
Mentioned: 4 Post(s)
Tagged: 0 Thread(s)
|
Thanks for sharing....
__________________
 |
|
|
|
|
09-01-2013, 10:55 AM
|
#9 |
|
Senior Member
Join Date: May 2013
Drives: Whiteout FRS
Location: Chapel Hill NC
Posts: 115
Thanks: 46
Thanked 30 Times in 21 Posts
Mentioned: 1 Post(s)
Tagged: 0 Thread(s)
|
This is amazing. Wow
|
|
|
|
|
09-17-2013, 09:28 AM
|
#10 |
|
Senior Addict

Join Date: Jan 2013
Drives: 86 GT
Location: Perth, Australia
Posts: 1,217
Thanks: 249
Thanked 336 Times in 215 Posts
Mentioned: 12 Post(s)
Tagged: 0 Thread(s)
|
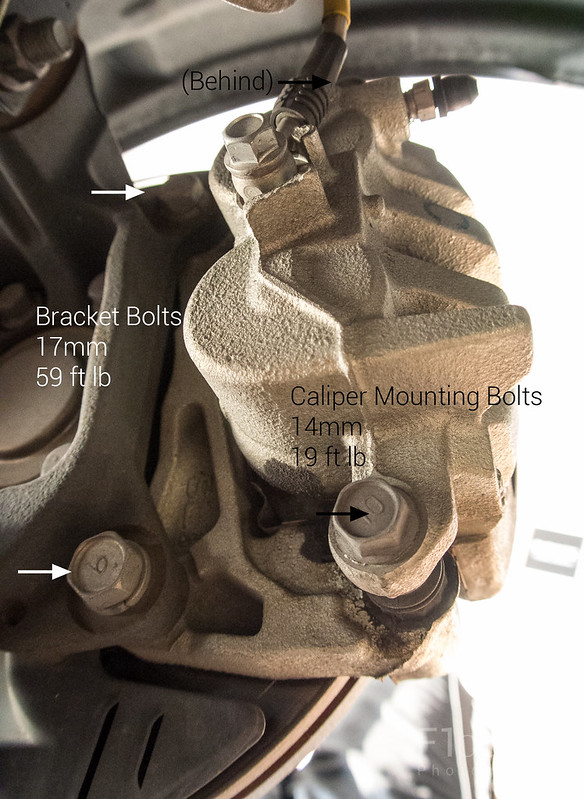
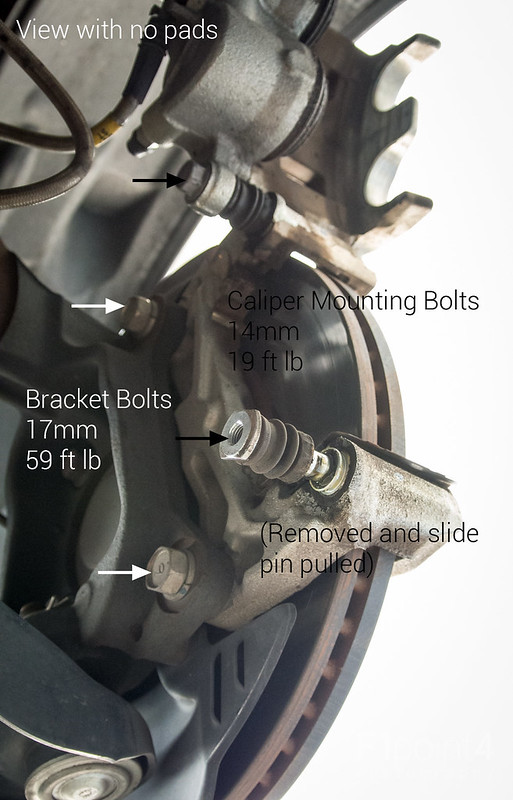
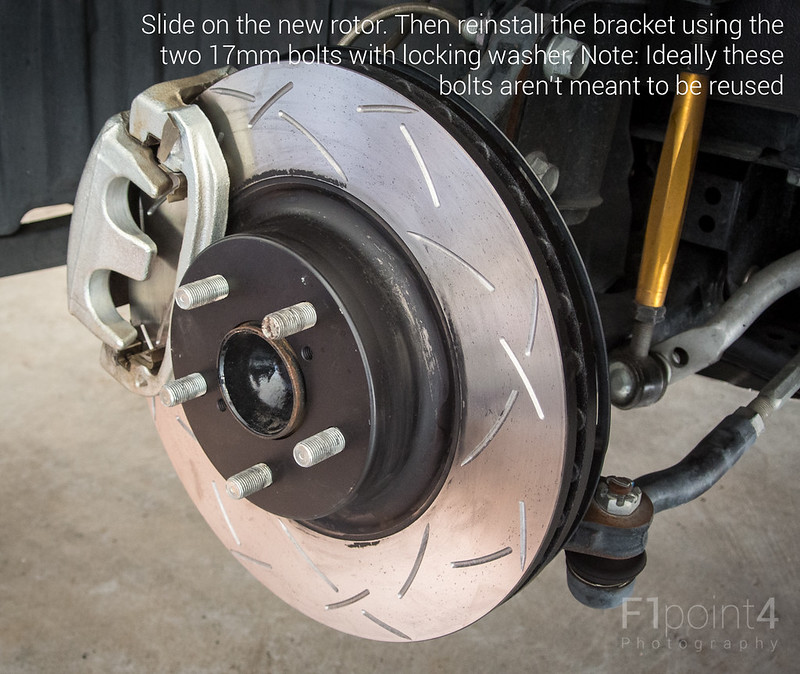
If I'm just replacing the rotors on a new-ish car (with appox 1500 easy driving miles), do u think I can skip sliding the calipers up? Can I just jump straight to removing the bracket bolts and move the whole brake assembly out of the way?
|
|
|
|
|
09-17-2013, 11:31 AM
|
#11 | |
|
Photo Specialist
Join Date: Feb 2012
Drives: 2013 Toyota 86 DGM 6MT
Location: Texas
Posts: 1,152
Thanks: 587
Thanked 1,802 Times in 420 Posts
Mentioned: 94 Post(s)
Tagged: 0 Thread(s)
|
Quote:
__________________
|
|
|
|
|
| The Following User Says Thank You to F1point4 For This Useful Post: | Fizz (09-17-2013) |
|
09-17-2013, 11:34 AM
|
#12 |
|
Banned
Join Date: Jan 2012
Drives: Attitude
Location: MD
Posts: 10,046
Thanks: 884
Thanked 4,889 Times in 2,902 Posts
Mentioned: 123 Post(s)
Tagged: 4 Thread(s)
|
Oh god HP+...

|
|
|
|
|
09-17-2013, 12:27 PM
|
#13 | |
|
Photo Specialist
Join Date: Feb 2012
Drives: 2013 Toyota 86 DGM 6MT
Location: Texas
Posts: 1,152
Thanks: 587
Thanked 1,802 Times in 420 Posts
Mentioned: 94 Post(s)
Tagged: 0 Thread(s)
|
Quote:
__________________
|
|
|
|
|
|
09-17-2013, 12:40 PM
|
#14 | |
|
Banned
Join Date: Jan 2012
Drives: Attitude
Location: MD
Posts: 10,046
Thanks: 884
Thanked 4,889 Times in 2,902 Posts
Mentioned: 123 Post(s)
Tagged: 4 Thread(s)
|
Quote:
|
|
|
|
|
|
|
|
|
|
| Tags |
| brake pad, brake rotor, diy |
|
|
 Similar Threads
|
||||
| Thread | Thread Starter | Forum | Replies | Last Post |
| Project Mu - Brake Pads, Rotors and Brake Cooling Duct - FREE SHIPPING! | eauto | Brakes, Suspension, Chassis | 255 | 10-15-2014 01:45 PM |
| R1 Concepts rotor, and brake pads | ExtremeAutowerks | Brakes, Suspension, Chassis | 37 | 12-23-2013 02:39 PM |
| FS: FRS OEM E-Brake (Emergency Brake) Hand Brake Boot | CamryDS | Interior Parts (Incl. Lighting) | 0 | 06-24-2013 11:26 PM |
| Brake rotor differences between base and Sport-tech BRZ | Sport-Tech | CANADA | 10 | 04-12-2013 07:15 AM |
| Redline360: Brake Lines, Brake Rotors, Brake Pads for BRZ/FRS | Redline360 | Brakes, Suspension, Chassis | 12 | 01-05-2013 10:20 PM |