


 11-07-2017, 04:02 AM
|
#169 |
|
Member
Join Date: Nov 2017
Drives: 2013 BRZ
Location: Melbourne, Australia
Posts: 13
Thanks: 0
Thanked 34 Times in 8 Posts
Mentioned: 4 Post(s)
Tagged: 0 Thread(s)
|
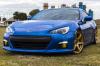
Hi guys, first time poster. Long time BRZer. Just wanted to share my attempt on removal of the mouthguard. Its a time consumptive process, but well worth the effort in my opinion. Any questions, feel free to ask.
|

|

|
| The Following 11 Users Say Thank You to BRZen For This Useful Post: |
|
11-08-2017, 08:53 PM
|
#170 |
|
Member

Join Date: Dec 2016
Drives: 2017 BRZ Premium
Location: San Jose, CA
Posts: 49
Thanks: 42
Thanked 21 Times in 13 Posts
Mentioned: 2 Post(s)
Tagged: 0 Thread(s)
|
I´m planning to attempt something similar with a plastic honeycomb grill too. Did you curve it? The one I already bought is flat, so I´m not sure how it will fit and look.
|
|
|
|
|
11-09-2017, 12:36 AM
|
#171 |
|
Member
Join Date: Nov 2017
Drives: 2013 BRZ
Location: Melbourne, Australia
Posts: 13
Thanks: 0
Thanked 34 Times in 8 Posts
Mentioned: 4 Post(s)
Tagged: 0 Thread(s)
|
Hi mate. Yes, I had to create a jig and heat mould the mesh over the jig.
|
|
|
|
|
11-09-2017, 11:18 AM
|
#172 | |
|
Member
Join Date: Dec 2016
Drives: 2017 BRZ Premium
Location: San Jose, CA
Posts: 49
Thanks: 42
Thanked 21 Times in 13 Posts
Mentioned: 2 Post(s)
Tagged: 0 Thread(s)
|
Quote:
|
|
|
|
|
| The Following User Says Thank You to Cheve For This Useful Post: | Tristor (05-09-2018) |
|
11-09-2017, 11:40 AM
|
#173 |
|
The Gunshine State

Join Date: Aug 2016
Drives: '14 BRZ Limited
Location: Florida
Posts: 1,463
Thanks: 631
Thanked 1,163 Times in 587 Posts
Mentioned: 9 Post(s)
Tagged: 0 Thread(s)
|
That's the first mustache-delete that looks good, now it just needs a fat intercooler behind it lol.
__________________
 Current DD: M235i |
|
|
|
|
11-30-2017, 06:35 PM
|
#174 |
|
Member
Join Date: Jul 2017
Drives: 2013 Subaru BRZ
Location: Houston, TX
Posts: 14
Thanks: 8
Thanked 2 Times in 2 Posts
Mentioned: 0 Post(s)
Tagged: 0 Thread(s)
|
I'm dying to know what was involved to do this, BRZen. Looks amazing. If this can be done without modifying the actual metal bumper, I'm doing it ASAP!
|
|
|
|
| The Following User Says Thank You to lbrixey For This Useful Post: | Tristor (05-09-2018) |
|
11-30-2017, 06:40 PM
|
#175 | |
|
Member
Join Date: Jul 2017
Drives: 2013 Subaru BRZ
Location: Houston, TX
Posts: 14
Thanks: 8
Thanked 2 Times in 2 Posts
Mentioned: 0 Post(s)
Tagged: 0 Thread(s)
|
Quote:
|
|
|
|
|
|
11-30-2017, 08:06 PM
|
#176 | |
|
Senior Member
Join Date: Aug 2016
Drives: BRZ
Location: Mendocino County
Posts: 369
Thanks: 7
Thanked 96 Times in 75 Posts
Mentioned: 4 Post(s)
Tagged: 0 Thread(s)
|
Quote:
|
|
|
|
|
| The Following User Says Thank You to NRXRaptor For This Useful Post: | Tristor (05-09-2018) |
|
12-01-2017, 10:01 PM
|
#177 | |
|
Member
Join Date: Dec 2016
Drives: 2017 BRZ Premium
Location: San Jose, CA
Posts: 49
Thanks: 42
Thanked 21 Times in 13 Posts
Mentioned: 2 Post(s)
Tagged: 0 Thread(s)
|
Quote:
|
|
|
|
|
|
12-02-2017, 04:48 AM
|
#178 |
|
Member
Join Date: Nov 2017
Drives: 2013 BRZ
Location: Melbourne, Australia
Posts: 13
Thanks: 0
Thanked 34 Times in 8 Posts
Mentioned: 4 Post(s)
Tagged: 0 Thread(s)
|
It will be hard to give dimensions because I moulded the piece on the shape of the cutout, and my cutout might be slightly different to yours. I'll post some pics that outline the process in my next post. Hope they help!
In saying that, it may be possible to just bend the plastic mesh into place and use some heavy weights to set the mesh while the glue dries. Also - no need to modify any of the chassis/crash beam/metal pieces beneath the bumper. I painted the crash beam black to make it less visible under the mesh, but that's it. That's worked really well for me. |
|
|
|
| The Following User Says Thank You to BRZen For This Useful Post: | Tristor (05-09-2018) |
|
12-02-2017, 04:57 AM
|
#179 |
|
Member
Join Date: Nov 2017
Drives: 2013 BRZ
Location: Melbourne, Australia
Posts: 13
Thanks: 0
Thanked 34 Times in 8 Posts
Mentioned: 4 Post(s)
Tagged: 0 Thread(s)
|
As promised.
|
|
|
|
| The Following 11 Users Say Thank You to BRZen For This Useful Post: |
|
12-04-2017, 05:16 PM
|
#180 |
|
Member
Join Date: Jul 2017
Drives: 2013 Subaru BRZ
Location: Houston, TX
Posts: 14
Thanks: 8
Thanked 2 Times in 2 Posts
Mentioned: 0 Post(s)
Tagged: 0 Thread(s)
|
Wow, thanks so much for the additional info and pics. I'm going to do this for sure. I can't believe more people haven't done this!
|
|
|
|
|
12-04-2017, 05:48 PM
|
#181 | |
|
Simply Forgotus

Join Date: Sep 2013
Drives: 2014 Supercharged SSM BRZ Limited
Location: Baltimore, MD
Posts: 916
Thanks: 735
Thanked 912 Times in 454 Posts
Mentioned: 30 Post(s)
Tagged: 0 Thread(s)
|
Quote:
|
|
|
|
|
|
01-30-2018, 07:13 AM
|
#182 |
|
Member
Join Date: Nov 2017
Drives: 2013 BRZ
Location: Melbourne, Australia
Posts: 13
Thanks: 0
Thanked 34 Times in 8 Posts
Mentioned: 4 Post(s)
Tagged: 0 Thread(s)
|
Old faithful, eBay.
|
|
|
|
|
|
|
|
 |
| Thread Tools | Search this Thread |
|
|
 Similar Threads
|
||||
| Thread | Thread Starter | Forum | Replies | Last Post |
| swap brz front end with fr-s? | koyv90 | Scion FR-S / Toyota 86 GT86 General Forum | 17 | 02-07-2012 03:23 AM |
| Subaru BRZ Front End...is...ugly? | hybrid4g | BRZ First-Gen (2012+) -- General Topics | 65 | 02-04-2012 11:33 AM |
| 215/40-17 front, 225/40-17 rear? | ZDan | Wheels | Tires | Spacers | Hub -- Sponsored by The Tire Rack | 5 | 01-21-2012 02:08 PM |
| Comparing front end of the FR-S/FT-86 to BRZ | DIG1992 | FR-S & 86 Photos, Videos, Wallpapers, Gallery Forum | 66 | 11-21-2011 05:26 PM |
| Buy this front bumper for G37 Coupe? | WhatIs86For | Other Vehicles & General Automotive Discussions | 12 | 02-26-2011 02:24 AM |


 The Burz
 2014 Subaru BRZ

