


|
||||||
| Member's Car Journals Car journals by our members. |
 |
|
|
Thread Tools | Search this Thread |
 02-20-2018, 05:23 AM
|
#1 |
|
Member

Join Date: Sep 2016
Drives: 2013 Subaru BRZ Sport
Location: Northern Germany
Posts: 49
Thanks: 7
Thanked 63 Times in 27 Posts
Mentioned: 1 Post(s)
Tagged: 0 Thread(s)
|
My 2013 BRZ, new parts (Nappa interior pieces, Likewise RLX lockout, and much more!)
Hi everybody!
Since I finally managed to get my account approved, I figured that I could introduce myself and my BRZ with the modifications I have already done to it. My name is Chris, I am 27 years old and I live in the city of Hamburg, Germany, and in 2015 I bought my BRZ with only some 60km (about 35 miles) on the odometer. Present mod list (as of 3rd May 2022) Exterior: -STI Front Underspoiler -STI Side Underspoilers -STI Rear Side Underspoilers -STI Front Emblem -OEM BRZ Facelift Fender Inserts -Replica Subaru Rear Diffuser -OEM Sharkfin Antenna -Ducktail Spoiler by Spiller -Grimmspeed Hood Dampers -Rear "Ínvisible" License Plate Holder -Mishimoto Magnetic Oil Drain Plug -SYMS Keyhole Mask -OLM Red Anodized Fuel Cap Cover -Black Trunk Emblems Lighting: -OEM BRZ Facelift Head Lights -Valenti Red/Clear Tail Lights -Valenti Red/Clear Rear Fog Light -Valenti LED Sidemarkers -OLM Nightseeker LED Fog Lights -LED License Plate Lights -LED Trunk Light Strip Interior: -STI Door Sill Cover -STI Shift Knob -STI Sound Changer -OEM BRZ tS Shifter Surround with OEM VSC-Buttons in Black -OEM BRZ tS Door Handle Applications -OEM BRZ tS Climate Control Surround -OEM BRZ tS Air Vent Rings -OEM BRZ tS Steering Wheel Application -OEM BRZ Facelift Radio Trim Piece -OEM BRZ Facelift Gauge Cluster Hood -OEM BRZ Facelift Climate Control Cover -OEM BRZ Facelift Window Switch Surrounds -OEM BRZ Facelift Climate Control Knobs -OEM BRZ Middle Console -OEM BRZ Floor Mats Red -Illumaesthetic STI Style Gauge Face -GCS Handbrake Button in black -GCS Reverse Lockout in black -Yospeed BRZ Badge matte black -SpaceCitySpy Trunk Strap -Mann Active Carbon Cabin Filter -MTEC Clutch Spring -DOMO! Suspension and Wheels: -Eibach Pro Kit 25mm/20mm -Enkei Yamato 18" (Bridgestone Potenza Sport) -LegalOne Lug Nuts blue -Whiteline Adjustable Camber Bolts Front -Whiteline Adjustable Camber Bushes Rear Electronics: -Pioneer AVH-ZL5150BT -Valenti Euro Winker Relay (Comfort Flashing Feature) -BW Rear View Camera Here is the first picture I took of it bone stock.  Of course it needed new wheels, so I got some Enkei Yamato 8*18 +35.   They are one of the few nice legal sets available in Germany, as the authorities need certificates for everything, and enforce the rules quite harshly. I actually planned for a drop, but would not have gottwn down my driveway at that time anymore, so this point had to wait for now. The next point on the agenda was the horrible factory stereo. For some reason the European market received some leftover 80s unit.  I replaced it with a Pioneer AVIC F-970BT, which fulfilled all my requirements and left some options to be added later.  Next up, the factory tail lights had to go, and were replaced with some Valentis (as everyone seems to do).  I used this opportunity to replace the Fog lights with units from a Subaru Forester, which is an upgrade to 2*55W, and also replace the license plate lights to LED units. Left is the original Fog Light, and on right the replacement unit.  As my OCD kicked in, I also replaced the rear fog light unit with the Valenti one:  Next on my list was the first track day at Meppen Race Park, a small technical track in the middle of nowhere. I was used to driving my RX-8 on the track, but the BRZ is quite a step up, but I still found potential for car and driver (mostly the latter) to improve.   I used a forced timeout due to a badly burned hand to collect some interior parts, as I found that part of the car to be lacking. I basically ordered a mix of BRZ tS parts, as well as some from the 2017 model.  After I was finally able to work again, I couldnt wait to install everything and basically ripped the car apart to work on it 24 hours straight. As the interior was basically out the car anyway, I decided to use the opportunity to install a rear view camera.    Some pictures of the finished work:     As I moved placed, I was finally able to give the car a slight drop with Eibach Springs and used the opportunity to install whiteline camber bolts in the front, and whiteline excentric camber bushings in the rear, and to have the car properly dialled in.    Next up, I wanted to get rid of the OEM excuse for a spoiler, so I got one custom made based on the TRD one (without the extensions). I even managed to have it entered in the papers, which is a feat in itself. Mounted it with some genuine Rocket Bunny rubber lip.   As the season was almost over, only sone little items remained: I got some custom made lug nuts from the Honda NSX forum (ball seat is otherwise impossible to find for our thread size), as well as a trunk tow strap.   The season whas then properly ended with a driving skill training.  Over the winter, I didnt do much, except sourcing a used Bastuck Catback, which was to be installed after it finally got warmer again, but first up, there was our opening tour, which was a bit messy due to the weather  Quick shot after I was back home:  Installed the Catback a bit later:  Went on holiday and switched my ride for a short time:  After I was back in my BRZ, the next drift training was coming up!  For this season, I dont have many plans, except for MTECs shift and clutch springs, as well as the obligatory season-start detailing session. This is how she sits and looks right now:  Sorry for the long post, its not that easy to cram 3 years onto 1 page
Last edited by Trollhart; 07-20-2023 at 09:46 AM. |

|

|
| The Following 3 Users Say Thank You to Trollhart For This Useful Post: |
|
02-20-2018, 05:59 AM
|
#2 |
|
Senior Member

Join Date: Mar 2016
Drives: 2018 BRZ tS
Location: Florida
Posts: 158
Thanks: 512
Thanked 137 Times in 56 Posts
Mentioned: 1 Post(s)
Tagged: 0 Thread(s)
|
What trunk strap is that?
__________________
 |
|
|
|
|
02-20-2018, 06:09 AM
|
#3 |
|
Member
Join Date: Sep 2016
Drives: 2013 Subaru BRZ Sport
Location: Northern Germany
Posts: 49
Thanks: 7
Thanked 63 Times in 27 Posts
Mentioned: 1 Post(s)
Tagged: 0 Thread(s)
|
This one.
They also sell via Amazon. The clip fits my trunk perfectly, but mind that EU cars all have the trunk liner. Edit: I also forgot my full "mod list" in the first post! Exterior: -Valenti Red/Clear Brake Lights -Valenti Red/Clear Fog Light -Ducktail Spoiler by Spiller Tuning -OEM Sharkfin Antenna -Grimmspeed Hood Dampers -Subaru Outback 55W Fog Lights -LED License Plate Lights -Chrome Indicator Bulbs Front and Side -Custom Rear License Plate Frame Black Stainless Steel -Mishimoto Oil Drain Plug Interior: -BRZ Facelift Radio Surround Leather -BRZ Facelift Odometer Cover Leather -BRZ Facelift A/C Console -BRZ Facelift Window Consoles -BRZ Facelift A/C Buttons -BRZ tS Shifter Surround with black OEM VSC Buttons -BRZ tS Door Panels -BRZ tS A/C Console Surrounds -BRZ tS Air Vent Surrounds -BRZ tS Steering Wheel Application -BRZ STI Sound Changer -Yospeed BRZ Badge Matte Black -OEM Armrest -OEM Floor Mats Red -GT86 Shift Knob -LED Trunk Lights -SpaceCitySpy Trunk Strap -Mann Activated Carbon Interior Filter -DOMO! Suspension and Wheels: -Eibach Pro Kit 25mm/20mm -Enkei Yamato 18" (Dunlop SportMaxx RT) -s2carbonworks Lug Nuts Black -Whiteline Camber Bolts Front -Whiteline Camber Bushings Rear Electrical: -Pioneer AVIC F970BT -Valenti Euro Winker Relay -BW Rear View Camera Last edited by Trollhart; 02-20-2018 at 07:14 AM. |
|
|
|
| The Following User Says Thank You to Trollhart For This Useful Post: | SkyeHack (02-20-2018) |
|
02-22-2018, 11:04 PM
|
#4 |
|
JDM Spirit of the '90s

Join Date: Dec 2016
Drives: 2015 FR-S Turbo
Location: South Florida
Posts: 304
Thanks: 321
Thanked 477 Times in 209 Posts
Mentioned: 1 Post(s)
Tagged: 0 Thread(s)
|
I like what I see!
Any chance you could share the part numbers for the faux carbon window switch covers? Thanks you!
__________________
|
|
|
|
|
02-23-2018, 08:05 PM
|
#5 |
|
Member
Join Date: Sep 2016
Drives: 2013 Subaru BRZ Sport
Location: Northern Germany
Posts: 49
Thanks: 7
Thanked 63 Times in 27 Posts
Mentioned: 1 Post(s)
Tagged: 0 Thread(s)
|
I could dig them out if you like, but they would likely not be of much use to you, as there are significant differences between the EU and other versions.
We have a slot for the folding mirrors on the left side, whereas the hole for the US lock button on the passenger side is missing. I suggest to ask a local Subaru dealer - these are 2017 BRZ OEM parts. Gesendet von iPhone mit Tapatalk |
|
|
|
| The Following User Says Thank You to Trollhart For This Useful Post: | Raven86Project (02-23-2018) |
|
02-23-2018, 08:38 PM
|
#6 |
|
-Phil's BIGGEST FAN BOI
Join Date: Jan 2016
Drives: 2014 Greddy Turbo BRZ
Location: Philadelphia
Posts: 678
Thanks: 19
Thanked 205 Times in 133 Posts
Mentioned: 5 Post(s)
Tagged: 0 Thread(s)
|
do you have a link to where to bought the rocketbunny rubber things?
__________________
2014 Subaru BRZ
Don't follow your dreams, follow my instagram www.instagram.com/soloside |
|
|
|
|
02-26-2018, 03:33 AM
|
#7 | |
|
Member
Join Date: Sep 2016
Drives: 2013 Subaru BRZ Sport
Location: Northern Germany
Posts: 49
Thanks: 7
Thanked 63 Times in 27 Posts
Mentioned: 1 Post(s)
Tagged: 0 Thread(s)
|
Quote:
I got them via Rocket Bunny's german distributor, Tofugarage. Don't know if he ships overseas, but just hit him up on facebook. |
|
|
|
|
|
02-27-2018, 03:30 AM
|
#8 |
|
Member
Join Date: Sep 2016
Drives: 2013 Subaru BRZ Sport
Location: Northern Germany
Posts: 49
Thanks: 7
Thanked 63 Times in 27 Posts
Mentioned: 1 Post(s)
Tagged: 0 Thread(s)
|
Forgot to leave this here.
Had some fun chasing a buddy at Meppen Race Park. He drives a boosted 2017 BRZ, while mine is stock power-wise. Sorry for the sound issues, the microphone was not really up to the task. [ame="https://www.youtube.com/watch?v=q8LCNFAys-g"]Racepark Meppen 2017 | Subaru BRZ - YouTube[/ame] |
|
|
|
| The Following User Says Thank You to Trollhart For This Useful Post: | JeremyR (03-29-2018) |
|
09-17-2018, 10:25 AM
|
#9 |
|
Member
Join Date: Sep 2016
Drives: 2013 Subaru BRZ Sport
Location: Northern Germany
Posts: 49
Thanks: 7
Thanked 63 Times in 27 Posts
Mentioned: 1 Post(s)
Tagged: 0 Thread(s)
|
Finally something new to post.
After I had been dozed off the Autobahn by 2,3 tons of Korean steel (inside a construction area, at that), my BRZ was sitting in the basement garage for quite some time, looking sad and wrinkly. I won't upload pictures here, you know how broken BRZs look like. That was on Friday, 13th April, by the way. No, I am not superstitious. Luckily, aside from some compressed metal and sore necks, neither my girlfriend nor I sustained any major injuries. I am really glad that I have attended several driving safety trainings over the last years, since my quick reaction saved us from either hitting a concrete barrier on the left, and being stranded in the left lane, or plowing through a metal fence on the right and falling 10 down meters. Settling this case has taken quite some time, despite immediately involving my attourney (yay for legal insurance!), because nobody cared to stop, leaving me without any independent witnesses. Anyway, I have dwelled enough on the absence of basic human courtesy. In August, I finally got my BRZ back from the workshop. Prior to the repairs, the car was inspected by my inspector and had a full alignment done and the values were compared against the ones the car had before the crash. All was okay, so Frame and suspension damage were ruled out, putting the repair cost well below the "totalled" figure. The repair itself was done mostly by pushing the metal back out (basically like PDR), and trying to use as little filler as possible (actually just one spot hat a very thin coat applied). Then, the left side was resprayed (except the door, which somehow managed to remain fully intact). If you know this fact, this makes it very obvious that the paint match is spot on - there is no difference to be seen. Here is the first picture after I got the car back and had an extended drive: 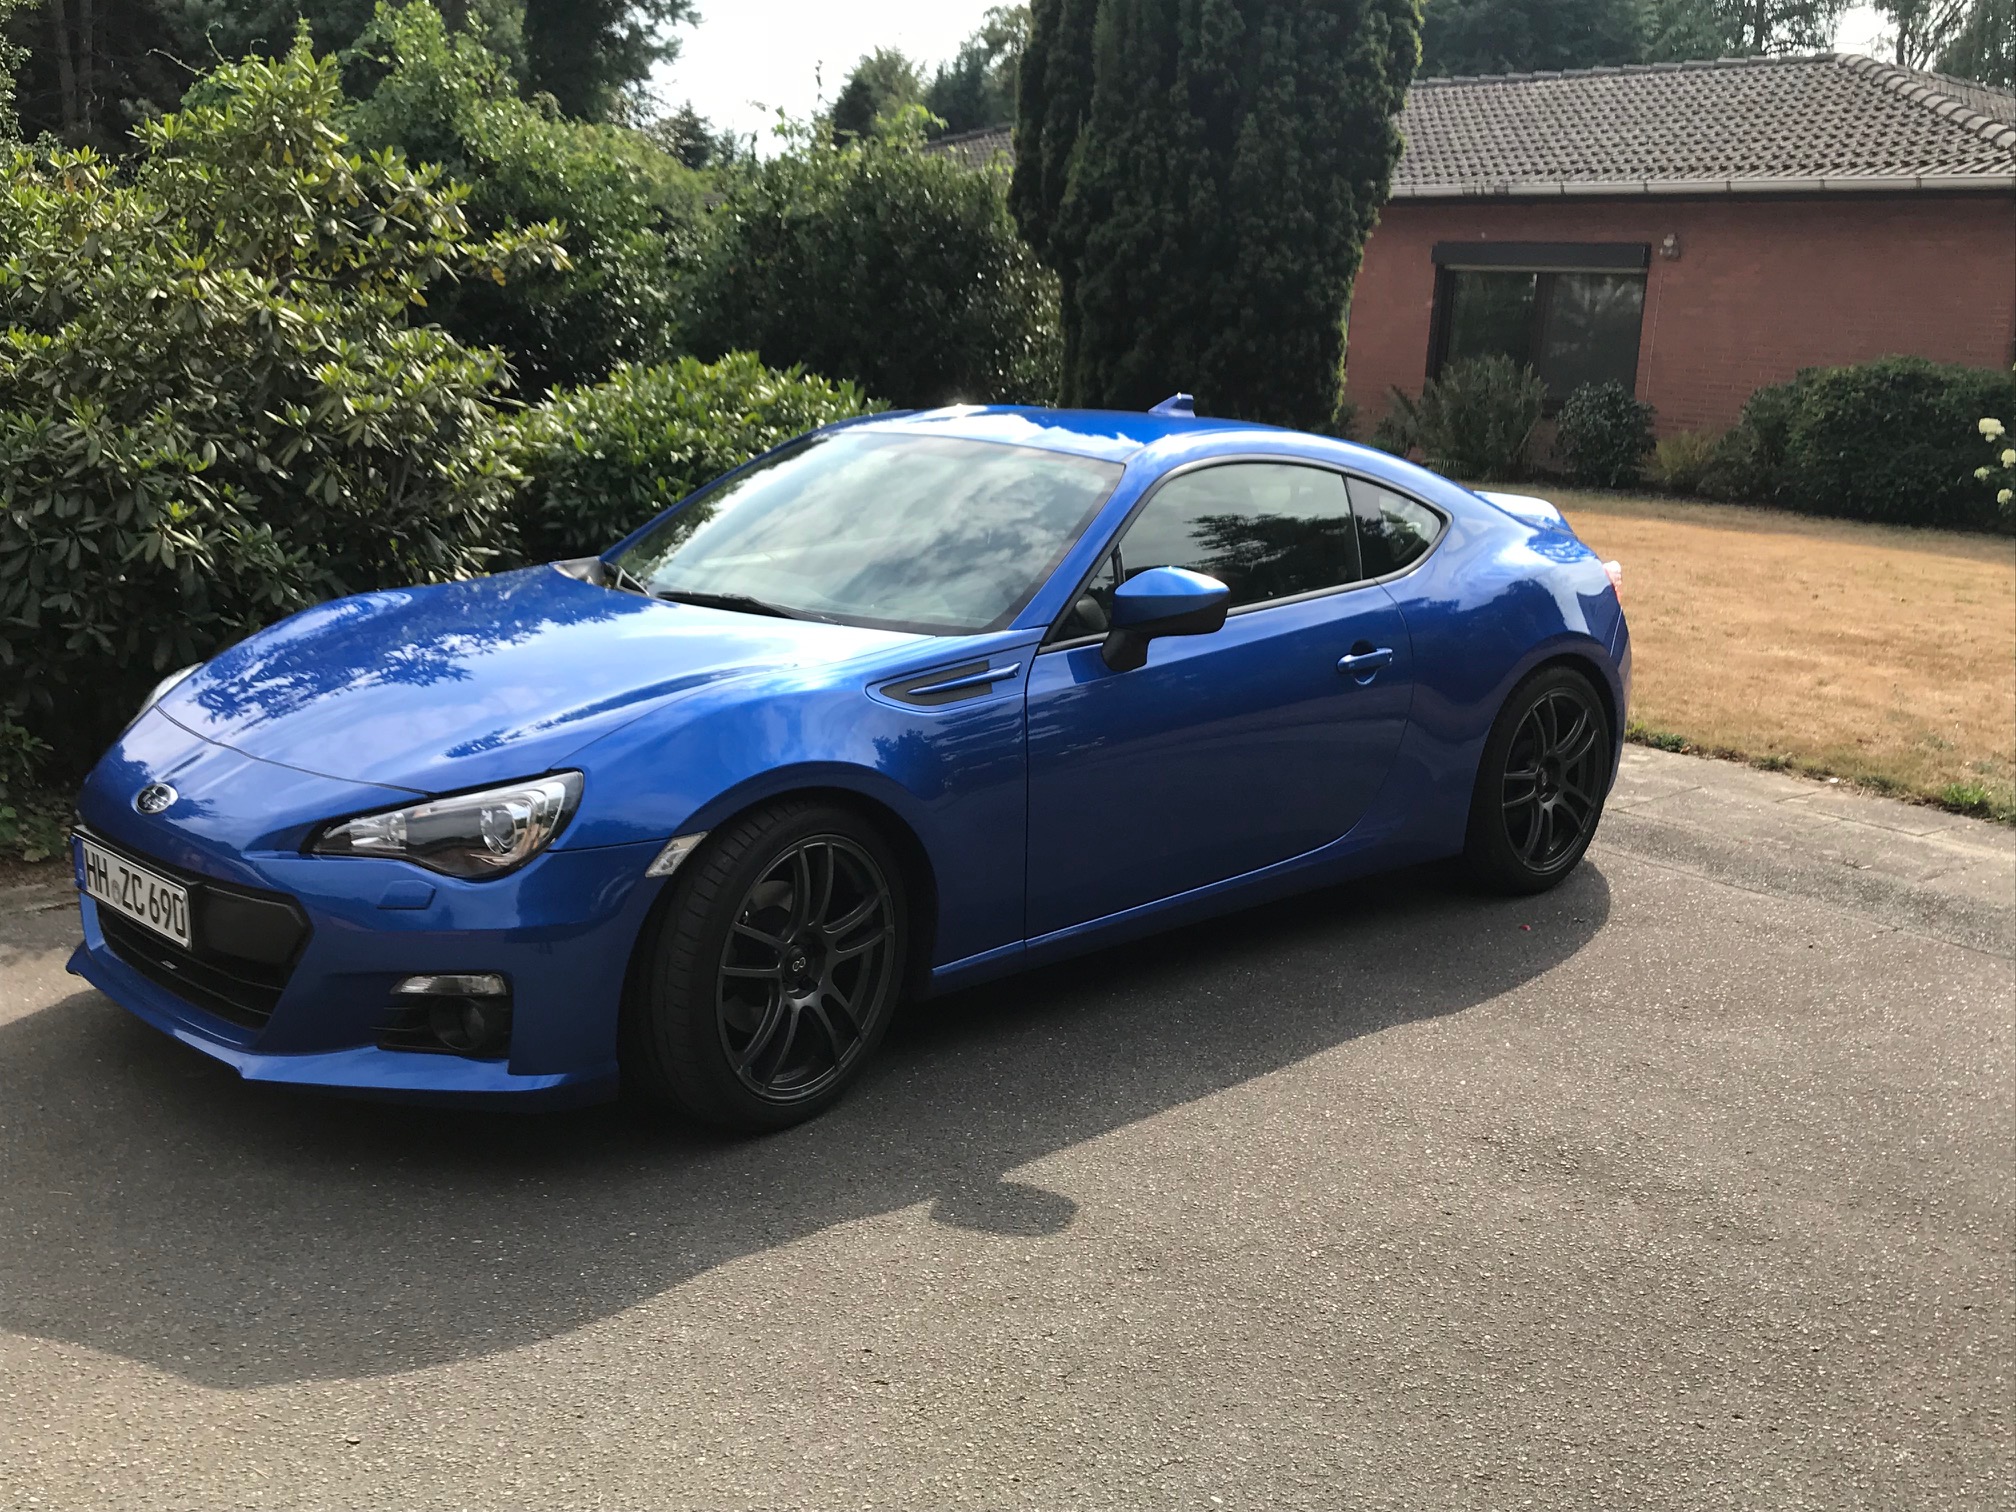 Just 2 days later the BRZ and I went to the track day at Meppen again (third year in a row). 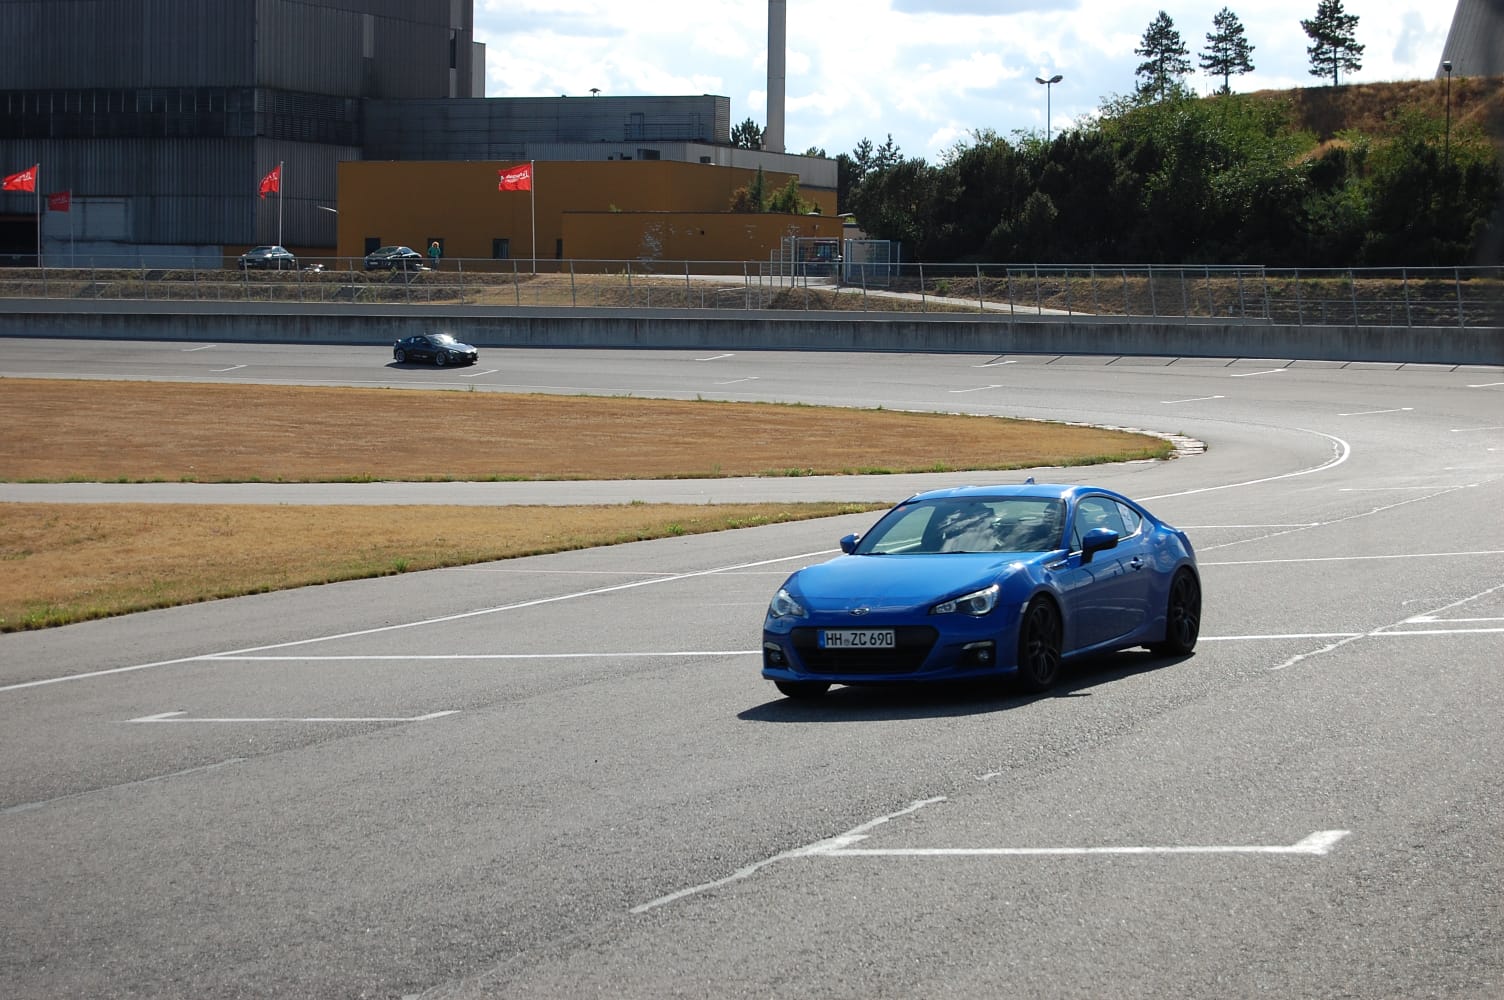  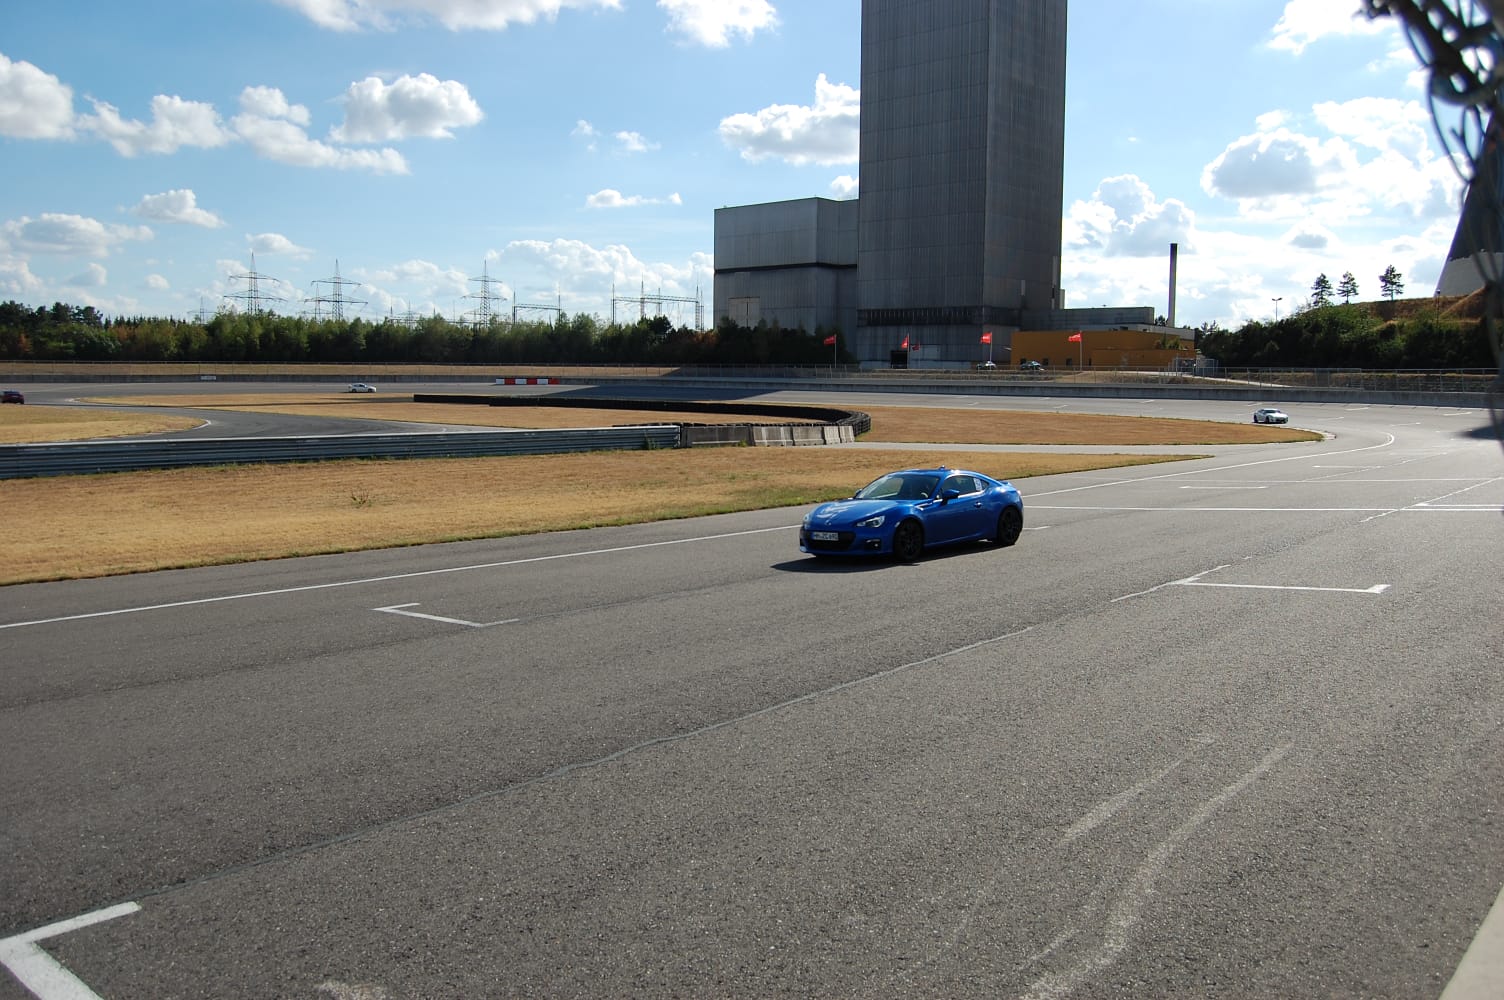 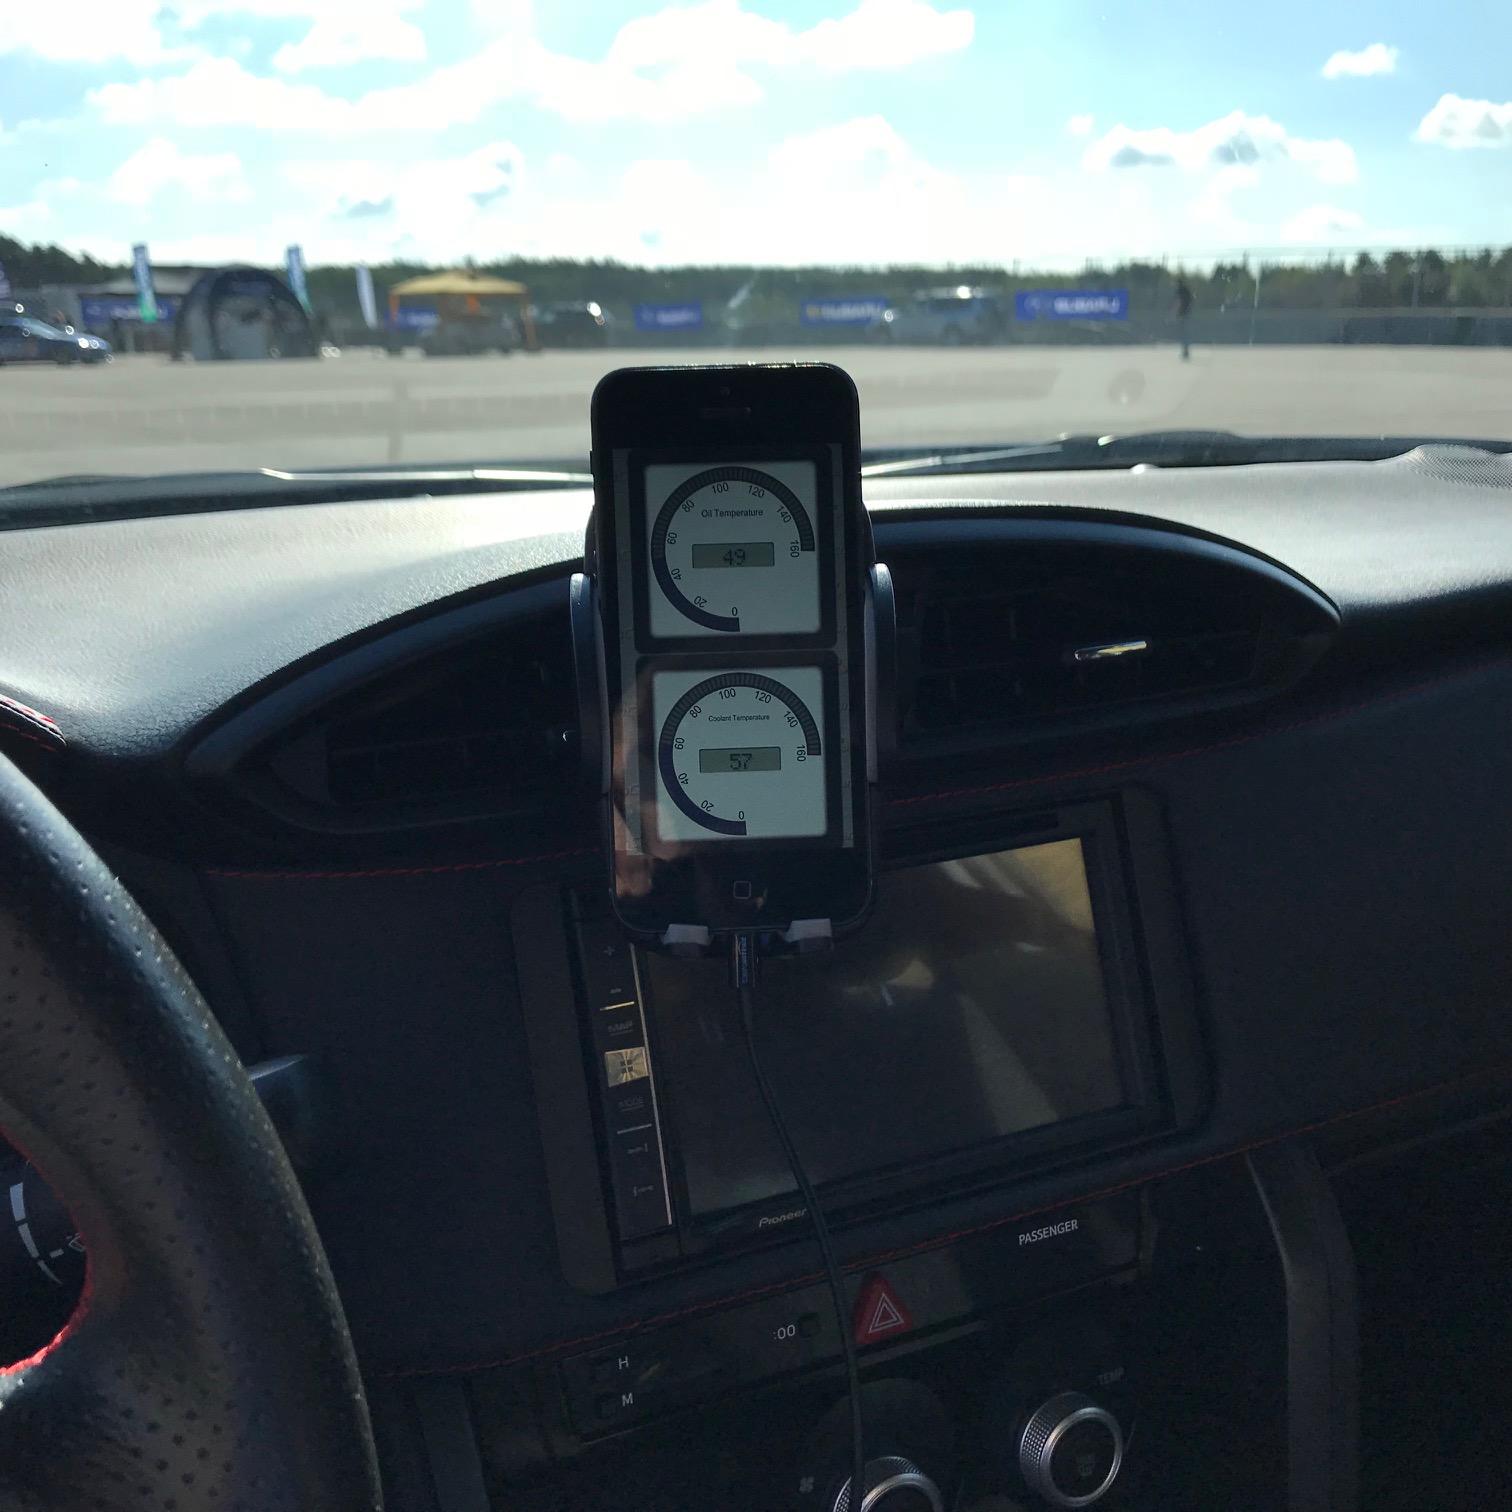 Since I did of course not stop buying any parts while the carsat in the garage, I used the nice weather to work through my car part backlog The "fake vents" of the BRZ always bothered me much more than they should have, but until recently, there was no good alternative. Until the Facelift of the BRZ came along. Knowing that the World Rally Blue was changed slightly at some Point, I had to buy the unpainted parts: 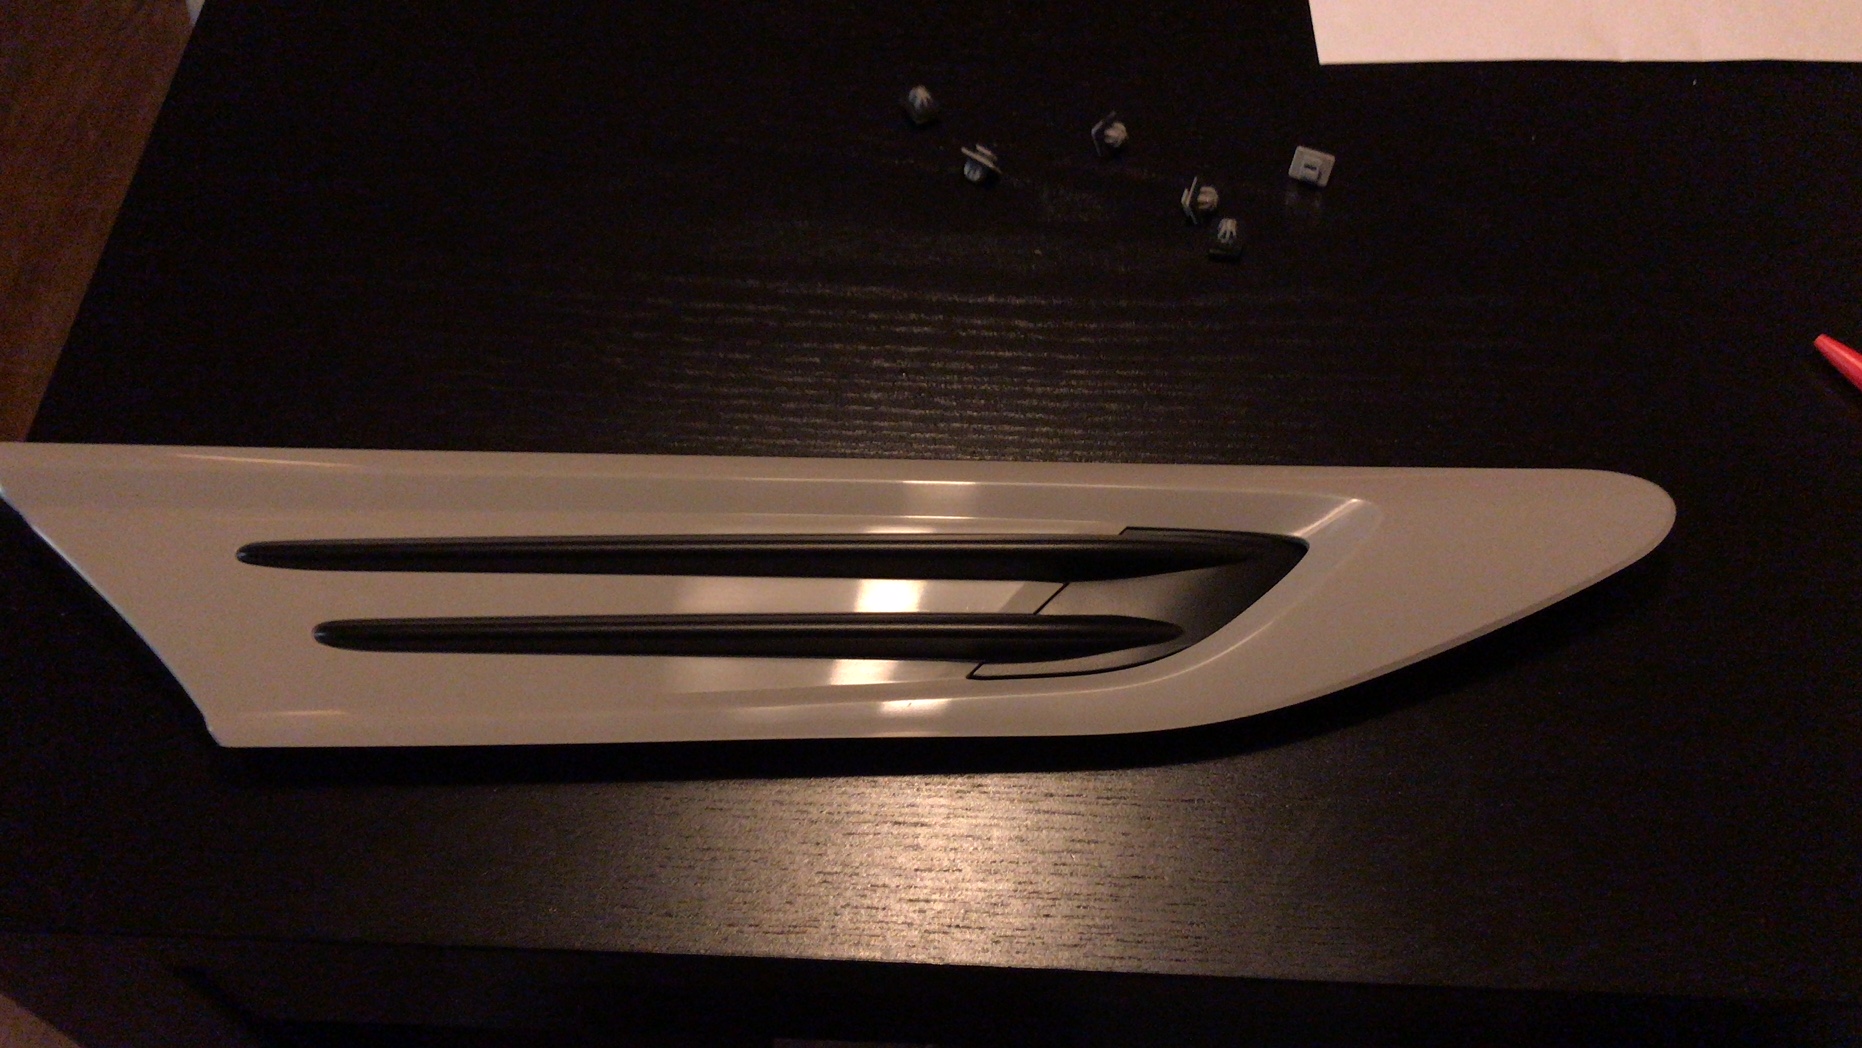 My paint shop (the ones that already did my duck tail) again delivered superb work: 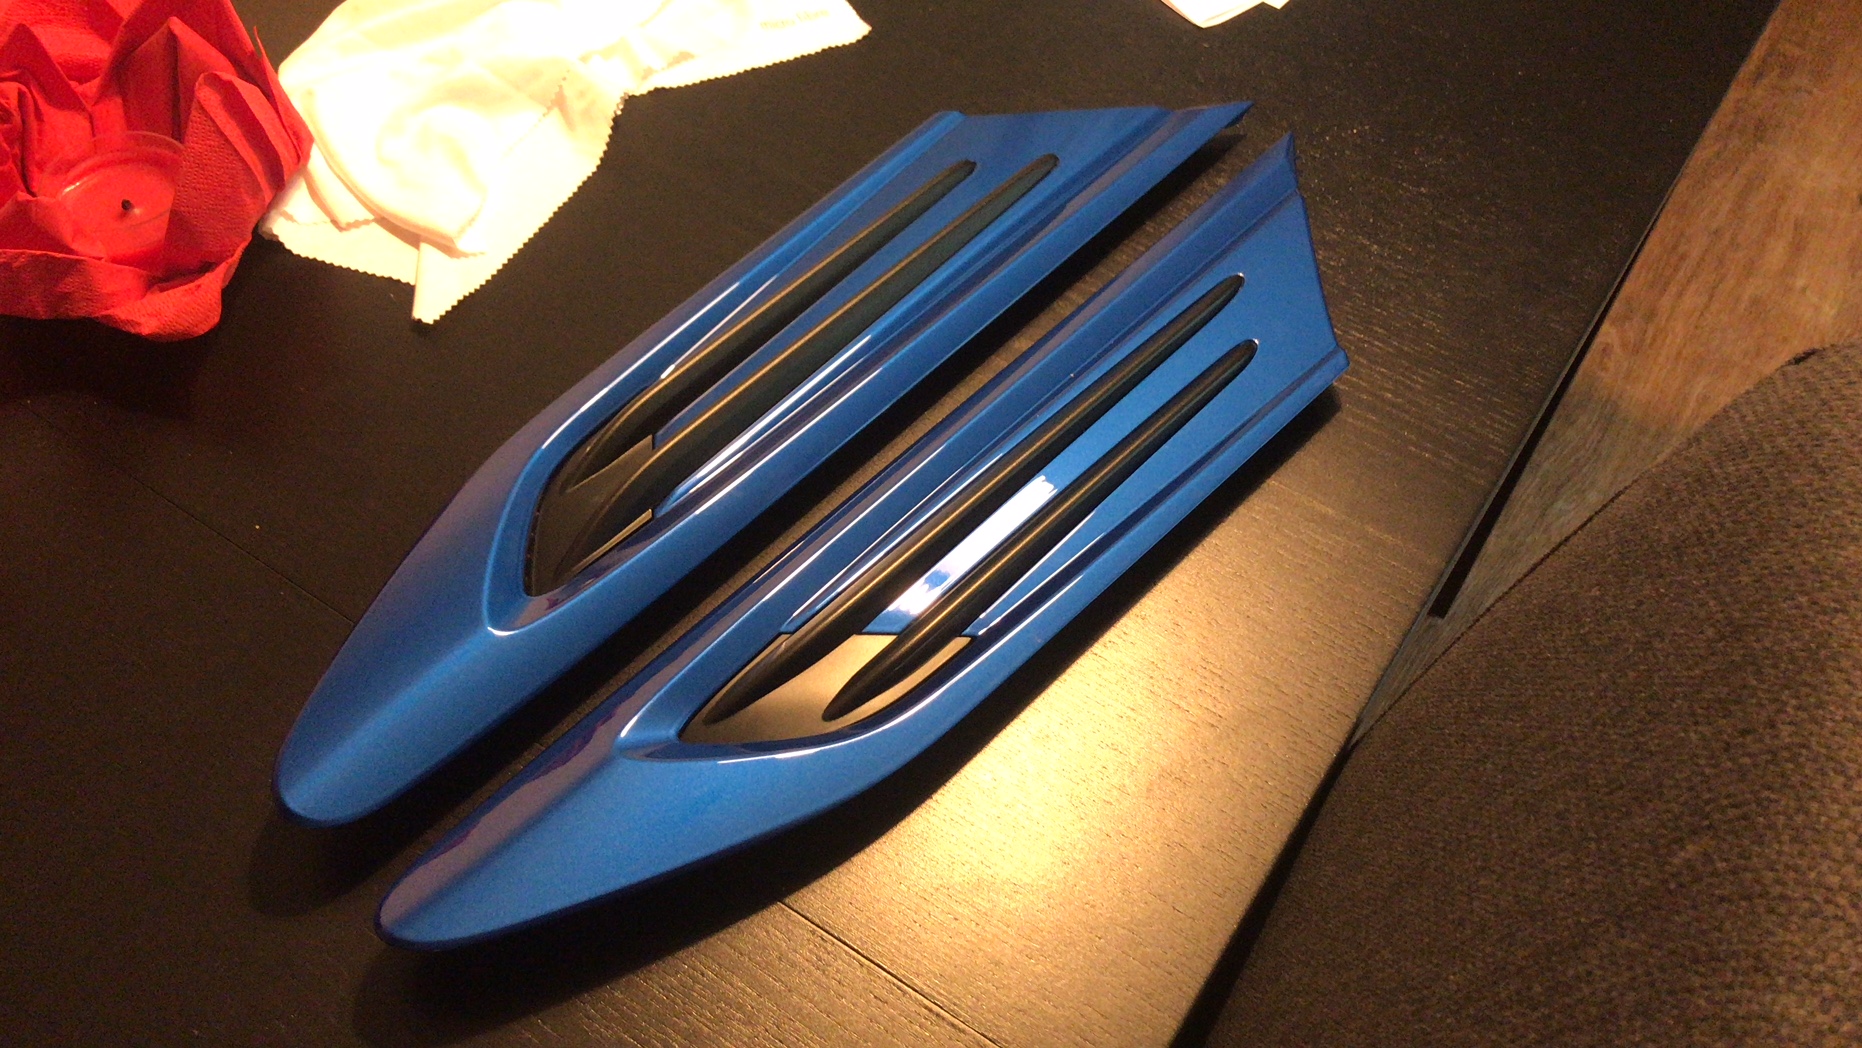 I used some fishing rod to cut through the 3M securing the old pieces in place: 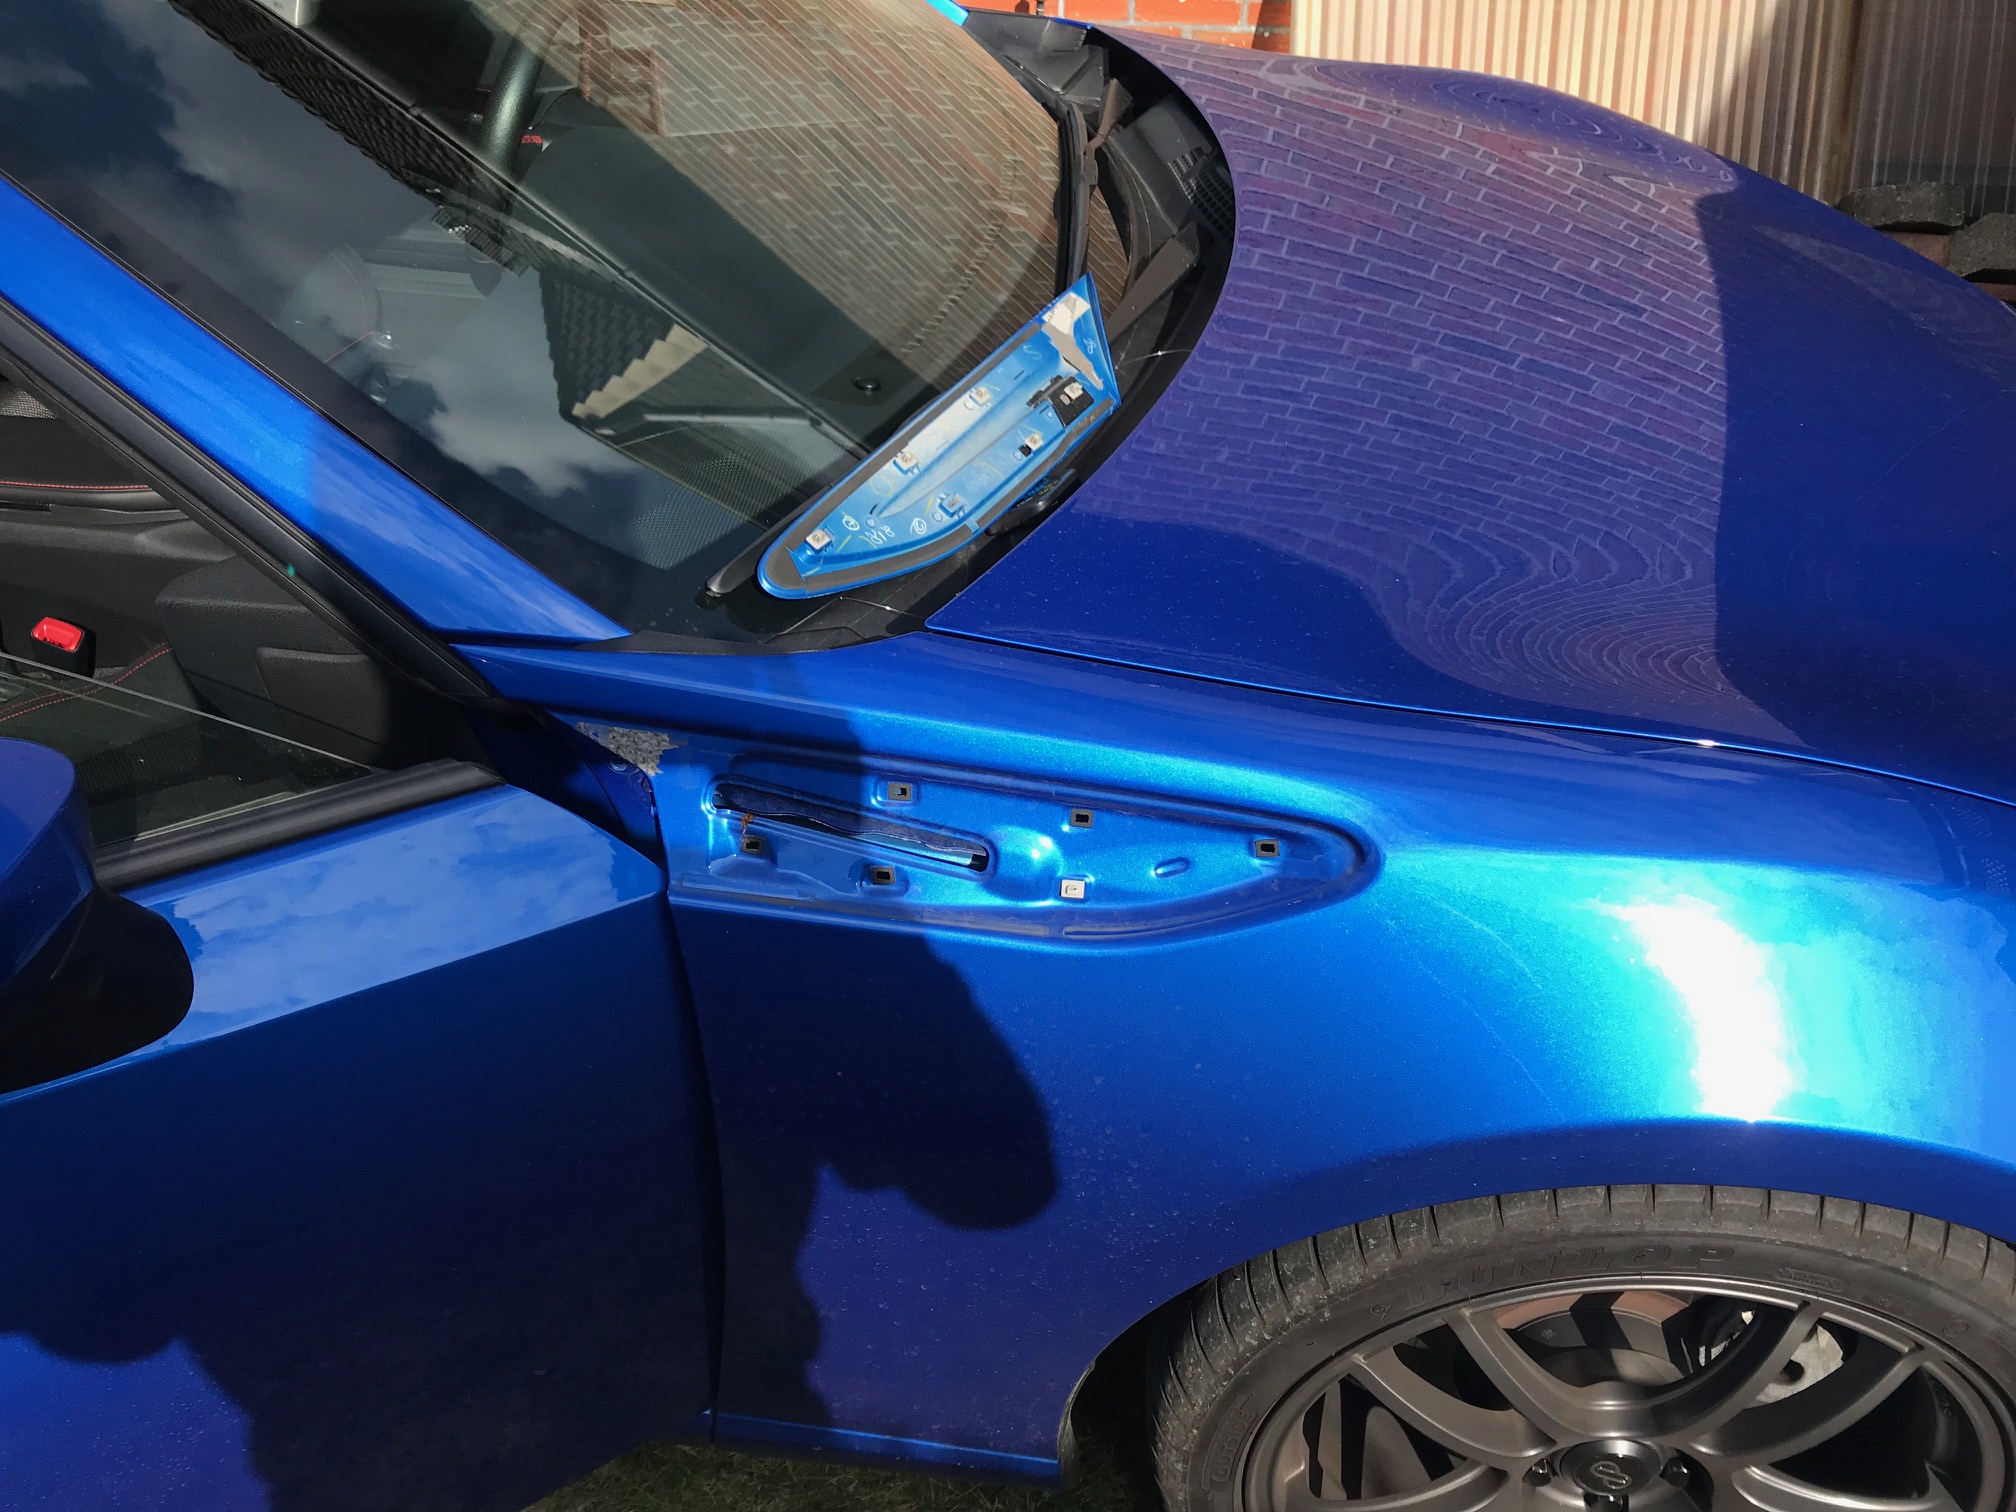 Then I removed the remainder of the glue and cleaned the surface with Isopropanol... 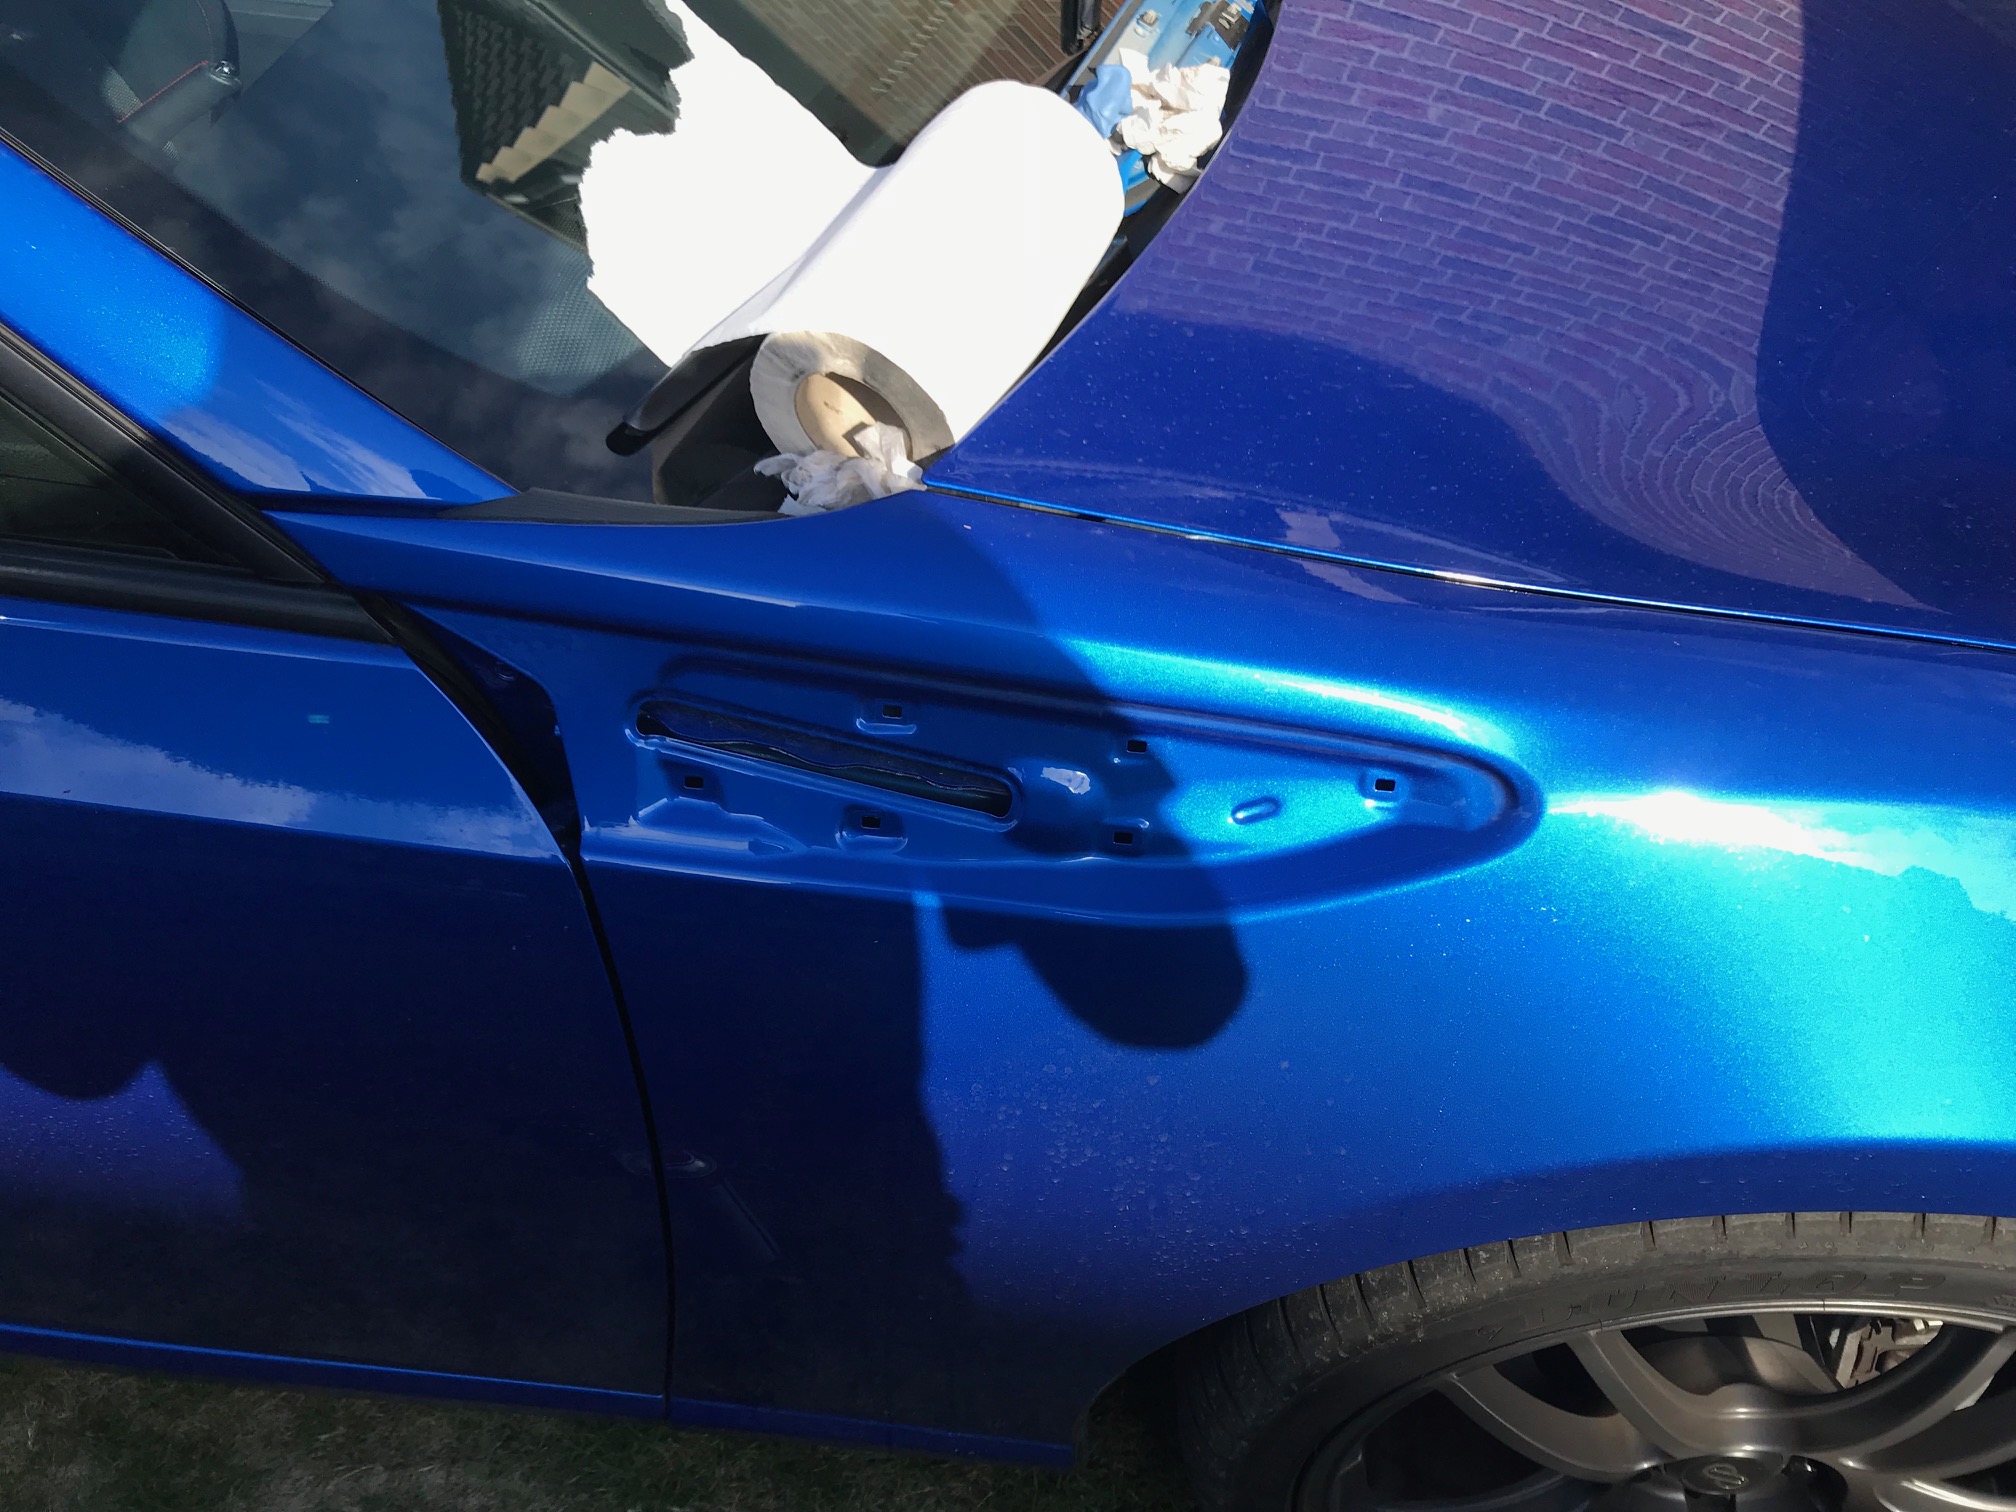 ...and pushed in the new vents. 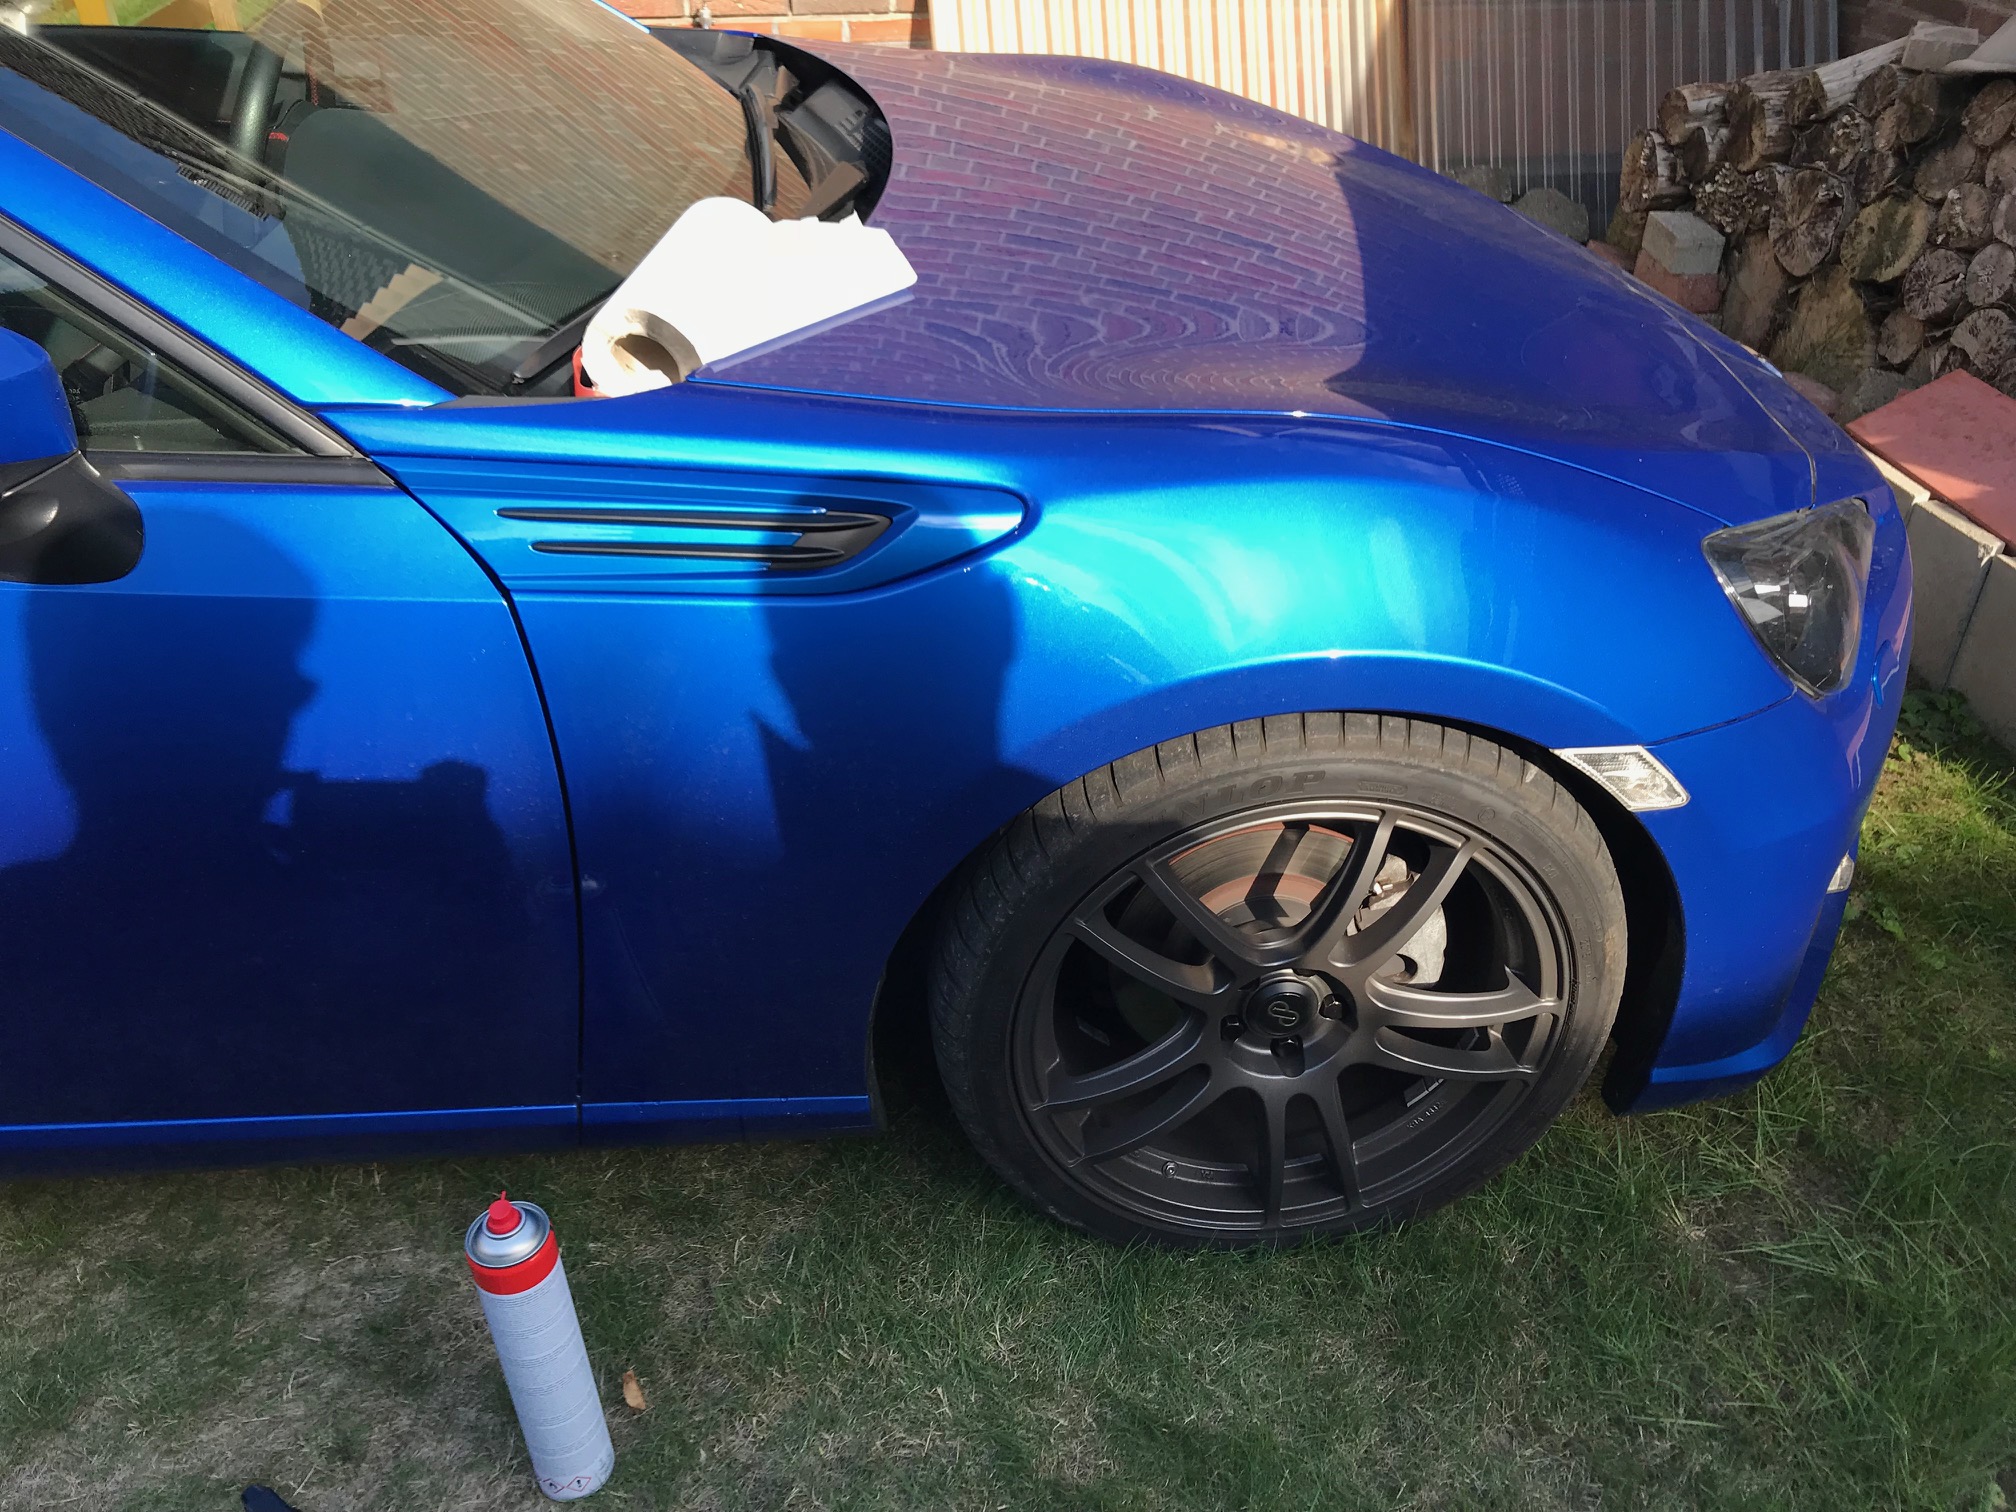 This is the end result: 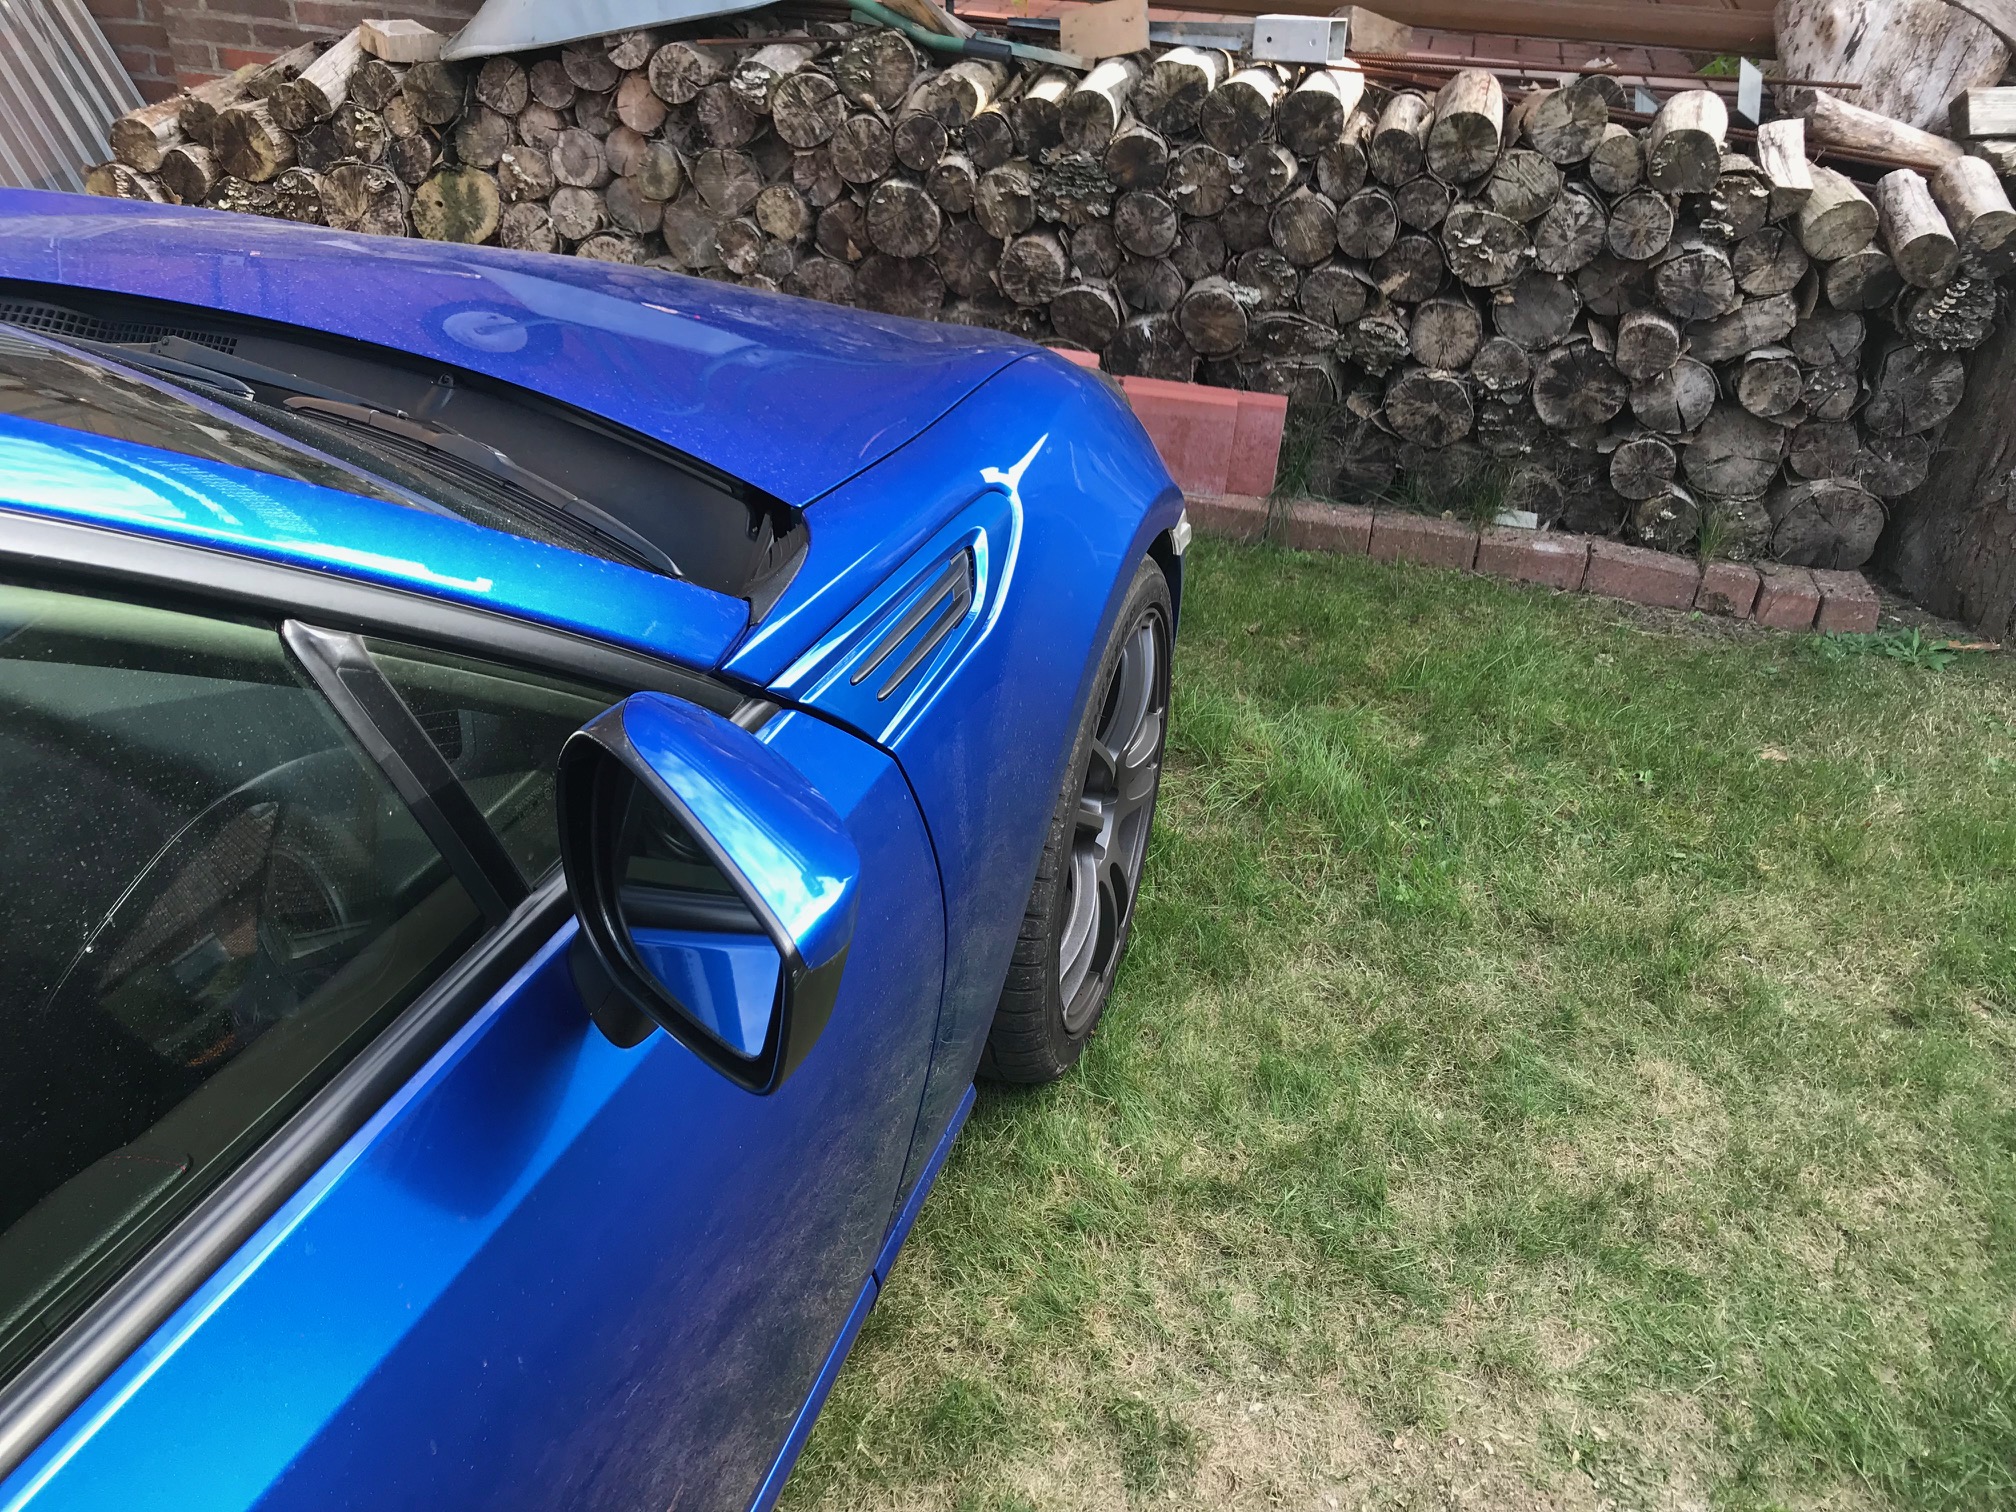 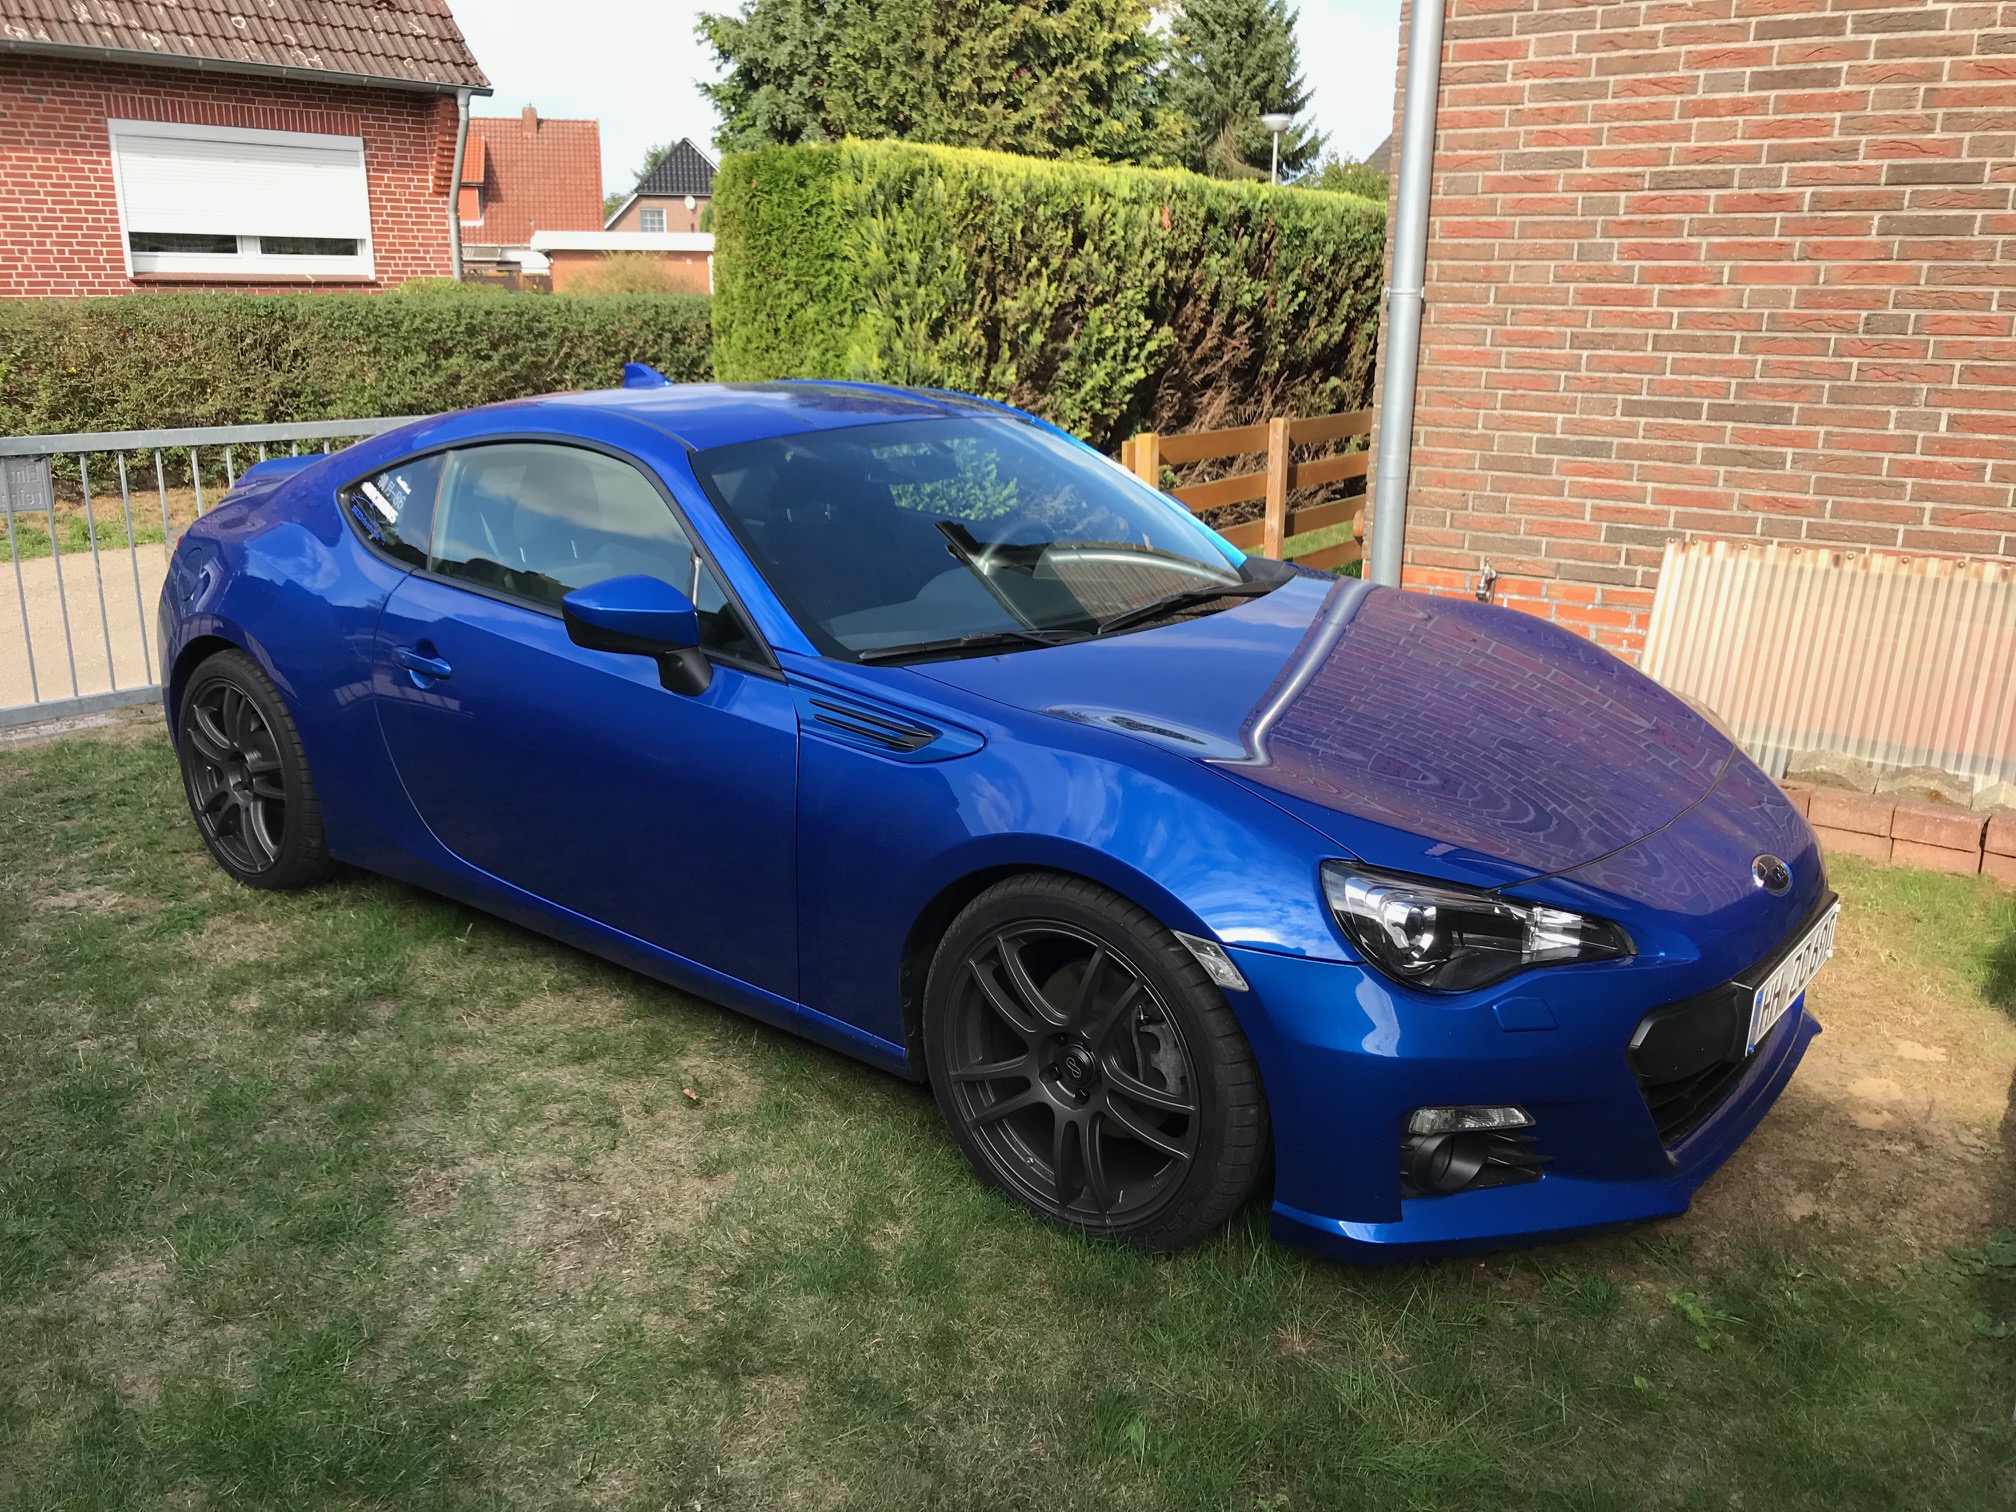 I really like how this came out, and hope that in the future no SUVs will want to cuddle with my car, so that I can enjoy it for the full summer next year
|
|
|
|
|
05-03-2022, 04:24 AM
|
#10 |
|
Member
Join Date: Sep 2016
Drives: 2013 Subaru BRZ Sport
Location: Northern Germany
Posts: 49
Thanks: 7
Thanked 63 Times in 27 Posts
Mentioned: 1 Post(s)
Tagged: 0 Thread(s)
|
Somehow I forgot about this thread.
I remember that I really wanted to keep it updated, but then life happened, I guess. Got married, bought and renovated a house, planted some trees, and going to be a dad in some 2 weeks. What better time to update this thread and then forget about it for another 4 years than now? As soon as I was more or less done with the house, I also built a little carport thing so that my BRZ would have a roof over its head, and also for me to have a place to do some "driveway mods". Over the Easter weekend, the weather was finally good enough so that I could start throwing all the parts at the car which I had collected over the years. I could not do anything in the previous years, because the apartment complex I lived in did not even allow me to change the wheels on their property. Seems we Germans keep working hard to keep our stereotypes alive. Anyway, after I had jacked up the car, I first removed the wheels and deep-cleaned the wheel wells because they were completely disgusting.  I then started with the small and quick items on my to do list. First thing to go was my old license plate frame which had started to flake. It was replaced with an "invisible" system which also cleared my rear view camera much better.  Then, I threw on the "SYMS keyhole mask" I don't remember where I got it, but it's simply a little magnetic piece that covers the keyhole on the driver side. Before and after:   Next, I removed the front bumper. I found this a bit more challenging than I would have thought from the tutorials I watched. I already had some experience with the side markers, so they weren't that much of a problem, however the wires from the DRLs as well as the headlight washer nozzles made my life harder than I would have liked it to be. Anyway, in the end I got it off the car without scratches:  Since I wanted to install the facelift BRZ headlights that I bought from some classifieds (separately), I removed the headlight shrouds. They can be left dangling, although ideally you might want to use some cable ties. I didn't.  I also used this opportunity to clean out all the junk that accumulated behind the bumper over the years. Mostly road dirt and leaves. One last comparison of the "old" HID headlights vs. the new LED ones:  The removal and installation is pretty straightforward. After the shrouds are loose, just unclip the actual headlight assemblies and remove 2 plugs (8 pins and 3 pins) each. The "new" headlights go in in reverse order. There has been a lot of discussion whether you need to re-pin anything for this swap. I have an EU car and I also (supposedly) bought EU headlights, according to the part numbers. On the driver side headlight, I did not need to re-pin anything. Everything worked out of the box. On the passenger side, things actually worked TOO much. For some reason, this headlight turned on the "boomerang", as soon as the car's regular DRLs were on. I found out that the passenger side light actually had all 8 pins of the plug connected, while the driver side light did not. The different pin was indeed No. 3 (DRL). After I had found that out, things were quite easy. The plug can easily be opened, and I pushed the surplus pin out to the back, wrapping it around the main harness with electrical tape, so it could not make any contact. Picture with the headlights in and shrouds re-tightened:  Since I wanted to change up any and all LEDs on the car's outside to LEDs, I removed by old fog light housings (I think they came from a Forester) and replaced them by OLM Nightseekers. Since I had previouly changed the fog lights, I already had the respective wiring harness from PSX24W to H11 in the car, so the change was be plug & play. Old vs. new:  Since the bumper was off anyway, I also threw on the STI emblem. Base clipped in from the back and is held in place by 2 screws, then the emblem is clipped on from the front and fastened against the base with 2 screw:   https://ibb.co/H4qWqK5 https://ibb.co/H4qWqK5The last thing to do before re-assembly was to install the STI front lip. I am quite impressed by the quality of the piece, as well as the installation hardware. Stencils, rubber bushes, high quality screws, you name it. Installation is straightforward, so I'll spare you the details. After some 60 minutes of work (measure thrice, drill once!):  Starting to re-assemble the front was basically the reverse of removal, though again the DRLs made things a bit difficult. They need to be passed through the bumper from the back first; then the fog light shrouds can go in from the front, whereafter the fog lights can be installed from the back. As a last step, the DLRs need to be inserted into their slot from the front and tightened down from the back. This is the result:  Finishing the front of with Valenti side markers. They simply connect to the OEM flash light housings and clip into place same as the OEM pieces. If you find yours a bit loose, you can either bend their clips outward with a screwdriver, or simply exchange them with the OEM ones (provided you did not break them during removal.    After that, I called a day and went back to work the next morning. Of course the STI lip would not stay alone. It was joined by the side skirts and rear side parts. Installation was a breeze again. The stuff is exmensive, but I honestly think in this case the quality is worth the premium.   While the car was already in the air, I also installed the rear diffuser:  This one is a replica, though. The Original is close to 700 EUR in Germany, plus some 50 EUR shipping, which is close to 800 USD total. I can not bring myself to pay this much for a piece of plastic. The replica is "okay" in terms of quality and blends in with the genuine STI stuff, but I used different mounting hardware. Where the maker of this diffuser wanted me to just drive some screws through the lower part of the bumper, I pre-drilled some holes and used actual bolts, washers and nuts, similar to how the original part would have been mounted. This also gives me some peace of mind when driving 200+ km/h on the Autobahn. Since the car's whole theme was now looking "black on blue", the old chrome logos on the trunk had to go. Some heat, fishing line and IPA did the trick. I had marked the position of the logos with some masking tape before removing them, since I had chosen to replace them with black ones:     I also quickly yanked out the old door sills and replaced them with STI ones:   Some bling for the fuel cap:   At this point, I was done with everything that needed to be done while the car was on jacks, so I mounted the summer wheels (which I had cleaned and coated some weeks ago already) and fastened them with new lug nuts. They are actually supposed to be street legal in Germany. I am looking forward to being pulled over by the police and have that discussion.  This is the end result from the outside:     The next day, I thought I'd do some stuff in the interior. I removed my old pioneer head unit and replaced it with a new Pioneed AVH-ZL5150BT, which I bought from Malaysia, after I had seen it somewhere here on thie forum. It's a perfect fit for the hole in the trim piece, plays nearly everything, has dual bluetooth and can do both Carplay and Android Auto. Luckily, since the Pioneer->Subaru wiring harness was already in the car from the previous unit, this swap was literally plug and play.  CarPlay:   Rearview Camera:  DVD...  ...of course only as long as the hand brake is pulled. Otherwise the car would be impounded instantly  Being happy with this installation, I figured I'd have another shot at the MTEC shifter spring. I tried this one some years ago, failed to even get the C-Clip off and hated myself. This time, I succeeded, but still hated myself. This, in my opinion, is one of the worst experiences you can have installing a car part. You are lying on your back, half in the car, half on the ground, and work in a space where you can't even really swing the hammer, which you need to push the holding pin out. Also, in the beginning I was also sure I had lost the C-Clip, however later found it was stuck in the grease of the pin, so at least it dropped into my eye after I got the whole pin pushed out. Happy days.  The result is noticable and not bad, but in my opinion not at all worth the effort to change this spring. Needing to go back to "nice and easy" I replaced the cluster gauge face with an "STI style" one from illumaesthaetic (since Subaru does not sell the original one from the tS to us regular peasants, but only verified tS Owners - and only as whole cluster assembly). Installation was done in 15 Minutes and only needed a kitchen fork to pull the needles off. Old vs new:  Cluster disassembled:  New one installed:  Night shot:  I also almost forgot to add some more goodies to the interior: STI shift knob and seatbelt covers (got the covers as a present at soem track day, but my wife -1,63cm- loves them, because the belt is not directly rubbing against her neck anymore):   The last thing I did for now was to lower the third brake light:    Also finished just in time to catch the cherry blossom in front of my new house - yes, we do have cherry blossom trees in cold northern Germany  Long post, but hope some of you enjoy this update; I definitely had fun during this "modding marathon"! |
|
|
|
| The Following 3 Users Say Thank You to Trollhart For This Useful Post: |
|
07-18-2023, 04:46 AM
|
#11 |
|
Member
Join Date: Sep 2016
Drives: 2013 Subaru BRZ Sport
Location: Northern Germany
Posts: 49
Thanks: 7
Thanked 63 Times in 27 Posts
Mentioned: 1 Post(s)
Tagged: 0 Thread(s)
|
Since the last post, I have changed/added a lot of stuff.
That's the present look:  Some STI bling and a dry filter:  I don't really get why everybody is stressing about yanking the centerpiece out in order to get access to the pushstart button. Just remove the side cover and push it out from the back:   Old and new:   Also got some new tail lights:    Thereafter I had a little photo op in the port of Hamburg:              Later on, I bought the REAL (that's the name of the brand) Steering Wheel from Japan:  Since it's made of Nappa Leather, I got the matching handbrake and shifter boots from redlinegoods. The handbrake one was a bit cumbersome; had to remove the old vinyl boot, sand away the old glue and then attach the new one with leather adhesive:     I also wanted to replace my A/C dials with something nicer. I had already added the facelift ones in the past, but I hate plasticky silver. So I bought some black metal dial covers. Prior to fixing them, I painted the dials black, so that no silver would shine through:    Installation is a breeze. Just pull the old ones off and push the new ones in:    Now for some interior treats: Removing the old shifter...   ...and shift boot.  Old vinyl off, new Nappa on:    Same for the handbrake:    While I was at it, I also got a nice Likewise RLX reverse lockout:     And to complete the Nappa frenzy, I removed the old steering wheel, transferred all the parts over to the new one, and put everything back together:     Working on the last remaining silver and chrome, I threw out the old door handles and replaced them by black ones:  Here's a view of the completed interior: 
|
|
|
|
| The Following 7 Users Say Thank You to Trollhart For This Useful Post: | Dzmitry (07-19-2023), Greg Erskine (07-18-2023), Jdmjunkie (07-18-2023), MrSkubi (07-20-2023), Rastarican718 (07-23-2023), Teseo (07-18-2023), villainous_frx (07-18-2023) |
|
|
|
|
|
|
|
 Similar Threads
|
||||
| Thread | Thread Starter | Forum | Replies | Last Post |
| KevinK121's BRZ journal picture heavy | KevinK121 | Member's Car Journals | 3 | 04-28-2016 01:34 PM |
| Valenti's Installed! (Picture/Video HEAVY!) | 636 | Cosmetic Modification (Interior/Exterior/Lighting) | 28 | 08-22-2014 03:54 AM |
| Full engine teardown picture thread. Taking requests. (PICTURE HEAVY!) | nelsmar | Engine, Exhaust, Transmission | 53 | 02-28-2014 05:29 PM |
| Just got my FR-S back with SiS's Build for me -- Picture Heavy -- | CamryDS | Northern California | 21 | 05-17-2013 02:06 PM |
| It is almost SEMA time!!! (Picture HEAVY!) | Apex Chase | Other Vehicles & General Automotive Discussions | 11 | 10-30-2012 09:16 PM |


