


 05-27-2019, 08:24 PM
|
#197 |
|
Senior Member

Join Date: Jul 2016
Drives: BRZ, WRX
Location: Sydney, Australia
Posts: 291
Thanks: 105
Thanked 962 Times in 233 Posts
Mentioned: 2 Post(s)
Tagged: 0 Thread(s)
|
Sorry no update this week guys, I used my day off to go racing in my WRX.

__________________
|

|

|
| The Following 4 Users Say Thank You to DIY For This Useful Post: |
|
05-28-2019, 02:17 AM
|
#198 |
|
Senior Member
Join Date: Sep 2015
Drives: 2015 frs
Location: Ca
Posts: 511
Thanks: 426
Thanked 196 Times in 148 Posts
Mentioned: 5 Post(s)
Tagged: 0 Thread(s)
|
Gotta get out and enjoy the cars once in awhile. Hopefully it was a good day!
__________________
|
|
|
|
| The Following User Says Thank You to Zer0 For This Useful Post: | DIY (05-28-2019) |
|
05-28-2019, 12:13 PM
|
#199 | ||
|
Senior Member
Join Date: Nov 2016
Drives: 2013 BRZ Limited 6MT
Location: Nashville, TN
Posts: 208
Thanks: 36
Thanked 80 Times in 58 Posts
Mentioned: 1 Post(s)
Tagged: 0 Thread(s)
|
Quote:
Quote:
|
||
|
|
|
| The Following User Says Thank You to ka-titties For This Useful Post: | DIY (05-28-2019) |
|
06-02-2019, 04:32 AM
|
#200 |
|
Senior Member
Join Date: Jul 2016
Drives: BRZ, WRX
Location: Sydney, Australia
Posts: 291
Thanks: 105
Thanked 962 Times in 233 Posts
Mentioned: 2 Post(s)
Tagged: 0 Thread(s)
|
Half a day to work on the car today so I kept going on the A-pillar gussets. I'm kind of stuck at the moment doing odd jobs because the person who usually does lathe work for me has gone on extended holiday in Europe. Without the lathe work I can't continue with the control arm fabrication.
Traced out my cardboard design onto some sheet metal.  Cut both sides out with the angle grinder then taped them together to drill holes in each corner.  Used my dremel to make the smaller cuts between the drilled holes. 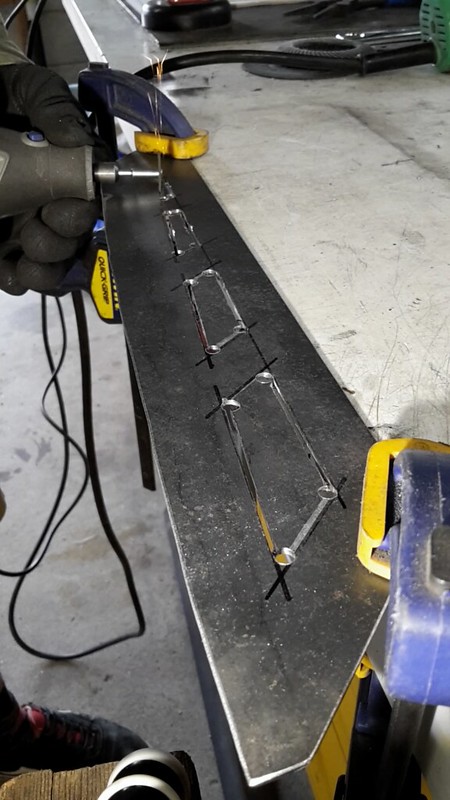 Cleaned them up with a hand file.  They are now ready to be stitch welded but I ran out of time.  These were time consuming but I see them as a very noticeable feature when you look at the car from the outside so I wanted to take the time to get everything perfect.
__________________
|
|
|
|
| The Following User Says Thank You to DIY For This Useful Post: | Ash_89 (03-02-2021) |
|
06-03-2019, 04:00 AM
|
#201 |
|
Senior Member
Join Date: Sep 2015
Drives: 2015 frs
Location: Ca
Posts: 511
Thanks: 426
Thanked 196 Times in 148 Posts
Mentioned: 5 Post(s)
Tagged: 0 Thread(s)
|
Nice custom touch. They look good.
__________________
|
|
|
|
| The Following User Says Thank You to Zer0 For This Useful Post: | DIY (06-03-2019) |
|
06-04-2019, 01:35 PM
|
#202 | |
|
Junior Member
Join Date: Jul 2018
Drives: BMW 335i
Location: Chicago
Posts: 2
Thanks: 0
Thanked 0 Times in 0 Posts
Mentioned: 0 Post(s)
Tagged: 0 Thread(s)
|
Quote:
|
|
|
|
|
|
06-04-2019, 07:22 PM
|
#203 | |
|
Senior Member
Join Date: Jul 2016
Drives: BRZ, WRX
Location: Sydney, Australia
Posts: 291
Thanks: 105
Thanked 962 Times in 233 Posts
Mentioned: 2 Post(s)
Tagged: 0 Thread(s)
|
Quote:
Yes it's a bit of an engineering masterpiece! https://www.raceking.com.au/ .
__________________
|
|
|
|
|
|
06-04-2019, 11:58 PM
|
#204 | |
|
Junior Member
Join Date: Jul 2018
Drives: BMW 335i
Location: Chicago
Posts: 2
Thanks: 0
Thanked 0 Times in 0 Posts
Mentioned: 0 Post(s)
Tagged: 0 Thread(s)
|
Quote:
|
|
|
|
|
|
06-16-2019, 04:23 AM
|
#205 |
|
Senior Member
Join Date: Jul 2016
Drives: BRZ, WRX
Location: Sydney, Australia
Posts: 291
Thanks: 105
Thanked 962 Times in 233 Posts
Mentioned: 2 Post(s)
Tagged: 0 Thread(s)
|
I went snowboarding last weekend so missed my day on the car, got some work done today though, finished welding the A-pillar gussets into the car.
Stitch welded with the TIG. 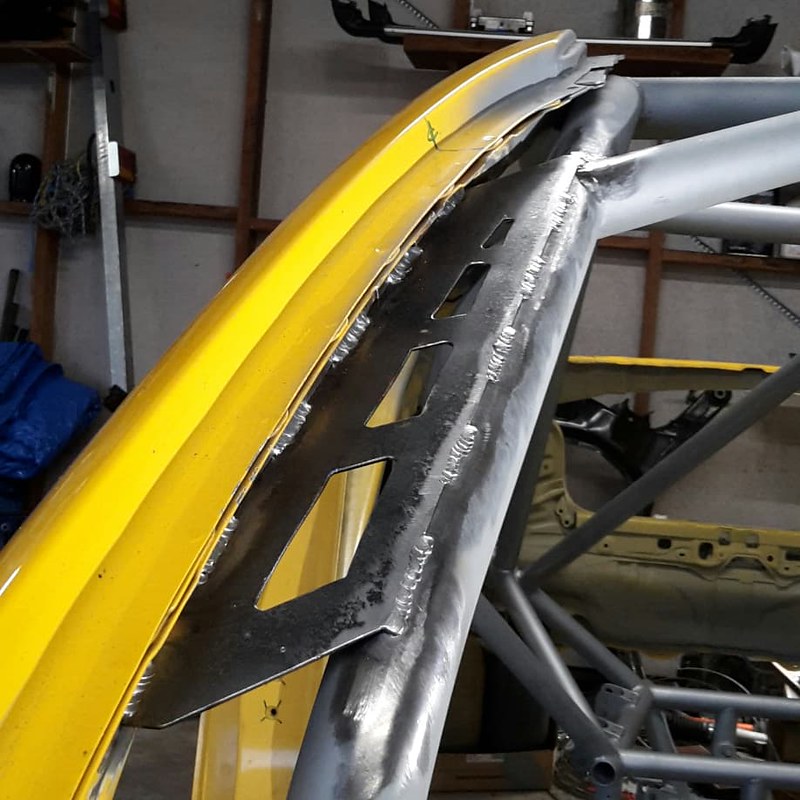 and a coat of primer so it doesn't go rusty.  I'm very happy with how these turned out, it looks a lot more sleek than the typical dimple die gussets IMO. 
__________________
|
|
|
|
|
08-19-2019, 04:02 AM
|
#206 |
|
Senior Member
Join Date: Jul 2016
Drives: BRZ, WRX
Location: Sydney, Australia
Posts: 291
Thanks: 105
Thanked 962 Times in 233 Posts
Mentioned: 2 Post(s)
Tagged: 0 Thread(s)
|
Sorry guys it has been a while since I posted an update. I won't bore you with excuses as to why I have not been working on the car but don't worry the project will continue eventually.
Some small progress has been the toe arms which are now essentially done but I do have to run a weld around them at some point. I am just going to leave them un-welded for now as I am not sure if I should just center the adjustment or possibly skew it for lengthening to get the camber I want. It will be easy enough to figure out once everything is assembled and the welding is only a 20 minute job. These were made from the factory arms and some old lateral links I had from my wrx. I had to get some lathe work done to make it all come together and since it was just a favor from a friend it ended up taking a very long time, plus the work ended up being fairly involved. 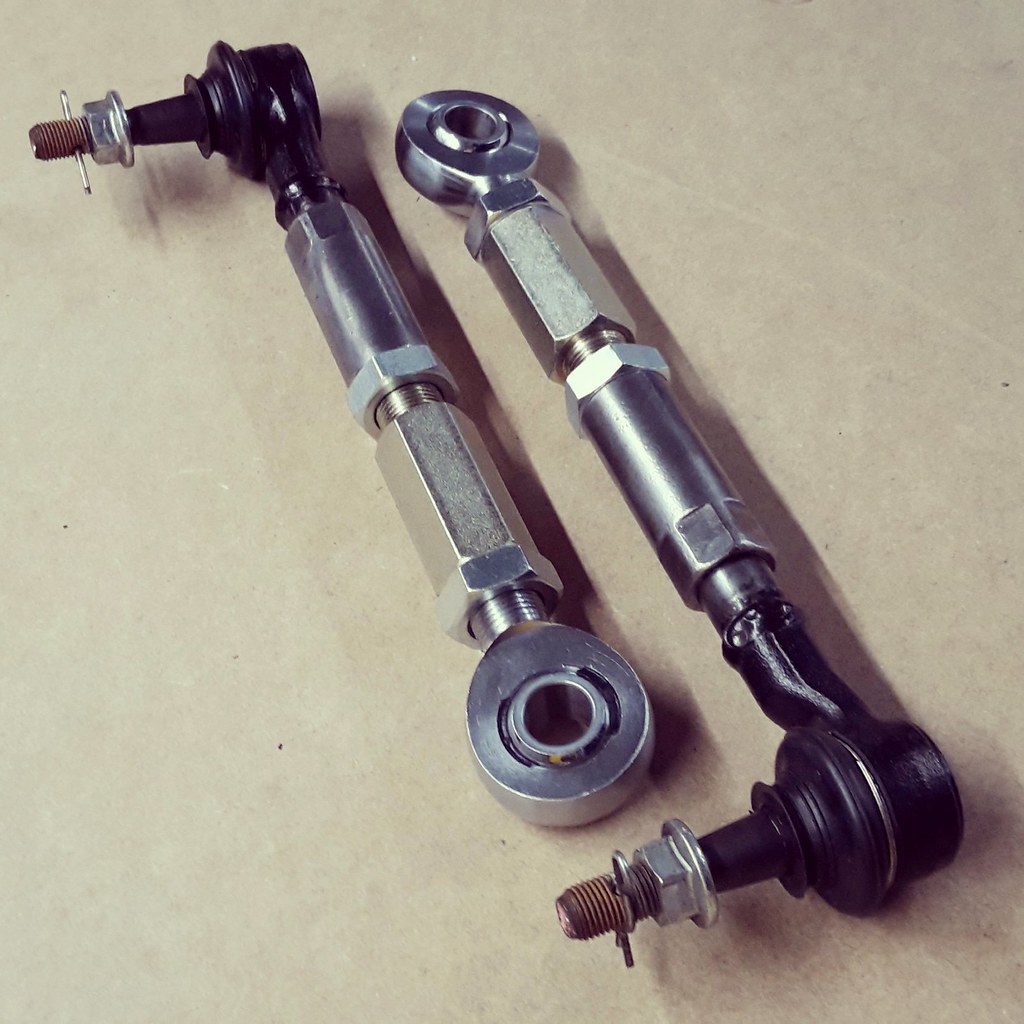 So my problem now is that I have used up all my favors on the lathe and I still need a whole bunch of uniball tapered adapters made up to complete the front control arms and upper rear arms.
__________________
|
|
|
|
|
08-26-2019, 10:11 AM
|
#207 |
|
Senior Member
Join Date: Nov 2016
Drives: 2013 BRZ Limited 6MT
Location: Nashville, TN
Posts: 208
Thanks: 36
Thanked 80 Times in 58 Posts
Mentioned: 1 Post(s)
Tagged: 0 Thread(s)
|
Great to see you're still making progress!
|
|
|
|
| The Following User Says Thank You to ka-titties For This Useful Post: | DIY (08-26-2019) |
|
11-17-2019, 07:08 AM
|
#208 |
|
Senior Member
Join Date: Jul 2016
Drives: BRZ, WRX
Location: Sydney, Australia
Posts: 291
Thanks: 105
Thanked 962 Times in 233 Posts
Mentioned: 2 Post(s)
Tagged: 0 Thread(s)
|
Today I made a welding jig to build some rear upper control arms. The jig works for both passenger and driver side arms. Making the control arms will not be easy due to the large angle of the stud into the knuckle which is part of the factory design to clear the chassis rails. Those are gone in my car but the angle remains in the knuckle so I have to keep it.
  The stud is held in the jig with a bolt just like it is in the knuckle.  Next weekend I hope to start building the new control arms.
__________________
|
|
|
|
|
11-18-2019, 02:23 AM
|
#209 |
|
Senior Member
Join Date: Sep 2015
Drives: 2015 frs
Location: Ca
Posts: 511
Thanks: 426
Thanked 196 Times in 148 Posts
Mentioned: 5 Post(s)
Tagged: 0 Thread(s)
|
Nice update. Can't wait to see the progress.
__________________
|
|
|
|
| The Following User Says Thank You to Zer0 For This Useful Post: | DIY (11-18-2019) |
|
11-24-2019, 04:52 AM
|
#210 |
|
Senior Member
Join Date: Jul 2016
Drives: BRZ, WRX
Location: Sydney, Australia
Posts: 291
Thanks: 105
Thanked 962 Times in 233 Posts
Mentioned: 2 Post(s)
Tagged: 0 Thread(s)
|
The parts I needed to keep working on the rear upper control arms did not show up in time for the weekend so I moved to the front of the car to work on the front upper control arms.
Things were going well, I got everything into position on the car with the plan of mocking up one control arm using my knuckle jig and then tacking it together before moving to the bench and creating another jig to hold it in place before fully welding and to make the other side.  My problem is the tube I am using is a little larger than the height of the spherical bearing housing. My plan was to heat the tube with my TIG torch and then squish it in the vice to bring the diameter down to the size I need. I have seen other aftermarket arms where they have done this where the tube meets the bearing. 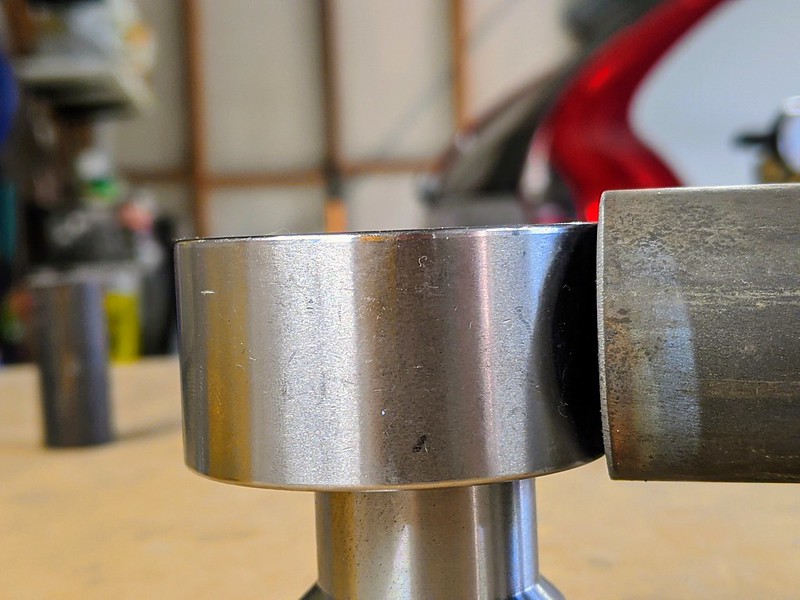 Well it didn't go so well, the first problem was that it was hard to prevent the TIG from melting the tube but at least I know it was hot enough, I was only testing on scrap so I pushed on. Once I started turning the vice it seemed to work but it was slow and I think the metal may have cooled too much as it became difficult to turn and then the vice handle bent. You can see I got the size down a little but the tube looks nasty and I still need it a little smaller than that.  I need to come up with a better method, I'm open to ideas? maybe a hydraulic press is needed to increase the squeeze speed.
__________________
|
|
|
|
| The Following User Says Thank You to DIY For This Useful Post: | Ash_89 (03-02-2021) |
|
|
|
|
 |
|
|


