


|
||||||
| DIY (Do-It-Yourself) Guides For all DIYs. |
 |
|
|
Thread Tools | Search this Thread |
 02-23-2013, 11:28 AM
|
#43 | |
|
Senior Member

Join Date: Oct 2012
Drives: 2013 Ultramarine FR-S
Location: Liberty Lake
Posts: 1,209
Thanks: 1,978
Thanked 539 Times in 327 Posts
Mentioned: 18 Post(s)
Tagged: 2 Thread(s)
|
Quote:
|
|

|

|
| The Following User Says Thank You to Freeman For This Useful Post: | mit_peid (02-23-2013) |
|
02-23-2013, 01:10 PM
|
#44 |
|
Boosted Noob

Join Date: Nov 2012
Drives: '13 FRS MT KW SC, '05 4Runner 4WD
Location: SoCal
Posts: 883
Thanks: 353
Thanked 343 Times in 175 Posts
Mentioned: 7 Post(s)
Tagged: 0 Thread(s)
|
Yeah just came back from Lowe's and picked these up. M5-.80 x 16's with wave washers and hex nuts. Going to try to use these for grounding of both the high and low. They're 8mm hex not 10mm. Hopefully they'll work just as well. Forgoing the Hella-provided relay too for my install.
__________________
 |
|
|
|
|
02-23-2013, 10:30 PM
|
#45 | |
|
Senior Member
Join Date: Mar 2012
Drives: brz 13
Location: Canada
Posts: 352
Thanks: 36
Thanked 140 Times in 45 Posts
Mentioned: 13 Post(s)
Tagged: 0 Thread(s)
|
Quote:
|
|
|
|
|
|
02-24-2013, 01:49 AM
|
#46 |
|
Boosted Noob
Join Date: Nov 2012
Drives: '13 FRS MT KW SC, '05 4Runner 4WD
Location: SoCal
Posts: 883
Thanks: 353
Thanked 343 Times in 175 Posts
Mentioned: 7 Post(s)
Tagged: 0 Thread(s)
|
I ended up drilling two holes in the bumper to get my two grounds since my rings weren't the correct size. I always seem to have difficulty finding rings to tap into existing stock bolts even when I was more active doing car stereo stuff.
__________________
|
|
|
|
|
02-24-2013, 11:13 AM
|
#47 |
|
DADA

Join Date: Jun 2012
Drives: 2013
Location: Kanada
Posts: 1,500
Thanks: 47
Thanked 388 Times in 249 Posts
Mentioned: 10 Post(s)
Tagged: 0 Thread(s)
|
Why are you guys drilling places or installing ground studs to get a ground ?
The connector on the right side has a ground .. Use that. You just need a spade lug and splice that to have to grounds .. |
|
|
|
|
02-24-2013, 01:48 PM
|
#48 | |
|
Boosted Noob
Join Date: Nov 2012
Drives: '13 FRS MT KW SC, '05 4Runner 4WD
Location: SoCal
Posts: 883
Thanks: 353
Thanked 343 Times in 175 Posts
Mentioned: 7 Post(s)
Tagged: 0 Thread(s)
|
Quote:
The only two things about my install is that using the mounting locations suggested by the OP, the horns appear slightly off-centered. Maybe it is just something I notice, but probably off by a few millimeters. In the entire bumper removal process I damaged one plastic fastener and got another one unaccounted for at the end. Also wasn't sure if my mud-flaps under the bumper were placed back exactly 100% like it was stock.
__________________
|
|
|
|
|
|
02-24-2013, 02:11 PM
|
#49 |
|
Boosted Noob
Join Date: Nov 2012
Drives: '13 FRS MT KW SC, '05 4Runner 4WD
Location: SoCal
Posts: 883
Thanks: 353
Thanked 343 Times in 175 Posts
Mentioned: 7 Post(s)
Tagged: 0 Thread(s)
|
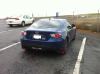
Here are some photos from my install. As you can see it is slightly off-centered. I may go back in one day to move/adjust them, maybe back to the stock mounting locations. My preference would to not to have the front license and the horns blocking the radiator, but it shouldn't impact things too much.
__________________
|
|
|
|
| The Following User Says Thank You to mit_peid For This Useful Post: | calis5nest (02-28-2013) |
|
02-24-2013, 02:17 PM
|
#50 | |
|
Senior Member
Join Date: Oct 2012
Drives: 2013 Ultramarine FR-S
Location: Liberty Lake
Posts: 1,209
Thanks: 1,978
Thanked 539 Times in 327 Posts
Mentioned: 18 Post(s)
Tagged: 2 Thread(s)
|
Quote:
|
|
|
|
|
| The Following User Says Thank You to Freeman For This Useful Post: | VTRTWIN (08-02-2013) |
|
02-24-2013, 02:41 PM
|
#51 | |
|
Boosted Noob
Join Date: Nov 2012
Drives: '13 FRS MT KW SC, '05 4Runner 4WD
Location: SoCal
Posts: 883
Thanks: 353
Thanked 343 Times in 175 Posts
Mentioned: 7 Post(s)
Tagged: 0 Thread(s)
|
Quote:
Or I might get in there to install some fog-lights once more options are available... I guess this entire exercise was also good to get used to how to remove the front bumper.
__________________
|
|
|
|
|
|
02-25-2013, 01:14 PM
|
#52 |
|
Member
Join Date: Jan 2012
Drives: 2013 BRZ, 2004 WRX
Location: San Antonio, TX
Posts: 33
Thanks: 0
Thanked 30 Times in 10 Posts
Mentioned: 0 Post(s)
Tagged: 0 Thread(s)
|
Just followed these instructions over the weekend, for the most part. Figured I'd share my experience to make it easier for others...
Removing & replacing the bumper sucked. Corner markers do not come off easy, and must literally be pried off until they pop. The sides of the bumper in front of the corner markers essentially come off in the same manner -- just pull firmly until 3 or 4 tabs pop loose. I was caught off guard by the variety of different bolts and push tabs holding the bumper on -- make sure you keep those organized as they come off. There's also a push tab in each hole left by a corner marker (facing upwards). It took me forever to find those. I also wired the whole thing twice -- once as described in this post before tearing all that out and replacing it. I ended up splitting the existing wiring (ground=black, positive=black+green) and running it to both horns in parallel, including ground. This also keeps the horns on the existing fuse(s). Side note -- you don't need any new bolts to wire it this way, as you don't have to create a ground. I can also confirm that the existing horns run at 12v, so use of the relay is not necessary. |
|
|
|
| The Following User Says Thank You to dolph For This Useful Post: | DAEMANO (12-05-2014) |
|
02-25-2013, 03:19 PM
|
#53 |
|
Boosted Noob
Join Date: Nov 2012
Drives: '13 FRS MT KW SC, '05 4Runner 4WD
Location: SoCal
Posts: 883
Thanks: 353
Thanked 343 Times in 175 Posts
Mentioned: 7 Post(s)
Tagged: 0 Thread(s)
|
Best DIY front bumper removal step-by-step
This is by far the best DIY step-by-step for removing the front bumper.
http://www.grillcraft.com/installs/i...install_id=309 It made removing the side-markers a lot easier. Also helps if the car is lifted a bit so you can see which fasteners are of what type.
__________________
|
|
|
|
|
02-28-2013, 08:40 PM
|
#54 |
|
Senior Member

Join Date: Jul 2012
Drives: scion frs firestorm
Location: hawthorne ca
Posts: 457
Thanks: 1,135
Thanked 251 Times in 136 Posts
Mentioned: 7 Post(s)
Tagged: 0 Thread(s)
|
sound clip on frs plz
__________________
-Alan
|
|
|
|
|
03-03-2013, 08:06 PM
|
#55 | |
|
Senior Member
Join Date: Oct 2012
Drives: 2013 Ultramarine FR-S
Location: Liberty Lake
Posts: 1,209
Thanks: 1,978
Thanked 539 Times in 327 Posts
Mentioned: 18 Post(s)
Tagged: 2 Thread(s)
|
Quote:
i havent decided. i might go perrin or i might go FA20club. |
|
|
|
|
|
03-31-2013, 08:39 PM
|
#56 |
|
Member

Join Date: Jan 2013
Drives: 2013 BRZ - Sterling Silver Metallic
Location: CA
Posts: 84
Thanks: 74
Thanked 32 Times in 23 Posts
Mentioned: 1 Post(s)
Tagged: 0 Thread(s)
|
Installed a pair of Supertones on my BRZ yesterday. It's possible to do it without cutting the stock wiring by trimming down a standard blade connector so it fits in the stock power connector. Also, my BRZ didn't have a second threaded bolt hole on the left side for the second ground connector, so I had to use a nut and lock washer instead.
|
|
|
|
|
|
|
|
|
|
|
 Similar Threads
|
||||
| Thread | Thread Starter | Forum | Replies | Last Post |
| BRZ/FR-S Coilover Installation Guide | GrimmSpeed | DIY (Do-It-Yourself) Guides | 64 | 02-21-2020 05:30 PM |
| Hella Supertones. | 636 | Cosmetic Modification (Interior/Exterior/Lighting) | 10 | 08-09-2012 12:16 AM |
| Suspension Installation Warning!!!! | Don@Accelerated | Suspension | Chassis | Brakes -- Sponsored by 949 Racing | 15 | 07-20-2012 06:44 PM |
| TRD parts installation manual | Nardi330 | Suspension | Chassis | Brakes -- Sponsored by 949 Racing | 10 | 05-21-2012 03:19 AM |
| chrome fender trim installation | taosracer | Cosmetic Modification (Interior/Exterior/Lighting) | 1 | 05-15-2012 03:13 PM |


 2013 Scion FR-S
