|
||||||
| DIY (Do-It-Yourself) Guides For all DIYs. |
 |
|
|
Thread Tools | Search this Thread |
 11-22-2016, 08:49 PM
|
#1 |
|
Senior Member
Join Date: Aug 2014
Drives: '14 981CS, '99 NB1
Location: Oregon
Posts: 1,274
Thanks: 1,234
Thanked 1,201 Times in 631 Posts
Mentioned: 114 Post(s)
Tagged: 2 Thread(s)
|
2017 BRZ STi Front Lip DIY
 As the 2017s are still quite new, there isn't a set of instructions for installing the 2017 STi lip from Subaru. The dealer checked for me, I looked on http://stis.subaru.com, and scoured the net - nothing. What you can find on http://stis.subaru.com is the install instructions for a 2015 STi lip (as well as a variety of other useful info). Here's a link directly to that PDF: http://subaruonlineparts.com/docs/E2410CA000.pdf The install is similar, but not the same. All of the templates are different, and a couple of the fasteners are different. As such, I decided to make this DIY. First I'll just post some pix of the numbers on the box and hardware you should receive with the lip. Numbers on the outside of the box:   The hardware bag with part number:  The template sheet (took a pic after removing two of them) with part number:  All of the hardware in the hardware bag, organized:  --------------- Tools Needed To do this install, you'll need a drill, drill bits, screw drivers, a center punch or something sharp/pointy, some general cleaner (I used rubbing alcohol), micro fiber towel. Pretty standard stuff. Pre-install - Get the front of the car up in the air on jack stands. Trying to do this install without the car in the air will be challenging. Step 1 - Install templates You'll want to clean the underside of the bumper first. If you have a fair amount of miles, this can be pretty dirty. Make sure you get it completely clean. I recommend making the last pass with rubbing alcohol so there is no wax on the surface. This will help make sure the templates stay in place, the adhesive they use is not very strong. Install the templates per the pictures below. Note: It's very important that you get them as close as possible, there isn't a lot of slop in the holes they put in the lip. Be especially careful when folding the template downward against the raised lip in the bumper, as it's easy to skew the template slightly. Always start applying the template from the back edge of the bumper and smoothly rub it into place towards the front edge of the bumper, as they are designed to fit against the natural shape of back edges of the bumper.        Step 2 - Mark holes with a punch Use a fine tipped punch or poker to stab into the bumper through the X's marked by the templates. Additionally, there are two subtle marks in the bumper that you need to punch that will be used for the two large clips supplied in the hardware bag. I note those below.       Step 3 - Prepare drill bits Subaru specs stepping up from a 1/8" (~3mm) -> 15/64" (~6mm) -> 3/8" (~9.5mm) bit to make the holes in the bumper. If you don't have a 15/64" bit, a 1/4" bit will work fine as well. It is incredibly important that you wrap the bits with some kind of tape about 1/4" down from the tip. Some of the places you'll be drilling into are right below some very important design elements in the bumper, and you could damage the bumper, and even the fog lights if you are careless. I used blue painters tape and carefully wrapped a decent thickness onto each bit before I got started. You can see this in the picture below.  Step 4 - Drill baby drill Remove all of the templates from the bumper. I chose to carefully place them back on the sheet they provide - just in case. Put your 1/8" bit in your drill and drill out each punched hole to 1/8". This should go without saying, but making sure that your drilling is straight and true is very important. As you step up through the bits, they will want to move around and throw the centerline of the holes off. Just be mindful of this as you go. I found that as I drilled each hole, the removed plastic from the bumper would end up inside the drill bit under the tape. I had to pull it out before doing the next hole on the bumper or it would mar the bumper and throw the bit off. A bit of a pita, so pay attention to this. After you've done all of the holes at 1/8", step up to 15/64" (or 1/4"), and then step up to 3/8". 3/8" is where your bit will be the most likely to walk, and since it is the final hole, it is the most important to get right. Also, be sure to run the bit through a couple times on the 3/8" to deburr it. The rivnuts you'll install in the next step are a tight fit. Templates removed   1/4" bit  15/64" bit  all of the 15/64" holes done  3/8" bit   Step 5 - Install rubber rivnuts Install the rubber rivnuts provided into the holes you've just made. There are two holes, the ones that were pre-marked on the bumper, that you will not install rivnuts into. I will provide a picture below to show which ones to exclude the rivnuts from. The rivnuts install easiest if you place the end in the hole and then wiggle them side to side while applying pressure. If a rivnut is being particularly difficult to insert, try running your 3/8" bit through the hole again, that should fix it.   This is how the front should look, note the two center holes have rivnuts, then the next one out does not.    Step 6 - Remove unused fasteners Remove the screw clip at the lowest point in the wheel well fender liner on both sides.  Remove the clip on the bottom corner of the bumper that holds the fender liner in place on both sides. Ignore the template in this photo, I took it out of order.  Step 7 - install speed nuts Pull back the fender liner and install the supplied speed nuts over the lowest hole in the fender well on the bumper on each side. Note: it may be easier to pull the liner back if you remove the two screw clips above the bottom one temporarily.    Step 8 - prepare to install Grab the 4 clips they provide, the two large and the two small. These will go into the buttom of the lip to hold it in place while you install the bolts/screws in the other fastener locations  Step 9 - attach lip This will be easiest with a second set of hands, but can be done by one person (I did it by myself). I recommend taking the two big clips and hold the lip up on the front edge while installing the two front clips. This will leave the sides hanging down. Take each of the smaller clips and use those to attach the lip on the bottom corner of the bumper over the fender liner. Be careful as you pull the side of the lip up so as to keep the rear most metal mount from scratching the bumper as it comes upward.   Step 10 - install the rest of the fasteners Put the black washers over the black bolts they provide, then install all of them loosely into the rivnuts. It's important to do them all loosely as I found that I needed to shimmy the lip around a bit to get them all in. How difficult it is to get all the bolts in will depend on how well you did installing those templates and drilling those holes. You'll beat yourself up at this point if you were careless during Steps 1-4. Once all of the bolts are installed loosely, install the screws loosely on the brackets that are in the wheel wells. Tighten down all of the bolts with a screwdriver. Be careful not to overtighten them or you'll damage the rivnut, they are not very tough. When it becomes hard to turn the screwdriver with one hand, you're probably done. DO NOT use a socket wrench on the bolts that go into the rivnuts - you'll most likely damage them. Once all the bolts are tightened, tighten down the screws in the wheel wells. If you have an angled screw driver, use that, otherwise move the wheels side to side with the steering wheel to get clearance.      Clean up your drilling mess, put the car back on the ground and enjoy. Please feel free to post pix of your install or ask questions if there's anything I left out! 
|

|

|
| The Following 16 Users Say Thank You to johan For This Useful Post: | 86SPEED (07-18-2017), 8R6 (01-04-2017), amcluesent (02-19-2017), asdf (12-20-2016), BaatLuk (10-08-2017), demonpoofball (04-02-2022), eurominican (11-23-2016), Harjotdhanota (10-26-2017), jmark (11-23-2016), justinco (11-22-2016), Kabong (12-02-2016), kuczynskika (11-29-2016), Leonardo (12-02-2016), Lonewolf (12-03-2016), Paiser (11-26-2016), wtrxprs007 (11-22-2016) |
|
11-22-2016, 09:47 PM
|
#2 |
|
btr.life

Join Date: Aug 2015
Drives: 2022 GR86
Location: Arizona
Posts: 1,099
Thanks: 662
Thanked 1,094 Times in 491 Posts
Mentioned: 23 Post(s)
Tagged: 0 Thread(s)
|
Awesome work! Can't wait to get mine on this weekend, many thanks for the DIY.
__________________
|
|
|
|
|
11-23-2016, 09:47 PM
|
#3 |
|
Bringing Hachiroku Back
Join Date: Sep 2012
Drives: 2013 Firestorm FR-S
Location: South Florida
Posts: 191
Thanks: 103
Thanked 46 Times in 36 Posts
Mentioned: 4 Post(s)
Tagged: 1 Thread(s)
|
Impressive writeup man! thanks!
__________________
 e u r o m i n i c a n e u r o m i n i c a n |
|
|
|
|
11-29-2016, 12:04 PM
|
#5 |
|
Senior Member
Join Date: Aug 2014
Drives: '14 981CS, '99 NB1
Location: Oregon
Posts: 1,274
Thanks: 1,234
Thanked 1,201 Times in 631 Posts
Mentioned: 114 Post(s)
Tagged: 2 Thread(s)
|
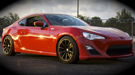
Some more pictures of it installed (with my new Velox Side Splitters to complete the look)
       
|
|
|
|
| The Following 4 Users Say Thank You to johan For This Useful Post: | 86 South Africa (10-29-2017), Bowen (01-03-2017), Elliotw (10-29-2017), kuczynskika (11-29-2016), Vin (11-29-2016) |
|
11-30-2016, 12:18 AM
|
#7 | |
|
Senior Member
Join Date: Aug 2014
Drives: '14 981CS, '99 NB1
Location: Oregon
Posts: 1,274
Thanks: 1,234
Thanked 1,201 Times in 631 Posts
Mentioned: 114 Post(s)
Tagged: 2 Thread(s)
|
Quote:
|
|
|
|
|
| The Following User Says Thank You to johan For This Useful Post: | humblebrz (03-19-2017) |
|
12-02-2016, 04:39 PM
|
#8 |
|
Member
Join Date: Oct 2012
Drives: 1999 Accord v6; 2017 CWP BRZ Ltd
Location: Bay Area, CA
Posts: 79
Thanks: 32
Thanked 27 Times in 21 Posts
Mentioned: 0 Post(s)
Tagged: 0 Thread(s)
|
Thanks for the writeup! Will keep this writeup in mind when I get mine!
|
|
|
|
|
12-03-2016, 04:15 PM
|
#9 |
|
btr.life
Join Date: Aug 2015
Drives: 2022 GR86
Location: Arizona
Posts: 1,099
Thanks: 662
Thanked 1,094 Times in 491 Posts
Mentioned: 23 Post(s)
Tagged: 0 Thread(s)
|
Installing mine today!

__________________
|
|
|
|
|
12-03-2016, 05:03 PM
|
#10 | |
|
Senior Member
Join Date: Aug 2014
Drives: '14 981CS, '99 NB1
Location: Oregon
Posts: 1,274
Thanks: 1,234
Thanked 1,201 Times in 631 Posts
Mentioned: 114 Post(s)
Tagged: 2 Thread(s)
|
Quote:
|
|
|
|
|
|
12-04-2016, 12:52 AM
|
#11 |
|
btr.life
Join Date: Aug 2015
Drives: 2022 GR86
Location: Arizona
Posts: 1,099
Thanks: 662
Thanked 1,094 Times in 491 Posts
Mentioned: 23 Post(s)
Tagged: 0 Thread(s)
|
All done, install video coming soon. Would have been much more time consuming and tricky without your DIY, so thanks again for that!
__________________
|
|
|
|
| The Following 3 Users Say Thank You to justinco For This Useful Post: |
|
12-04-2016, 01:12 AM
|
#12 | |
|
Senior Member
Join Date: Aug 2014
Drives: '14 981CS, '99 NB1
Location: Oregon
Posts: 1,274
Thanks: 1,234
Thanked 1,201 Times in 631 Posts
Mentioned: 114 Post(s)
Tagged: 2 Thread(s)
|
Quote:
|
|
|
|
|
|
12-04-2016, 01:28 AM
|
#13 | |
|
btr.life
Join Date: Aug 2015
Drives: 2022 GR86
Location: Arizona
Posts: 1,099
Thanks: 662
Thanked 1,094 Times in 491 Posts
Mentioned: 23 Post(s)
Tagged: 0 Thread(s)
|
Quote:
My son has not quite showed interest, but maybe someday.
__________________
|
|
|
|
|
|
12-11-2016, 09:26 PM
|
#14 |
|
btr.life
Join Date: Aug 2015
Drives: 2022 GR86
Location: Arizona
Posts: 1,099
Thanks: 662
Thanked 1,094 Times in 491 Posts
Mentioned: 23 Post(s)
Tagged: 0 Thread(s)
|
FYI I created a video based on your DIY for the 2017 BRZ. Thanks again for the great work writing this up!
__________________
Last edited by justinco; 04-11-2021 at 03:24 PM. |
|
|
|
| The Following 11 Users Say Thank You to justinco For This Useful Post: | 86SPEED (07-18-2017), BaatLuk (10-08-2017), BboyRuda (01-17-2017), Busybee (06-24-2019), demonpoofball (04-02-2022), johan (12-17-2016), Lococholo84 (07-05-2018), Mazikowski (01-11-2017), nico_rsx (04-30-2017), Subie_Nubie (09-14-2017), zc06_kisstherain (12-20-2016) |
|
|
|
|
|
|
|
 Similar Threads
|
||||
| Thread | Thread Starter | Forum | Replies | Last Post |
| 2017 BRZ front bumper conversion 2014MY | Ricks919 | DIY (Do-It-Yourself) Guides | 67 | 01-20-2020 12:17 AM |
| 2017 BRZ Front bumper swap | BRZoomTX | Cosmetic Modification (Interior/Exterior/Lighting) | 16 | 06-01-2018 02:55 PM |
| Anyone Seen Front Lip Kits for 2017 BRZ | pleong | Cosmetic Modification (Interior/Exterior/Lighting) | 5 | 03-21-2017 03:47 AM |
| 2017 front bumper | Jmk91 | Cosmetic Modification (Interior/Exterior/Lighting) | 19 | 12-13-2016 01:15 PM |
| 2017 86 front license plate holder part number | Revelia | Cosmetic Modification (Interior/Exterior/Lighting) | 1 | 11-06-2016 07:31 AM |