


|
||||||
| DIY (Do-It-Yourself) Guides For all DIYs. |
 |
|
|
Thread Tools | Search this Thread |
 11-13-2012, 01:39 PM
|
#1 |
|
Senior Member
Join Date: Jul 2012
Drives: 2013 SWP BRZ
Location: New York
Posts: 2,240
Thanks: 458
Thanked 878 Times in 556 Posts
Mentioned: 34 Post(s)
Tagged: 0 Thread(s)
|
DIY - Password:JDM Carbon Fiber Engine Cover Install
I was fortunate enough to be able to grab this piece fairly quickly from Password JDM. Its pretty easy to install but I figured i'd make a thread anyway.
Tools you will need: socket wrench 10mm socket extension 5mm Hex Bit socket (or regular 5mm hex key will work) You should have received the engine cover and two new bolts with shiny and nice machined washers (I received gold as I ordered a bolt kit in all gold and gold strut bars). Step 1) Unbolt Noise Generator - take your socket wrench and 10mm socket with an extension and unbolt these two bolts holding the noise generator down. 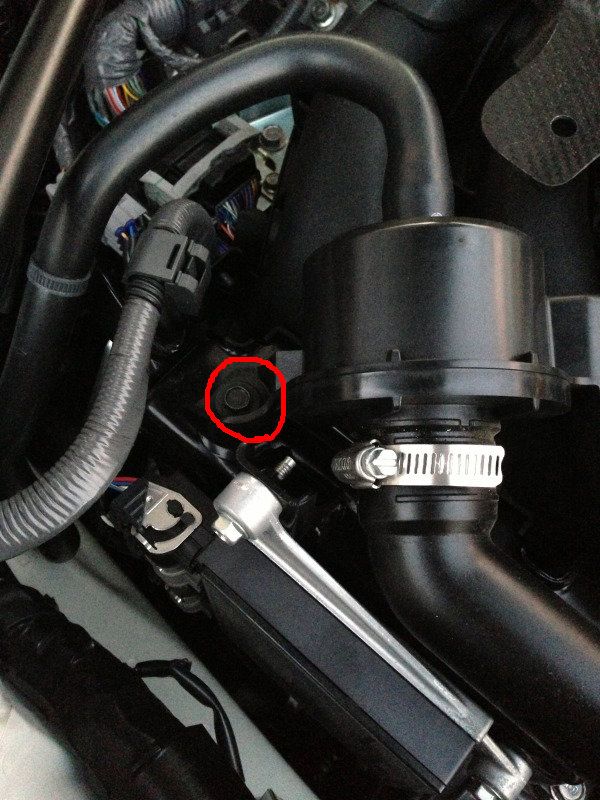 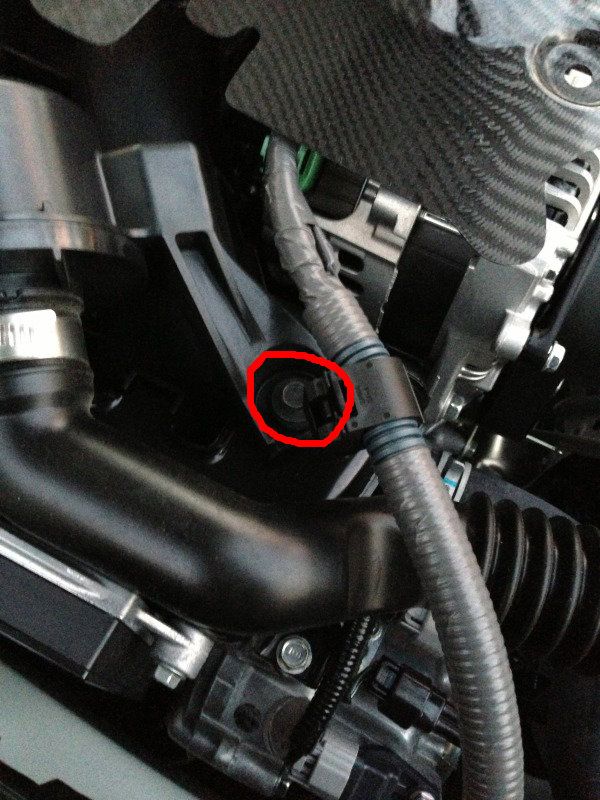 Step 2) Disconnect hose from Noise generator, tuck away generator for easier work area - Simply pull off this hose below, and tuck the hose end under the strut brace. you can then take the noise generator and tuck it in front of the fuse box like so. 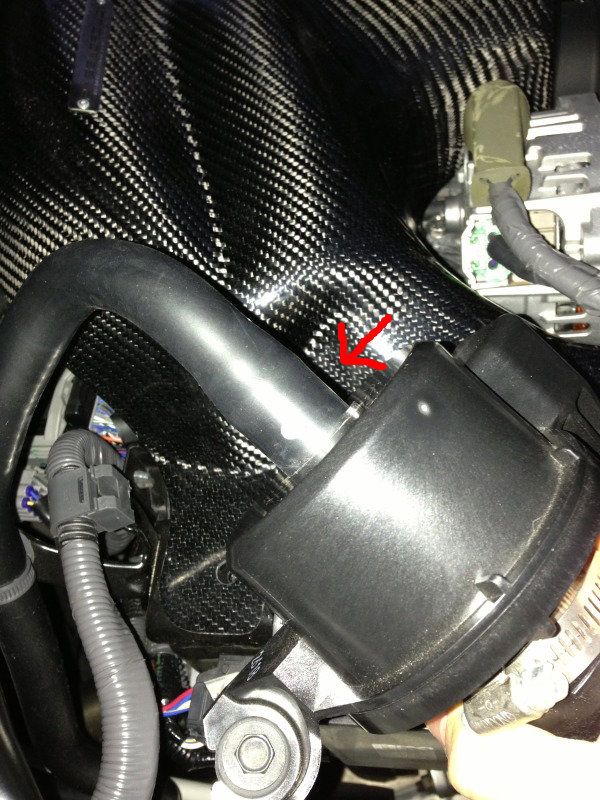 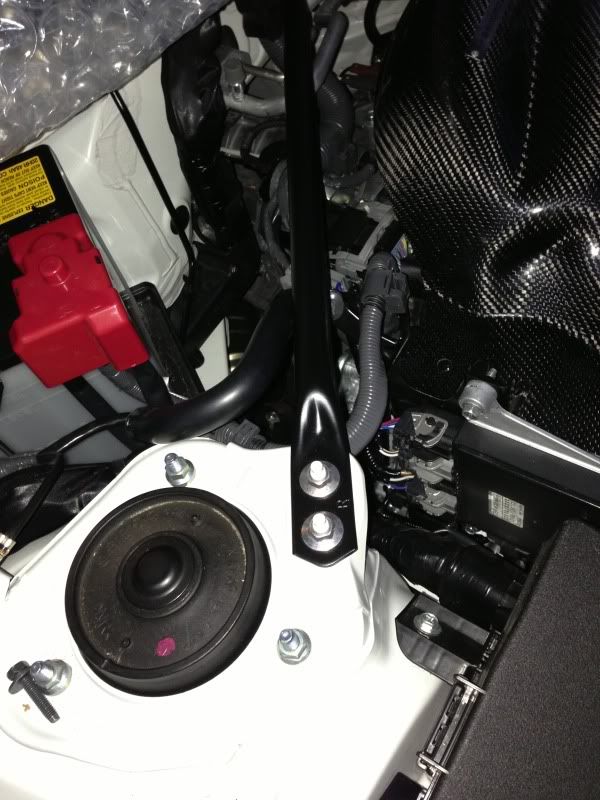 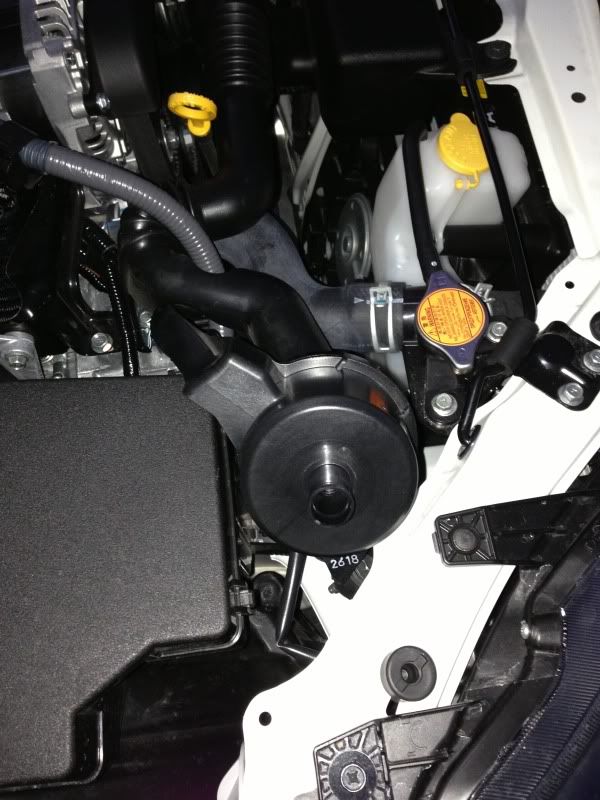 Step 3 - Remove 10mm bolt on Fuel line bracket - You will be replacing this bolt with the included bolts. Place this bolt to the side. The other bolt will go into the empty hole on the black bracket underneath this fuel line bracket towards the back (thought I took a picture of this, you will see it regardless once you get the cover on) Step 5 - Install cover - Now that the necessary bolts and items are out of your way, its time to install the cover. Its a tight fit, but it goes in. The easiest way to do this is start by sliding the cover UNDERNEATH the AC hose (the hose pictured above where I told you to remove the bolt from the fuel line bracket). If you try to install the other side first (like I did lol), you won't be able to pull the ac line up and over it without trying to bend the cover and thats the last thing you want to do. Once you get the line above the cover, you want to install it at an angle, like so : \ The reason is because you need to clear this bracket on the noise generator side: 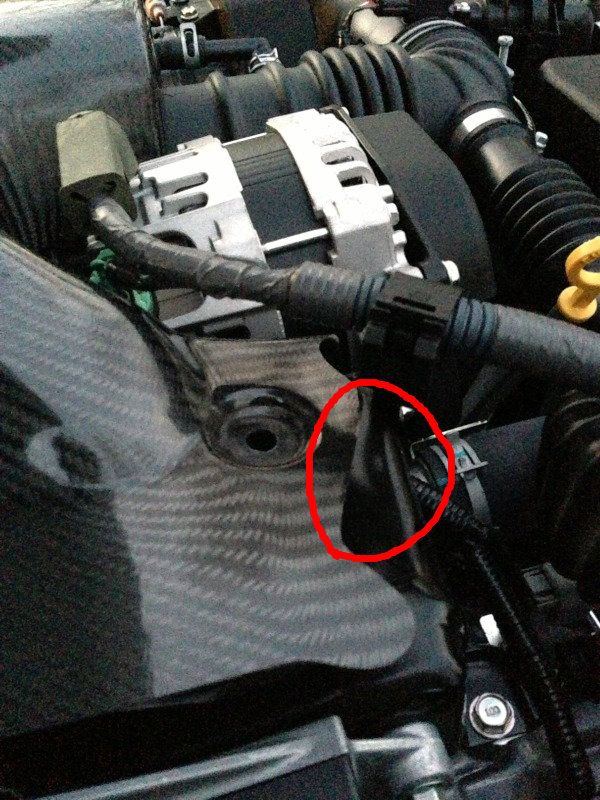 It will want to hit but you can manage to get it in there if you put it in properly. Once you clear that bracket, it should go right into place with a little wiggling. cover sitting in after clearing that bracket: 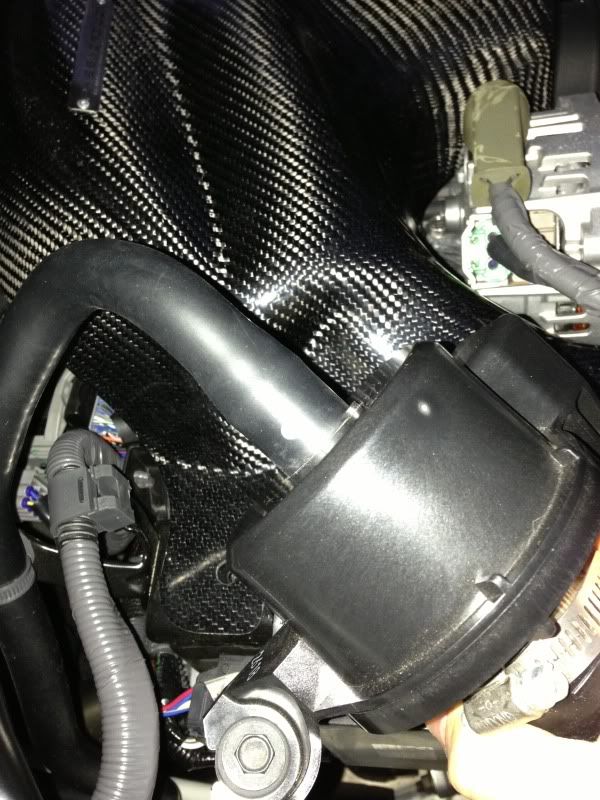 Step 6 - Re-Install Noise Generator - Reconnect the black hose to the generator, and then line the generator back up and bolt it back on. the cover goes UNDER the noise generator, and you use the same stock bolts. No bolts are supplied for this side. Step 7 - Install supplied bolts on driver side - Grab the two supplied bolts and install them into their allotted holes. This is where you need the 5mm Hex key or socket. [IMG]http://i15.photobucket.com/albums/a393/xxscaxx/Password%20JDM%20Parts/F092183D-36E1-47D4-9CE6-8866***2CEC9-14568-000005D01DD3C8BA.jpg[/IMG] Step 8 - Stand back and enjoy your new cover Here you can see the two supplied bolts installed on the driver side. 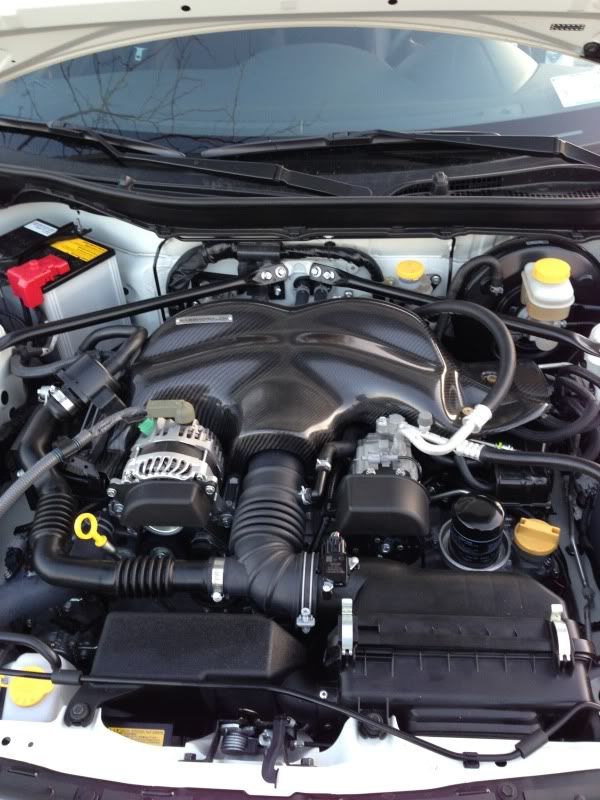
|

|

|
|
11-13-2012, 01:40 PM
|
#2 |
|
Senior Member
Join Date: Jul 2012
Drives: 2013 SWP BRZ
Location: New York
Posts: 2,240
Thanks: 458
Thanked 878 Times in 556 Posts
Mentioned: 34 Post(s)
Tagged: 0 Thread(s)
|
I know someone will ask, so heres a shot of the clearance between the cover and the stock inlet.
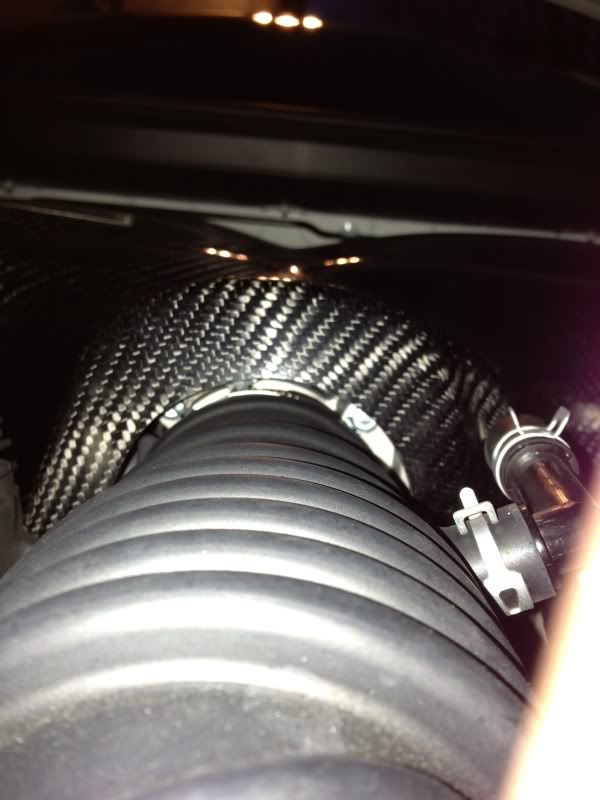 another shot: 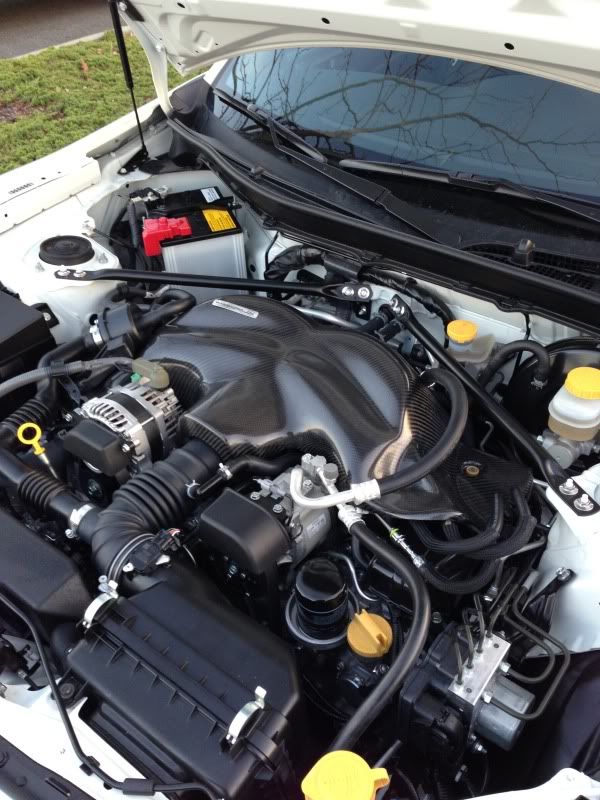
|
|
|
|
|
11-13-2012, 01:58 PM
|
#3 |
|
Banned
Join Date: Aug 2012
Drives: VortechSC,BorlaEL,Perrin,GCRace
Location: HighHeatHighAltitudeAZ,USA
Posts: 2,254
Thanks: 458
Thanked 669 Times in 394 Posts
Mentioned: 9 Post(s)
Tagged: 2 Thread(s)
|
how much and where does one get one?
|
|
|
|
|
11-13-2012, 02:02 PM
|
#4 |
|
Ridge Racerrrrrrrrr

Join Date: Jul 2012
Drives: 2013 Scion FR-S, 2004 Toyota Coroll
Location: Regina, Sk
Posts: 3,516
Thanks: 5,786
Thanked 1,363 Times in 954 Posts
Mentioned: 37 Post(s)
Tagged: 1 Thread(s)
|
That is incredibly sexy. A carbon fiber intake tube would really set this off (ala the one Airaid used in their SEMA car).
__________________
|
|
|
|
| The Following User Says Thank You to SkAsphalt For This Useful Post: | Guff (11-13-2012) |
|
11-13-2012, 02:35 PM
|
#5 | |
|
Car Enthusiast

Join Date: Jul 2011
Drives: tC 05 & 07, Rav4
Location: Northern California
Posts: 524
Thanks: 218
Thanked 122 Times in 61 Posts
Mentioned: 3 Post(s)
Tagged: 1 Thread(s)
|
Quote:
__________________
  |
|
|
|
|
|
11-13-2012, 02:41 PM
|
#6 |
|
Banned
Join Date: Jan 2012
Drives: Attitude
Location: MD
Posts: 10,046
Thanks: 884
Thanked 4,889 Times in 2,902 Posts
Mentioned: 123 Post(s)
Tagged: 4 Thread(s)
|
Slicker looking than when I initially saw pictures. Almost want to make another frivolous purchase...
|
|
|
|
| The Following User Says Thank You to OrbitalEllipses For This Useful Post: | Guff (11-13-2012) |
|
11-13-2012, 02:57 PM
|
#7 |
|
Regional Moderator

Join Date: Aug 2012
Drives: 13' ZN6 / 00' AP1 / 20' A90/ 15 EVO
Location: Portland, OR
Posts: 4,629
Thanks: 85
Thanked 1,275 Times in 854 Posts
Mentioned: 307 Post(s)
Tagged: 0 Thread(s)
|
Will this fit with an injen intake?
|
|
|
|
|
11-13-2012, 02:58 PM
|
#8 |
|
Senior Member

Join Date: Mar 2012
Drives: 2017 Subaru BRZ Perf Pack 6MT
Location: Colorado Springs
Posts: 5,048
Thanks: 1,949
Thanked 1,945 Times in 1,150 Posts
Mentioned: 27 Post(s)
Tagged: 0 Thread(s)
|
That looks immensely better than stock! Now you just need an intake and a strut bar to complete the look. Or a supercharger, jussayin'

__________________
 Current: 2005 Porsche 911 Carrera S 6MT Previous: 2 BRZ's, 997 C2S, C5 RS6, C4 S6, B8 S4, GDB STi, S30 240Z, FC3S RX-7 TII, AW11/SW20 MR2, E30 318is/325i, etc. |
|
|
|
|
11-13-2012, 03:13 PM
|
#9 |
Join Date: Aug 2012
Drives: 2013 Subaru BRZ
Location: Pico Rivera, CA
Posts: 933
Thanks: 8
Thanked 30 Times in 23 Posts
Mentioned: 4 Post(s)
Tagged: 0 Thread(s)
|
xxscaxx, you my friend, are the man!!!! Thanks for the awesome write-up!
Btw the cover works with the injen intake and most of the aftermarket intakes on the market. |
|
|
|
|
11-13-2012, 03:39 PM
|
#10 | ||
|
Senior Member
Join Date: Jul 2012
Drives: 2013 SWP BRZ
Location: New York
Posts: 2,240
Thanks: 458
Thanked 878 Times in 556 Posts
Mentioned: 34 Post(s)
Tagged: 0 Thread(s)
|
Quote:
 Quote:
For those asking where to buy: http://www.ft86club.com/forums/showthread.php?t=21043 |
||
|
|
|
| The Following User Says Thank You to xxscaxx For This Useful Post: | No Limit Motorsport (11-13-2012) |
|
11-13-2012, 04:07 PM
|
#11 |
|
F Z1LLA

Join Date: Jul 2012
Drives: Lexus IS-F Series 2
Location: MJ SK Canada
Posts: 3,875
Thanks: 1,725
Thanked 1,993 Times in 1,246 Posts
Mentioned: 31 Post(s)
Tagged: 2 Thread(s)
|
Looks good! Still debating between this and the kevlar model

__________________
2URGSE |
|
|
|
|
11-13-2012, 07:30 PM
|
#12 | |
|
Banned
Join Date: Jan 2012
Drives: Attitude
Location: MD
Posts: 10,046
Thanks: 884
Thanked 4,889 Times in 2,902 Posts
Mentioned: 123 Post(s)
Tagged: 4 Thread(s)
|
Quote:
|
|
|
|
|
|
11-13-2012, 10:38 PM
|
#13 |
|
Senior Member

Join Date: Aug 2012
Drives: FR-S
Location: IL
Posts: 2,857
Thanks: 519
Thanked 2,997 Times in 1,095 Posts
Mentioned: 159 Post(s)
Tagged: 1 Thread(s)
|
I wanted this until I thought about how much heat it will trap in the intake manifold. Thoughts?
Thanks for the DIY BTW.
__________________
|
|
|
|
|
11-13-2012, 11:40 PM
|
#14 |
|
"Fast Looking Slow Car"
Join Date: Jul 2012
Drives: 13' BRZ
Location: Colorado Springs, CO
Posts: 298
Thanks: 62
Thanked 83 Times in 54 Posts
Mentioned: 10 Post(s)
Tagged: 0 Thread(s)
|
Wow! Look's amazing.
|
|
|
|
| The Following User Says Thank You to Luke.Cariveau For This Useful Post: | password:jdm (11-16-2012) |
|
|
|
|
|
|
|
 Similar Threads
|
||||
| Thread | Thread Starter | Forum | Replies | Last Post |
| Carbon Fiber-patterned Key cover... | FR-S/GT-86 | Cosmetic Modification (Interior/Exterior/Lighting) | 10 | 07-25-2012 11:21 AM |


 優雅
優雅
 Mister Two
 F DR1VR