


|
||||||
| Member's Car Journals Car journals by our members. |
 |
|
|
Thread Tools | Search this Thread |
 07-15-2014, 10:50 AM
|
#15 |
|
Senior Member
Join Date: Mar 2014
Drives: 2014 BRZ Premium - SWP
Location: Chicago
Posts: 159
Thanks: 0
Thanked 21 Times in 20 Posts
Mentioned: 3 Post(s)
Tagged: 0 Thread(s)
|
All done, well for now... what a long night! LOL.
I learned a lot about painting, clearing, polishing, and wax/sealing. This is a pic after I sanded down the clear coat with 1500 and 2000 and wax/sealed it with my XP7424. As you can see (maybe you can't), the clear coat is all nice... but I did a shitty job on the red paint sanding/buffing. I didn't realize that it was really that bad until I installed the lights and turned the lights on... so blurry  So it's 11:30p, I can't sleep with this shit looking like crap. I took them out and sanding down with 1500 grit to clean up the red paint under the clear. The good news is that I put 5 coats of red on, so when I got down to the red I didn't burn through it. I sanded for about 10 minutes with the 1500 and 5 minutes with 2000. You know you are done when you don't see any sparkles and the lens is totally smooth... you will have a good idea of how it will come out when you wet the lens and you can see through clearly! This was the mistake I made initially... I didn't polish the crap out the red to make it really clean and smooth. I didn't put a clear on yet, because it was late. I polished it down with wax/sealant and here are the results just to see if I'm heading down the right path... Before... [IMG]  [/IMG] [/IMG]After... (no clear applied yet, just wax and sealant) [IMG]  [/IMG] [/IMG][IMG]  [/IMG] [/IMG]Next step this weekend... 1. Apply a couple coats of clear 2. sand down 1500 and 2000 3. buy some polish and apply with my buffer 4. apply wax sealant 5. take better pics 5. REST - The steps above have been updated per my experiences...
__________________
Vortech SC V3 // 3.12 Pulley // Moto-East Tune (93oct,e40-50,e85)
|

|

|
| The Following User Says Thank You to sissupr For This Useful Post: | SkAsphalt (07-15-2014) |
|
07-16-2014, 02:38 PM
|
#16 |

Join Date: Sep 2012
Drives: FRS, M3
Location: La Habra, CA
Posts: 296
Thanks: 48
Thanked 135 Times in 103 Posts
Mentioned: 24 Post(s)
Tagged: 1 Thread(s)
|
Awesome. Great work.
|
|
|
|
|
07-17-2014, 02:26 PM
|
#17 |
|
Senior Member
Join Date: Mar 2014
Drives: 2014 BRZ Premium - SWP
Location: Chicago
Posts: 159
Thanks: 0
Thanked 21 Times in 20 Posts
Mentioned: 3 Post(s)
Tagged: 0 Thread(s)
|
1st tank of e85
 @ 1280 miles. @ 1280 miles.
__________________
Vortech SC V3 // 3.12 Pulley // Moto-East Tune (93oct,e40-50,e85)
Last edited by sissupr; 07-17-2014 at 04:37 PM. |
|
|
|
|
08-04-2014, 06:23 PM
|
#18 |
|
Senior Member
Join Date: Mar 2014
Drives: 2014 BRZ Premium - SWP
Location: Chicago
Posts: 159
Thanks: 0
Thanked 21 Times in 20 Posts
Mentioned: 3 Post(s)
Tagged: 0 Thread(s)
|
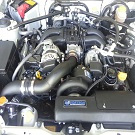
Vortech oil change.
Used 3/4 of a bottle of supercharger oil. Let drain for about 30min, before refilling through the fill hole.   drain plug, vented fill plug, and dip stick filled using about 3/4 of a bottle of vortech v3 oil and ran for 1 min... perfect fill... right in the middle  All done, now for some of my favorite beer... Spotted Cow  
__________________
Vortech SC V3 // 3.12 Pulley // Moto-East Tune (93oct,e40-50,e85)
Last edited by sissupr; 08-04-2014 at 07:15 PM. |
|
|
|
|
08-06-2014, 09:54 PM
|
#19 |
|
Senior Member
Join Date: Dec 2012
Drives: 2013 Asphalt FR-S
Location: San Antonio
Posts: 175
Thanks: 27
Thanked 9 Times in 9 Posts
Mentioned: 4 Post(s)
Tagged: 0 Thread(s)
|
Any issues with the idler pulley, yet?
|
|
|
|
|
08-06-2014, 10:17 PM
|
#20 | |
|
Senior Member
Join Date: Mar 2014
Drives: 2014 BRZ Premium - SWP
Location: Chicago
Posts: 159
Thanks: 0
Thanked 21 Times in 20 Posts
Mentioned: 3 Post(s)
Tagged: 0 Thread(s)
|
Quote:
__________________
Vortech SC V3 // 3.12 Pulley // Moto-East Tune (93oct,e40-50,e85)
|
|
|
|
|
|
08-11-2014, 05:50 PM
|
#21 |
|
Senior Member
Join Date: Mar 2014
Drives: 2014 BRZ Premium - SWP
Location: Chicago
Posts: 159
Thanks: 0
Thanked 21 Times in 20 Posts
Mentioned: 3 Post(s)
Tagged: 0 Thread(s)
|
1st oil change stuff arrived and some LEDs from http://viciousled.com/. Got the LEDs from a member, we'll see if I like the look
 I plan on doing my 1st oil change at the 6 month mark of ownership. I don't drive but 80-100 miles per week. So the oil change is planned for Sept 14. Filters (no crush washer) were $35.99 through Amazon Prime (free shipping). I realize these oil filters are for the FRS, and not the 130 or 160 BRZ part number I should use. I'm assuming they will be fine... Royal Purple was $37.79 for 5qt and $7.86 for extra qt at Walmart.  I'm so freaking excited about this valve, LOL.  $25.95 from Amazon with Prime (free shipping) $25.95 from Amazon with Prime (free shipping) LEDs installed... Need a better pic! 
__________________
Vortech SC V3 // 3.12 Pulley // Moto-East Tune (93oct,e40-50,e85)
|
|
|
|
|
08-11-2014, 06:02 PM
|
#22 |
|
Senior Member
Join Date: Dec 2012
Drives: 2013 Asphalt FR-S
Location: San Antonio
Posts: 175
Thanks: 27
Thanked 9 Times in 9 Posts
Mentioned: 4 Post(s)
Tagged: 0 Thread(s)
|
Cool journal...keep up the news feed. :-)
|
|
|
|
|
08-11-2014, 08:51 PM
|
#23 |
|
Senior Member

Join Date: Aug 2012
Drives: FR-S
Location: IL
Posts: 2,857
Thanks: 519
Thanked 2,997 Times in 1,095 Posts
Mentioned: 159 Post(s)
Tagged: 1 Thread(s)
|
You get a dyno yet? How is it running how do logs look?
__________________
|
|
|
|
|
08-11-2014, 09:33 PM
|
#24 | |
|
Senior Member
Join Date: Mar 2014
Drives: 2014 BRZ Premium - SWP
Location: Chicago
Posts: 159
Thanks: 0
Thanked 21 Times in 20 Posts
Mentioned: 3 Post(s)
Tagged: 0 Thread(s)
|
Quote:
__________________
Vortech SC V3 // 3.12 Pulley // Moto-East Tune (93oct,e40-50,e85)
|
|
|
|
|
|
12-15-2014, 03:05 PM
|
#25 |
|
Senior Member
Join Date: Mar 2014
Drives: 2014 BRZ Premium - SWP
Location: Chicago
Posts: 159
Thanks: 0
Thanked 21 Times in 20 Posts
Mentioned: 3 Post(s)
Tagged: 0 Thread(s)
|
Purchased Saikou dual catch.
Install: Easy, once I figured out how much hose to buy and where the check valve on the Vortech kit would go. After some searching, the check valve is on the outlet end of the catch can back to the manifold. Impressions: Overall, glad I went about doing this. I found about 1ml or 2 of blow by oil in my intake before I installed the breather can. That's what prompted me to install the cans and protect my supercharger and intercooler.. really happy with the way it looks. I do however wish I didn't have to remove both cans in order to release the valve at the bottom when cleaning out the cans. It's a tight fit to get to without removing the cans. Some pics.
__________________
Vortech SC V3 // 3.12 Pulley // Moto-East Tune (93oct,e40-50,e85)
|
|
|
|
|
02-13-2015, 01:59 PM
|
#26 |
|
Senior Member
Join Date: Mar 2014
Drives: 2014 BRZ Premium - SWP
Location: Chicago
Posts: 159
Thanks: 0
Thanked 21 Times in 20 Posts
Mentioned: 3 Post(s)
Tagged: 0 Thread(s)
|
Purchased T-Bolt clamps from Siliconeintakes.com. Got them in 2 days and very happy with the clamps @ $2.60 each for any size!
Impressions: I decided to use T-bolt clamps on anywhere that I could fit the clamps on. I was having issues with the hose that connects the supercharger to the air box slipping off and causing a huge boost leak. The T-bolt clamp fits perfectly between and holds on so much tighter then the worm clamps. A T-bolt clamp would not fit between the supercharger and the hose because the T-bolt design. One other benefit is the the T-bolt clamps remove the small play from the pipes moving around where connected to silicone couplers.... this is due the worm clamps width vs. the T-bolts, besides the clamping force. Very happy with the upgrade, especially with extreme temp differences in Chicago.
__________________
Vortech SC V3 // 3.12 Pulley // Moto-East Tune (93oct,e40-50,e85)
|
|
|
|
|
03-02-2015, 05:31 PM
|
#27 |
|
Senior Member
Join Date: Mar 2014
Drives: 2014 BRZ Premium - SWP
Location: Chicago
Posts: 159
Thanks: 0
Thanked 21 Times in 20 Posts
Mentioned: 3 Post(s)
Tagged: 0 Thread(s)
|
Purchased Red Line 0w-20 oil from Amazon. $84 total shipped.
Impressions: MAN, having the Fukmoto valve makes oil changes so damn easy, I can't be happier with that purchase. Engine sounds quieter, but to be honest could just be placebo effect here. I wanted to change to Eneos Sustina or Red Line based on the reviews of use with FI and E85 (since both oils are SN rated). I will be sending off my Royal Purple to Blackstone for oil analysis as soon as I get the oil kit.
__________________
Vortech SC V3 // 3.12 Pulley // Moto-East Tune (93oct,e40-50,e85)
|
|
|
|
|
04-21-2015, 11:31 AM
|
#28 |
|
Senior Member
Join Date: Mar 2014
Drives: 2014 BRZ Premium - SWP
Location: Chicago
Posts: 159
Thanks: 0
Thanked 21 Times in 20 Posts
Mentioned: 3 Post(s)
Tagged: 0 Thread(s)
|
Purchased RS*R Superdowns from GuerillaRacing with SPC camber bolts. Forum vendor, would buy from again.
Install: Used the DIY guide with the short cut of using the car weight to compress the springs before releasing (for the fronts). The rears struts I removed because my thru socket weren't deep enough. Nonetheless, the install wasn't bad and it took me about 3hr total. I didn't use the SPC camber bolts, as the drop wasn't significant enough IMO. If my alignment is way off or I can't get it to where I want it... I will install the SPC bolts. For now, for street driving... should be no issue with the stock bolts up front. I have too say... I LOVE MY 3/8 Dewalk Impact Wrench!!! It really saved me time and energy! I was quoted $325 for labor locally. Spent about $200 on tools to make this install easier, and I'm so HAPPY that I did it myself. Now if I want to go back to stock or get coilovers I have everything I need to do it again!  Impressions: Very happy with the ~1" drop and ride quality. I can't tell over the past couple of days that the ride is worse by any means. I think any additional drop on stock struts would be noticeable IMO (bouncy ride, floating feeling over dips on the highway, etc). Some random pics. Need a wash. Will take better pics of the new stance after a full detail this week.
__________________
Vortech SC V3 // 3.12 Pulley // Moto-East Tune (93oct,e40-50,e85)
|
|
|
|
| The Following User Says Thank You to sissupr For This Useful Post: | charged86 (08-20-2015) |
|
|
|
|
|
|
|
 Similar Threads
|
||||
| Thread | Thread Starter | Forum | Replies | Last Post |
| Subaru BRZ Clear bra Install (self healing), Window Tint & Wolf's Hard Body Sealant | Rickrack | Cosmetic Maintenance (Wash, Wax, Detailing, Body Repairs) | 27 | 03-15-2015 02:54 PM |
| Nomed Alucard's Build - Wolf 86 | Nomed Alucard | Member's Car Journals | 21 | 03-26-2014 02:42 PM |
| Detailer's Domain: 12 Lexus GS350 FSport - New Car Prep with Wolf's Hard Body | DetailersDomain | Cosmetic Maintenance (Wash, Wax, Detailing, Body Repairs) | 8 | 02-12-2013 08:00 AM |
| vinyl wrap and wolf's hardbody? | enjoi23 | Cosmetic Maintenance (Wash, Wax, Detailing, Body Repairs) | 3 | 11-07-2012 10:04 PM |
| Wolf's Chemicals Hard Body? | Spd229 | Cosmetic Maintenance (Wash, Wax, Detailing, Body Repairs) | 13 | 07-30-2012 03:58 PM |


