


|
||||||
| DIY (Do-It-Yourself) Guides For all DIYs. |
 |
|
|
Thread Tools | Search this Thread |
 03-23-2015, 11:24 AM
|
#1 |
|
Sweeper

Join Date: Oct 2014
Drives: '02 RA Bugeye | '15 FRS
Location: Seattle, WA
Posts: 1,876
Thanks: 2,291
Thanked 1,488 Times in 788 Posts
Mentioned: 41 Post(s)
Tagged: 0 Thread(s)
|
OVERVIEW This guide shows one approach to adding heat shields to the Perrin Engine/Motor Mounts for the FR-S using a heat shielding pad, thermaflect tape, and steel zip-ties. The approach is to create a blanket that wraps around the urethane while not compromising mount movement, adding NVH, or limiting access to bolts. Other ideas and implementations of this concept and more are encouraged and will be featured on the front page- add a post and the guide will be updated. 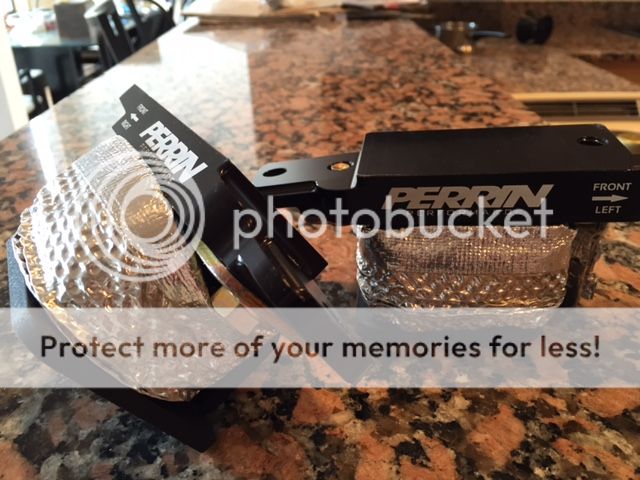 MATERIALS & EQUIPMENT - Perrin Engine Mounts - Heat Shielding Material ([ame="http://www.amazon.com/Heatshield-Products-120614-Inferno-Stainless/dp/B002UPOX9M/ref=sr_1_1?s=automotive&ie=UTF8&qid=1427123166&sr= 1-1&keywords=Heatshield+Products+Inferno+Shield+6%22 +X+14%22"]Heatshield Products Inferno Shield 6" X 14"[/ame]) - Thermaflect Tape ([ame="http://www.amazon.com/Heatshield-Products-340001-Thermaflect-Shield/dp/B004GJQAK0"]Heatshield Products Thermaflect Tape 1.5" X 3'[/ame]) - Steel zip ties - Hole Punch (I used a leather punch, black, left) - Needle-Nose Pliers -- 1. Gather the necessary tools and equipment for the job  2. Cut a strip that's as wide as the urethane on the mount. I eyeballed this at around 1 3/4 inches and trimmed to fit well    3. Wrap the exposed side with thermaflect tape to seal the deal    4. Mold the blanket around the mount, starting with wedging the material between the metal slot on the back. You will have some overlap.   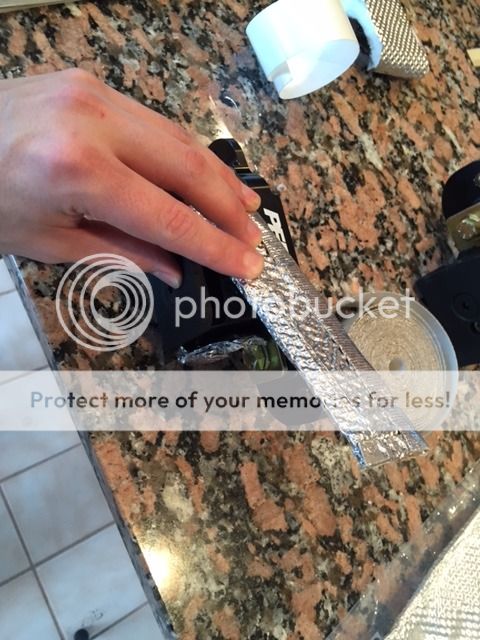  5. Either trim the blanket and re-seal with thermaflect or leave as is...then punch the two ends to make a hole for the steel zip-tie. 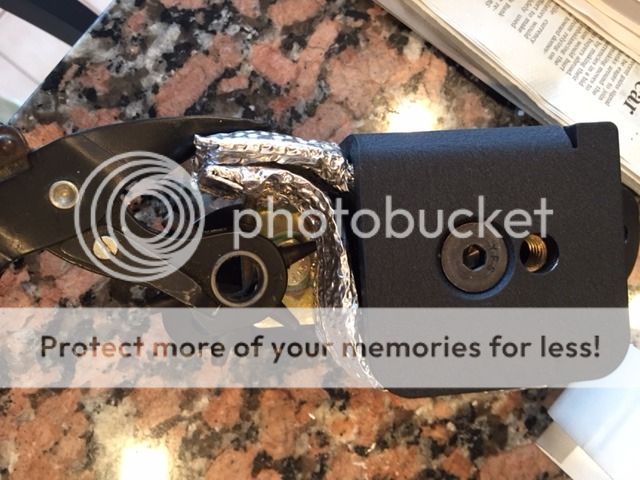  6. Clean up the area around the blanket as desired, making sure bolts are unobstructed and that there is even coverage throughout    Other's Ideas: Here's @FrX with a way to make a "blanket" out of thermaflect tape: http://www.ft86club.com/forums/showp...8&postcount=80 FEEDBACK AND IDEAS WELCOME Enjoy! Comments, criticism, suggestions, revisions welcome. I will update the Overview with trial results and rolling aging reviews as the mounts rack up miles on my 86.
__________________
Last edited by Koa; 03-29-2015 at 02:31 PM. |

|

|
| The Following 3 Users Say Thank You to Koa For This Useful Post: |
|
03-23-2015, 11:34 AM
|
#2 |
|
Sweeper
Join Date: Oct 2014
Drives: '02 RA Bugeye | '15 FRS
Location: Seattle, WA
Posts: 1,876
Thanks: 2,291
Thanked 1,488 Times in 788 Posts
Mentioned: 41 Post(s)
Tagged: 0 Thread(s)
|
INSTALL NOTES & SUGGESTIONS
- Follow the Perrin install guide carefully. Spend the extra time to decouple the frontpipe-midpipe connection and two transmission nuts. - UNBOLT AND TAKE OFF ANY AND ALL FRONT STRUT TOWER BARS. Damage to the fuel lines and intake coupling are well within possible if jacking the engine up too high. Taking off the stock strut-to-firewall bars are not required. - Watch out for how your wood block will obstruct access to bolts. A good rule of thumb is that the wood block should be a little over the length of the entire oil pan. - It is possible and recommended to take off the motor mount bolts using a mix of extensions and small 14mm sockets. Taking off the steering rack, exhaust manifold, and front sway bar will make this a lot easier, but the hassle isn't worth it if you get creative; can slide extensions under the steering rack to get at the rear mount bolts. - Don't be afraid to jack your engine up to get that pesky driver's side out. Turn the driver's side mount different directions and take out through the back if the exhaust manifold is still on - When installing the Perrin mounts, the lettering and arrows go INSIDE (the FRONT LEFT means driver side. FRONT RIGHT means passenger side. I don't know why they don't use those descriptions. There is a typo on the current Perrin instructions relative to these.. see if you can find it - The spacer's flat face is to clear the transmission's lip near the rear bolt hole. You'll figure it out; orient the spacer to the rear and slightly looking 'in' to the transmission Enjoy some bare OFH porn and some misc pics of the install      
|
|
|
|
|
03-24-2015, 12:07 PM
|
#3 |
|
Member

Join Date: Aug 2013
Drives: 2013 GBS Subaru BRZ Limited
Location: Philadelphia PA
Posts: 69
Thanks: 7
Thanked 31 Times in 16 Posts
Mentioned: 2 Post(s)
Tagged: 1 Thread(s)
|
Nice DIY. The formatting and pictures are great. How do the motor mounts feel?
|
|
|
|
| The Following User Says Thank You to Cuchullain For This Useful Post: | Koa (03-24-2015) |
|
03-24-2015, 12:09 PM
|
#4 | |
|
Sweeper
Join Date: Oct 2014
Drives: '02 RA Bugeye | '15 FRS
Location: Seattle, WA
Posts: 1,876
Thanks: 2,291
Thanked 1,488 Times in 788 Posts
Mentioned: 41 Post(s)
Tagged: 0 Thread(s)
|
Quote:
Love them so far.. have the Group N's on my wrx and used those for going on three years and these perform favorably to them |
|
|
|
|
|
03-24-2015, 12:22 PM
|
#5 |
|
I like to eat!
Join Date: Sep 2012
Drives: BRZ
Location: Pacific NorthWet
Posts: 1,039
Thanks: 409
Thanked 570 Times in 351 Posts
Mentioned: 24 Post(s)
Tagged: 0 Thread(s)
|
Question: Is Perrin doing any R&D to come up with different materials for future mounts? (Or is this the only solution to prevent melting) Why don't the OEM ones melt?
|
|
|
|
|
03-24-2015, 02:25 PM
|
#6 |
|
NASA SpecE30 Racer

Join Date: May 2012
Drives: 2006 Honda S2000
Location: Gulf Breeze, FL
Posts: 7,279
Thanks: 607
Thanked 5,759 Times in 3,055 Posts
Mentioned: 274 Post(s)
Tagged: 10 Thread(s)
 |
Great write up. I will be doing a similar thing for my engine mount.
__________________
- King Tut
Street/Track Car: 2006 Honda S2000 TT3 || Race Car: 1987 BMW 325is SpecE30 || Tow Vehicle: 2014 RAM 1500 EcoDiesel Sold Cars: 2012 BMW M3 || 2013 Subaru BRZ || 2012 Porsche Cayman R || 2009 Chevrolet Z06 || 2009 BMW M3 || 2004 BMW M3 || 2004 Nissan 350Z |
|
|
|
| The Following User Says Thank You to King Tut For This Useful Post: | Koa (03-24-2015) |
|
03-24-2015, 04:39 PM
|
#7 | |
|
Sweeper
Join Date: Oct 2014
Drives: '02 RA Bugeye | '15 FRS
Location: Seattle, WA
Posts: 1,876
Thanks: 2,291
Thanked 1,488 Times in 788 Posts
Mentioned: 41 Post(s)
Tagged: 0 Thread(s)
|
Quote:
|
|
|
|
|
|
03-24-2015, 09:18 PM
|
#8 | |
|
Senior Member

Join Date: Feb 2014
Drives: Strangely.
Location: Burbank, CA
Posts: 390
Thanks: 104
Thanked 142 Times in 100 Posts
Mentioned: 6 Post(s)
Tagged: 0 Thread(s)
|
Quote:
__________________
My FR-S has a build thread!
(It's mostly full of Nissans) |
|
|
|
|
|
03-25-2015, 11:13 AM
|
#9 | |
|
Sweeper
Join Date: Oct 2014
Drives: '02 RA Bugeye | '15 FRS
Location: Seattle, WA
Posts: 1,876
Thanks: 2,291
Thanked 1,488 Times in 788 Posts
Mentioned: 41 Post(s)
Tagged: 0 Thread(s)
|
Quote:
you'll have to inspect them to discern if the issue is on your set.. what are your mods and what are the temps seen by your setup and environment? |
|
|
|
|
|
03-25-2015, 05:10 PM
|
#10 | |
|
Senior Member
Join Date: Feb 2014
Drives: Strangely.
Location: Burbank, CA
Posts: 390
Thanks: 104
Thanked 142 Times in 100 Posts
Mentioned: 6 Post(s)
Tagged: 0 Thread(s)
|
Quote:
__________________
My FR-S has a build thread!
(It's mostly full of Nissans) |
|
|
|
|
|
02-02-2018, 03:12 PM
|
#11 |
|
Senior Member
Join Date: May 2015
Drives: 15 BRZ, 2003 MR2, '70 Elky, 06 TBSS
Location: Mobile, Alabama
Posts: 510
Thanks: 194
Thanked 200 Times in 142 Posts
Mentioned: 7 Post(s)
Tagged: 0 Thread(s)
|
are these pictures still available anywhere?
|
|
|
|
|
02-02-2018, 03:27 PM
|
#12 | |
|
Senior Member
Join Date: May 2016
Drives: 2016 BRZ Limited, Stock
Location: Seattle, WA
Posts: 243
Thanks: 183
Thanked 154 Times in 94 Posts
Mentioned: 3 Post(s)
Tagged: 0 Thread(s)
|
Quote:
|
|
|
|
|
| The Following User Says Thank You to arkanist For This Useful Post: | B T (02-02-2018) |
|
|
|
|
|
| Thread Tools | Search this Thread |
|
|
 Similar Threads
|
||||
| Thread | Thread Starter | Forum | Replies | Last Post |
| Engine Dress-Up, Heat Shielding & Motor Oil products @ OAKOS.com | OAKOS Automotive | Engine, Exhaust, Bolt-Ons | 192 | 02-13-2015 01:38 PM |
| Heat Shields | X Factor | Engine, Exhaust, Transmission | 4 | 09-05-2014 03:47 PM |
| Help! Need torque specs for motor mount | Pele86 | Engine, Exhaust, Transmission | 5 | 08-05-2013 04:24 PM |
| Trans/Motor Mount question | DanoFA20 | Engine, Exhaust, Transmission | 5 | 03-02-2013 03:16 PM |
| weather shields for the 86.. | Slide | Scion FR-S / Toyota 86 GT86 General Forum | 11 | 01-18-2012 05:04 AM |


 Momo
Momo
 Boost
Boost

