


|
||||||
| Electronics | Audio | NAV | Infotainment Anything related to in-car electronics, navigation, and infotainment. |
 |
|
|
Thread Tools | Search this Thread |
 11-05-2012, 01:57 AM
|
#15 | |
|
KCCO From Canada
Join Date: Oct 2012
Drives: Asphalt FRS
Location: The Great White North
Posts: 424
Thanks: 160
Thanked 72 Times in 61 Posts
Mentioned: 7 Post(s)
Tagged: 0 Thread(s)
|
Quote:

|
|

|

|
|
11-05-2012, 05:22 PM
|
#16 |

Join Date: Jul 2012
Drives: 2013 BRZ, 2020 KTM Super Duke 1290R
Location: Denver
Posts: 1,788
Thanks: 714
Thanked 1,141 Times in 624 Posts
Mentioned: 49 Post(s)
Tagged: 1 Thread(s)
|
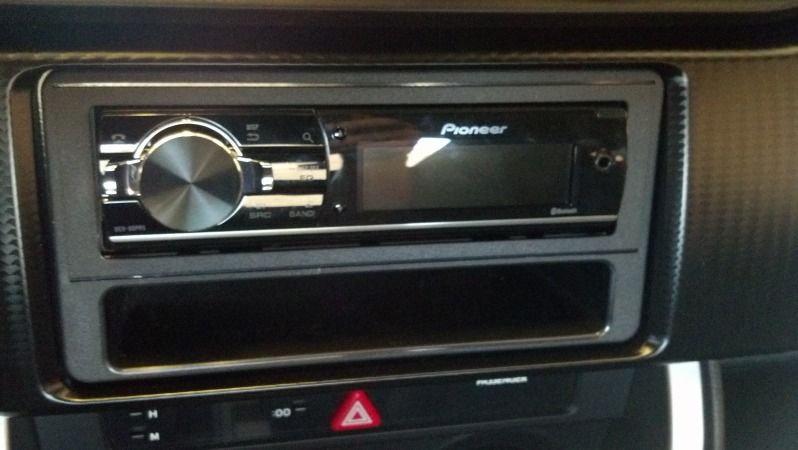
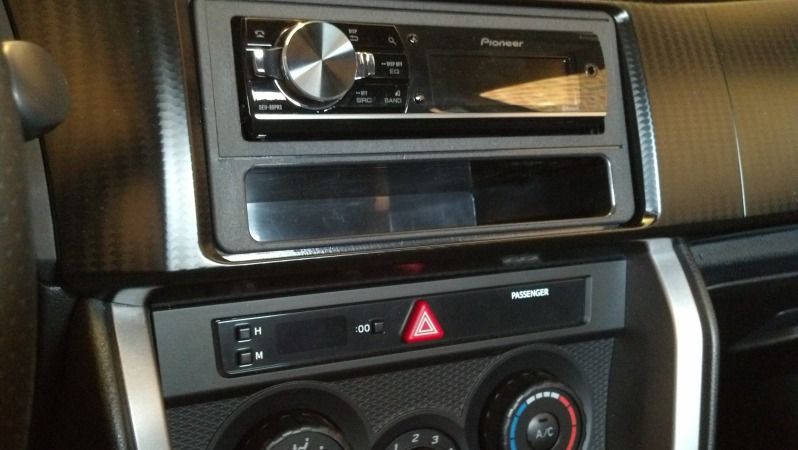
Here's the trim kit I fabricated. The two OEM side brackets hold everything in place, so the head unit can stay put without the trim ring, and vice versa. The aluminum plate mounts by itself to the OEM brackets, and holds the carbon plate around the head unit.
It consists of a piece of aluminum (2024-T3) and a 4-ply carbon fiber plate. The carbon was laid up without vacuum on a sheet of clear Mylar to give it a glossy finish. I wanted to clear coat it, but got impatient. The aluminum was bent with the outer flanges outer measurement exactly at 7 inches wide. The initial bends left the piece too wide, so I added the hump in the center to pull the ends together, it serves no other purpose. I located the aluminum bracket on the face plate and used a high grade epoxy paste adhesive (way overkill). The original design (out of the car) shows the plate trimmed only large enough for the face plate to protrude. I still wanted a more finished look, so I opened the hole a bit larger and notched it out where the Pioneer trim plate clips needed to fit (this is how it looks in the in-car pic at the bottom). I don't have any pics of the notches, but you get the idea. I work in the composites shop of an aviation company so many of these material scraps were handy, but they can just as easily be purchased on the open market. The carbon plate can be substituted for literally anything flat and rigid, even a piece of fancy wood, plastic, stainless steel, stitched leather bonded to something, whatever... BTW I love this head unit! the auto TA and EQ work exceptionally well. The TA can be centered or flipped via the "Position" menu, so your passenger can get the full effect. With the 9887 I always hated that I couldn't easily center or reverse the time alignment for my passenger, so they'd just have to take my word for it that it sounded good, while it sounded terrible to them. With the 80PRS, the subs are pulled right up front with everything else; sounds like they're mounted right to the dash (in a good way). The EQ creates a baseline so your custom EQs still apply. I've never, ever, ever heard bass continuity that so seamlessly EQ'd between the mid and subs. I'm hearing things in refreshing new detail that I never could before with the 9887 with it's manual adjustments. The 99PRS would be a hands down choice for even better audio quality, but it drops a few functions I really would like to have, such as the built-in Bluetooth, Pandora app mode, and dual USB. 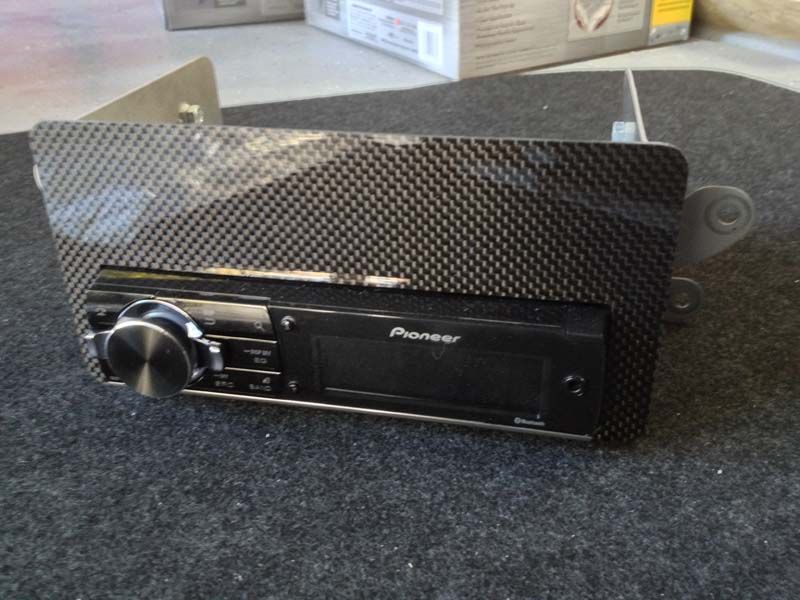 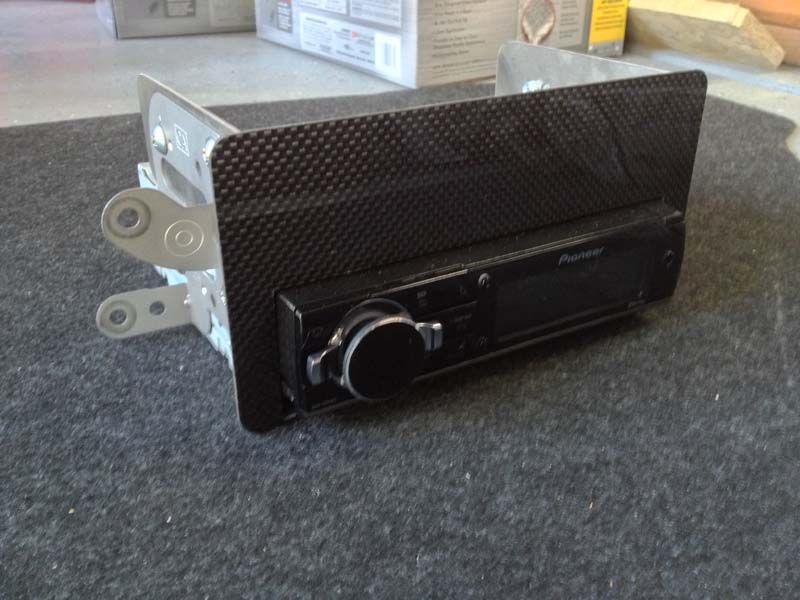 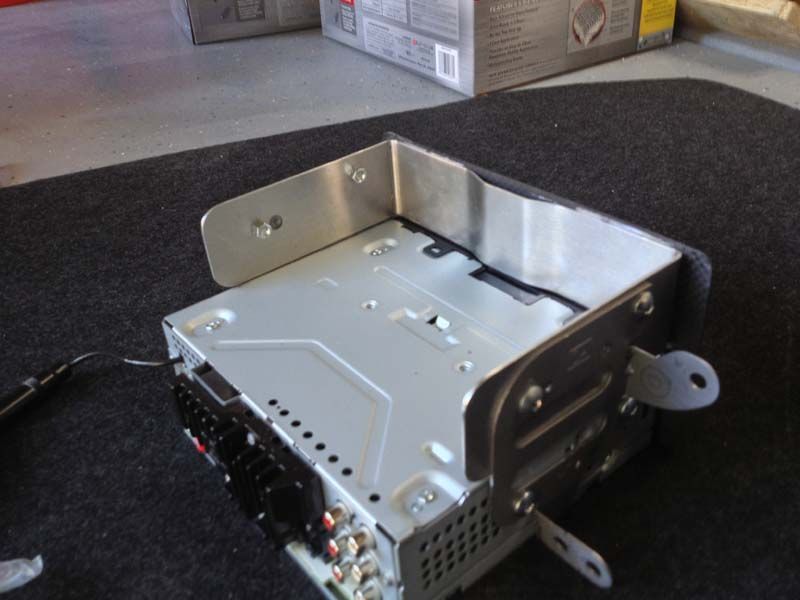 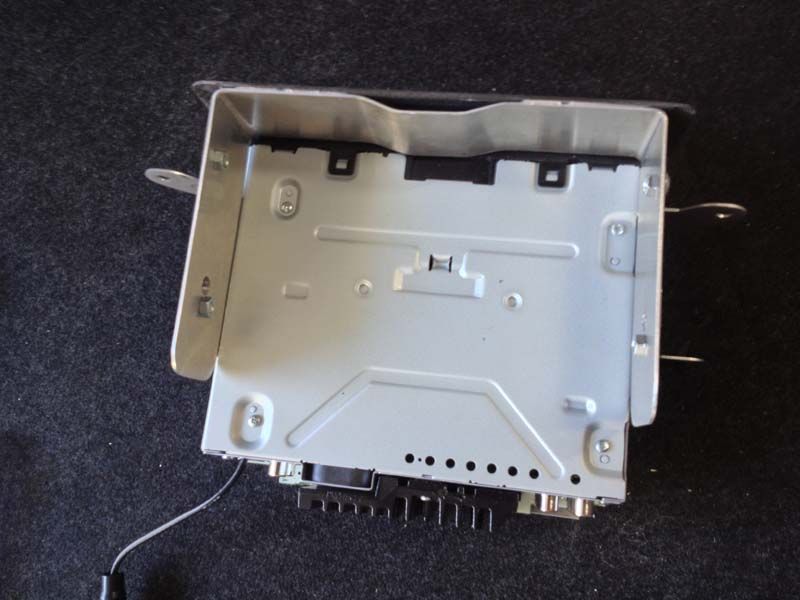 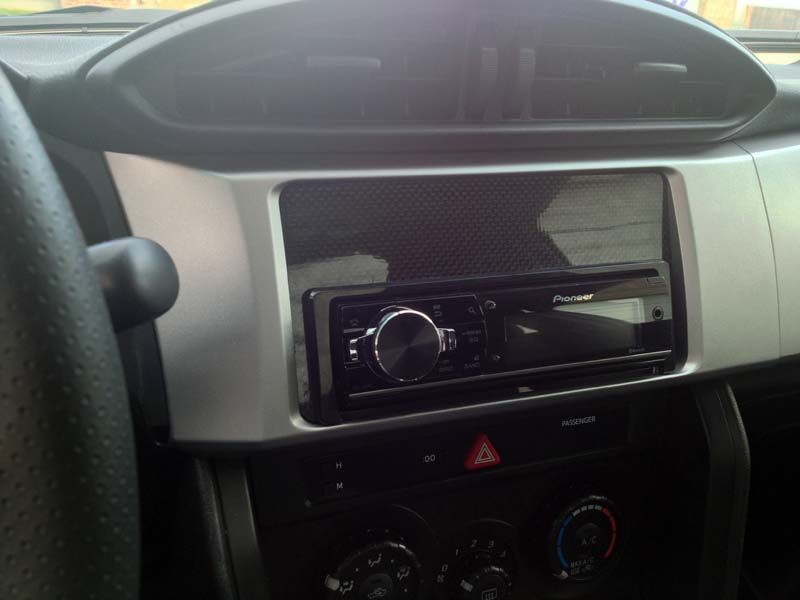 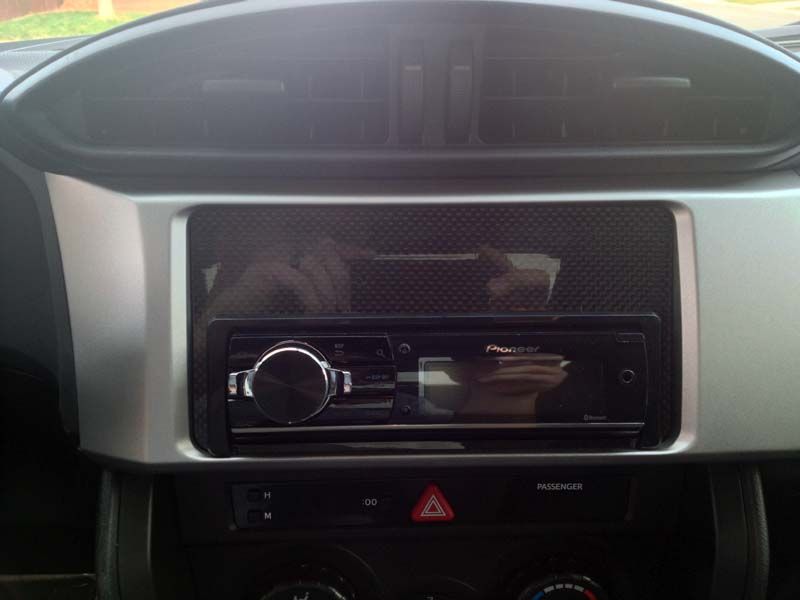
|
|
|
|
|
11-05-2012, 06:25 PM
|
#18 |
|
Senior Member
Join Date: Oct 2011
Drives: Firestorm FRS
Location: Louisiana
Posts: 322
Thanks: 6
Thanked 80 Times in 42 Posts
Mentioned: 3 Post(s)
Tagged: 0 Thread(s)
|
The Best Kits does work if you can get ahold of one.
|
|
|
|
| The Following User Says Thank You to -max- For This Useful Post: | wheelhaus (11-05-2012) |
|
11-05-2012, 07:36 PM
|
#19 | |
|
F Z1LLA
Join Date: Jul 2012
Drives: Lexus IS-F Series 2
Location: MJ SK Canada
Posts: 3,875
Thanks: 1,725
Thanked 1,993 Times in 1,246 Posts
Mentioned: 31 Post(s)
Tagged: 2 Thread(s)
|
Quote:
Nice Job! Perhaps you could fabricate one for me ?  Thinkin' of pulling my 99PRS from my Lancer and transfer it over to my BRZ 
__________________
2URGSE |
|
|
|
|
|
11-05-2012, 07:43 PM
|
#20 | |
|
Senior Member
Join Date: Oct 2011
Drives: Firestorm FRS
Location: Louisiana
Posts: 322
Thanks: 6
Thanked 80 Times in 42 Posts
Mentioned: 3 Post(s)
Tagged: 0 Thread(s)
|
Quote:

|
|
|
|
|
|
11-05-2012, 07:46 PM
|
#21 | |
|
F Z1LLA
Join Date: Jul 2012
Drives: Lexus IS-F Series 2
Location: MJ SK Canada
Posts: 3,875
Thanks: 1,725
Thanked 1,993 Times in 1,246 Posts
Mentioned: 31 Post(s)
Tagged: 2 Thread(s)
|
Quote:

__________________
2URGSE |
|
|
|
|
|
11-05-2012, 07:53 PM
|
#22 | |
|
F Z1LLA
Join Date: Jul 2012
Drives: Lexus IS-F Series 2
Location: MJ SK Canada
Posts: 3,875
Thanks: 1,725
Thanked 1,993 Times in 1,246 Posts
Mentioned: 31 Post(s)
Tagged: 2 Thread(s)
|
Quote:
__________________
2URGSE |
|
|
|
|
|
11-05-2012, 10:17 PM
|
#23 | |
|
Join Date: Jul 2012
Drives: 2013 BRZ, 2020 KTM Super Duke 1290R
Location: Denver
Posts: 1,788
Thanks: 714
Thanked 1,141 Times in 624 Posts
Mentioned: 49 Post(s)
Tagged: 1 Thread(s)
|
Quote:
|
|
|
|
|
| The Following User Says Thank You to wheelhaus For This Useful Post: | 2forme (11-05-2012) |
|
11-06-2012, 12:31 PM
|
#24 | |
|
Member
Join Date: Oct 2012
Drives: B5 S4 k04'd +
Location: Glenview IL
Posts: 14
Thanks: 2
Thanked 10 Times in 6 Posts
Mentioned: 0 Post(s)
Tagged: 0 Thread(s)
|
Quote:
|
|
|
|
|
| The Following User Says Thank You to Tambat For This Useful Post: | finch1750 (11-07-2012) |
|
11-06-2012, 08:01 PM
|
#25 |
|
Senior Member
Join Date: Jul 2012
Drives: FRS
Location: Cali
Posts: 1,558
Thanks: 188
Thanked 461 Times in 264 Posts
Mentioned: 9 Post(s)
Tagged: 0 Thread(s)
|
How much room do you have above the cd player? You need just over 2" for standard gauges. I think it would be a great solution. I would prefer a black background rather than the carbon.....
|
|
|
|
|
11-07-2012, 12:43 PM
|
#26 | |
|
Join Date: Jul 2012
Drives: 2013 BRZ, 2020 KTM Super Duke 1290R
Location: Denver
Posts: 1,788
Thanks: 714
Thanked 1,141 Times in 624 Posts
Mentioned: 49 Post(s)
Tagged: 1 Thread(s)
|
Quote:
|
|
|
|
|
|
11-12-2012, 02:34 PM
|
#27 |
|
Senior Member
Join Date: May 2012
Drives: 2013 Scion FR-S White Out
Location: Nashville
Posts: 136
Thanks: 8
Thanked 30 Times in 25 Posts
Mentioned: 3 Post(s)
Tagged: 0 Thread(s)
|
That best kit setup looks sort of cheap in the photos. :-( I'm guessing they will all be like that unless I do something custom.
|
|
|
|
|
11-12-2012, 06:20 PM
|
#28 |
|
Senior Member
Join Date: Oct 2011
Drives: Firestorm FRS
Location: Louisiana
Posts: 322
Thanks: 6
Thanked 80 Times in 42 Posts
Mentioned: 3 Post(s)
Tagged: 0 Thread(s)
|
Yes, it looks like the cheap plastic that it is. I have plans to plasticoat it and see how that looks.
|
|
|
|
|
|
|
|
|
|
|
 Similar Threads
|
||||
| Thread | Thread Starter | Forum | Replies | Last Post |
| SINGLE EXIT EXHAUST | karma003 | Engine, Exhaust, Transmission | 163 | 06-28-2018 02:48 PM |
| T1R 70R Exhaust (Single) Prototype V.2 ! | AJ PwR | Engine, Exhaust, Transmission | 104 | 02-15-2013 02:33 PM |
| Ridge Racing School; Lapping/school Sept 7th | rice_classic | Northwest | 4 | 09-05-2012 01:27 AM |
| Single DIN option from Metra | Calum | Electronics | Audio | NAV | Infotainment | 0 | 07-28-2012 05:48 PM |
| Single din adapters? | -max- | Electronics | Audio | NAV | Infotainment | 7 | 07-18-2012 03:30 PM |


 F DR1VR