


|
||||||
| Engine, Exhaust, Transmission Discuss the FR-S | 86 | BRZ engine, exhaust and drivetrain. |
 |
|
|
Thread Tools | Search this Thread |
 03-29-2013, 09:05 PM
|
#1 |
|
Senior Member

Join Date: Jan 2013
Drives: Asphalt Scion FR-S
Location: Los Angeles, CA
Posts: 499
Thanks: 274
Thanked 215 Times in 136 Posts
Mentioned: 10 Post(s)
Tagged: 1 Thread(s)
|
PPE Engineering Headers Installation and DIY
I purchased the Header and Overpipe in High temp black coating from Jeff at Micro Image. The welds are amazing and of high quality. The black finish is pretty stealthy and looks clean in the engine bay. This post will have pictures of both header and overpipe, including side by side between PPE Header and stock header. 2nd post will have DIY guide, which I've updated with gained experience. 3rd post will have the dyno graph of my car as it stands, no before graph for comparison.
It is loud with Berk catted front pipe and stock catback. There is rasp with this setup. I have some added engine noise 3-4k with the Visconti STG1 tune, and now at 4k+, it just roars. With the tune, I didn't have any CEL lights, as I'm sure the defouler they designed in does its job. Works with the stock tune and didn't throw a CEL for the few hours I had it flashed. Visconti tune worked well and made a noticeable difference with smoother idle and helped the midrange. Trying to find time next week to dyno. 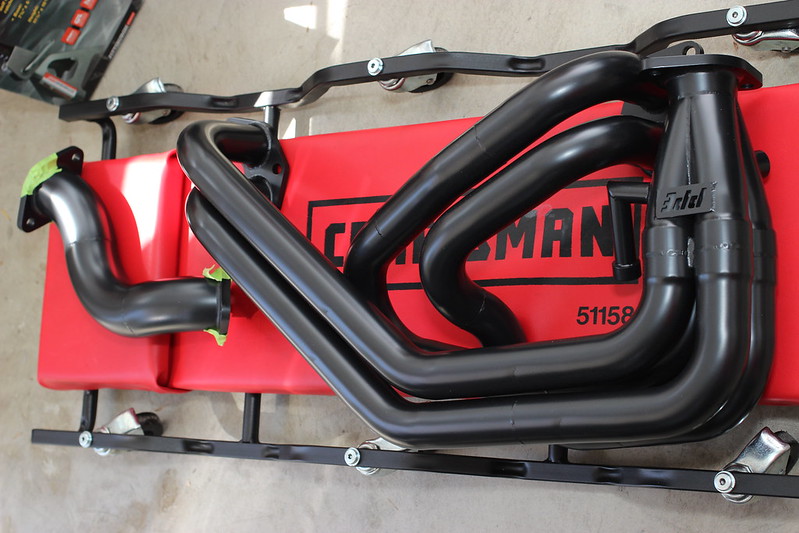 IMG_4528 by jdkane527, on Flickr 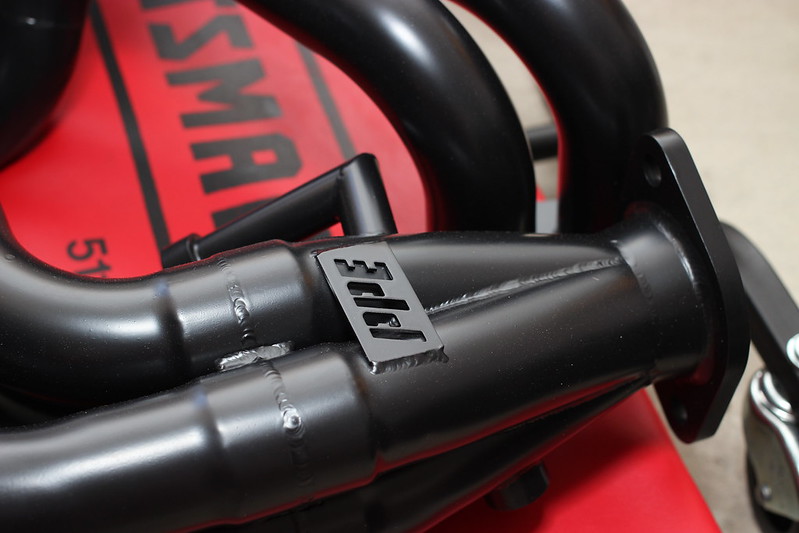 IMG_4527 by jdkane527, on Flickr 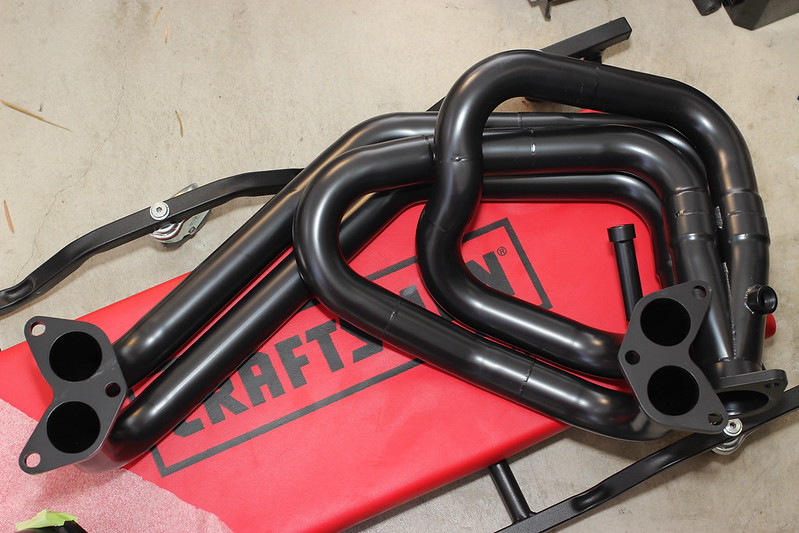 IMG_4539 by jdkane527, on Flickr 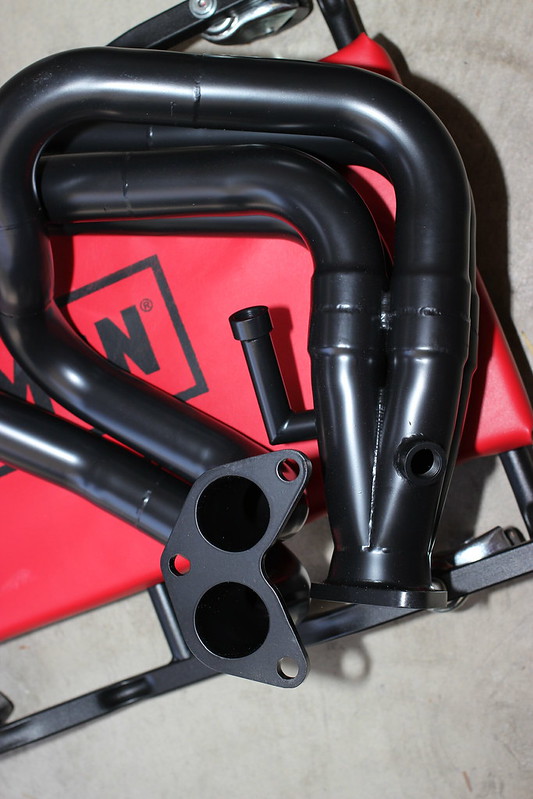 IMG_4537 by jdkane527, on Flickr 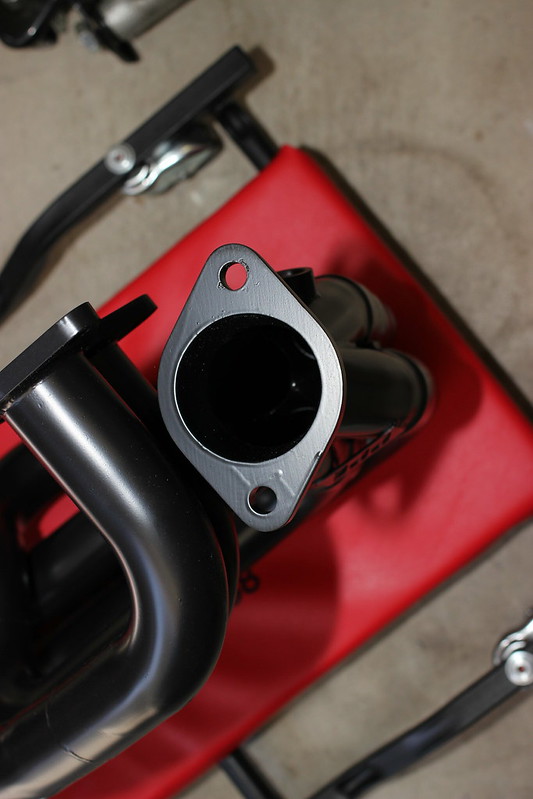 IMG_4533 by jdkane527, on Flickr  IMG_4540 by jdkane527, on Flickr 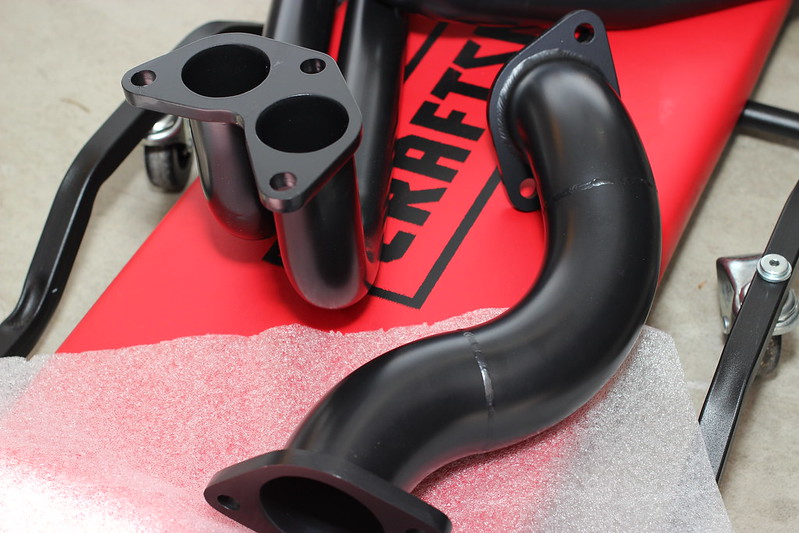 IMG_4542 by jdkane527, on Flickr 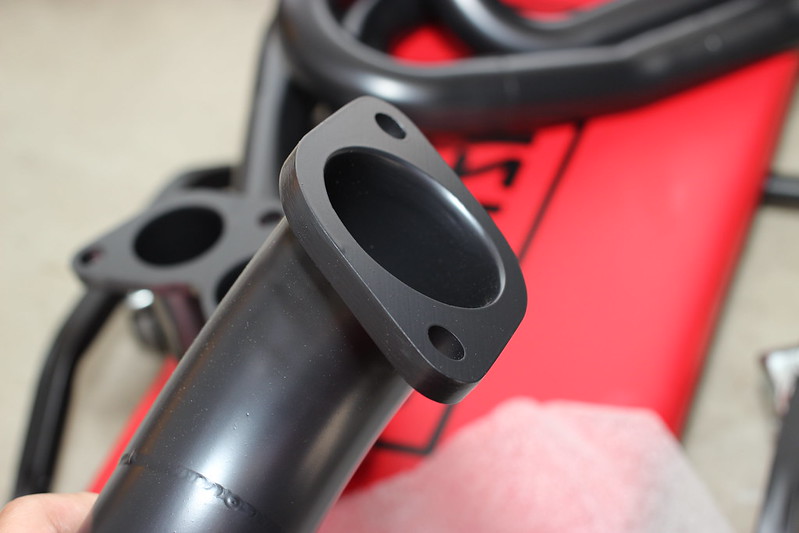 IMG_4541 by jdkane527, on Flickr Side by side: 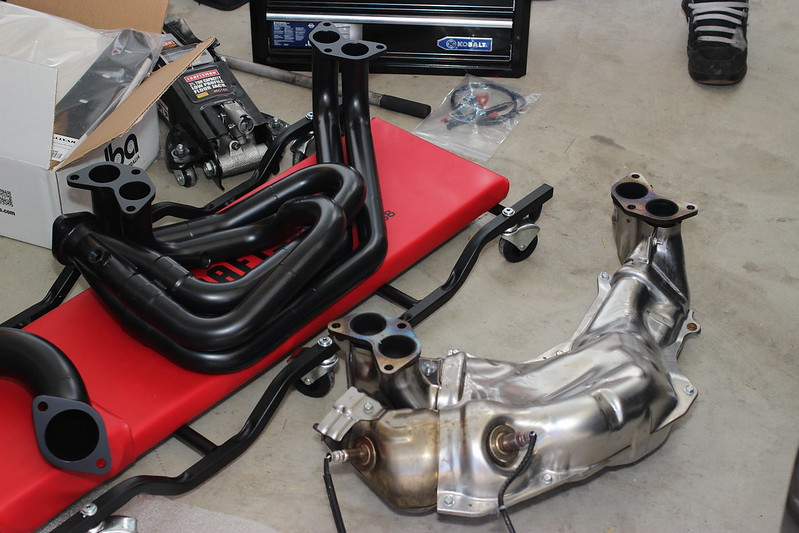 IMG_4551 by jdkane527, on Flickr
__________________
Last edited by JDKane527; 04-09-2013 at 06:00 PM. |

|

|
| The Following 6 Users Say Thank You to JDKane527 For This Useful Post: | 03Z33 (04-01-2013), Anthonytpt (04-10-2013), charged86 (03-29-2013), Cop (10-14-2014), Mr. (04-10-2013), tripjammer (04-01-2013) |
|
03-29-2013, 09:05 PM
|
#2 |
|
Senior Member
Join Date: Jan 2013
Drives: Asphalt Scion FR-S
Location: Los Angeles, CA
Posts: 499
Thanks: 274
Thanked 215 Times in 136 Posts
Mentioned: 10 Post(s)
Tagged: 1 Thread(s)
|
DIY Guide:
I had my neighbor help me install this. It is possible to do by yourself, but much easier with an extra set of hands. I posed the question in another thread if it is possible to do this without lifting up the rear of the car. To prove it, I did it myself, and it is possible to do it with only the front lifted. It's good to have a few various sizes of wrenches and sockets between 10mm, 12mm, 14mm, and 17mm, as well as a few long socket extensions. The header nuts require a deep 14mm socket to reach. I used a crescent wrench to remove the O2 sensor, since the largest wrench I have is 19mm. First disconnect the wires for the O2 sensors. They will be located left of the alternator. The O2 sensor will be removed when the header is off the car. 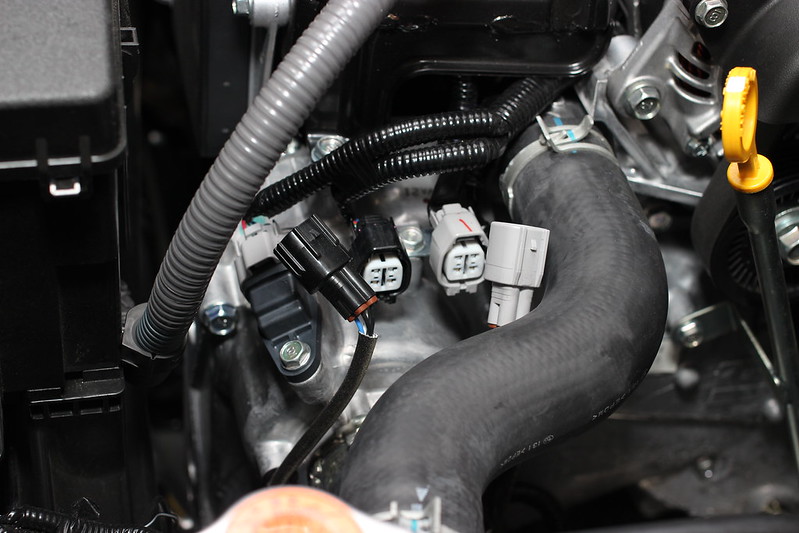 IMG_4529 by jdkane527, on Flickr Use a flathead screwdriver or something appropriate to remove the clips holding the wires to the engine block. There are 2 clips for each O2 sensor. 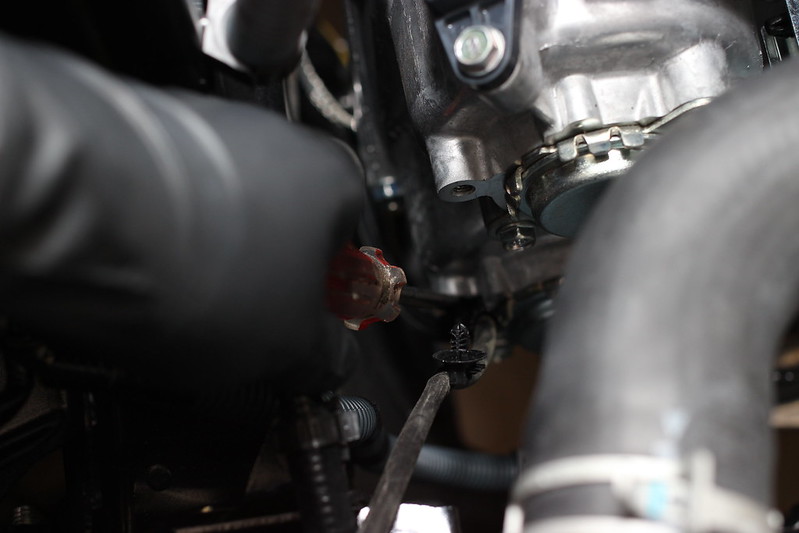 IMG_4547 by jdkane527, on Flickr Crawl underneath the car and remove the 2 undercovers, the metal one in the front under the engine and the plastic in the rear under the transmission. Didn't have pictures for the next few steps. Spray PB-Blaster or equivalent on the 6 nuts securing the header onto the engine block. Spray the 2 nuts holding the header to the overpipe, and if necessary, the 2 nuts holding the overpipe to the front pipe. Using deep 14mm socket with extension, remove 4 of the nuts, and leave 2 just to hold it up. Remove the 4 nuts holding the overpipe, and remove the bolt holding the frontpipe mount to the transmission mount. It is the bolt that attaches to the bracket on the front pipe. 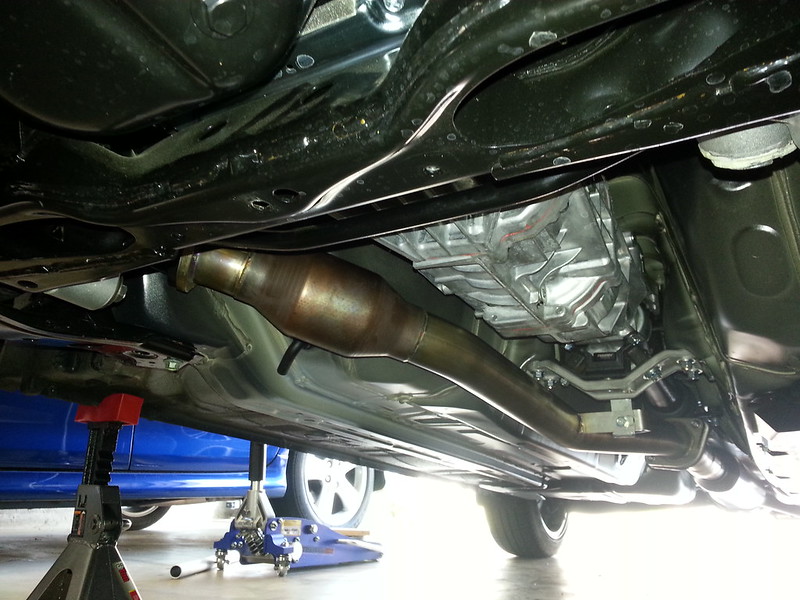 2013-03-29 15.41.09 by jdkane527, on Flickr Remove 2 nuts holding header and drop stock headers with O2 sensors still in place. To remove the overpipe, unbolt the 2 motor mounts to the chassis with 14mm socket with extension. Put a jack under the front part of the transmission and slowly raise it approximately 1" to remove the overpipe. If you feel comfortable jacking it from under the motor, that works too. Once removed, the engine can be returned to its original position and motor mount bolts installed. Torque nuts under motor mount to 50 ft-lbs. The Toyota manual says 70 ft-lbs, but 50 is adequate. At 70 ft-lbs, the nut kept rotating and wasn't tightening so I did not want to destroy the mount. Spray PB Blaster or equivalent on the threads of the O2 sensors. I did not do it for one and almost thought I screwed up the threads. Remove O2 sensors from stock header and install on PPE Header, noting which were first and second in exhaust gas flow. The first O2 sensor will be installed directly to the tube of the header. The second O2 sensor will install off the right angle. First time I wasn't thinking and switched the 2. Idle was rough but car didn't throw a CEL with stock tune or Visconti tune. 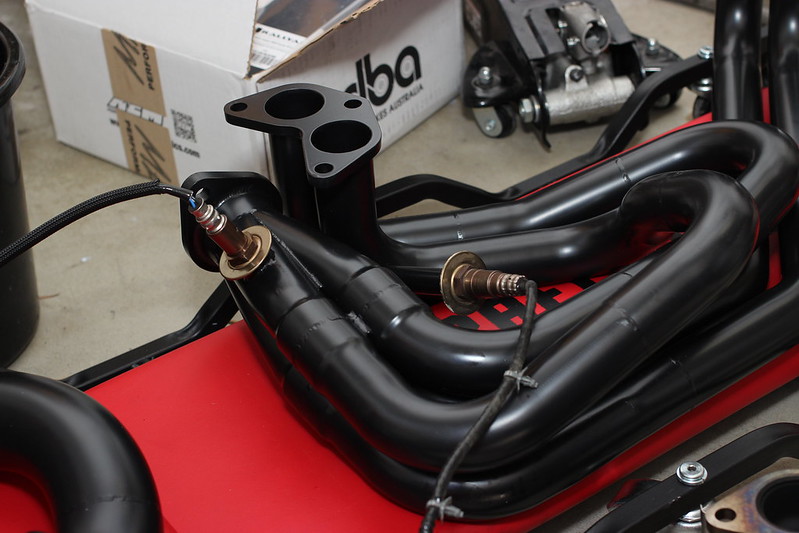 IMG_4552 by jdkane527, on Flickr For the first O2 sensor, the cable needs to be spliced and extended. Jeff included the wires with connectors for me. 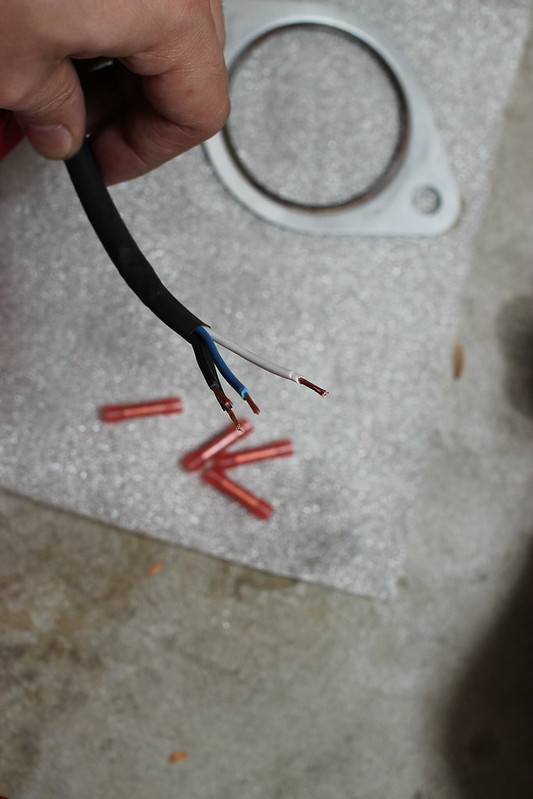 IMG_4560 by jdkane527, on Flickr Note in this picture I had the O2 sensors in incorrect location and the sensor that needs to be extended is the sensor installed directly to the tube. I cut the connector off leaving a few inches of wire with the connector and pulled back on the loom to give me some more wire to work with. Strip wire and solder wire extension on. In the picture though I crimped the wires. After a few days, the wire came out from the crimp connector because the wire gauge is to small. Strongly recommend soldering! You can see how I cut a slit in the loom. I used heatsink on each wire and a large piece around the set. In the picture, I wrapped electrical tape around the 4 connectors to keep them protected. 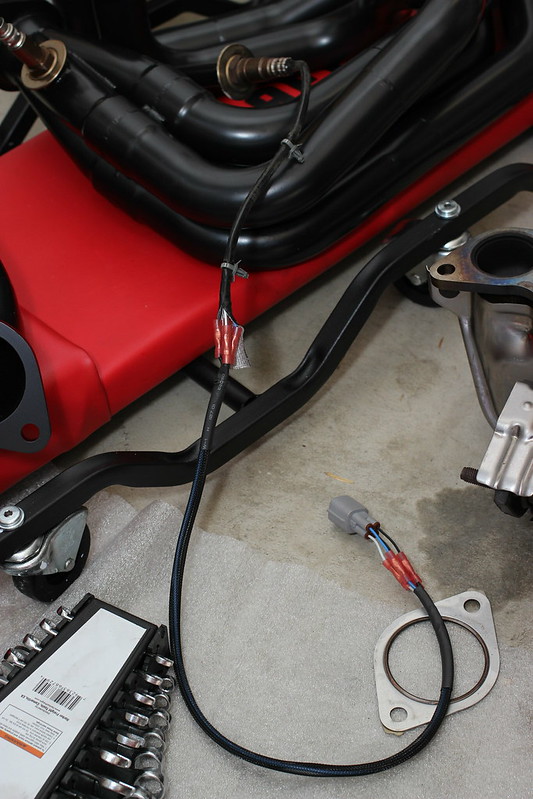 IMG_4562 by jdkane527, on Flickr 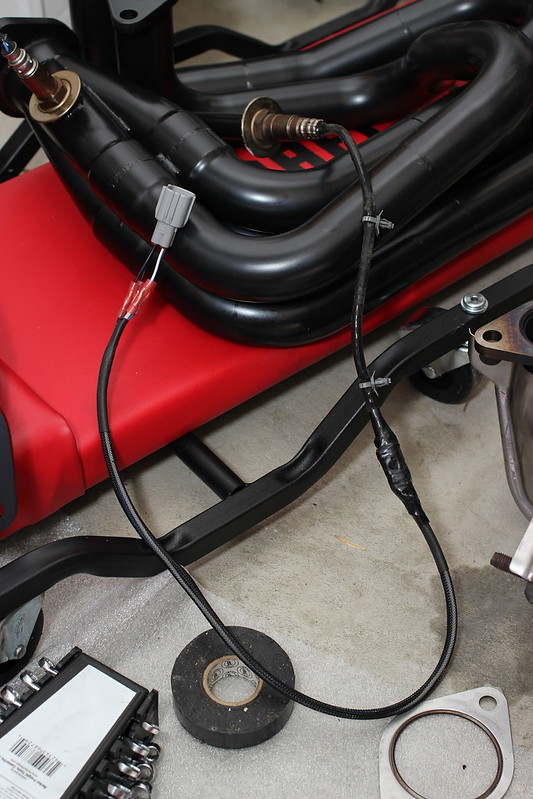 IMG_4563 by jdkane527, on Flickr Didn't get pictures of this, but install header onto engine block. PPE didn't include new gaskets, so I reused the OEM ones. My car has 1900 miles, so they still looked good. Here are the exhaust gas ports on the underside of the FA20 block. 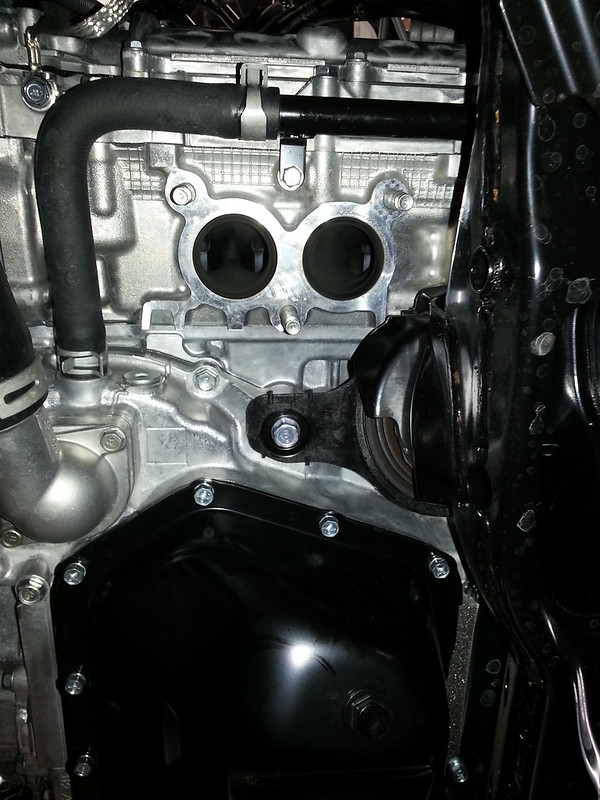 2013-03-29 13.04.30 by jdkane527, on Flickr Here is the picture with the header installed. I could only get a socket on 3 of the 6 nuts. The nuts need to be torqued to 29 ft-lbs. For the other 3 nuts that can't be reached, a wrench works fine. Check the torqued nut to see how 29 ft-lbs feels, and then try to get those 3 nuts approximately as tight. 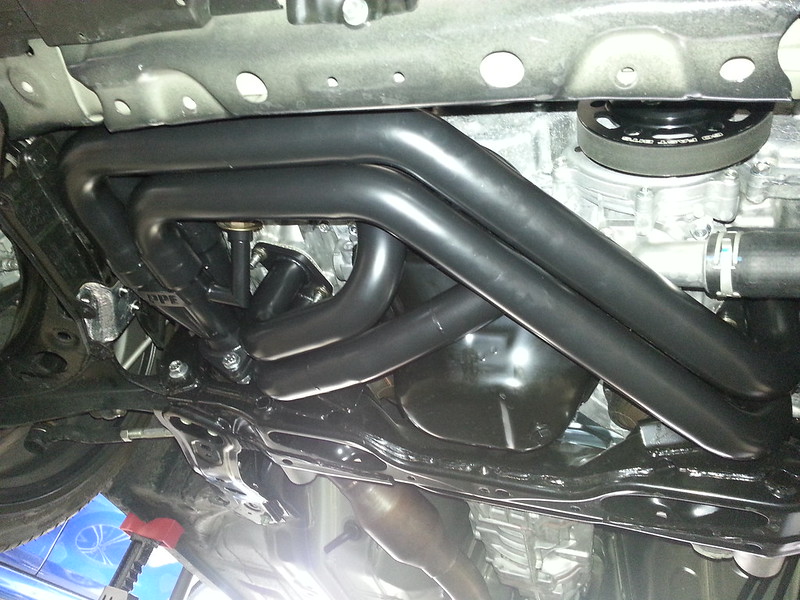 2013-03-29 15.40.38 by jdkane527, on Flickr Move the front pipe out of the way a bit, and work the overpipe in. I reused the gaskets here again, and used the included hardware. Lining everything up by working from the front back, header-overpipe, and then overpipe-front pipe. 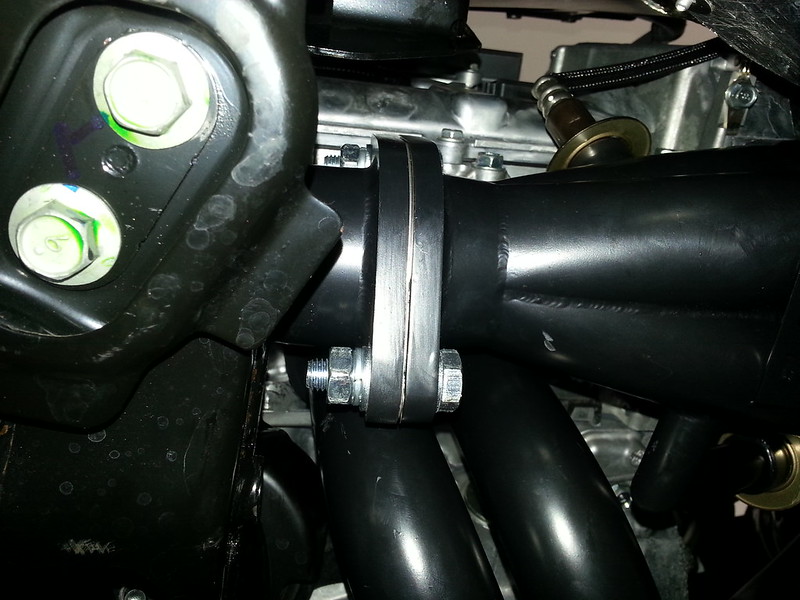 2013-03-29 15.41.31 by jdkane527, on Flickr 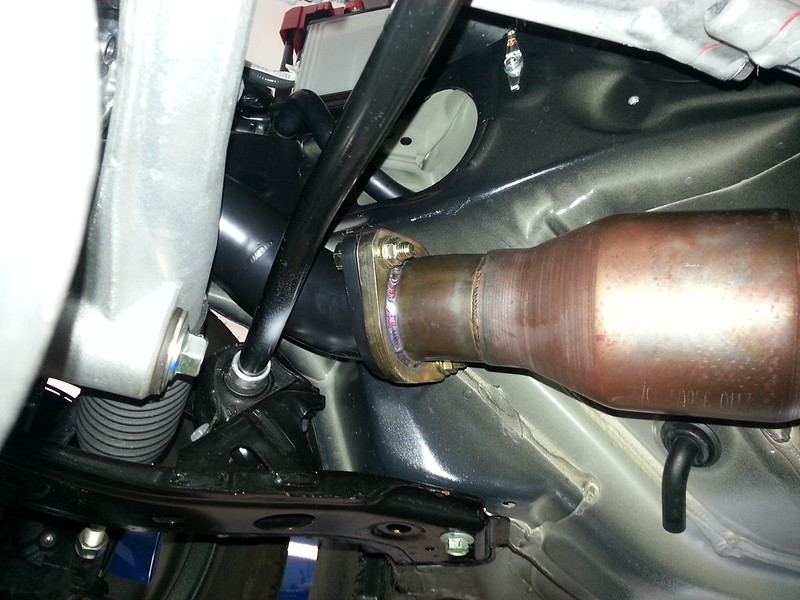 2013-03-29 15.41.16 by jdkane527, on Flickr 2013-03-29 15.41.09 by jdkane527, on Flickr Plug connectors back in for O2 sensors. Use zipties to secure the cables as needed. I left more wire on, as having more length to work with in the event that I wanted to move the O2 sensor further back.  IMG_4567 by jdkane527, on Flickr 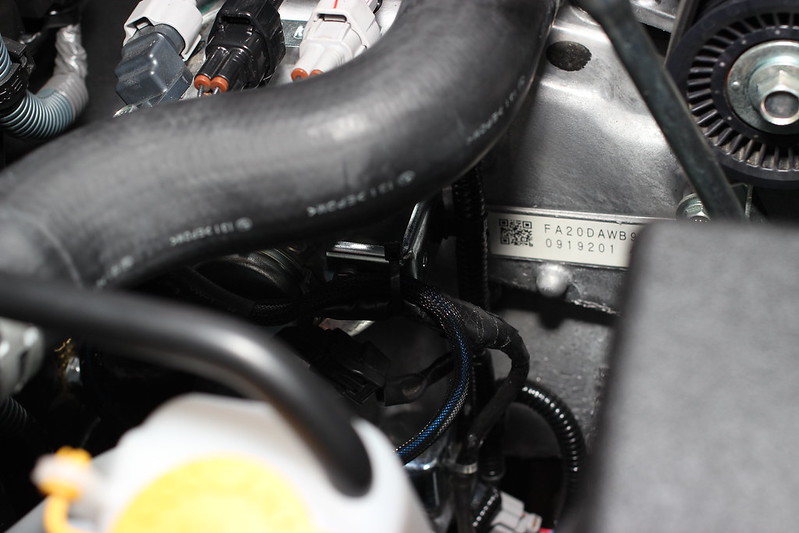 IMG_4568 by jdkane527, on Flickr Crawl under again to make sure no wires are loose or nearby the header tubes or engine block. 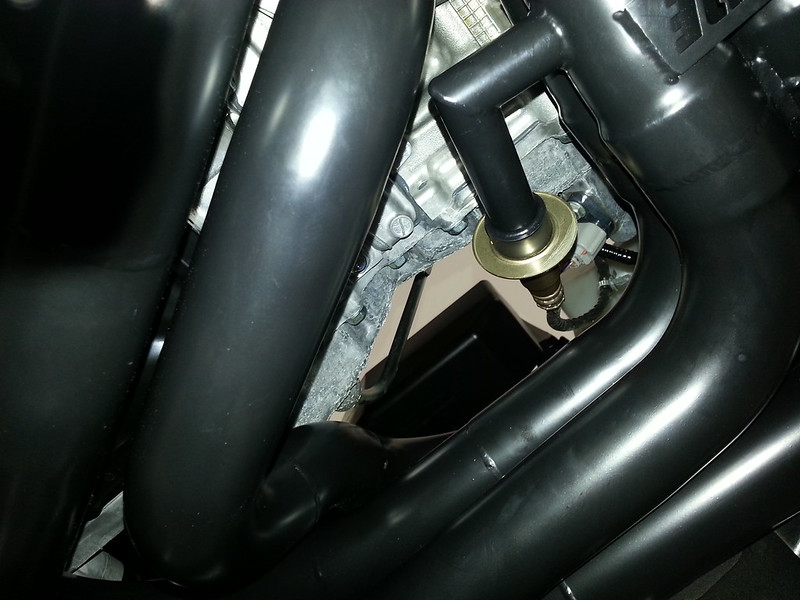 2013-03-29 15.41.40 by jdkane527, on Flickr 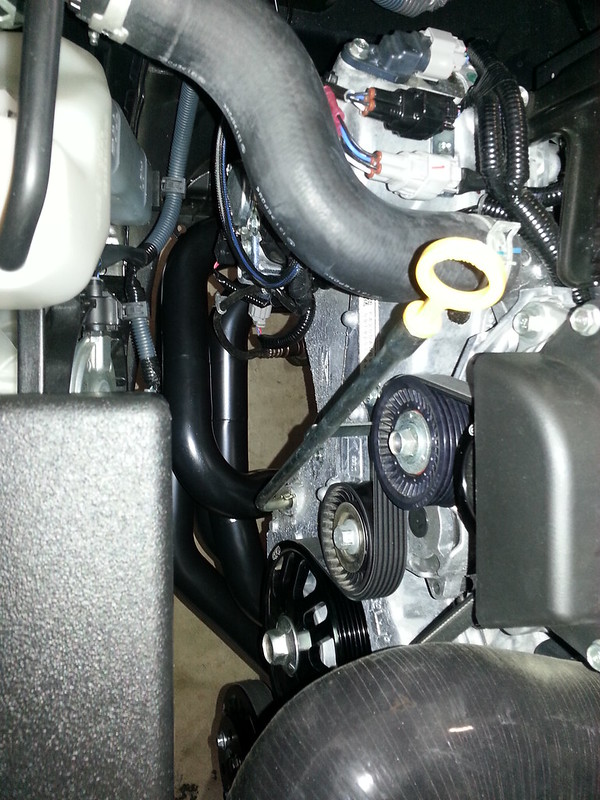 2013-03-29 15.41.53 by jdkane527, on Flickr Put all the undercovers back in place, admire your work, and take it for a spin! 
__________________
Last edited by JDKane527; 04-03-2013 at 03:50 AM. |
|
|
|
| The Following 11 Users Say Thank You to JDKane527 For This Useful Post: | 03Z33 (04-01-2013), Anthonytpt (04-10-2013), chiefshayan (12-30-2013), diss7 (12-30-2013), Gums (06-30-2013), jdm-az-fuk (12-30-2013), Mr. (04-10-2013), NorCalRider (04-01-2013), Pete (03-30-2013), swift996 (03-29-2013), tripjammer (04-01-2013) |
|
03-29-2013, 09:06 PM
|
#3 |
|
Senior Member
Join Date: Jan 2013
Drives: Asphalt Scion FR-S
Location: Los Angeles, CA
Posts: 499
Thanks: 274
Thanked 215 Times in 136 Posts
Mentioned: 10 Post(s)
Tagged: 1 Thread(s)
|
Reserved for Dyno.
[ame]http://youtu.be/B1qMJmzH3G4[/ame] I have Perrin inlet tube, GFB lightweight pulleys, PPE Headers and overpipe, and Berk catted front pipe, with Visconti STG1 Tune. Went to KT Motoring in Chatsworth near my home to get dyno'd. The guys were way chill and took their time setting everything up. Measured 163 whp peak. I'll have to search around to find a stock graph on a dyno dynamics. It measures low, they estimate it might read about 188whp on a dynojet. This will be my baseline and I will work up my build from there. I played around with paint and was able to make the graph area transparent on the stock dyno, and after lining up the graphs and scaling appropriately, have somewhat of a comparison between stock, and my car. The blurry thick red line is the stock taken from Dynosty, link below if you want to do the exercise yourself and overlay the graphs. The torque dip occurs earlier in the power band, and is shorter. Midrange at 4k+ rpm looks great, with gains of 20+whp and close to 30ft-lbs torque. The bottom end looks like a retune would help. Dynosty measured 153 whp peak on a stock FR-S on a Dyno Dynamics machine. http://www.dynosty.com/2012/06/scion...dyno-baseline/ Considering I gained 10whp peak on a hot day, it's not bad. I'll play around with photoshop to see if I can overlay their stock graph on my graph to compare the midrange, what I'm more interested in than peak.
__________________
Last edited by JDKane527; 05-29-2013 at 06:01 AM. |
|
|
|
| The Following User Says Thank You to JDKane527 For This Useful Post: | tripjammer (04-01-2013) |
|
03-29-2013, 09:18 PM
|
#4 | |
|
Senior Member

Join Date: Mar 2013
Drives: whiteout gt86 2015 IS350fsport
Location: northern kentucky. cincy
Posts: 1,931
Thanks: 2,154
Thanked 697 Times in 437 Posts
Mentioned: 42 Post(s)
Tagged: 0 Thread(s)
|
Quote:
This is really nice. I'm waiting for a company to make a nice catted header to keep dBl down |
|
|
|
|
| The Following 2 Users Say Thank You to charged86 For This Useful Post: | 2forme (04-02-2013), Anthonytpt (03-31-2013) |
|
03-29-2013, 10:05 PM
|
#5 | |
|
Senior Member
Join Date: Jan 2013
Drives: Asphalt Scion FR-S
Location: Los Angeles, CA
Posts: 499
Thanks: 274
Thanked 215 Times in 136 Posts
Mentioned: 10 Post(s)
Tagged: 1 Thread(s)
|
Quote:
 If a catted header were available with catted front pipe, it would be pretty calm sounding. Driving around town so far, staying between 2-3.5k rpm, it's not bad. Manageable with radio on. It roars 4k+, but if you're in that range, you're not looking for a quiet ride. 
__________________
|
|
|
|
|
|
03-29-2013, 10:28 PM
|
#6 | |
|
Senior Member
Join Date: Mar 2013
Drives: whiteout gt86 2015 IS350fsport
Location: northern kentucky. cincy
Posts: 1,931
Thanks: 2,154
Thanked 697 Times in 437 Posts
Mentioned: 42 Post(s)
Tagged: 0 Thread(s)
|
Quote:

|
|
|
|
|
|
03-30-2013, 11:34 AM
|
#7 |
|
Senior Member
Join Date: Oct 2012
Drives: 2013 Raven FRS
Location: Virginia Beach, Va
Posts: 496
Thanks: 30
Thanked 143 Times in 93 Posts
Mentioned: 18 Post(s)
Tagged: 3 Thread(s)
|
Such a nice looking header makes a person wish it was mounted on top instead of the bottom. lol.
|
|
|
|
|
03-30-2013, 02:03 PM
|
#8 |
|
Senior Member

Join Date: Mar 2012
Drives: Monkey-butt red FR-S
Location: Mesa, AZ
Posts: 795
Thanks: 26
Thanked 184 Times in 148 Posts
Mentioned: 7 Post(s)
Tagged: 0 Thread(s)
|
I have the prototype in my car, but it is silver; I like the black better.
|
|
|
|
|
03-31-2013, 06:29 PM
|
#9 |
|
Senior Member
Join Date: Jan 2013
Drives: Asphalt Scion FR-S
Location: Los Angeles, CA
Posts: 499
Thanks: 274
Thanked 215 Times in 136 Posts
Mentioned: 10 Post(s)
Tagged: 1 Thread(s)
|
After putting 200 miles on it, it has gotten a little quieter. There is some rasp but with a proper catback it should be less noticeable. I flashed the stock tune and it didn't throw a CEL so the extension for the second O2 sensor works. Idle is smooth as well. The tune helped the midrange torque according to the butt dyno. Overall very happy, the car sounds pretty badass
  Sent from my SCH-I535 using Tapatalk 2
__________________
Last edited by JDKane527; 04-01-2013 at 01:56 PM. |
|
|
|
| The Following User Says Thank You to JDKane527 For This Useful Post: | Huehuecoyotl (03-31-2013) |
|
04-01-2013, 06:06 AM
|
#10 |
|
Senior Member
Join Date: Jan 2013
Drives: Asphalt Scion FR-S
Location: Los Angeles, CA
Posts: 499
Thanks: 274
Thanked 215 Times in 136 Posts
Mentioned: 10 Post(s)
Tagged: 1 Thread(s)
|
Realized I had goofed during installation and had switched O2 sensors. Secondary O2 sensor was in direct path of gas, and the first O2 sensor was on the right angle, not directly in path of gas.
Switching the 2, my idle is smooth now and drives better. Funny though that with the incorrect configuration, the car didn't throw a CEL, even on stock tune. @Visconti tune works well with it. Sent from my SCH-I535 using Tapatalk 2
__________________
|
|
|
|
| The Following 2 Users Say Thank You to JDKane527 For This Useful Post: | Mr. (04-10-2013), tripjammer (04-01-2013) |
|
04-01-2013, 06:44 PM
|
#13 | |
|
Senior Member
Join Date: Jan 2013
Drives: Asphalt Scion FR-S
Location: Los Angeles, CA
Posts: 499
Thanks: 274
Thanked 215 Times in 136 Posts
Mentioned: 10 Post(s)
Tagged: 1 Thread(s)
|
Quote:
I think a catback will make the overall exhaust drone more, while making the rasp less noticeable.
__________________
|
|
|
|
|
| The Following User Says Thank You to JDKane527 For This Useful Post: | tripjammer (04-02-2013) |
|
04-01-2013, 07:07 PM
|
#14 | |
|
Senior Member
Join Date: Mar 2012
Drives: Monkey-butt red FR-S
Location: Mesa, AZ
Posts: 795
Thanks: 26
Thanked 184 Times in 148 Posts
Mentioned: 7 Post(s)
Tagged: 0 Thread(s)
|
Quote:
Btw, my co-driver thinks the car sounds cool, and when I hear it when he or my wife is autoxing it, the car sound freakin' great. It flat out roars. |
|
|
|
|
|
|
|
|
|
|
|
 Similar Threads
|
||||
| Thread | Thread Starter | Forum | Replies | Last Post |
| Headers? | BuBlake | Engine, Exhaust, Transmission | 30 | 04-22-2014 10:46 AM |
| Anyone put UEL headers on this car yet? | MarkMash | Engine, Exhaust, Transmission | 118 | 03-29-2013 12:30 PM |
| Headers | tdoggy57 | Engine, Exhaust, Transmission | 10 | 01-13-2013 05:09 AM |
| j2 engineering | rosco186 | Engine, Exhaust, Transmission | 3 | 12-02-2012 11:57 PM |
| Headers UEL vs EL | Decameron | Engine, Exhaust, Transmission | 38 | 08-31-2012 12:00 PM |


 86
86
