


|
||||||
| View the official forum sponsors list |
 |
|
|
Thread Tools | Search this Thread |
 09-05-2012, 01:29 AM
|
#29 |
|
Codename: Stitch

Join Date: Apr 2012
Drives: 91 MR2; 06 IS350; 16 BRZ; 18 CX-5
Location: Hayward/NorCal
Posts: 5,248
Thanks: 4,021
Thanked 5,436 Times in 2,307 Posts
Mentioned: 462 Post(s)
Tagged: 6 Thread(s)
|
is the two piece easier to install than the full one-piece?
Also would you be able to do this design/cutout? 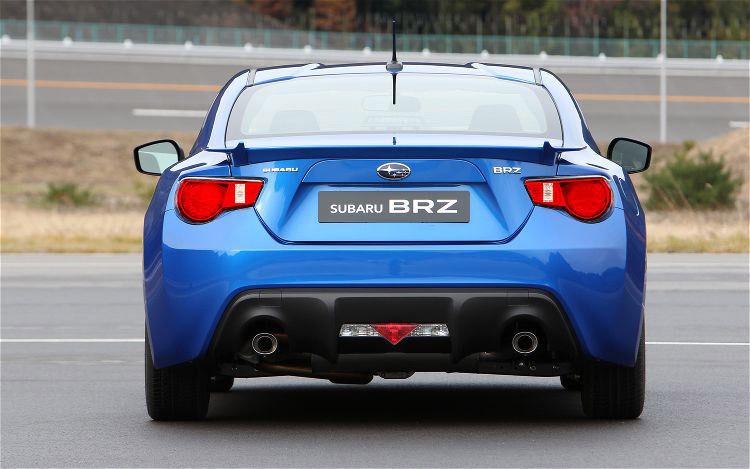
|

|
|
09-05-2012, 04:11 AM
|
#30 |
|
Senior Member

Join Date: Mar 2012
Drives: 2013 Ultramarine 86
Location: Bay Area, CA
Posts: 338
Thanks: 156
Thanked 125 Times in 79 Posts
Mentioned: 35 Post(s)
Tagged: 1 Thread(s)
|
Speaking of requests, could you also make one like this?

__________________
 |
|
|
|
09-05-2012, 02:21 PM
|
#31 | |
|
OH HEY NOW!!!!
Join Date: Jun 2012
Drives: 2013 Scion Fr-s Asphalt
Location: Orange County
Posts: 1,235
Thanks: 714
Thanked 634 Times in 364 Posts
Mentioned: 34 Post(s)
Tagged: 0 Thread(s)
|
Quote:
|
|
|
|
|
09-05-2012, 03:20 PM
|
#32 |
|
Senior Member

Join Date: May 2012
Drives: 2013 Scion FR-S Toyota 86
Location: Bay Area
Posts: 1,077
Thanks: 1,234
Thanked 312 Times in 195 Posts
Mentioned: 14 Post(s)
Tagged: 0 Thread(s)
|
looking forward for more products and details.. Add my name in your future transaction.. Can't wait!
|
|
|
|
09-05-2012, 07:12 PM
|
#33 |
|
When In Doubt...
Join Date: May 2011
Drives: Slowww
Location: PA215
Posts: 1,844
Thanks: 1,023
Thanked 752 Times in 412 Posts
Mentioned: 20 Post(s)
Tagged: 0 Thread(s)
|
I have a feeling I'm gonna be in over my head trying to install my tail light overlays....
Any tips? I'm 1000% sure I'm going to remove the tails to do it but haven't really considered anything else to make this any easier.
__________________
Join the Galaxy Blue Silica BRZ registry below: https://docs.google.com/spreadsheet/...2c&usp=sharing |
|
|
|
09-06-2012, 02:35 AM
|
#34 |
|
Glorious BRZ Master Race

Join Date: Apr 2011
Drives: Subaru Libird
Location: Race Wars
Posts: 3,645
Thanks: 1,050
Thanked 2,718 Times in 1,079 Posts
Mentioned: 110 Post(s)
Tagged: 0 Thread(s)
|
Hi Andy,
Here's a subtly aggressive yet clean-cut idea for a matte black overlay on the BRZ spoiler (outlined in red below only along the backing of the middle blade piece, not on the top). Works well with the existing black accents on the front bumper cover, side mirrors, and rear diffuser. And this would work with my BRZ STI black/blue theme I've got going. My idea was inspired by this Release Series tC spoiler: Can you make this? If you need a BRZ to work on in San Diego let me know!
__________________
Last edited by switchlanez; 09-06-2012 at 04:17 AM. |
|
|
|
09-07-2012, 10:38 PM
|
#35 | |
|
Senior Member
Join Date: Aug 2012
Drives: 1997 Acura NSX
Location: San Diego
Posts: 763
Thanks: 91
Thanked 174 Times in 118 Posts
Mentioned: 26 Post(s)
Tagged: 2 Thread(s)
|
Quote:
 . That looks like a lighter smoke tint or red. Email me . That looks like a lighter smoke tint or red. Email me  B@t |
|
|
|
| The Following User Says Thank You to Bluebatmobile For This Useful Post: | 713_GT86 (08-01-2013) |
|
09-07-2012, 10:40 PM
|
#36 | |
|
Senior Member
Join Date: Aug 2012
Drives: 1997 Acura NSX
Location: San Diego
Posts: 763
Thanks: 91
Thanked 174 Times in 118 Posts
Mentioned: 26 Post(s)
Tagged: 2 Thread(s)
|
Quote:
. One piece is standard cut. Specify two piece if thats what you desire .btw-I can do the requested cut for you . Email me.B@t |
|
|
|
|
09-07-2012, 10:41 PM
|
#37 | |
|
Senior Member
Join Date: Aug 2012
Drives: 1997 Acura NSX
Location: San Diego
Posts: 763
Thanks: 91
Thanked 174 Times in 118 Posts
Mentioned: 26 Post(s)
Tagged: 2 Thread(s)
|
Quote:
.B@t |
|
|
|
|
09-08-2012, 12:43 AM
|
#38 |
|
When In Doubt...
Join Date: May 2011
Drives: Slowww
Location: PA215
Posts: 1,844
Thanks: 1,023
Thanked 752 Times in 412 Posts
Mentioned: 20 Post(s)
Tagged: 0 Thread(s)
|
Oh boy, just got done (for now) applying my tail light overlays with the cut outs. The first one I had a lot of trouble with till I realized how pliable the vinyl really is once heated up. I did a lot better on the second tail light. I've never worked with vinyl before but I'll say as long as you are a patient person or like in my case, can encourage yourself to be patient for the sake of your car, you should be able to handle it. I can't imagine doing it without a heat gun or a professional hair dryer. My personal advice....
1. Clean the light first (soap/water mix) 2. Buff clean, make sure there's no finger prints 3. Spray some soap/water mix onto the light and onto the vinyl overlay 4. Using a squeegee of some sort smooth out the face of the light as much as possible. Get out all of the water too. 5. Start working on the edges, I choose the huge PITA curves at the end of the tail light (outside edge of the car) to start with. Heat the vinyl up to stretch it and then firmly press it down/squeegee it flat. Don't try to do the entire curve at once unless you're already experienced. Work from the inside out, saving the edges of the light for last. To avoid creases/wrinkles you're really gonna have to heat/stretch the vinyl. As far as the sale, thanks Andy! got them in a week flat. They were shipped to my work and my secretary was trying to figure out if the envelope said "F$*# me" or "kill me"...turns out it said "Fragile"  I'm gonna see if I can fix up the first one tomorrow morning and I'll try to get some pictures too.
__________________
Join the Galaxy Blue Silica BRZ registry below: https://docs.google.com/spreadsheet/...2c&usp=sharing |
|
|
| The Following User Says Thank You to Laika For This Useful Post: | oso_25 (09-08-2012) |
|
09-08-2012, 02:49 AM
|
#39 | |
|
The Comedian
Join Date: Jun 2012
Drives: SWP BRZ Limited
Location: Irvine
Posts: 969
Thanks: 94
Thanked 642 Times in 266 Posts
Mentioned: 12 Post(s)
Tagged: 0 Thread(s)
|
Quote:
|
|
|
|
| The Following User Says Thank You to ihaskrayon For This Useful Post: | Khalis (09-09-2012) |
|
09-08-2012, 08:47 AM
|
#40 | |
|
Senior Member
Join Date: Aug 2012
Drives: 1997 Acura NSX
Location: San Diego
Posts: 763
Thanks: 91
Thanked 174 Times in 118 Posts
Mentioned: 26 Post(s)
Tagged: 2 Thread(s)
|
Quote:
 B@t |
|
|
|
|
09-08-2012, 04:13 PM
|
#41 |
|
When In Doubt...
Join Date: May 2011
Drives: Slowww
Location: PA215
Posts: 1,844
Thanks: 1,023
Thanked 752 Times in 412 Posts
Mentioned: 20 Post(s)
Tagged: 0 Thread(s)
|
Andy, my suggestion to you would be that if you included a simple 8"x8" piece of vinyl with the tail light overlays it would give people the chance to practice doing the curves of the tails properly.
Pictures here! I love the overlays http://www.ft86club.com/forums/showthread.php?t=7268
__________________
Join the Galaxy Blue Silica BRZ registry below: https://docs.google.com/spreadsheet/...2c&usp=sharing |
|
|
|
|
|
|
|
|
|
 Similar Threads
|
||||
| Thread | Thread Starter | Forum | Replies | Last Post |
| NOW AVAILABLE: Pre Cut Vinyl Overlays (Red Out Tail Light Tint & More) | Premium Auto Styling | Exterior Parts - The Rest | 32 | 08-01-2012 03:40 AM |


 2013 Scion Frs


 Morgan