


 03-22-2019, 11:24 AM
|
#85 |
|
Senior Member

Join Date: Feb 2018
Drives: 2017 Subaru BRZ Limited
Location: Denver, CO
Posts: 619
Thanks: 3,059
Thanked 595 Times in 300 Posts
Mentioned: 9 Post(s)
Tagged: 0 Thread(s)
|
Some quick updates, no photos, although I have some of the following at some point to maybe drop in the thread:
-3.2 degrees camber in the front, -2 degrees camber in the rear, 10mm spacers in the front, 6mm spacers in the rear with 17x9 +42 wheels w/ 245/40R17 tires (Toyo Proxes R888R). I think this is where I want to start out on track while I'm waiting on take-off slicks to come back in stock to buy. So right now I'm just getting some of the wrenching I can do right now out of the way, and I'm waiting on the last little parts. Last edited by Tristor; 03-22-2019 at 02:18 PM. |

|

|
| The Following 2 Users Say Thank You to Tristor For This Useful Post: | Code Monkey (03-24-2019), mistople (03-22-2019) |
|
03-23-2019, 11:13 PM
|
#86 |
|
Senior Member
Join Date: Feb 2018
Drives: 2017 Subaru BRZ Limited
Location: Denver, CO
Posts: 619
Thanks: 3,059
Thanked 595 Times in 300 Posts
Mentioned: 9 Post(s)
Tagged: 0 Thread(s)
|
Quick update, all the bushings are in except the rear subframe bushing inserts (KDT922, called the "Positive Traction Kit"). In this kit there is supposed to be 4x bushing insert bottoms, and 2x of one type and 2x of another type of bushing insert toppers, but in my case I got 3x and 1x of the toppers, so I cannot proceed.
Whiteline was closed today. I reached out to @Racecomp Engineering and let them know, I'm hoping I can get another KDT922 sent to me, and hopefully it contains the right parts. Honestly, I was expecting this to be way worse and more time consuming to do all these bushings than it was. This was pretty straightforward since I had access to a lift, air tools, a pole jack, a shop press, and a torch. Good stuff. Car feels awesome already, and I'm really looking forward to the KDT922 and then getting the rest of the suspension (rear LCAs, rear toe arms, and coilovers) in. I'm going to take it to a buddy that works at a Honda dealership for a quick alignment check Monday afternoon and then I need to figure out who does proper track alignments in my area to go to. |
|
|
|
| The Following 2 Users Say Thank You to Tristor For This Useful Post: | Code Monkey (03-24-2019), Racecomp Engineering (03-25-2019) |
|
03-25-2019, 06:07 PM
|
#87 |
|
Senior Member
Join Date: Feb 2018
Drives: 2017 Subaru BRZ Limited
Location: Denver, CO
Posts: 619
Thanks: 3,059
Thanked 595 Times in 300 Posts
Mentioned: 9 Post(s)
Tagged: 0 Thread(s)
|
Whiteline got back to me today, they are sending me the correct part that is missing from the KDT922 kit. No idea when that will arrive though, and I'm still waiting on my top nuts from Vorshlag for the rear strut mounts. Since I'm waiting on stuff to show up, what's the best plan? Order more parts of course.
Ended up ordering the following:
 Now I get to play the waiting game, it seems I may not be done with all this during this weekend after all. |
|
|
|
|
03-25-2019, 10:07 PM
|
#88 |
|
Senior Member

Join Date: Jul 2015
Drives: '13 LAVA - lightly modded
Location: Western NC
Posts: 124
Thanks: 144
Thanked 56 Times in 32 Posts
Mentioned: 1 Post(s)
Tagged: 0 Thread(s)
|
I'd be interested to hear feedback for the door stabilizers. That's a mod I've been interested in for quite some time as a way. Does the door feel or sound different when you shut it? I doubt I could feel the added stiffness it adds to the chassis, but if it could at least make the door slam closer to a solidly built german car I'd be all for it.

__________________
You are going to be condemned to live out the consequences of your taste - TM
|
|
|
|
|
03-26-2019, 12:16 AM
|
#89 | |
|
Senior Member
Join Date: Feb 2018
Drives: 2017 Subaru BRZ Limited
Location: Denver, CO
Posts: 619
Thanks: 3,059
Thanked 595 Times in 300 Posts
Mentioned: 9 Post(s)
Tagged: 0 Thread(s)
|
Quote:
|
|
|
|
|
| The Following User Says Thank You to Tristor For This Useful Post: | TeutonicShift89 (03-26-2019) |
|
03-31-2019, 04:58 PM
|
#90 |
|
Senior Member
Join Date: Feb 2018
Drives: 2017 Subaru BRZ Limited
Location: Denver, CO
Posts: 619
Thanks: 3,059
Thanked 595 Times in 300 Posts
Mentioned: 9 Post(s)
Tagged: 0 Thread(s)
|
Quick update, I got the top nuts from Vorshlag and they fit properly, and I also got the one bushing topper I was missing in my KDT922 kit from Whiteline. I only had a couple of hours in the shop yesterday, so I assembled the struts but didn't install coilovers or arms, that's now delayed until next Saturday. I did get my KDT922 installed though, and I had an alignment done today. I'm flying out tomorrow during an early red-eye for a quick work trip, but I am hoping to be back on track very very very soon.
During my alignment, it looks like I need to work on my subframe with a pry bar quite a lot. Right now I'm almost a full degree off on cross camber (-1.8 on LR, -0.9 on RR). I'd rather fix it in the subframe than in the LCAs, even though I'll be putting LCAs in during my coilover install. |
|
|
|
|
04-06-2019, 11:34 PM
|
#91 |
|
Senior Member
Join Date: Feb 2018
Drives: 2017 Subaru BRZ Limited
Location: Denver, CO
Posts: 619
Thanks: 3,059
Thanked 595 Times in 300 Posts
Mentioned: 9 Post(s)
Tagged: 0 Thread(s)
|
Well things didn't go as planned today, so I still haven't installed my coilovers. I did install my SPL Parts rear LCAs and toe arms. I need an alignment before I really drive anywhere, but I will say I am very annoyed with the "titanium" socket cap screws used for the double adjuster. They cam out really easily and strip easily.
I'm hoping to get a basic alignment tomorrow and then get a serious alignment later in the week. |
|
|
|
|
04-11-2019, 09:58 PM
|
#92 |
|
Senior Member
Join Date: Feb 2018
Drives: 2017 Subaru BRZ Limited
Location: Denver, CO
Posts: 619
Thanks: 3,059
Thanked 595 Times in 300 Posts
Mentioned: 9 Post(s)
Tagged: 0 Thread(s)
|
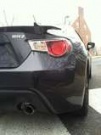
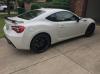
Track Alignment and Coilovers have been achieved!!! Also, SPL gave me replacement screws for the two I boogered up. Everything seems to be working swimmingly and the car feels great. I did note that I misclocked the Whiteline offset caster bushings slightly so my cross-caster isn't perfect, but if it really annoys me I can fix it later with FLCAs.
 How she sits now with 15mm spacers in the rear and a 10mm+6mm stacked spacers in the front.  Initial track alignment specs after setting ride height and corner weighting. (ignore the before section) |
|
|
|
| The Following 3 Users Say Thank You to Tristor For This Useful Post: |
|
04-12-2019, 08:55 AM
|
#93 | |
|
Senior Member
Join Date: Jan 2013
Drives: 13' DGM Built FBM BRZ
Location: Silver Spring, Maryland
Posts: 1,280
Thanks: 761
Thanked 250 Times in 195 Posts
Mentioned: 31 Post(s)
Tagged: 1 Thread(s)
|
Quote:
I know this thread is like a year old, and idk if anyone has said this. (I didnt see though the pages my bad lol) But the seat covers are upside down. I would insert a pic of my shrader delete kit setup, but if you flip them over the back bent tabs fit inside the longer rectangle bar so they actually hide behind it rather than being exposed like in your pic. Mess with it and Im sure youll get it, but its much cleaner if you set it up this way. Like what you have done with the car! |
|
|
|
|
| The Following User Says Thank You to Marcoscrdo For This Useful Post: | Code Monkey (04-12-2019) |
|
04-12-2019, 03:05 PM
|
#94 | |
|
Senior Member
Join Date: Feb 2018
Drives: 2017 Subaru BRZ Limited
Location: Denver, CO
Posts: 619
Thanks: 3,059
Thanked 595 Times in 300 Posts
Mentioned: 9 Post(s)
Tagged: 0 Thread(s)
|
Quote:
If I'm understanding correctly, you're saying that in this picture: https://www.ft86club.com/forums/atta...hmentid=163488 that if I can insert the top tab edge into the long piece that runs across the back to hide it, so it appears carpeted the entire way? I'm guessing the push clips would still be visible, but only the head of them? |
|
|
|
|
| The Following User Says Thank You to Tristor For This Useful Post: | Marcoscrdo (04-23-2019) |
|
04-17-2019, 03:46 PM
|
#95 |
|
Senior Member
Join Date: Feb 2018
Drives: 2017 Subaru BRZ Limited
Location: Denver, CO
Posts: 619
Thanks: 3,059
Thanked 595 Times in 300 Posts
Mentioned: 9 Post(s)
Tagged: 0 Thread(s)
|
Just a quick update, my STI JDM motor mounts arrived yesterday. I am going to install motor mounts, trans mount, and driveshaft center bearing bushings tonight. I have a mini-school scheduled for Sunday at Harris Hill, so I can get back on with an instructor to start the year and reacquaint myself with the car after my suspension changes. After that, I'm going to buy my membership for the year and start going every weekend I can to Harris Hill.
EDIT: I have installed the motor mounts, trans mount, and the driveshaft center bearing bushings. Note if you do the driveshaft center bearing bushings, the instructions are lying to you blatantly when they say all it takes is a flat head screwdriver and slight tug to separate the factory bushings. That's total horseshit. Since you don't need to save the factory bushings, save yourself wasting an hour and just use a cut-off wheel which is what I did for bushing #2 after fighting bushing #1 into submission. The motor mounts went in like a dream, surprisingly easy actually. Trans mount was a breeze too. Did everything in an hour and a half, the center bearing bushings were actually the "hardest" part. Car feels pretty awesome and throttle response is now near instantaneous. It's surprising how much difference it makes in feel removing driveline slop. Now I really want to get a CF drive shaft, lightened pulleys, header back exhaust, flex fuel, and an e85 tune. I think this car is going to be very fun once I'm done with it later this year. For the moment though, she's very ready to be let loose to scream and roar on the track on Sunday. I'm excited and I can't wait! Last edited by Tristor; 04-17-2019 at 11:21 PM. |
|
|
|
| The Following User Says Thank You to Tristor For This Useful Post: | Code Monkey (04-18-2019) |
|
04-21-2019, 09:04 PM
|
#96 |
|
Senior Member
Join Date: Feb 2018
Drives: 2017 Subaru BRZ Limited
Location: Denver, CO
Posts: 619
Thanks: 3,059
Thanked 595 Times in 300 Posts
Mentioned: 9 Post(s)
Tagged: 0 Thread(s)
|
Just wanted to post a quick update after my track day. Changing so much suspension items definitely changed the feel of the car.
During session 1 of the day, my rhythm was off significantly since I was driving the car as it was, rather than as it is now. After I figured out my issues I went back out in session 2 and improved dramatically, really getting a feel for the new rhythm of the car. Now everything is so much more immediate and crisp that during session 1 I was consistently turning in too early on corners and was too direct with throttle/brake inputs. During session 2 I fixed my line and now that I had adapted I was shedding seconds and quickly attained an average lap time for session 2 which matched my previous personal best lap. During session 3, I capitalized on this and started focusing on braking and shift points. I'm going so much faster now at every point around the track that I'm hitting redline/fuelcut in 3rd gear where before I would only shift out of 3rd into 4th on the straight leading into turn 4. I can get into 4th now before turn 7 and before turn 10. I think it's possible to do it before turn 2 as well, but I haven't quite got there yet. Given how much more speed I'm carrying though, I had some trouble with changing my brake zones and I'm still learning how to trail brake effectively. At the end of session 3 my 2nd to last lap was the fastest of the day, showing that more seat time yields results and set my new personal best nearly a full 3 seconds faster than my previous personal best. I'm still crunching data logs and compiling video, I'll post some more stuff later. Also, I'm now officially a member at H2R, paid up and ready to go. I'm going to start trying to hit H2R every weekend I'm not traveling for work, as additional seat time seems to be the thing I need the most now that I've addressed most of the weaknesses I had previously identified in the car. Honestly, I do think I could use a little more power now, but only so I can shift sooner. If I could climb the rev range more quickly it'd move my shift points on track into areas which are much more suited. Right now I'm either going to need to short shift 3 -> 4 to avoid hitting fuel cut, or give up speed and feather the throttle to maintain close to redline in 3rd. It's probably 10ths not full seconds in difference, but I think either more revs available or higher power to shift sooner would be a big win given the track layout and gearing. I might go ahead and bite the bullet to do a full exhaust, flex fuel, and tune. But I'd also like to prevent myself from adding power until after I've really mastered what I've got. I think given the current car I can probably shave another second or two just by improving my trail braking and could probably gain another second by using throttle more effectively and fixing my shift points, that'd have me making 1:32s-1:33s without any power adders and the current platform record on this track is a 1:27. My PR is now 1:36 when it was previously 1:39 All in all, a good day and perfect weather. |
|
|
|
| The Following 2 Users Say Thank You to Tristor For This Useful Post: | Code Monkey (04-23-2019), Racecomp Engineering (04-24-2019) |
|
04-21-2019, 09:10 PM
|
#97 |
|
Senior Member
Join Date: Feb 2018
Drives: 2017 Subaru BRZ Limited
Location: Denver, CO
Posts: 619
Thanks: 3,059
Thanked 595 Times in 300 Posts
Mentioned: 9 Post(s)
Tagged: 0 Thread(s)
|
Also, yeah I know this is a double-post but I wanted to address something else that several people previously asked me about.
Holy bumps batman! Several people have asked me about the bumpiness at H2R and my take, and I said after it got repaved last year it was much improved. But what I didn't realize is how much difference having the compliant stock suspension made to ride smoothness on the track. Before the repave there were serious bumps I could feel with the stock suspension that went away. Now that I've stiffened everything up and I'm on coilovers, wow. Just wow. H2R is super super super bumpy, but at the same time the car feels very controlled given the environment. I'd really like to go on COTA with the car as it is now, but we'll see if that's in the budget later this year. |
|
|
|
|
04-23-2019, 10:44 AM
|
#98 | |
|
Senior Member
Join Date: Jan 2013
Drives: 13' DGM Built FBM BRZ
Location: Silver Spring, Maryland
Posts: 1,280
Thanks: 761
Thanked 250 Times in 195 Posts
Mentioned: 31 Post(s)
Tagged: 1 Thread(s)
|
Quote:
|
|
|
|
|
|
|
|
|
 |
|
|
 Similar Threads
|
||||
| Thread | Thread Starter | Forum | Replies | Last Post |
| 48 States cross-country road trip | jababa82 | Scion FR-S / Toyota 86 GT86 General Forum | 20 | 07-09-2017 01:23 PM |
| Subaru differential specialist? | kster1 | Northern California | 5 | 12-11-2014 12:11 PM |
| It's Official: Road conditions in L.A. region judged worst in country | danthedirt | Southern California | 4 | 10-04-2013 10:58 PM |
| 86Drift, Australian 86/BRZ Specialist | 86drift | Australia Classifieds | 73 | 04-14-2013 02:22 AM |
| FR-S Cross Country Road Trip! | anusornsan | Scion FR-S / Toyota 86 GT86 General Forum | 13 | 09-11-2012 05:01 AM |


 Branka

