


 11-20-2017, 11:57 AM
|
#29 |
|
Senior Member
Join Date: Apr 2014
Drives: 2013 Ultramarine FR-S
Location: Springfield, MO
Posts: 1,948
Thanks: 2,539
Thanked 1,414 Times in 804 Posts
Mentioned: 31 Post(s)
Tagged: 3 Thread(s)
|
Definitely powers through it, It helps quite a bit to help with traction, it just makes it noticeably slower.
You don't need to do anything with the wire to the light. It's off by default. If you were to ground it, The light would come on.
__________________
 |

|

|
| The Following User Says Thank You to DustinS For This Useful Post: | BRX (11-20-2017) |
|
11-20-2017, 12:03 PM
|
#30 | |
|
Senior Member

Join Date: Jul 2015
Drives: Toyota GT86
Location: Abu Dhabi, UAE
Posts: 168
Thanks: 42
Thanked 111 Times in 64 Posts
Mentioned: 2 Post(s)
Tagged: 0 Thread(s)
|
Quote:
 Sent from my Pixel XL using Tapatalk |
|
|
|
|
|
11-25-2017, 12:53 PM
|
#31 |
|
Senior Member
Join Date: Jul 2015
Drives: Toyota GT86
Location: Abu Dhabi, UAE
Posts: 168
Thanks: 42
Thanked 111 Times in 64 Posts
Mentioned: 2 Post(s)
Tagged: 0 Thread(s)
|
The CAN BUS translator is done and is supposed to be shipped today. Ignition, AC, cruise control and the throttle pedal will be the only things needed to be wired other than the CAN BUS. All of the above use the same signals on both platforms, in this case a 2014 86 and a 2008 Tundra ECU.
Once everything is wired I can then reprogram the Tundra immobilizer for a new key and it should fire right up! Here is a video of the CAN BUS translator in action. The engine and transmission mounts after powder coating along with the transmission adapter. Engine bay was wiped clean for final installation and starter testing with the flywheel/flexplate and South bend clutch on. We should have the engine and car running this week or early next week as the fuel system is fairly straightforward on the 5.7L with a single feed line and a single return line. Once we confirm everything is in order custom coolant and AC lines will be made and then finally modifying the hood for the additional 3.7 liters under it.    https://cloud.tapatalk.com/s/5a19ad12...98448934~2.mp4 https://cloud.tapatalk.com/s/5a19ad12...98448934~2.mp4Sent from my Pixel 2 XL using Tapatalk |
|
|
|
| The Following User Says Thank You to BRX For This Useful Post: | DustinS (11-27-2017) |
|
11-25-2017, 01:12 PM
|
#32 |
|
Member

Join Date: Nov 2012
Drives: 2013 BRZ Limited manual
Location: va
Posts: 68
Thanks: 5
Thanked 16 Times in 9 Posts
Mentioned: 2 Post(s)
Tagged: 0 Thread(s)
|
looking good! can't wait to see a video of it moving
__________________
IAG built stage 3 block, HKS camshafts, built and tuned by national speed. 1050 ID injector, garret GTX3071 93 octane 415whp, E85 524whp monster! Quaife QBE69G sequential transmission!
|
|
|
|
|
12-01-2017, 02:23 AM
|
#33 |
|
Senior Member
Join Date: Jul 2015
Drives: Toyota GT86
Location: Abu Dhabi, UAE
Posts: 168
Thanks: 42
Thanked 111 Times in 64 Posts
Mentioned: 2 Post(s)
Tagged: 0 Thread(s)
|
With holidays in the states last week I still haven't received the CAN BUS translator and holidays here this weekend we weren't able to get everything installed in time but it's definitely gonna start and move under its own power next week.
Engine is in for the last time. Crankcase is done and can hold up 8 liters of oil along with the modified oil pick up tube. AC lines are done. All accessories are on the engine. Radiator and AC condenser are mounted and barely clear the compressor thanks to the low profile fans. Fuel lines are sorted out. Things left to do: Oil filter remote mount Engine harness wiring ECU Reprogramming CAN BUS translator wiring Serpentine belt All are pretty simple and should be knocked off in a couple of days.        Sent from my Pixel 2 XL using Tapatalk |
|
|
|
|
12-01-2017, 09:14 AM
|
#34 |
|
Senior Member
Join Date: Oct 2016
Drives: 2017 WR BLUE BRZ
Location: San Jose
Posts: 641
Thanks: 608
Thanked 502 Times in 249 Posts
Mentioned: 15 Post(s)
Tagged: 0 Thread(s)
|
Pushers will look cool from the front.
|
|
|
|
|
12-01-2017, 08:59 PM
|
#35 |
|
Member
Join Date: Apr 2016
Drives: Toyota 86
Location: Australia
Posts: 13
Thanks: 0
Thanked 4 Times in 3 Posts
Mentioned: 1 Post(s)
Tagged: 0 Thread(s)
|
Coming together nicely. Good to see something a bit different.
__________________
86modified.com - Modifying your Toyota 86 and Subaru BRZ
|
|
|
|
|
12-11-2017, 05:32 PM
|
#36 |
|
Senior Member
Join Date: Jul 2015
Drives: Toyota GT86
Location: Abu Dhabi, UAE
Posts: 168
Thanks: 42
Thanked 111 Times in 64 Posts
Mentioned: 2 Post(s)
Tagged: 0 Thread(s)
|
We ran into a few bumps which is expected. I was way to optimistic in getting it running last week but we're getting there. Pretty much everything is done and installed:
- Oil pan / crankcase - Oil filter adapter and remote mount - All Accessories - Fuel lines - A/C lines - Almost all water lines We could not find a hose that would work between the filler neck and the thermostat housing and since both are plastic and so close to each other fabrication was not an option. We welded a filler neck on the water jacket pipe but didn't like how it came out. So I finally gave in and ordered an aluminum Koyo filler neck that we can work with. We still have to make an intake and most likey it will be routed under the headlight. With that said, the car is getting put back together as the intake pipe and the filler neck are easy to access later. Harness is going in tomorrow, then wiring the CAN BUS module, fuel pump, throttle pedal, cruise control, and A/C. Pics of it's current state (water jacket will be fixed)     Sent from my Pixel 2 XL using Tapatalk Last edited by BRX; 12-11-2017 at 05:57 PM. |
|
|
|
| The Following 4 Users Say Thank You to BRX For This Useful Post: |
|
12-25-2017, 01:32 PM
|
#37 |
|
Senior Member
Join Date: Jul 2015
Drives: Toyota GT86
Location: Abu Dhabi, UAE
Posts: 168
Thanks: 42
Thanked 111 Times in 64 Posts
Mentioned: 2 Post(s)
Tagged: 0 Thread(s)
|
It's been a couple of weeks since my last update.
The car is back on it's wheels, we started wiring the ECU(s) last week and after 3 long days of diagrams and dissecting harnesses it finally fired up! However we have discovered a few things along the way. Even though the diagrams look similar with the exact same abbreviations and wiring, some stuff did not work between the two systems. The throttle pedal didn't work even though it shares the same plug as a Tundra pedal and all the wires have the same tag name. Fortunately a tundra pedal did work immediately and it has the same exact mount to the firewall. It's currently being modified so the pedal is in the same location as OEM. The fuel pump also didn't want to cooperate. Hooking it up to the Tundra ECU didn't work. With the 86 ECU it primed but didn't pump fuel as the 86 ECU doesn't know when the engine is running. So now the fuel pump stays running with the key in ignition. The CAN BUS translator seems to have been dead on arrival. Another one is on the way so the dash and power steering will have to wait. Now that everything else is wired up, hooking up teachstream to the OBD port the software recognizes the engine ECU from a 2007 Tundra. Other than some emission and transmission related codes everything else is working as it should. This also means my local tuner can tune it as if it was a Tundra and delete all the codes mentioned above We discovered a small oil leak in the crankcase but nothing crazy. At least we know we have oil pressure lol. The car is a huge mess of wires at the moment so I haven't taken any pictures recently (yes a bigger mess than the picture below from last week). Here is a short video of it firing up for the 3rd time before rigging up the fuel pump. Enjoy the open headers https://cloud.tapatalk.com/s/5a41434f...034621_380.mp4  Sent from my Pixel 2 XL using Tapatalk |
|
|
|
|
12-26-2017, 08:57 AM
|
#38 | |
|
Senior Member
Join Date: Mar 2015
Drives: 2015 FRS - FFR GTM
Location: Key Largo, FL
Posts: 785
Thanks: 240
Thanked 817 Times in 378 Posts
Mentioned: 9 Post(s)
Tagged: 0 Thread(s)
|
Quote:
__________________
 2015 FR-S - One Day I'll Finish The Swap |
|
|
|
|
|
12-26-2017, 09:25 AM
|
#39 | |
|
Senior Member
Join Date: Jul 2015
Drives: Toyota GT86
Location: Abu Dhabi, UAE
Posts: 168
Thanks: 42
Thanked 111 Times in 64 Posts
Mentioned: 2 Post(s)
Tagged: 0 Thread(s)
|
Quote:
Sent from my Pixel 2 XL using Tapatalk |
|
|
|
|
|
12-26-2017, 10:07 AM
|
#40 |
|
Long Distance Driver

Join Date: Aug 2012
Drives: 2013 Scion FR-S
Location: Northern VA
Posts: 779
Thanks: 565
Thanked 312 Times in 207 Posts
Mentioned: 43 Post(s)
Tagged: 3 Thread(s)
|
Good stuff! excellent documentation for future reference
__________________
|
|
|
|
|
01-09-2018, 03:12 PM
|
#41 |
|
Senior Member
Join Date: Jul 2015
Drives: Toyota GT86
Location: Abu Dhabi, UAE
Posts: 168
Thanks: 42
Thanked 111 Times in 64 Posts
Mentioned: 2 Post(s)
Tagged: 0 Thread(s)
|
Car is all wired up except for the can bus translator, should be here next week. Once it gets here all the wiring will be tidied up and sleeved.
Throttle pedal is installed and working just like factory (it was painted after taking the photo below). I drove it today out of the shop and got it towed to an exhaust shop and drove it onto their ramp. Clutch is perfect, brake works, no power steering yet because of the can bus. Anyway the exhaust should be done tomorrow and then It's time for a proper intake pipe.   Sent from my Pixel 2 XL using Tapatalk |
|
|
|
| The Following 3 Users Say Thank You to BRX For This Useful Post: |
|
01-10-2018, 03:23 PM
|
#42 |
|
Senior Member
Join Date: Jul 2015
Drives: Toyota GT86
Location: Abu Dhabi, UAE
Posts: 168
Thanks: 42
Thanked 111 Times in 64 Posts
Mentioned: 2 Post(s)
Tagged: 0 Thread(s)
|
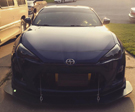
Exhaust is done along with the intake. Not the best welding but hopefully the boogers won't show after paint. I'll just leave the vibrant muffler and tips unpainted. The headers got bungs for O2 sensors and heat wrapped since they're very close to the steering column and the starter motor.
Filter is located right behind the grille I was hoping we could fit it behind the fog light but it was too long and I couldn't find a decent filter locally that would fit. Silicon couplers will be color matched later lol. Next, the last piece of the puzzle: a hood!    Sent from my Pixel 2 XL using Tapatalk Last edited by BRX; 01-10-2018 at 03:39 PM. |
|
|
|
| The Following 3 Users Say Thank You to BRX For This Useful Post: |
|
|
|
|
 |
|
|
 Similar Threads
|
||||
| Thread | Thread Starter | Forum | Replies | Last Post |
| Pentosin Trans Fluid Swap | Motul 300 Diff Swap | Impressions | Dezoris | Mechanical Maintenance (Oil, Fluids, Break-In, Servicing) | 15 | 06-06-2017 10:54 PM |
| 2JZ Swap Kit? | Moe23 | Engine Swaps | 37 | 10-27-2016 07:04 PM |
| WRX or STI Swap? | gbgracer | Engine Swaps | 8 | 09-10-2015 03:12 AM |
| Before you do a 2JZ swap.. | Manji | Engine Swaps | 25 | 03-14-2015 04:32 PM |
| Ej Swap | koyv90 | Engine Swaps | 50 | 11-14-2013 07:59 PM |


