|
||||||
| Member's Car Journals Car journals by our members. |
 |
|
|
Thread Tools | Search this Thread |
|
|
#1 |
|
Senior Member
Join Date: May 2013
Drives: Subaru BRZ with Delicious Innovate
Location: Cleveland OH
Posts: 194
Thanks: 81
Thanked 106 Times in 63 Posts
Mentioned: 10 Post(s)
Tagged: 0 Thread(s)
|
CaliSpec's BR-Zed
[IMG]
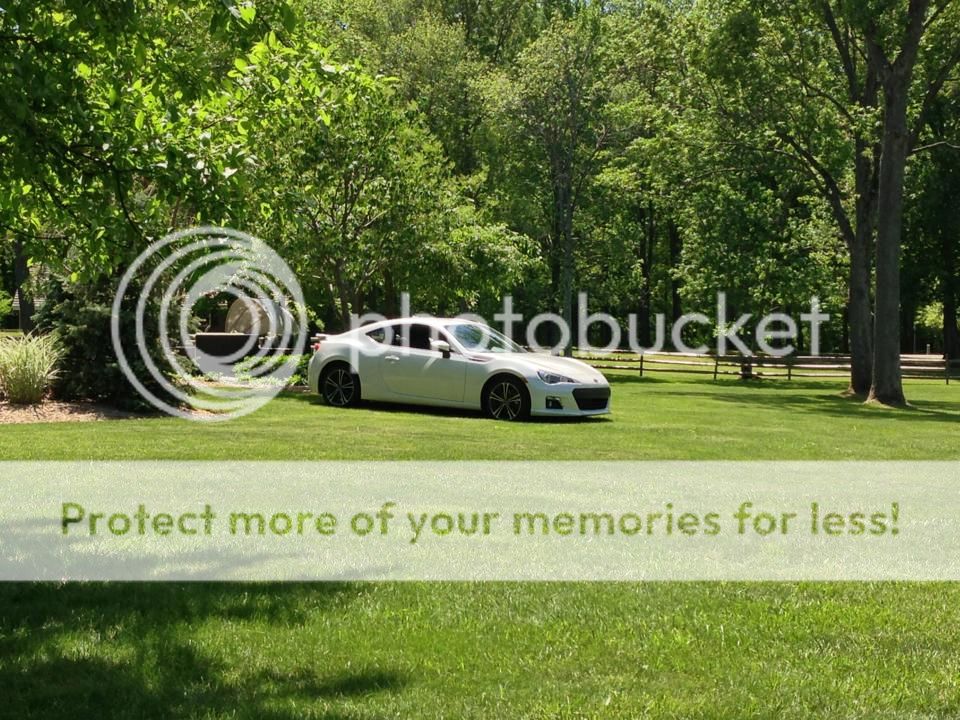 [/IMG] [/IMG]Well I figured it was about time for me to start my build thread. This is mainly to keep track of what I have done over the ownership of my car and pass on any knowledge and experience that I have gained. I am going to try to do something that I havenít seen yet. I have kept receipts for everything I have done. My plan is to show you exactly what it costs to do these modifications and how you can save money by doing it the right way the first time. I'll start by giving a little information about myself. I grew up in Southern California where I developed a love for cars and later moved to Ohio for school. GO BUCKS. The biggest difference between here and there is.. In California you have the weather to play with cars all year but have to deal with the car Naziís, keeping you from doing anything fun. In Ohio you can do just about anything you want with better gas but the winter is rough. (end rant) My first car project was a mid-engine rear-wheel-drive Honda Del Slow with a B18C1. VTEC just KICKED in YO!!.. Build thread HERE That was definitely a learning experience. I still have the car, and yes I drove it all the way from California. Everything I did to the Del Sol was learned from reading forums and books. If I can help someone else spend wayyy too much money and pass on a little knowledge along the way then I did my part in giving back. When I arrived at college I joined a student project team called Formula SAE. More specifically Formula Buckeyes. I was the Drivetrain Team Leader for two years. That may have been my title but we all played numerous roles. This is where most of my racing experience comes from. A team of 8 of us designed and built a fully custom, Ĺ scale F1 inspired, carbon monocoque racecar powered by a CBR600F4i engine from the ground up. I can count the number of off the shelf parts we used on one hand. Custom Titanium uprights, carbon control arms, hand laid carbon chassis with ĹĒ aluminum honeycomb core and phenolic hard points. We literally had nearly an unlimited budget. The school didnít actually pay for anything. Any donations or money we received was because we actively looked for sponsors. It did help that we had the name of a BIG school to throw around though. If any of you are going to go to college or have kids attending college with an automotive interest encourage them to find the schools SAE Teams! Most of them have one. [IMG] 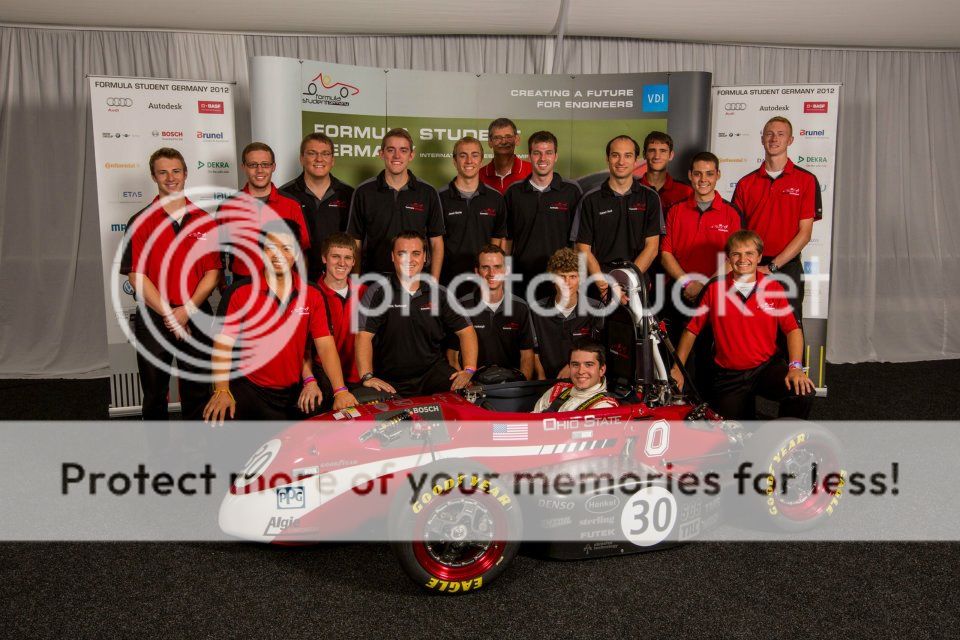 [/IMG] [/IMG]I got the opportunity to drive this car in Germany at the Hockenheim Ring. We DNFed in endurance due to a flat tire and ended up 46th but the same car raced in Michigan a few months later and placed 18th of 126 teams. More importantly I learned what we did WRONG. If you donít have data to show where you have come from and data to show where you are going, anything you do will mean NOTHING. You will find later that a lot of what I do will have some sort of data tied to it. DISCLAIMER: I do not claim to be an expert and I still have a LOT to learn. I have a good foundation of knowledge when it comes to racecars but I am not specialized in any specific area. I am weakest with forced induction and that is partly why I installed the Innovate Supercharger, to gain experience and knowledge in an area where I have none. |
|
|

|
|
|
#2 |
|
Senior Member
Join Date: May 2013
Drives: Subaru BRZ with Delicious Innovate
Location: Cleveland OH
Posts: 194
Thanks: 81
Thanked 106 Times in 63 Posts
Mentioned: 10 Post(s)
Tagged: 0 Thread(s)
|
BR-Zed Improvements
The goal of the BR-Zed:
I will be driving this car daily and yes (cringe) through the winter months and snow!! This car is PRIMARILY a street car. I do not plan to do ANYTHING that will compromise the street ability of the car. While it is a street car I LOVE to take this car to the track. In the first 6 months of owning the car I had 6 hours of track time on the car. As we all know the BR-Zed is AWESOME stock but there are some voids that need to be filled. I plan to fix all the major ones that are apparent from the factory and any others that arise due to the modifications. RADIATOR/OIL COOLER [IMG] 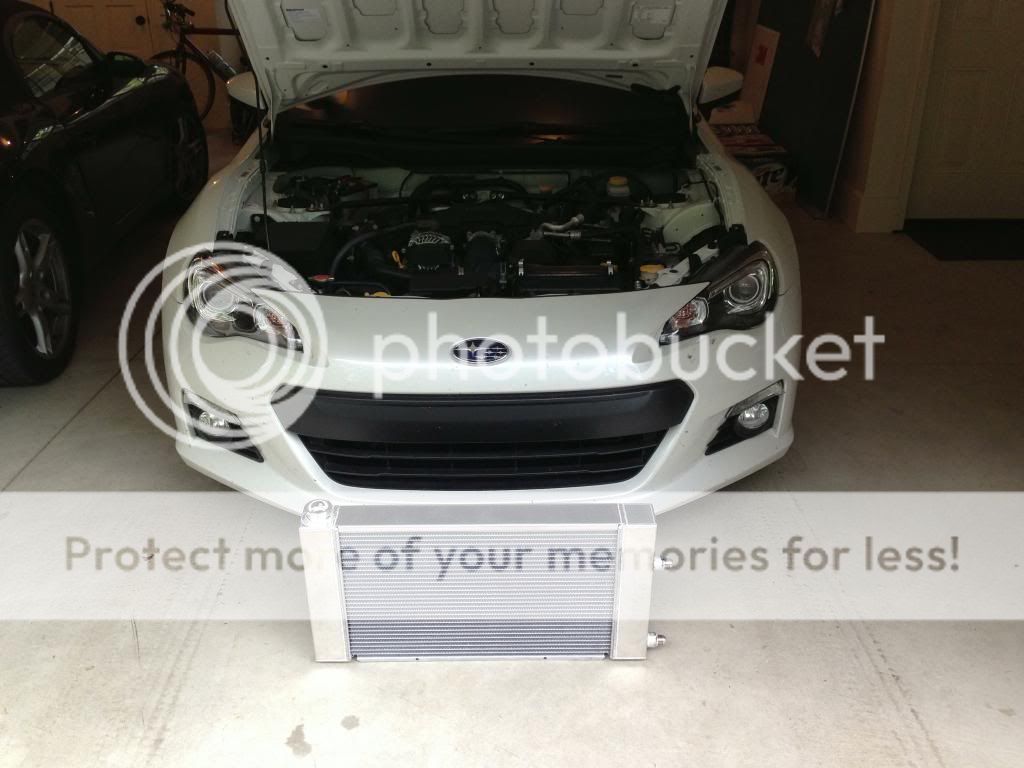 [/IMG] [/IMG][IMG] 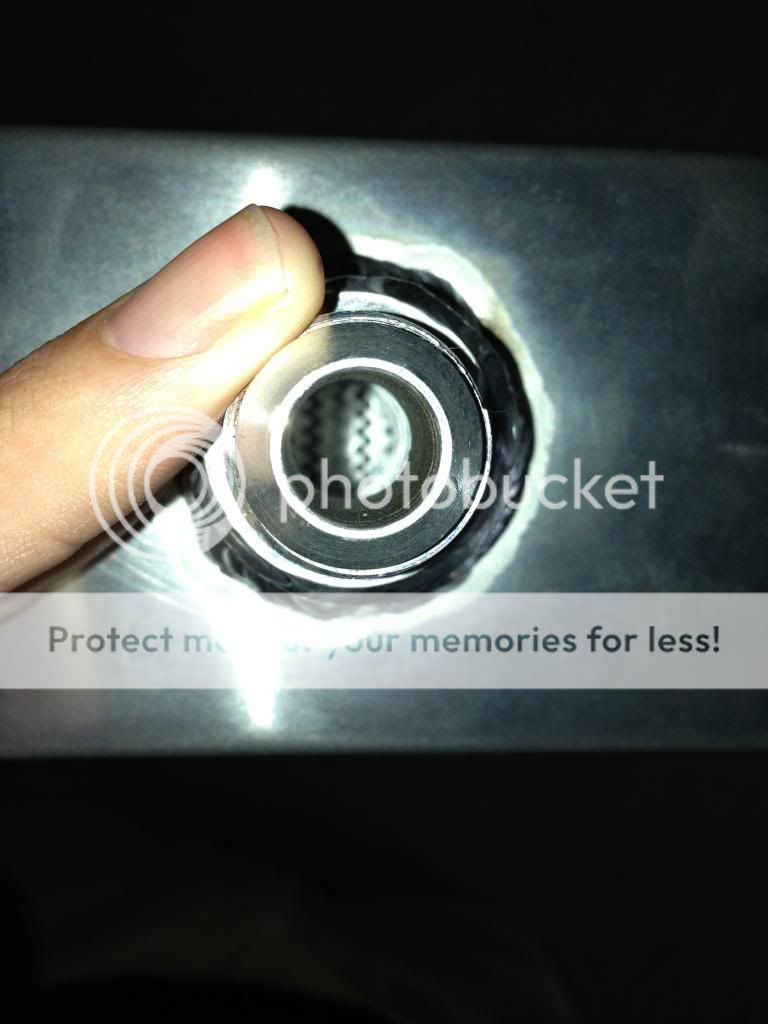 [/IMG] [/IMG][IMG] 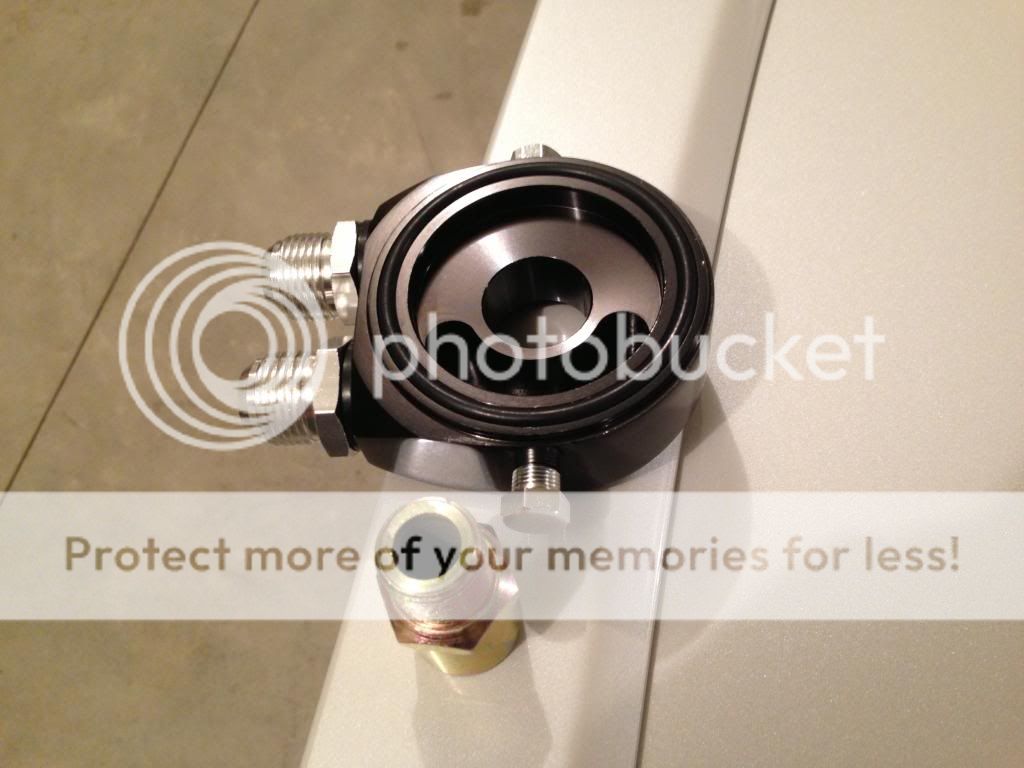 [/IMG] [/IMG][IMG] 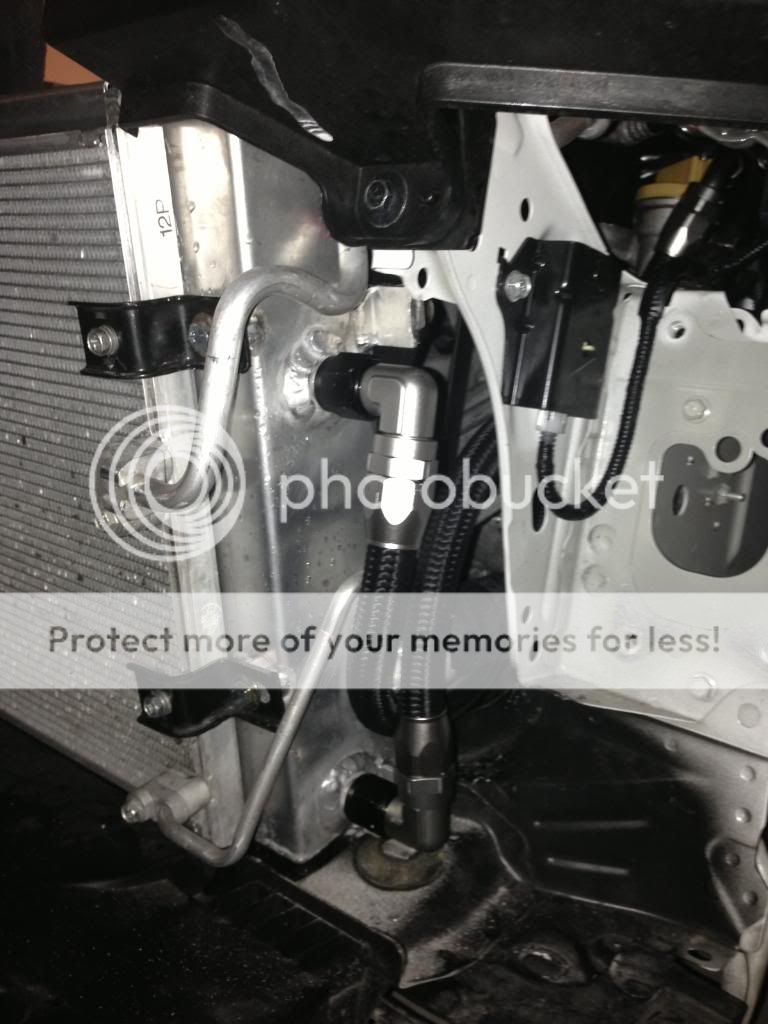 [/IMG] [/IMG][IMG] 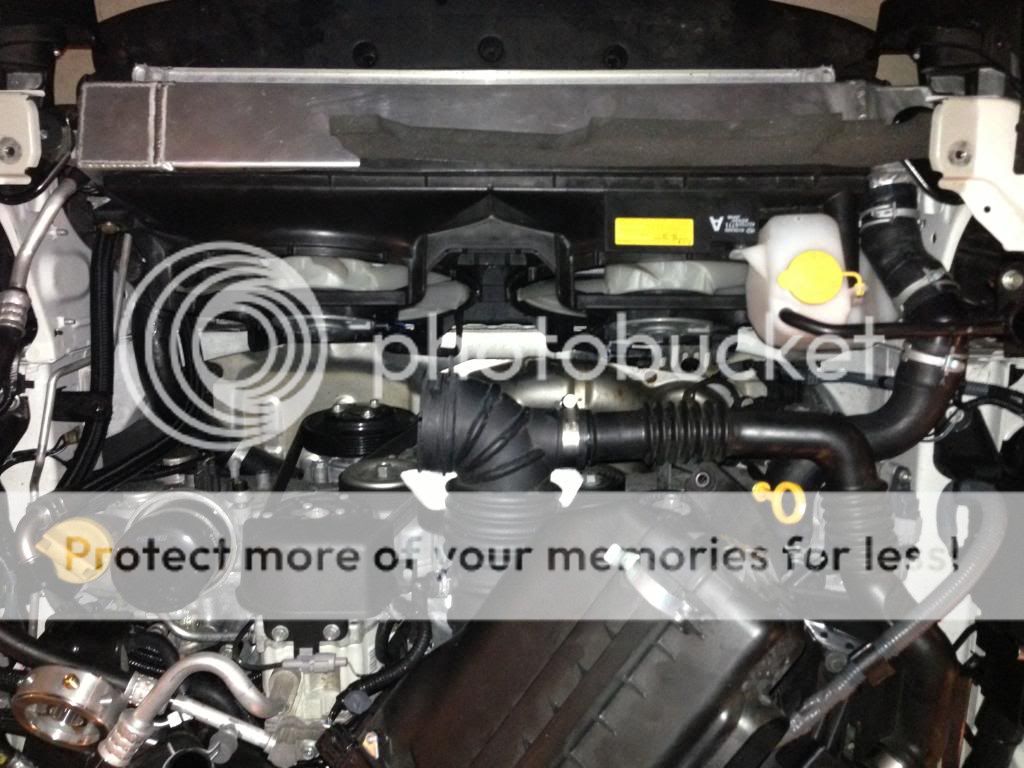 [/IMG] [/IMG]The first thing I did to the BR-Zed was fix the cooling issue. For the average person the cooling on this car is perfectly fine!! Even for the weekend Auto Xer. You only start to see a problem is when you start stretching its legs around a track for any length of time. The problem is also amplified once ambient temperatures start to rise. Once again the cooling capacity is fine for daily driving even in extreme temperatures but you don’t want to be doing any lengthy spirited driving in hot temperatures. You can see the charts below showing oil and coolant temperatures for before and after the oil cooler. THIS IS ALL POST COOLER TEMPERATURES. AS SOON AS I GET A THERMOCOUPLE ON THE PRE COOLER SIDE I WILL UPDATE THE GRAPHS. [IMG] 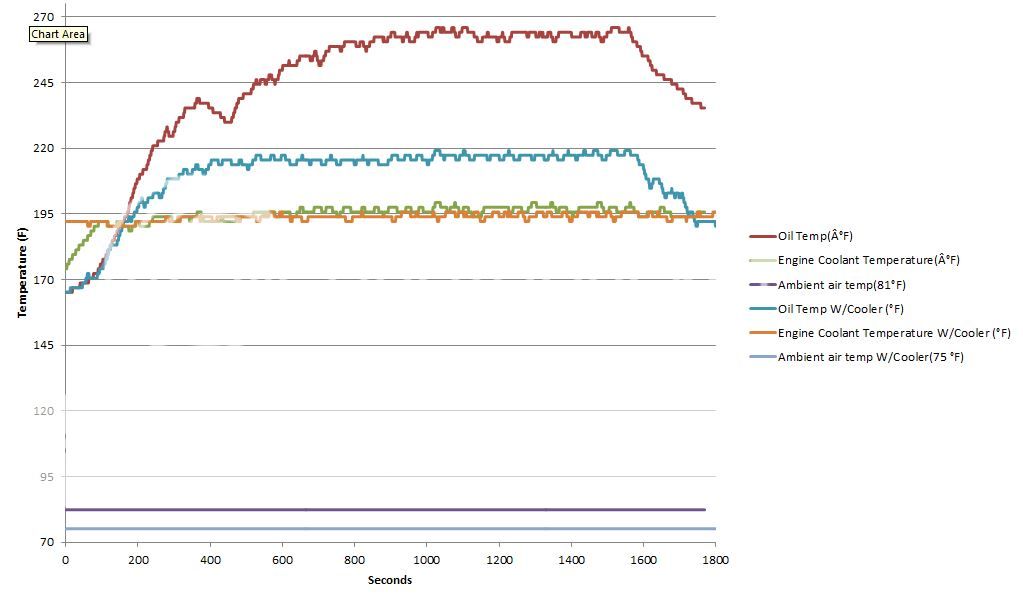 [/IMG] [/IMG]I did a lot of research while I was on Formula Buckeyes about the effects of temperature on oil as well as the different methods used to cool oil. The MAIN reason you want to keep oil cool is to prevent it from breaking down and losing its lubricating abilities. Oil also serves a second purpose, to help cool the engine. I don’t want to get into too much detail or cause a debate so I will leave with one fact. If all other conditions are equal, cooler components will wear less than hot components. Let me go through the different types of oil coolers and give MY OPINION on the advantages and disadvantages of each. The most common type of oil cooler is an oil to air heat exchanger (radiator) that usually sits in front of the engine coolant radiator. Oil passes through a metal tube with fins to increase the surface area and promotes heat transfer. This oil cooler will generally work just fine as long as the radiator is sized properly and it is in relatively controlled ambient temperatures. The problem is, there is nothing to regulate the oil temperatures. If the weather gets cold you can actually cool the oil too much which is bad for numerous reasons. To combat this, companies have come up with thermostats which prohibit oil from passing through the radiator until temperatures have reached a predetermined value. These work similarly to a thermostat on a coolant system. I do not like this either as I feel it is a Band-Aid and just another part to fail. The engine in the racecar that I worked on used a sandwich plate style oil cooler between the oil filter and the block. Coolant from the radiator would flow through a jacket in that sandwich plate cooling the oil as it passed through the middle. This is the type of radiator/oil cooler that I chose to use for the BR-Zed. There are a LOT of advantages when using this type of radiator/oil cooler. I switched things up a little and pumped the oil to the radiator instead of pumping the radiator coolant to the oil. Oil comes out of the block by way of a sandwich plate and travels to a new LARGER radiator that can accommodate the extra needed cooling capacity (engine coolant heat + oil heat). The hot oil then travels into the COLD side tank of the radiator and passes through a sandwich plate style water to oil heat exchanger. It comes out of the radiator cooler and then travels back to the block to be circulated through the engine. The main advantage of this style oil cooler is there is no need to regulate the oil lines. When the engine is first started everything is cold. The coolant thermostat is CLOSED. Flow rate in the coolant system is almost zero. As the engine warms up so does the oil. The oil, hotter than the coolant system, will actually HEAT up the coolant as it is getting ready to go into the engine, COOLING the oil. If the coolant capacity (how much water is in the system) was not changed the engine and cooling system would actually warm up FASTER with, than without the oil cooler. Now the engine has reached its optimum temperature. The oil continues to preheat the coolant before it enters back into the engine. Your initial thought might be “That’s not good. It’s going to overheat the coolant system.” This is where the design of the radiator comes into play. With a bigger radiator the temperature delta (maximum to minimum) will be more than the OE one. The colder coolant first comes in contact with the oil cooler. The coolant increases in temperature but not above the 190 that the engine is happy with. If it starts to approach that temperature the thermostat opens on the coolant system and more cold coolant passes over the oil cooler, cooling the oil slightly more and the coolant doesn’t raise in temperature as much. Essentially if things get too hot the system will just up the flow rate increasing the heat transfer through the radiator and brings the temperatures back to ideal. The coolant thermostat is killing two birds with one stone. Keeping the coolant happy.. and keeping the oil happy. No need for a thermostat on the oil. I am not the first person to do this. Trans coolers and oil coolers have been made this way for a long time. They aren’t as widely used and it is my belief that is due to the higher cost. If you look at the above graph you can see that the Oil temperature changes from about 160 to 185 F when the ambient temperatures change from 35 – 75 F. A compromise had to be made. The car will run a little cooler for daily driving because I wanted to keep the oil about 220 on the track. These are all POST COOLER TEMPERATURES. That is part of the reason why I am not worried when I see 160 F oil temperatures. That’s probably more like 195 pan temperatures and hopefully above 110 head temperatures. WARNING: Cheap Ebay sandwich plates could end up costing you a LOT of money. This is what I found when I took mine out of the box. Had I not looked it could have been a bad day. Keep in mind that everything you are doing is PRE oil filter so chances are you would be okay. I just wouldn’t take the chance. [IMG] 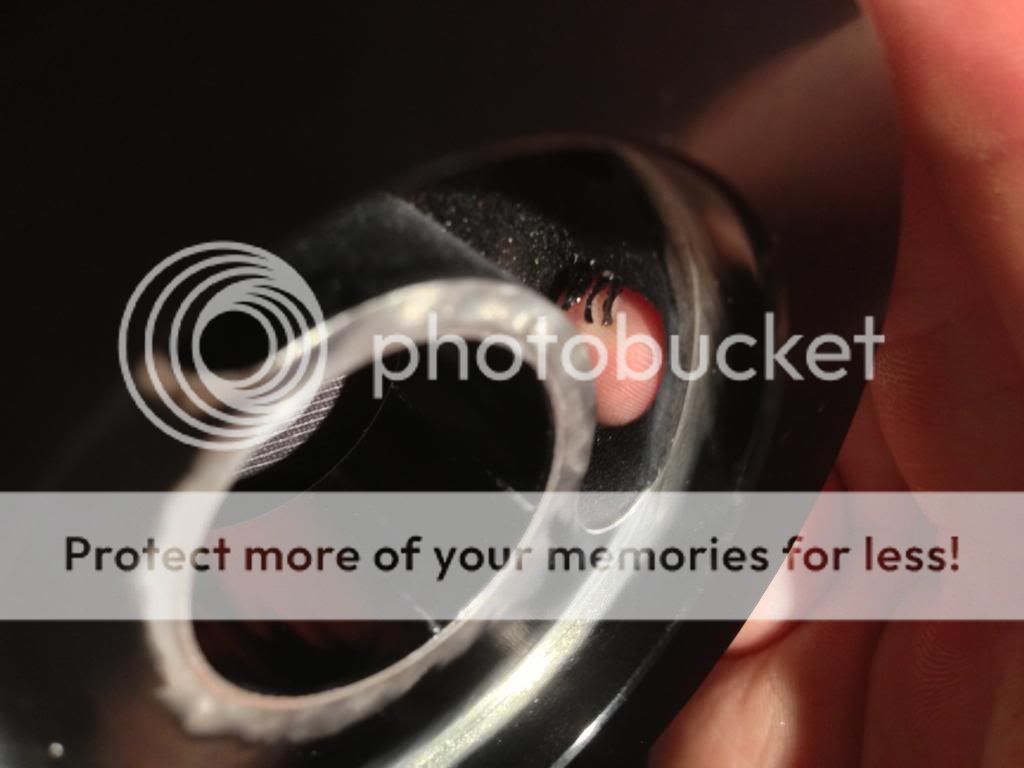 [/IMG] [/IMG][IMG] 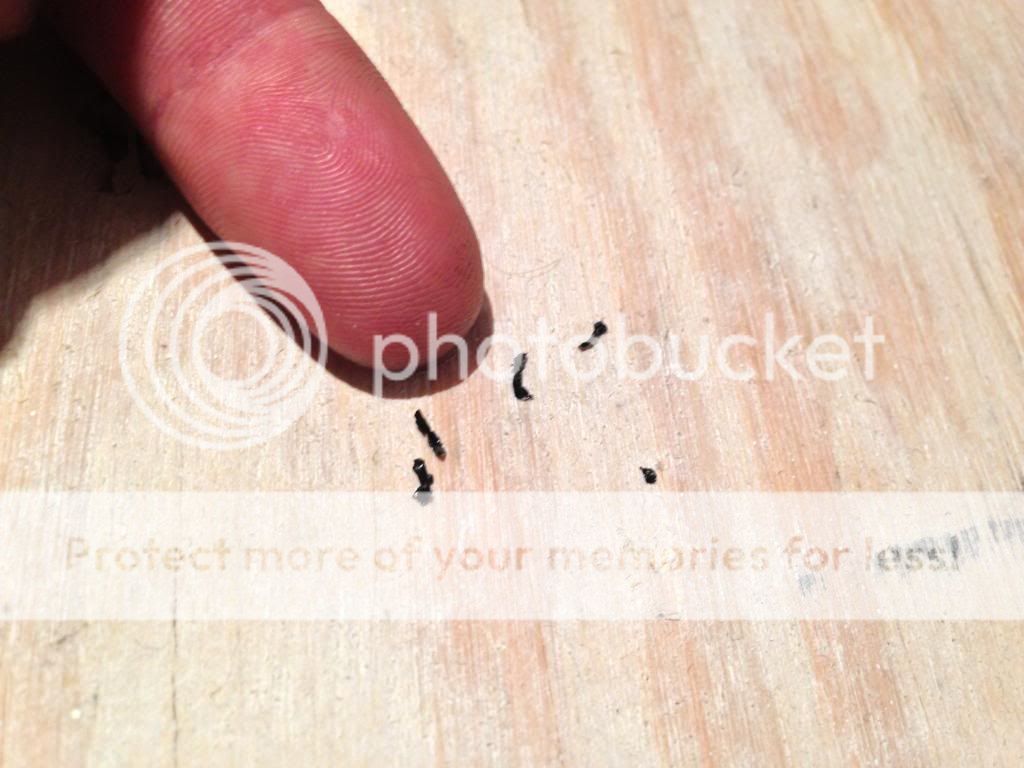 [/IMG] [/IMG][IMG] 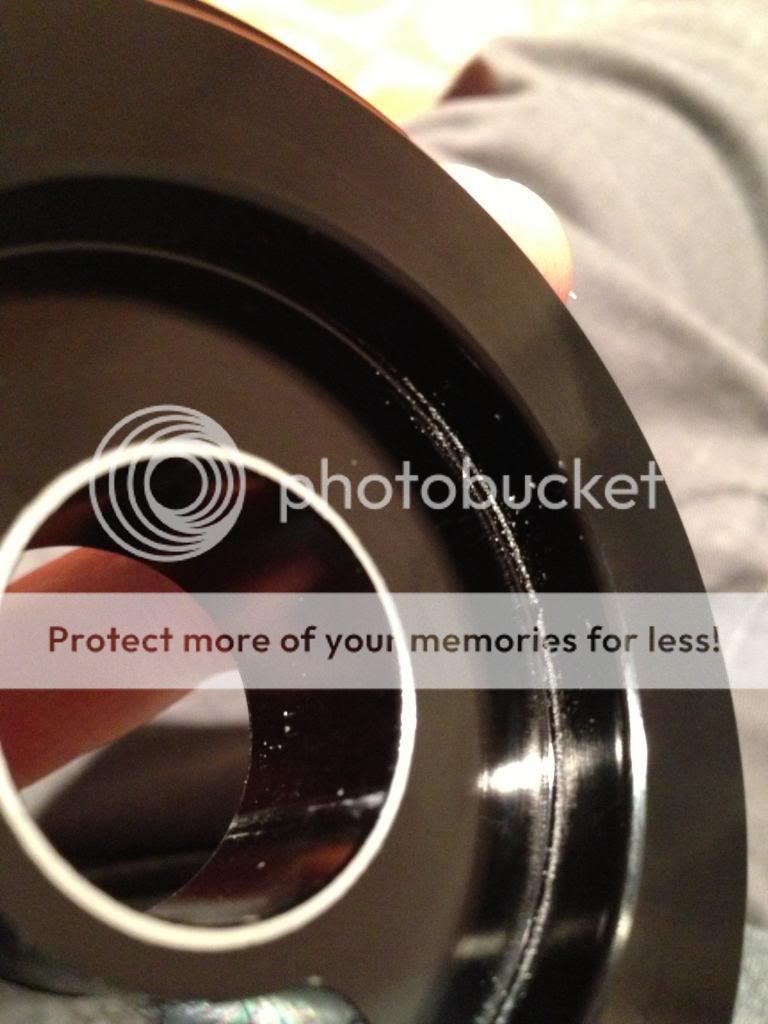 [/IMG] [/IMG][IMG] 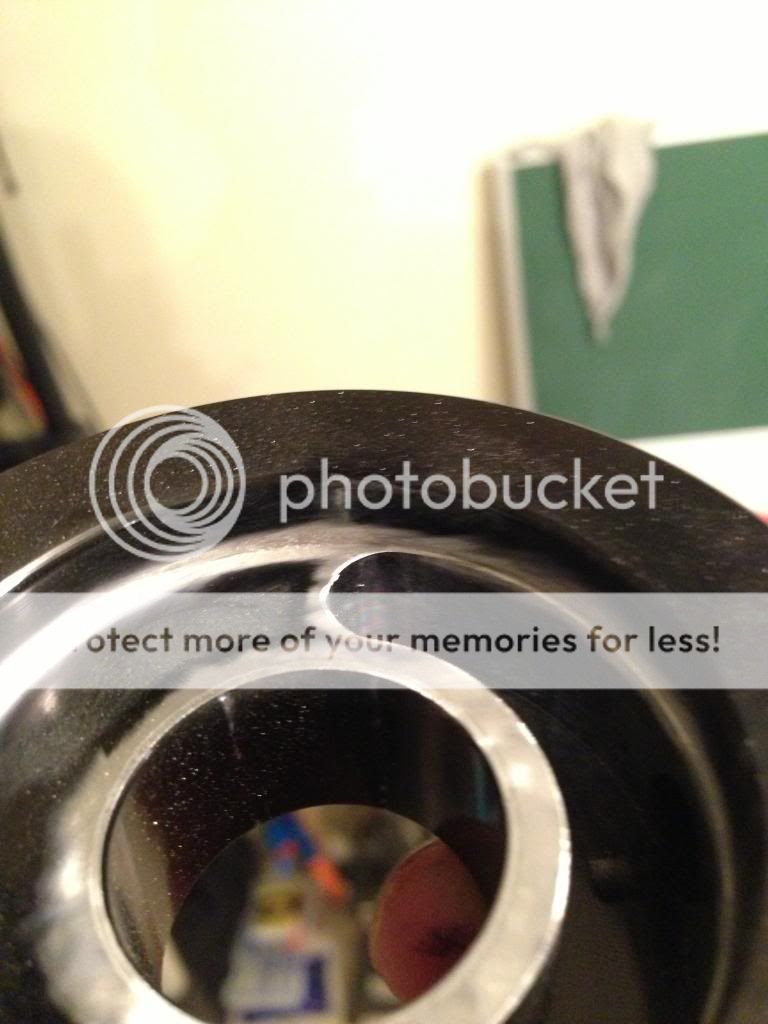 [/IMG] [/IMG][IMG] 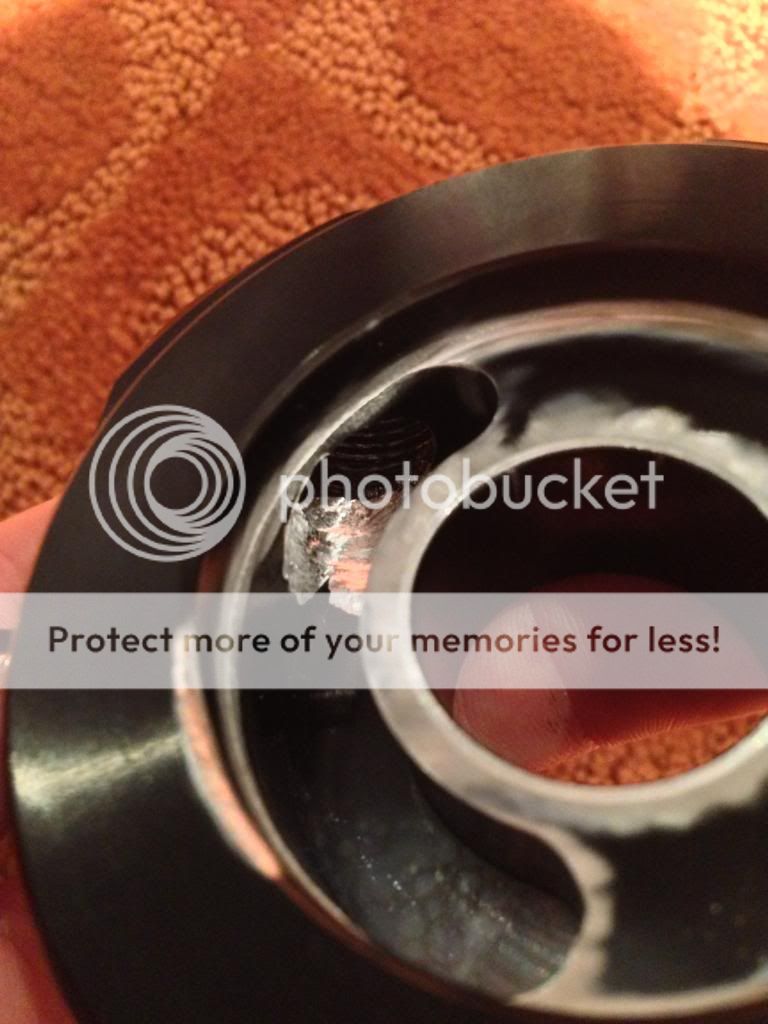 [/IMG] [/IMG]SUPERCHARGER: I just recently purchased and installed the Innovate Supercharger. I am not going to do a full write up because there is a LOT of information on this forum about it but I will highlight the most important parts. Fit & Finish of this kit is AWESOME!! INSTRUCTION MANUAL: The instructions are fairly decent. A lot of the pictures in the manual refer to a right hand drive vehicle and it can be difficult at times to understand exactly where in the engine bay the picture was taken. A few of the steps are out of order. The evap purge solenoid can be held down with the existing screw for RHD manual trans. I had a problem with the evap purge line going to the manifold. I am not sure if I used the wrong hose or if I did something wrong but the one I originally used was a little too short. I ended up just using the spare line and cutting it to length. For the most part everything went together very well. You can definitely rely on the manual and stumble through the install. I would give it an 8 out of 10. PROBLEMS: The wire extension that ran to the throttle body was not pinned correctly. When I went to start the engine it started but hated life. It threw a code and I was able to isolate the problem pretty quickly and fix it. I had the biggest problem with EcuTek. I would highly advise anyone attempting to do the install their self to first flash a stock ROM to the car to familiarize yourself with the software. It took me almost 5 hours and a bunch of emails back and forth with my first tuner to get first tune flashed. After you have flashed your ECU for the first time it’s a walk in the park to do it again. If I were trying to do all this for the first time after I installed the supercharger I wouldn’t have been driving it to work the next morning. I also learned that you can NOT data log with EcuTek unless there is an EcuTek tune on the ECU. You can NOT data log your factory car. [IMG] 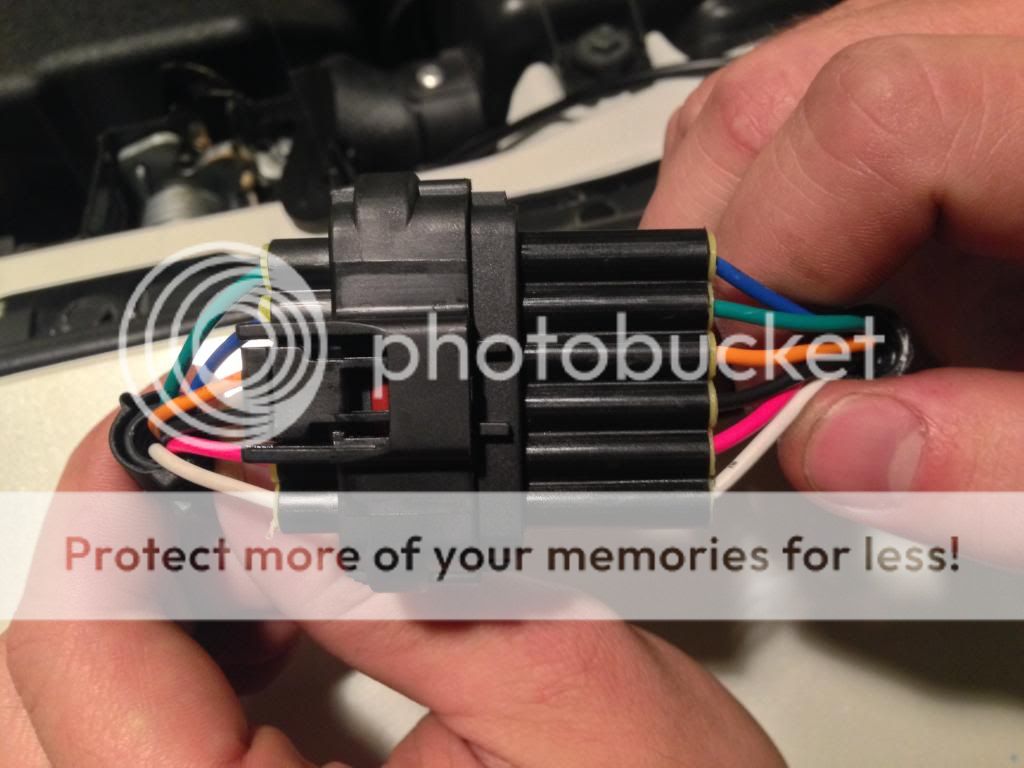 [/IMG] [/IMG]OUTCOME: I am not made of money and do not have access to a Dyno so I decided to do things a little different than most. I heard about a program Virtual Dyno and wanted to see for myself how well it worked. I searched for a long time to find a place (in Mexico) that was safe, FLAT, SMOOTH, and STRAIGHT. This is KEY to getting accurate and consistent runs on the street. Obviously weight is a big factor so any time you are making new runs you need to make sure you have everything out of your car and your gas tank is at a similar level. Below you can see the comparison between my Virtual Dyno run and a dyno I found of a stock BR-Zed. Pretty close. Not perfect but still. [IMG] 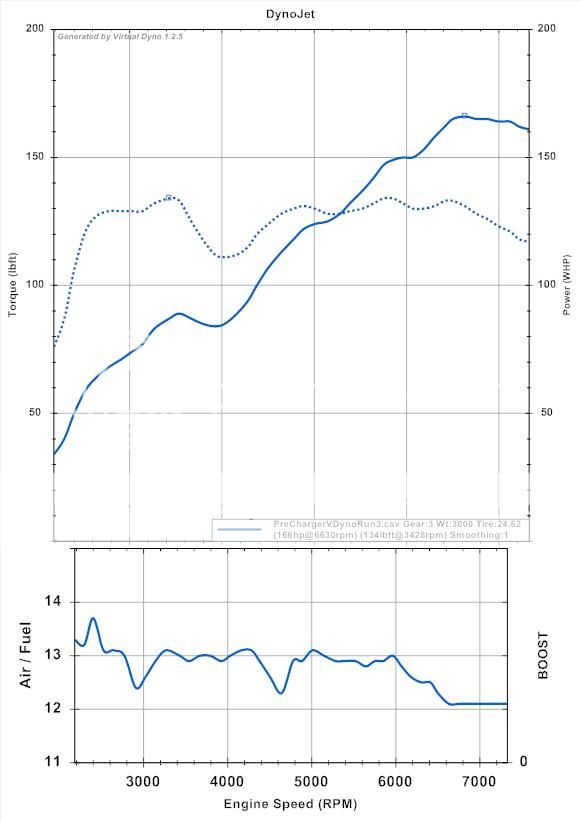 [/IMG] [/IMG][IMG] 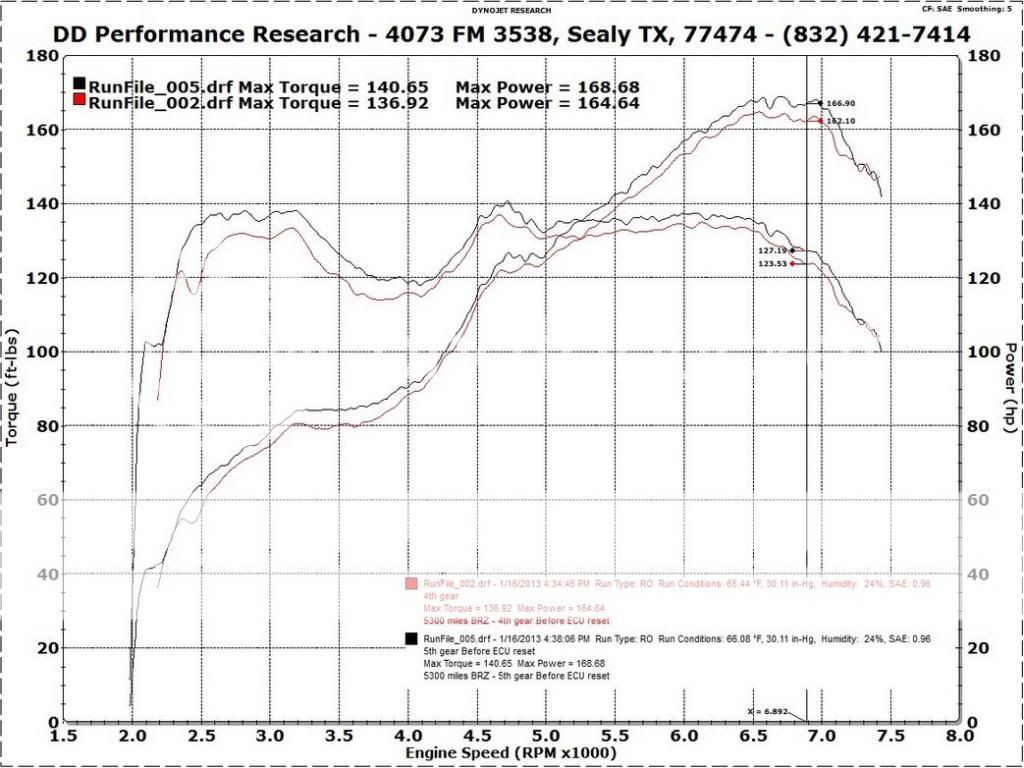 [/IMG] [/IMG]My initial setup was the following: Supercharger K&N drop in filter 70mm Pulley (SMALLER) 700cc Injectors Tuner (1) My second setup was the following: Supercharger K&N drop in filter 75mm Pulley (STOCK) STOCK INJECTORS Delicious Tune Below you can see the difference between the tuners. I made MORE power with the BIGGER (less psi) pulley and the STOCK INJECTORS than I did with the smaller one. And look how smooth it is!! I was also informed that the STOCK INJECTORS will flow enough for the 70mm pulley and intercooler so I pretty much wasted money on the 700cc injectors. Learn from my mistake. Blue STOCK Orange 70mm 700cc Tuner (1) Red 75mm Stock @DeliciousTuning THESE ARE BOTH THE ORIGINAL TUNES NO REVISIONS!!!!!!! [IMG] 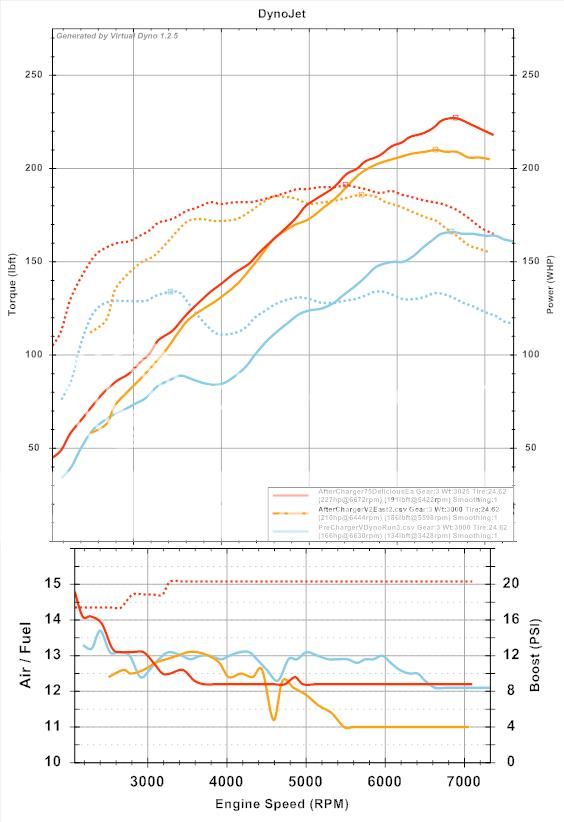 [/IMG] [/IMG]I will be purchasing the charge cooler at the end of winter. I will put the smaller pulley back on then and get a dyno for everyone. WINTER UPDATE Well my Oil temps bottomed out at 165 F and I decided that was a little too cold. So like any good parent would do.... I gave my child a coat... [IMG] 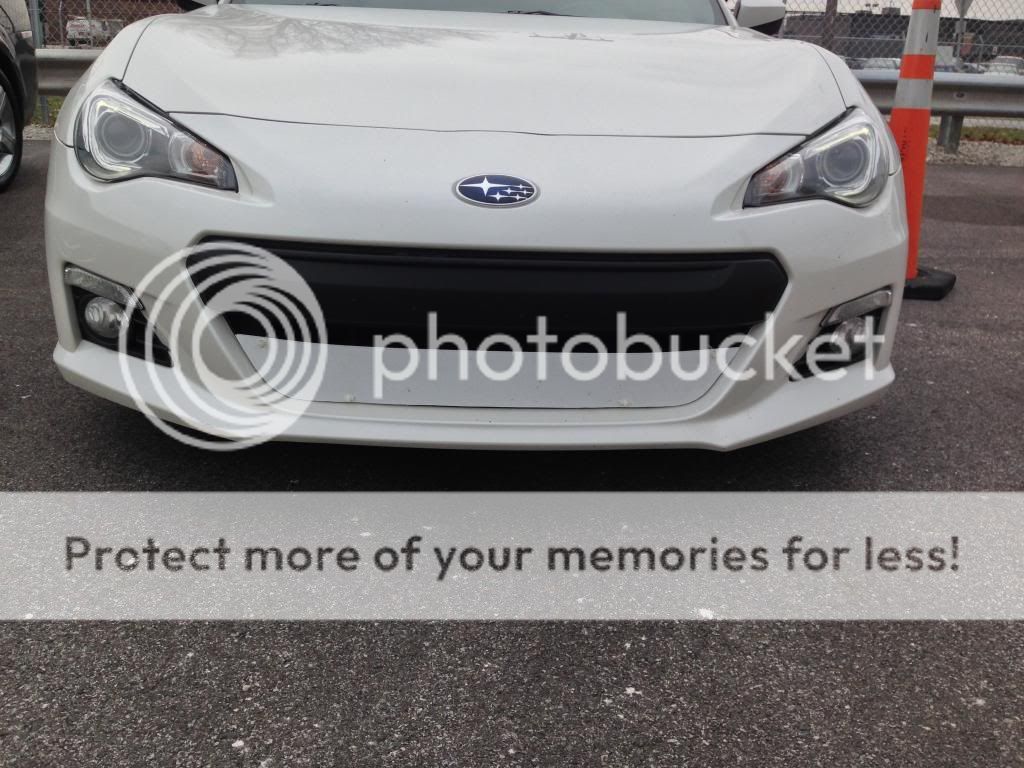 [/IMG] [/IMG]I like this option much better than a thermostat. A Stat is one more thing to go wrong and one more thing to restrict oil flow. This brought my oil temps up to where they are supposed to be. When it gets warm again ill just take it off.. Maybe ill make a Carbon Fiber one to make it a little more legit. The grey and pink are the new coolant and oil temps.. the coolant got up to 199 which is perfectly fine.. I don't even think the fans kick on at that temp.. [IMG] 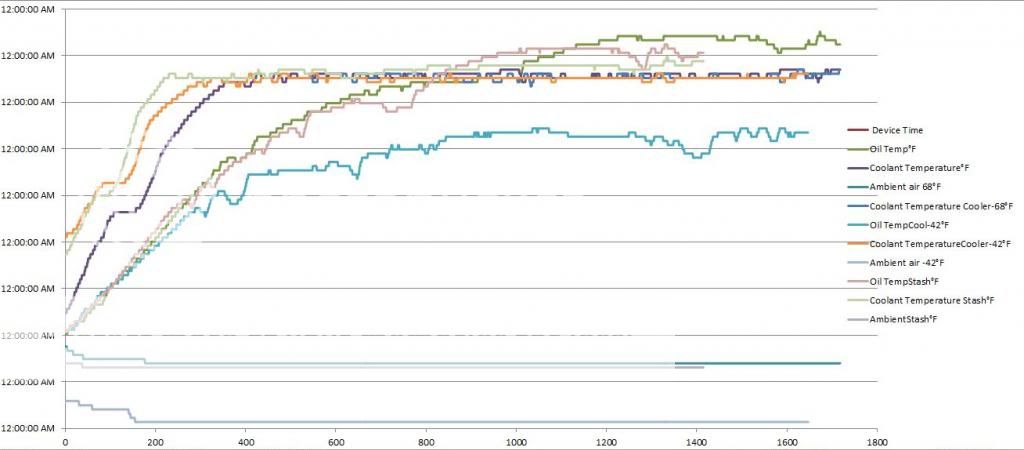 [/IMG] [/IMG]Added a catch can over the winter.. After a lot of research and looking I stumbled upon, what I believe is the best bang for the buck. ADD W1 Catch Can. I think it was $80 shipped from eBay. 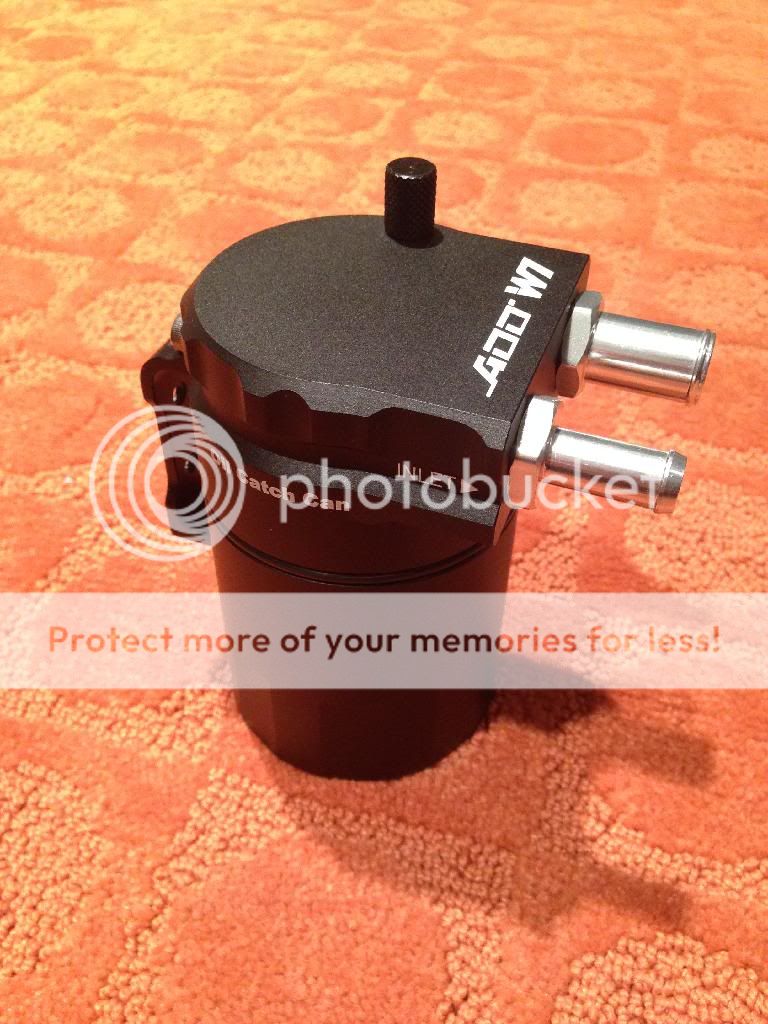 It is VERY similar to the radium catch cans. Non baffled catch cans are a waste of money!!! I decided I was going to make one.. FAIL!! not even going to post pictures.. First: a little information on catch cans. Oil in the engine gets pulverized by the crank and pistons while it is in the crank case. Imagine throwing a cup of water through an industrial fan at full tilt.. the fan being the crank and the water being any oil in the engine.. As the oil collides with the moving parts it is beaten into a mist. Now we introduce something called blow-by. blow-by is usually caused by a worn engine where combustion gasses can actually make it past the rings and into the crank case. Air can also enter the crank case via worn valves and a few other ways. This extra air needs to go somewhere. There is a crank case vent with a PCV valve which does just that. It allows the extra air to escape. Only now it is not just air. It has picked up some of that oil mist we created. People have decided to save our planet so it typically gets pumped right back into the intake to be burnt again. The problem is.. we don't want that oil to come in contact with those super hot valves and cake their way onto them. Oil also has a low octane rating meaning it will combust before the gas does.. That means KNOCK.. NOT GOOD.. Lets get that crap out of there.. The whole reason for a catch can is to catch the oil that is suspended in the air coming from the crank case. The only way to do that is with a BAFFLED catch can. As the air does some bobbing and weaving around a baffle the oil, which is heavier, wants to continue in a straight line.. it then smacks into a wall and condences with all the other oil.. once it is thick enough to create a droplet there is no concern with it getting back into the air stream.. it drops to the bottom of the can and waits to be thrown out.. 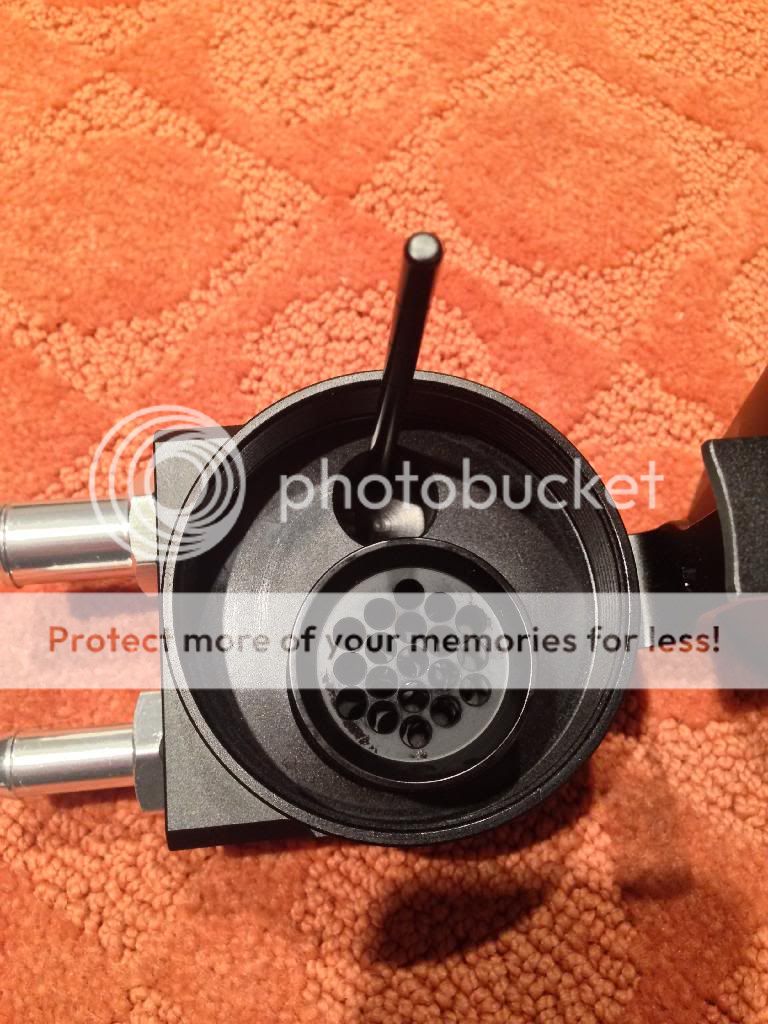 Inlet comes in and goes through this little basket. I went to the grocery store looking for car parts and found a copper scrubber.. perfect baffling material. stainless works too but they didn't have any.. cut a little piece out and shove it into that perfectly made basket.. you don't want too much to restrict flow but you want enough to catch the oil. 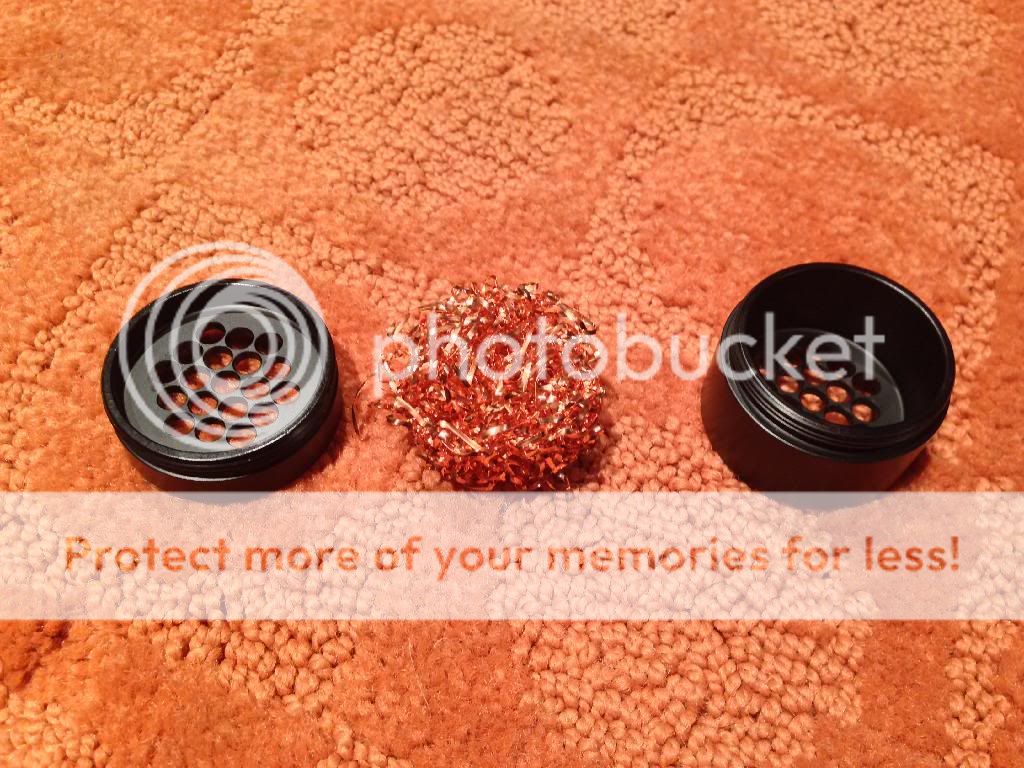 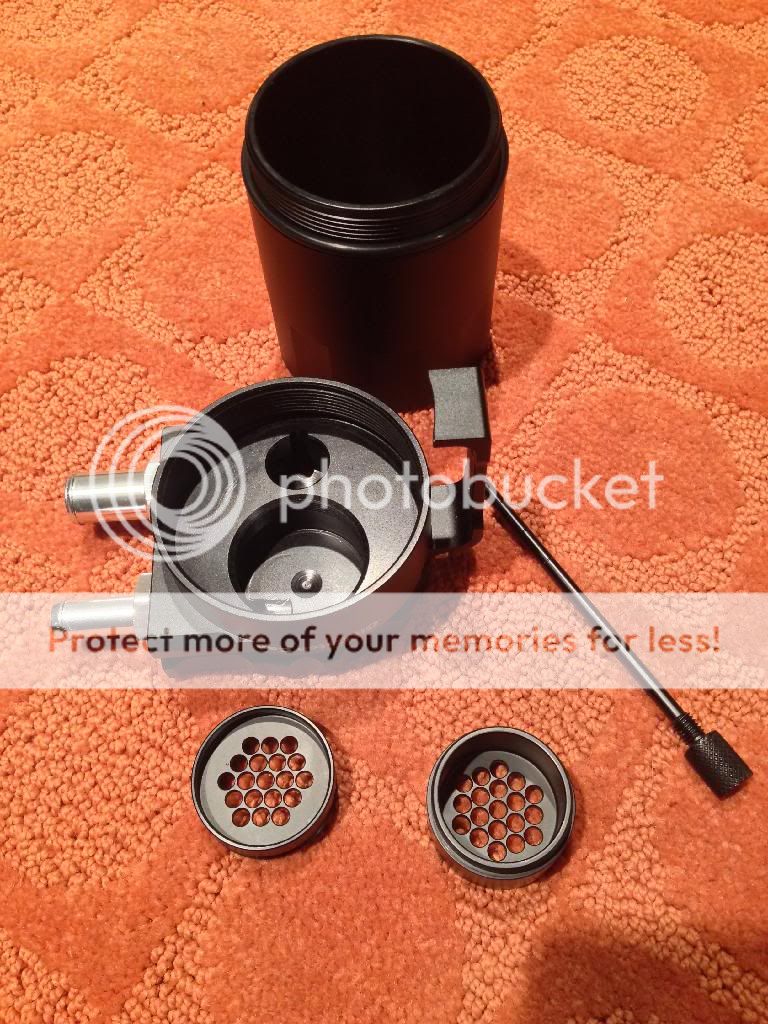 So whats wrong with this little $80 gem? Well.. It only came with one O-Ring.. And in my opinion it was in the wrong spot.. It came inside the lid.. I don't like it there.. it wasn't captured and with enough suction.. (our engine sees -13 psi) I thought it could pull its way into the can and cause a vacuum leak. So I took it and placed it on the OD of the threads.. be careful though... don't tighten the can too tight.. all you need to do is load the O-Ring.. not crush it.. tighten it till it touches.. give it another half a turn.. it's not going any where.. Then pick up some sealing washers (2).. they go on the male threads of the nipples to create a seal.. yeah i used male and nipples in a sentence. http://www.mcmaster.com/#93786a225/=qjhev6. I THINK IT WAS 14mm Do yourself a favor and measure it before you just click the link and buy it.. This kit ships with (2) 9mm nipples and (2) 15mm nipples.. good for us because we need one of each.. 9 on the inlet and 15 on the outlet. put the sealing washer between the nipple and the top of the can.. tighten down but don't go crazy.. last get a small O-Ring to go over the male threads of the dip stick.. when you tighten the dip stick remember.. don't crush the 0-ring.. just load it.. I mounted mine here... Probably not the best way but I wasn't feeling too creative at the time.. 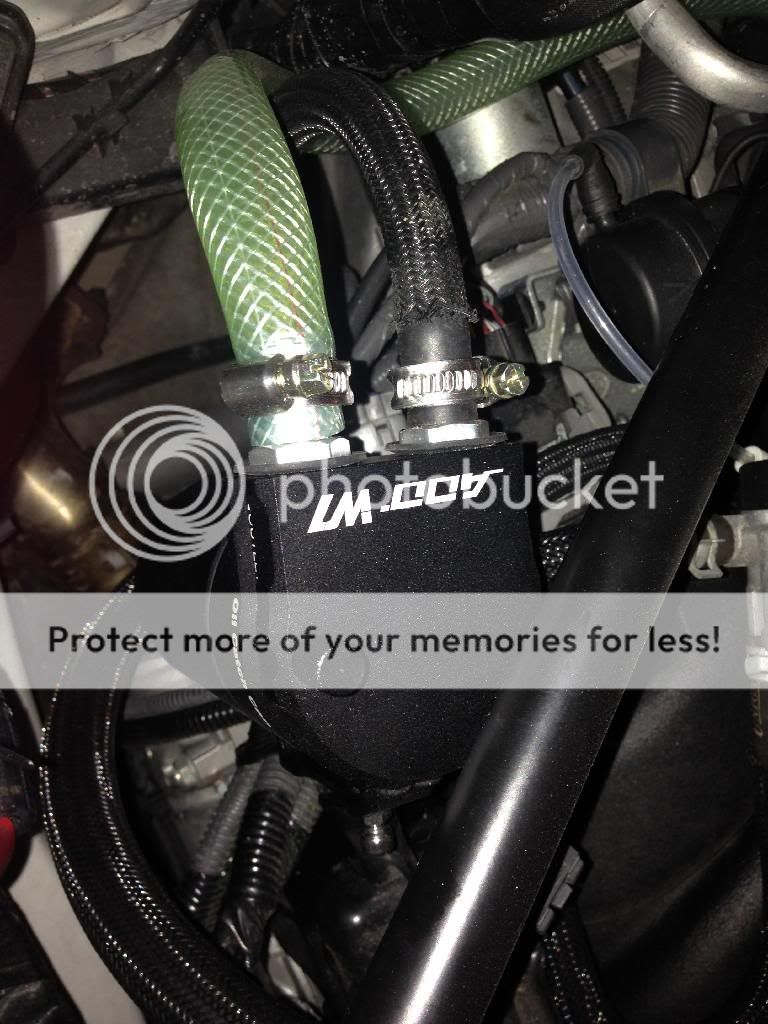 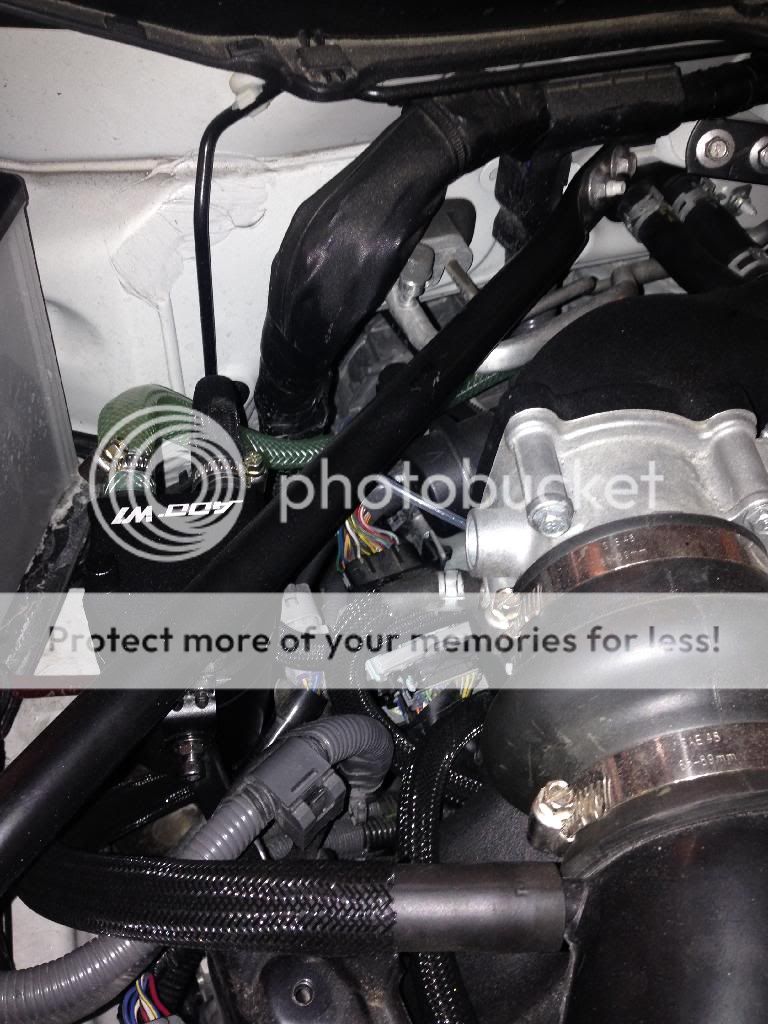 Do your self a favor and get some nice black hose.. I used the hose in the kit on the outlet because I wanted to see if the can was working.. 800 miles later 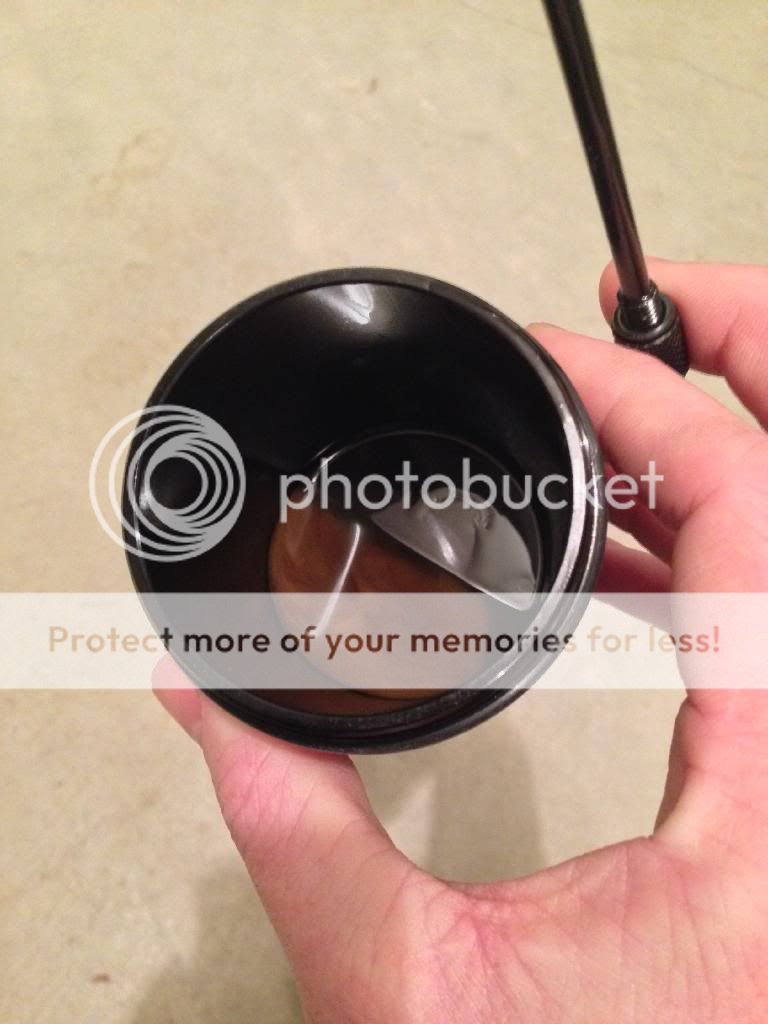  The inlet should go to the PCV valve here 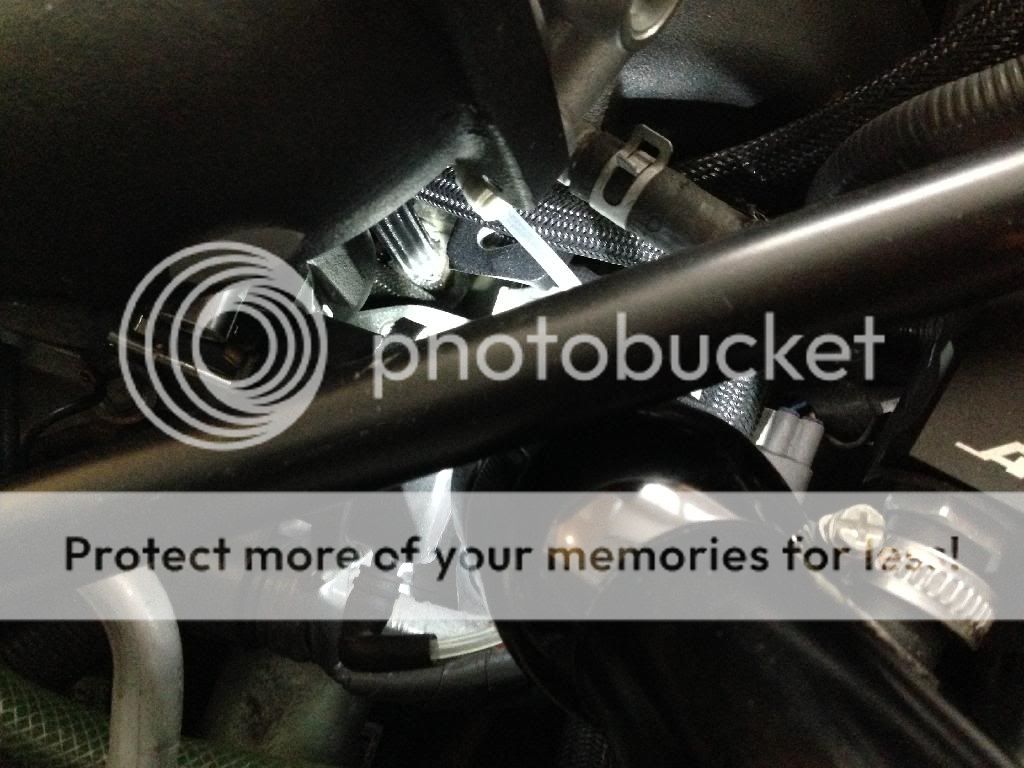 a better picture from @Dezoris He has a pretty good DIY here STI BREMBO Swap Last season (2015) I decided i wanted a little more brake but didn't want to spend a lot of money. Once again this build is about making my money go as far as I can. The STI Brembos bolt right on so I figured I would look a little further into them. Just because you can do something doesn't mean you should.. There is also a lot of bad information about these brakes circulating around the internet and MOST of it is incorrect. Ill start with a quote from a post I made on this forum about how horrible these brakes are and then I will explain further.. Front brembos off an STI: 4 piston 40mm and 46mm 1/2 piston area = 2918.5 mm^2 Effective diameter = 268mm Brz OEM calipers front: 2 piston 42.8mm and 42.8mm piston area = 2877.44 mm^2 Effective diameter = 247mm If both see the same line pressure the brembos will see 6.74% more stopping [force] (edit: torque) than the OEM calipers. I didn't bother doing the rears because I knew it was going to be way worse and didn't want to spend the time trying to find the information on them. With stickier tires you will see more weight transfer because you are stopping faster. Probably somewhere in the 4-7% range. I think it's safe to assume with sticky tires the brembos on the front will work out to be pretty great. That's what I did. I have a lot of hours on track with them and so far I love it. I want to stress that if you are looking to change your brakes to the STI brakes DO NOT change the rears. The rear piston area on the STI calipers is LESS than the piston area on the OEM BRZ/FRS. Less piston area means less brake torque.. you will actually move the bias FORWARD by adding the "larger" brakes to the rear.. Not a good thing.. Ill add some photos of the calipers I put on.. Bought them used. stripped them down, powder coated and rebuilt them before putting them on the car. Also upgraded to SS braided lines.. In my opinion it was a very good improvement. Last edited by calispec; 10-28-2015 at 09:12 PM. |
|
|

|
| The Following 3 Users Say Thank You to calispec For This Useful Post: |
|
|
#3 |
|
Senior Member
Join Date: May 2013
Drives: Subaru BRZ with Delicious Innovate
Location: Cleveland OH
Posts: 194
Thanks: 81
Thanked 106 Times in 63 Posts
Mentioned: 10 Post(s)
Tagged: 0 Thread(s)
|
Interior
I liked the Torque Pro app so much for monitoring different sensors that I bought a Nexus 7. I wanted a better way to mount the Nexus than anything that was already out there so I designed a mount for it. The only bad part about it being here is obvious. The ac controls aren't completely accessible. You can sneak your fingers behind it to adjust anything you want but it is still in the way. The Nexus 7 clips in and out with one hand and is very easy to do. The mounts are solid enough they will take any amount of track abuse you can throw at it. The lateral G's are actually very accurate as well.
[IMG] 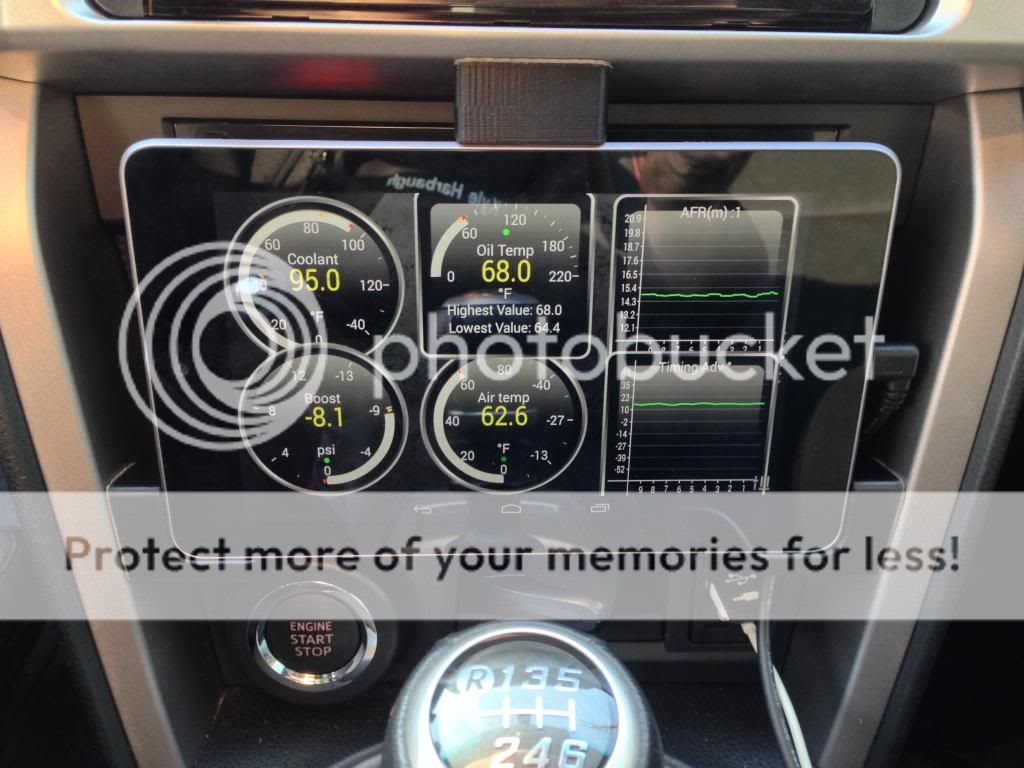 [/IMG] [/IMG][IMG] 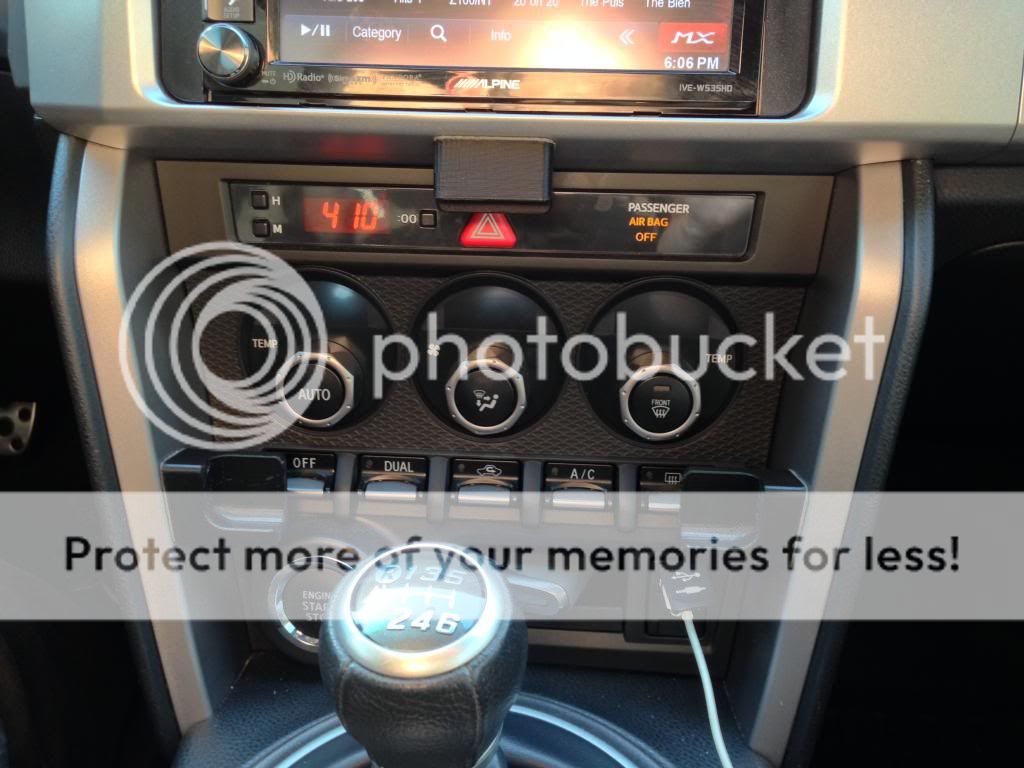 [/IMG] [/IMG][IMG] 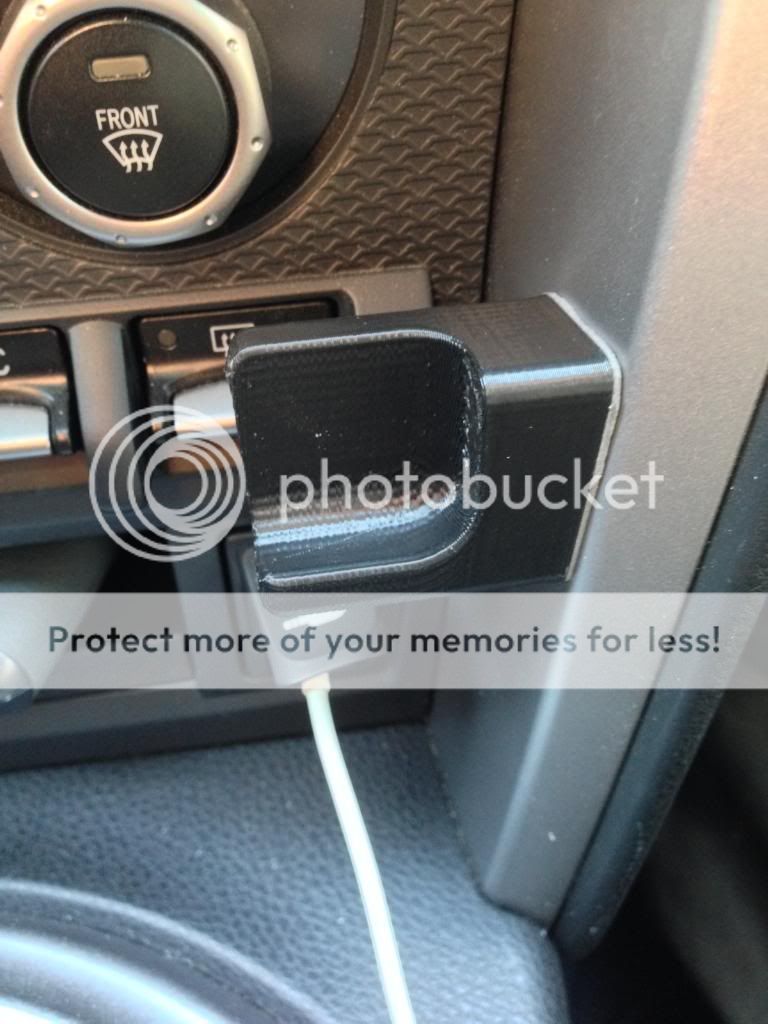 [/IMG] [/IMG][IMG] 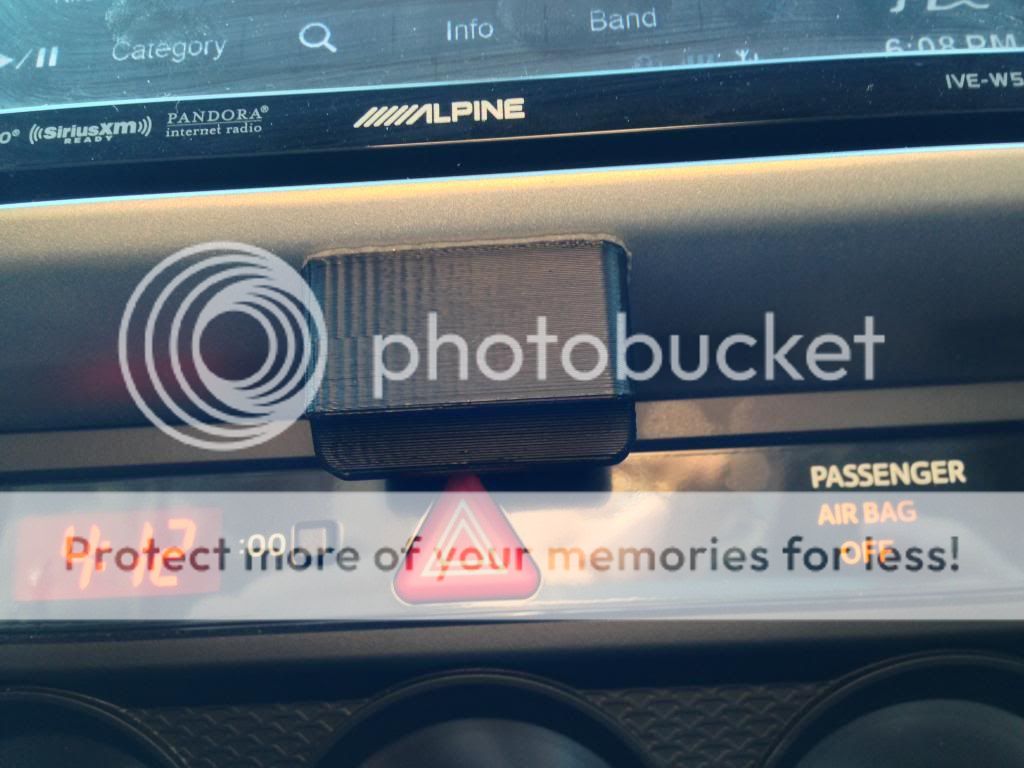 [/IMG] [/IMG][IMG] 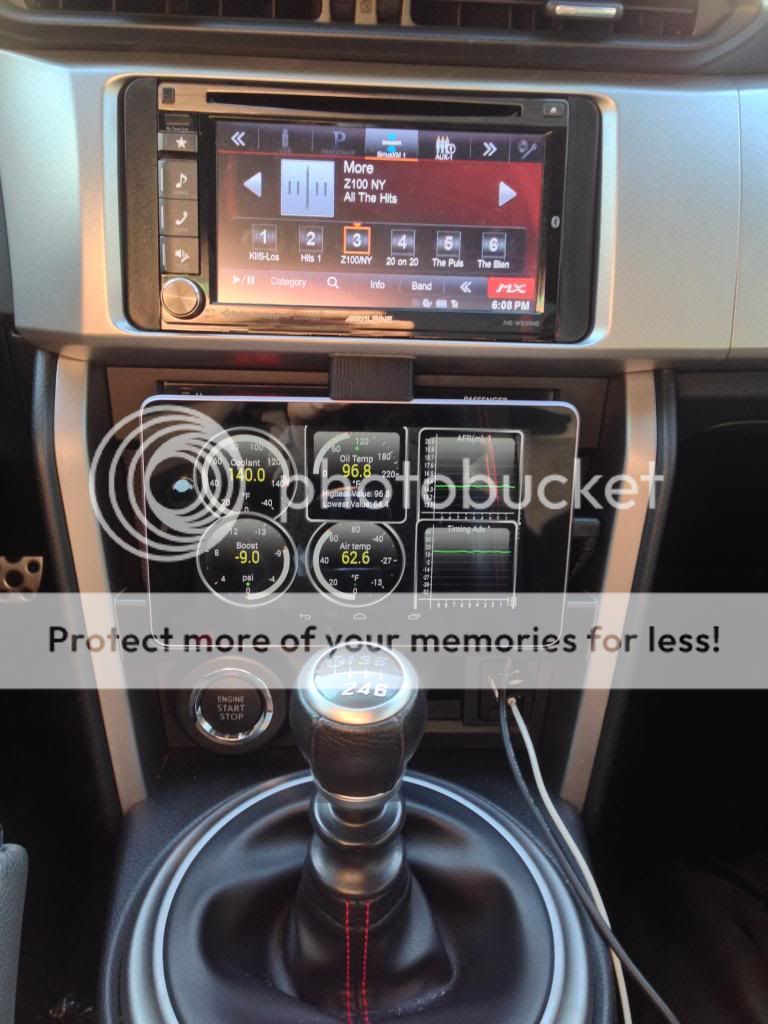 [/IMG] [/IMG]VIDEO [ame]http://youtu.be/9VuvtibvEoo[/ame] If anyone is interested in these mounts just let me know. Right now I only have one designed for the old nexus 7 but it wouldn't be too much work to adjust it for just about anything. It is Rapidprototyped. I am almost done with the iPad Mini. REMOTE START GOAL: Remote start vehicle without needing to carry two key fobs. A remote start key fob (or phone) and the factory key fob. Do all this while retaining smart key features and door locks. Well after a lot of research the SmartStart doesn't work the way I want it to but it is too cold here in Ohio to live without one. So here is what I found out. Once the BR-Zed is started the BCM ignores ALL inputs from the key fob and sense doors. This is probably for safety reasons. So what does this mean? If you start your car with the remote start while it is locked there will be no way to get in without an aftermarket key fob. The factory key fob will do nothing and the sense buttons on the doors won;t work once you arrive at your car.. well it will open the trunk... as of now the only way to get into the car is from the application on your phone or a second aftermarket key fob. I just use my phone for now. There also isn't a bypass module made for our car yet.. that will do what I want it to do at least.. there is one that works well but it is used to integrate with an aftermarket alarm/remote start that uses a second key fob... The only one I have found that will do what I want it to do is the 1101T. You leave your second key in the car and it applies power to it while it starts the car, then shuts off. Works great BUTTTT. As we all know you can drive off in the car WITHOUT a key once it is started. If someone were to break the window while it is running and get into the car, they could drive it away.. one word insurance... the second down fall is that once it is started the car ignores the remote start. not so bad until you decide you want to turn OFF the car remotely.. It won't do it. It will just continue to run.. If you click the button enough it will ground the starter button turning off the car but then the tach input will say that the engine isn't running and it will start it right back up again.. long story short. don't start the car unless you can get to it and physically push the on/off button to shut the car off. One more thing to be cautious about. If you star car from a phone that is almost dead.. and you get to your car.. reach into your pocket.. pull out a dead phone.. you are crawling into your started car through the trunk.. I haven't done it yet but it will happen... Procedure: start car from phone.. walk out to car.. when I see my car get phone out of pocket.. open SmartStart App.. Click unlock.. Wait 15 seconds.. unlock.. get in car.. drive away.. I am working on hacking the BCM so that the car does not ignore the key fob but that is going to take a while.. Ill be sure to let everyone know when I do.. The great thing about the BRZ is that there is a neutral safety switch.. meaning the car won't start unless it is in neutral. Bad part about the BRZ.. Door triggers are + meaning you need two relays to switch the - trigger.. Clutch is + so you need a relay to switch the - trigger I grounded the start button to start the car so I had to change the + starter input to a - trigger.. one more relay.. 4 Relays for those of you who want to install a Smart Start your self and need a way to activate it.. here is the key to the city. YES you can buy one on eBay, Install it, and activate it yourself. CAUTION: It must be a U.S. Spec Smart Start or you will not be able to activate it. http://www.managesmartstart.com/install/login?timeout Username: dei1 Password: dei1 found that after a lot of searching.. I also found a document named all the wiring info you need http://www.ft86club.com/forums/showthread.php?t=30665 Hope that helps Last edited by calispec; 12-06-2013 at 08:26 PM. |
|
|

|
|
|
#4 |
|
Dismember
Join Date: Mar 2013
Drives: 2013 Red Scion FR-S
Location: Castro Valley
Posts: 5,562
Thanks: 2,153
Thanked 4,002 Times in 2,157 Posts
Mentioned: 43 Post(s)
Tagged: 1 Thread(s)
|
I'm surprised by the difference between tunes, but I'm not sure how much I trust the software.
|
|
|

|
|
|
#5 |
|
Senior Member
Join Date: May 2013
Drives: Subaru BRZ with Delicious Innovate
Location: Cleveland OH
Posts: 194
Thanks: 81
Thanked 106 Times in 63 Posts
Mentioned: 10 Post(s)
Tagged: 0 Thread(s)
|
I didn't trust the software either. But I made MULTIPLE runs. In both directions. Small variances in each run. Same road. Same starting points. I was very sceptical but after playing with the software some I am plea entry surprised. The magnitude might not be exactly correct but I believe the differences. Also. Look at the delicious line. Torque curve is smooth and looks very similar to other dynos I have seen from him. I could care less about the numbers. I am just comparing the differences. I can post more runs if you would like. But they all look very similar to each other.
__________________
|
|
|

|
| The Following User Says Thank You to calispec For This Useful Post: | EAGLE5 (11-04-2013) |
|
|
#6 | |
|
Senior Member
Join Date: May 2013
Drives: Subaru BRZ with Delicious Innovate
Location: Cleveland OH
Posts: 194
Thanks: 81
Thanked 106 Times in 63 Posts
Mentioned: 10 Post(s)
Tagged: 0 Thread(s)
|
Quote:
The first graph is 4 runs, all on the first tuner. Some of the variance could be because I wasn't starting exactly on the same spot, but close. I took them in alternating fashion. East 1 West 1 East 2 West 2. As you can see my road is a little east bias. Its close enough for me. I could take the average of the two runs and see where that got me but I am not that concerned. It proved to me that the results were repeatable. Each run was made with about a 5 minute down time to let the vehicle cool. Its not perfect I know but its better than paying for dyno time. IMHO! [IMG] 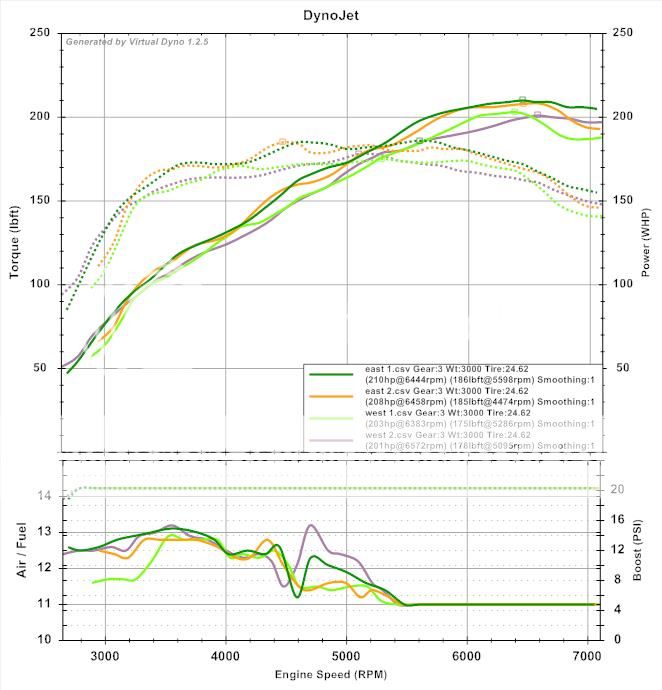 [/IMG] [/IMG]The second graph shows again how my road is east bias. Both are the Delicious Tune. [IMG] 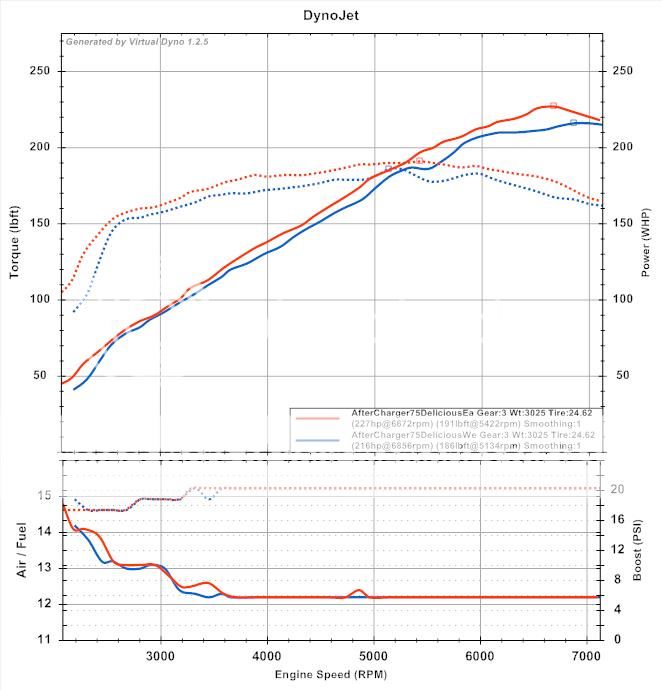 [/IMG] [/IMG]If I get another chance I'll head out to mexico again and do 6 or 8 runs to get some more data.
__________________
|
|
|
|

|
|
|
#8 |
|
Senior Member
Join Date: Sep 2013
Drives: Black BRZ
Location: Toronto
Posts: 438
Thanks: 116
Thanked 144 Times in 105 Posts
Mentioned: 9 Post(s)
Tagged: 1 Thread(s)
|
Hey nice to see another FSAE alumni on here! I was on the University of Western Ontario's team where I was engine manager for two years like yourself and then technical director this past year. You guys had a nice car this year - very clean, very simple. Our team got you by a couple places in Michigan - we were 16th. But I am super jealous that you got to go to Germany. Something I would have loved to do but we never had the funds to do it. That's too bad a bout the flat tire. I was impressed with the amount of North American presence in Germany this year. Good to see.
I really like what you've done to your BRZ so far. I got mine about 4 months ago. Haven't had the chance to take it to the track or do near as many mods as you have yet. What are you using as a data acquisition for all the engine temperatures? Looks like the plot is just excel but how are you gathering all the data points? Very clean build so far. Wish I had the money to keep up with you! |
|
|

|
| The Following User Says Thank You to ToyoburuBRZ For This Useful Post: | calispec (11-05-2013) |
|
|
#9 |
|
Senior Member
Join Date: May 2013
Drives: Subaru BRZ with Delicious Innovate
Location: Cleveland OH
Posts: 194
Thanks: 81
Thanked 106 Times in 63 Posts
Mentioned: 10 Post(s)
Tagged: 0 Thread(s)
|
Torque pro app with the ELM mini on the nexus. Pretty awesome setup. Sample rate isn't very good but plenty good for temps. I just wish someone could find the PID for knock correction.
__________________
|
|
|

|
| The Following User Says Thank You to calispec For This Useful Post: | ToyoburuBRZ (11-05-2013) |
|
|
#10 |
|
Senior Member
Join Date: May 2013
Drives: Subaru BRZ with Delicious Innovate
Location: Cleveland OH
Posts: 194
Thanks: 81
Thanked 106 Times in 63 Posts
Mentioned: 10 Post(s)
Tagged: 0 Thread(s)
|
I updated the second and third post with some Smart Start info and some more oil cooler stuff.. I think I am going to make most of the updates in those posts just to keep all the information in one spot..
__________________
|
|
|

|
|
|
#11 |
|
Senior Member
Join Date: Mar 2012
Drives: beater
Location: United States
Posts: 218
Thanks: 10
Thanked 91 Times in 46 Posts
Mentioned: 23 Post(s)
Tagged: 0 Thread(s)
|
Maybe I missed it, but what kind of radiator are you running?
|
|
|

|
|
|
#12 |
|
Senior Member
Join Date: May 2013
Drives: Subaru BRZ with Delicious Innovate
Location: Cleveland OH
Posts: 194
Thanks: 81
Thanked 106 Times in 63 Posts
Mentioned: 10 Post(s)
Tagged: 0 Thread(s)
|
@ntaphse Its a radiator I put together and plan on selling through my company Zeltus. 3" core with oil to water cooler in the cold side tank. It's similar to robispecs but different cores and slightly different design. Drop in replacement using factory fans.
__________________
|
|
|

|
| The Following User Says Thank You to calispec For This Useful Post: | DriftEm (01-02-2014) |
|
|
#13 |
|
Senior Member
Join Date: Apr 2013
Drives: 86
Location: SA
Posts: 364
Thanks: 395
Thanked 116 Times in 81 Posts
Mentioned: 5 Post(s)
Tagged: 0 Thread(s)
|
__________________
VOLK LE37 17X7.5, SWIFT Springs, Bilstein B8, HKS intake duct, Cosworth Air Filter, HKS headers, PLM Over Pipe, EVS Down Pipe & Exhaust, FD 4.55, GFB pulleys, Axle-Exchange Drive Shaft, Mishimoto oil cooler, Cusco F&R strut bar, TRD door stabilizer, Innovate SC, Delicious Tuned
|
|
|

|
| The Following User Says Thank You to 8686 For This Useful Post: | calispec (12-09-2013) |
|
|
#14 |
|
Senior Member
Join Date: Mar 2013
Drives: 2013 Scion FR-S
Location: San Diego, CA
Posts: 285
Thanks: 120
Thanked 135 Times in 87 Posts
Mentioned: 13 Post(s)
Tagged: 1 Thread(s)
|
nice write up, very interested in the radiator.
__________________
 |
|
|

|
| The Following User Says Thank You to DriftEm For This Useful Post: | calispec (03-11-2014) |
|
|
|
|
|
|